02/28/25 A brief explanation of Helicon Focus, and possible errors
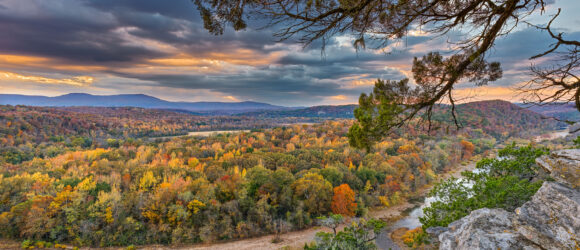
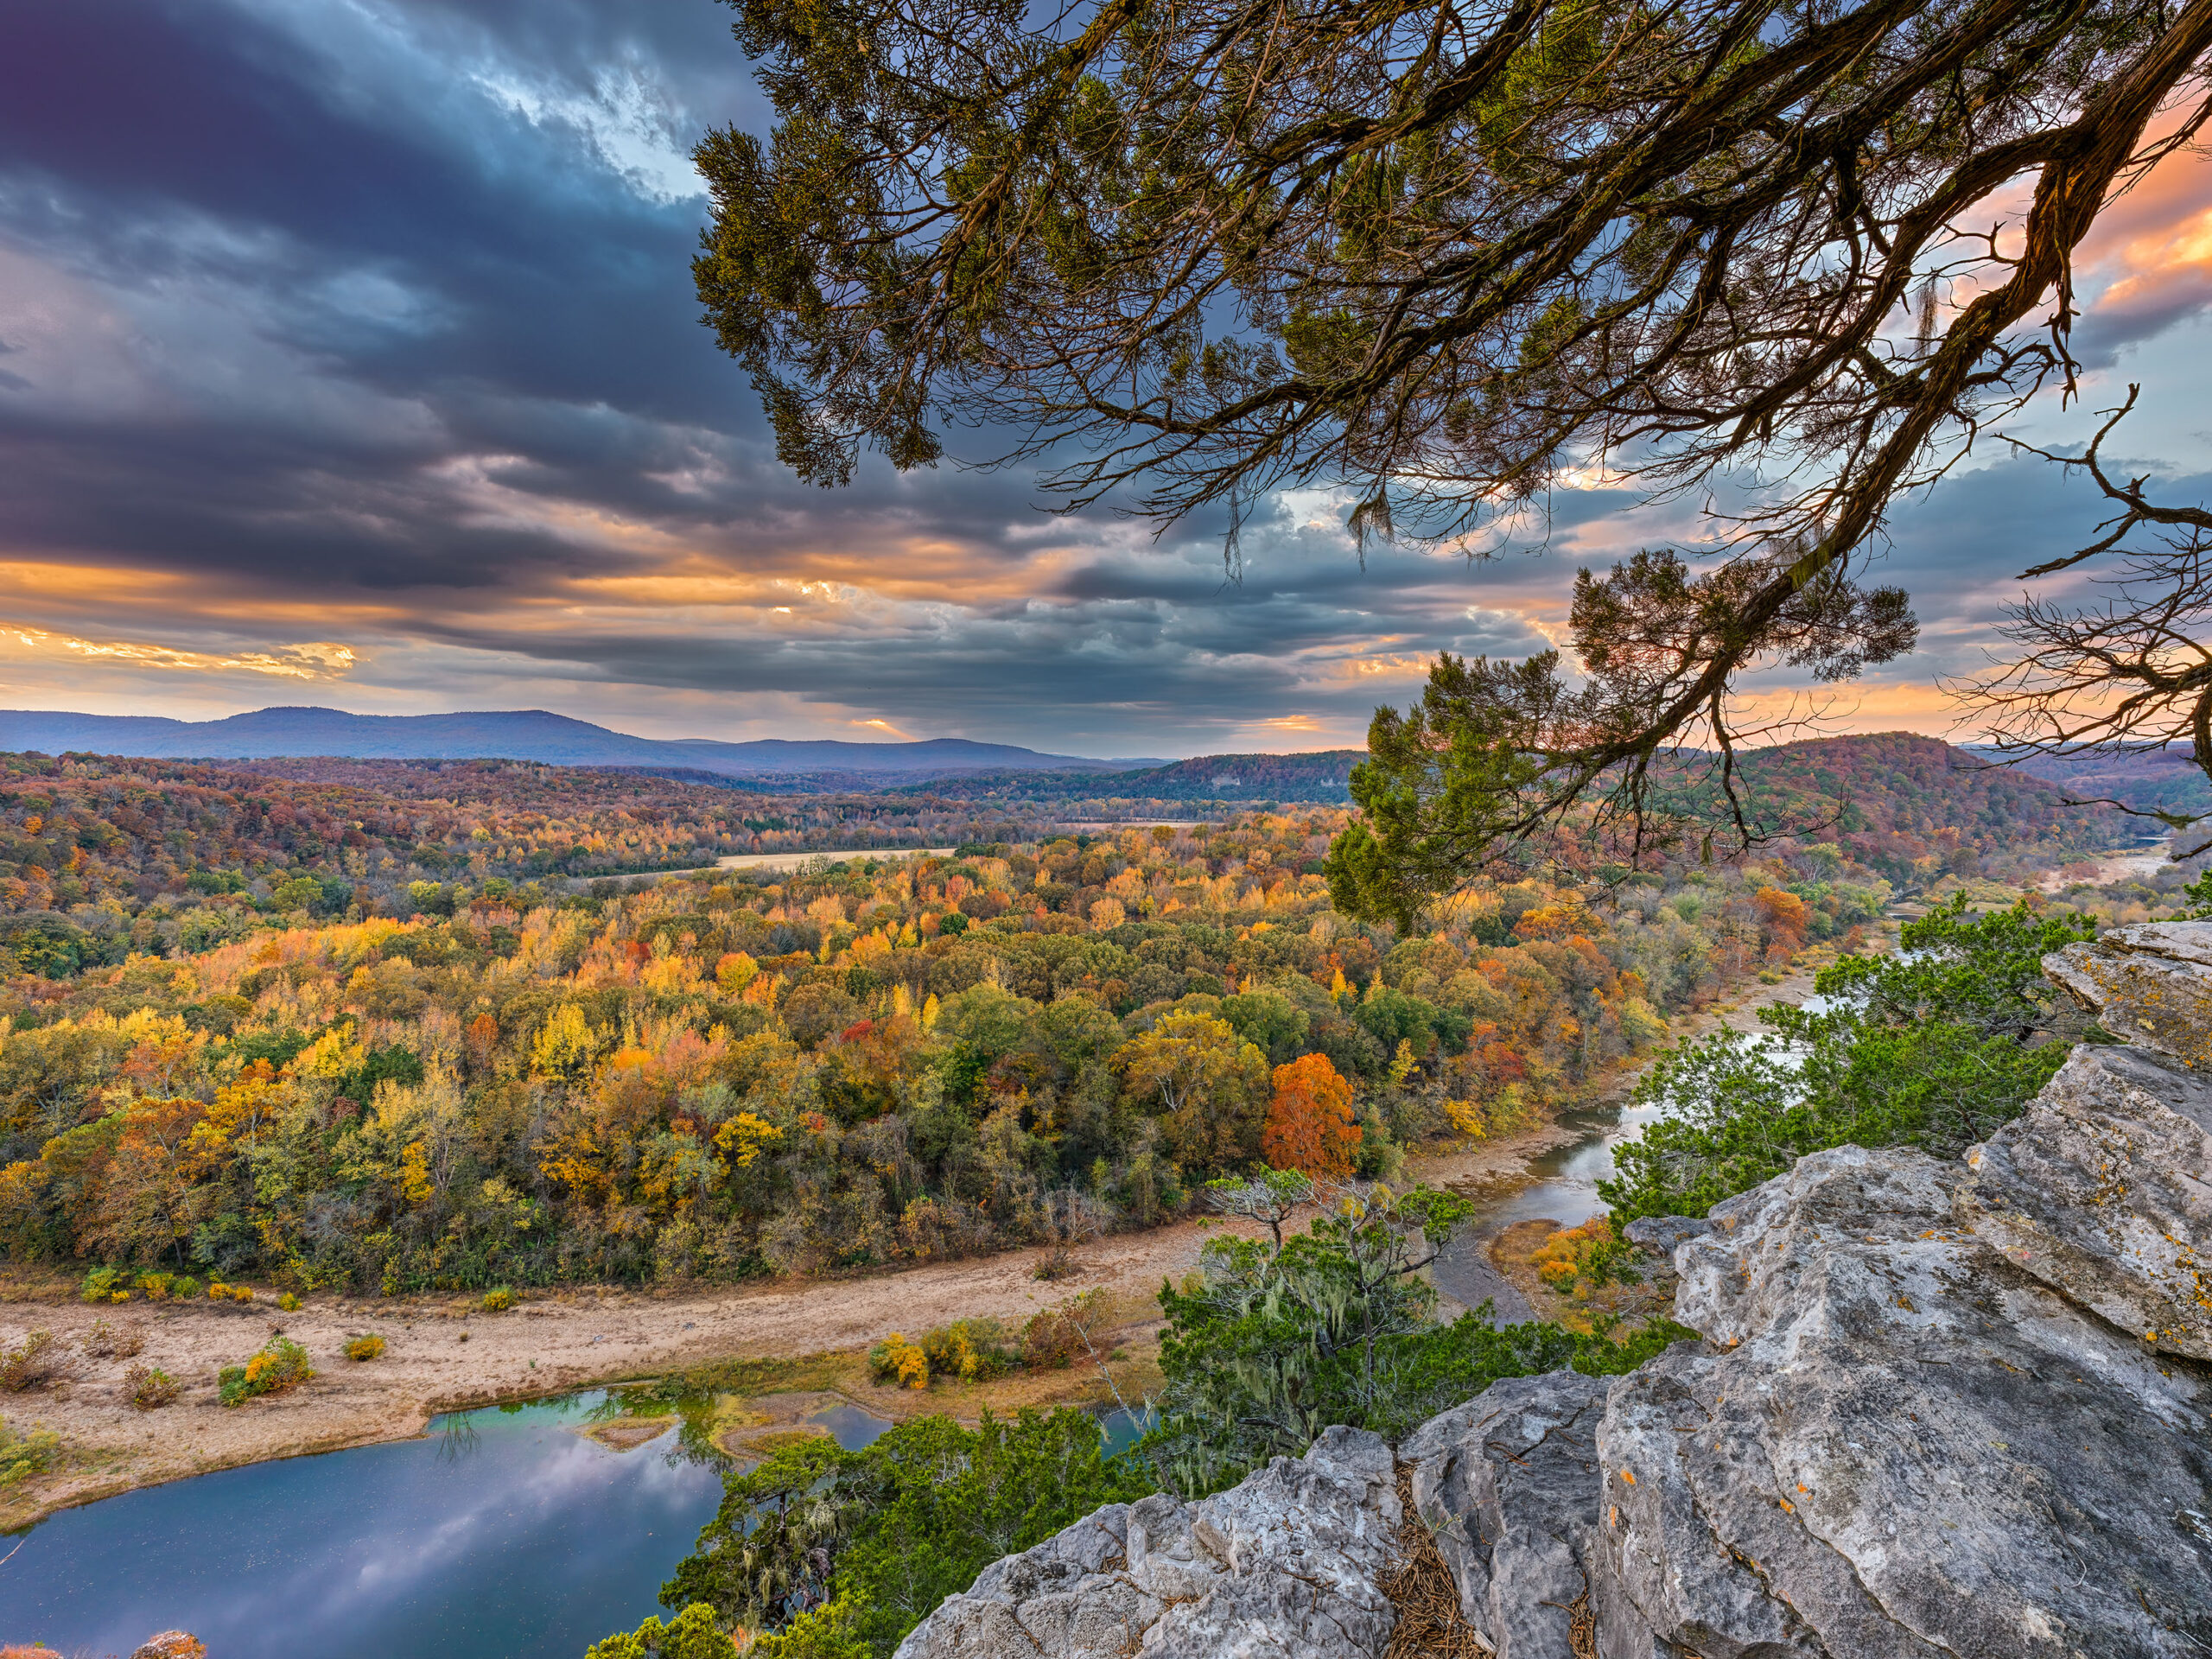
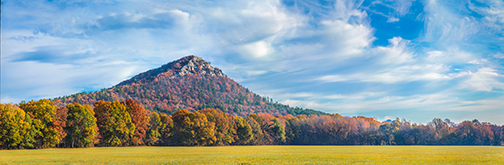
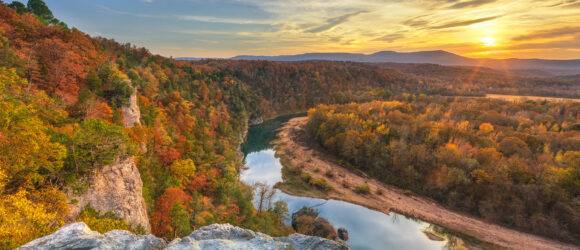
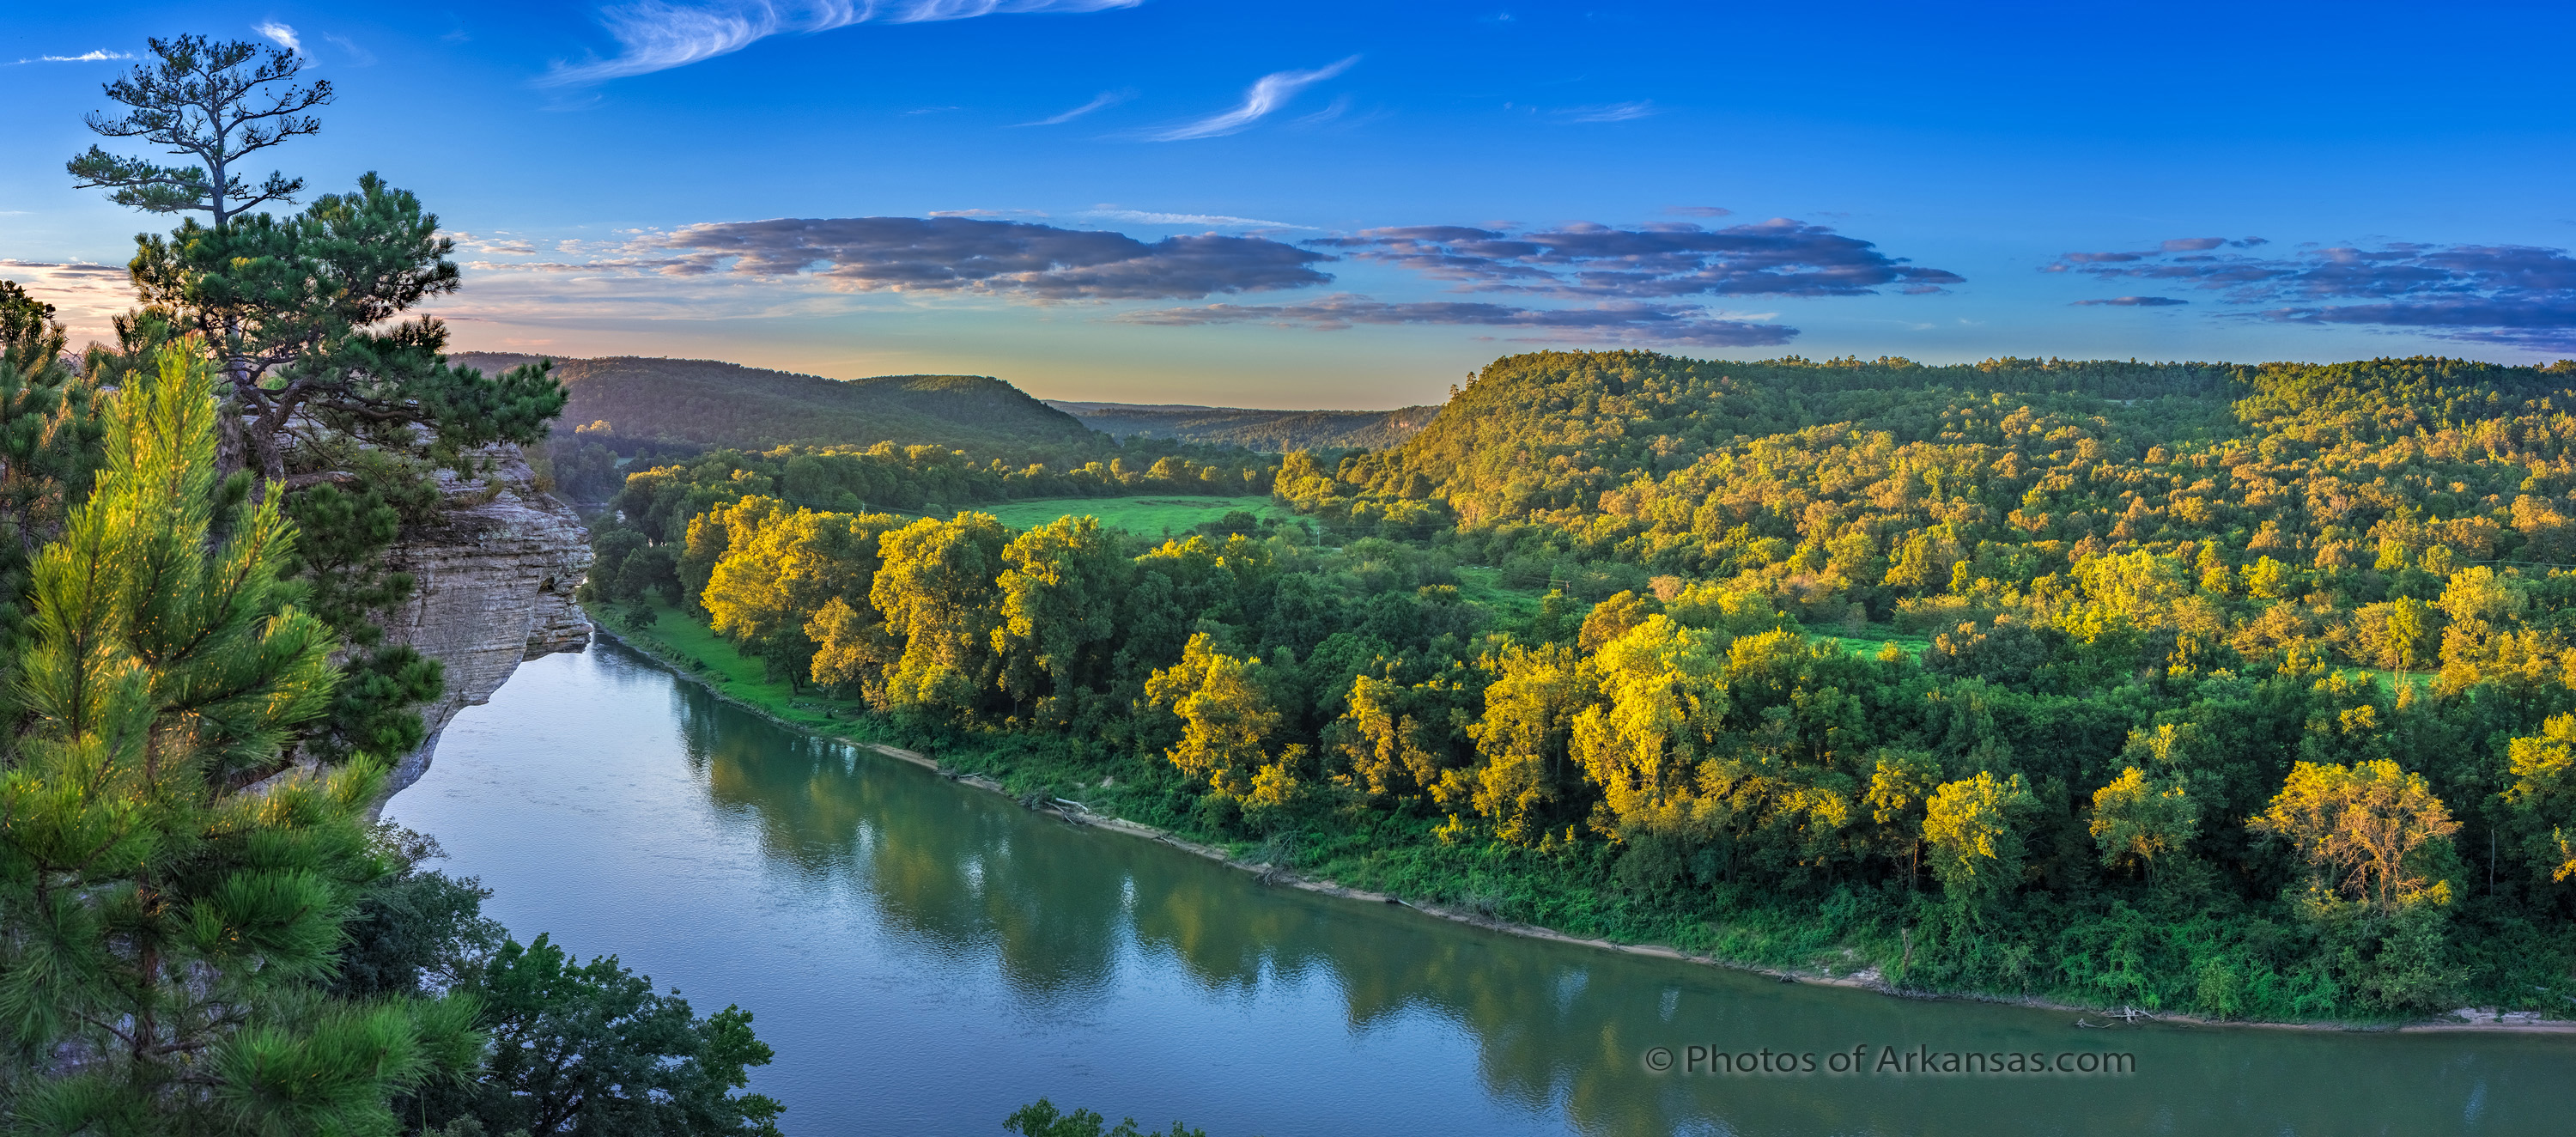
Final from Hasselblad X2D Focus Bracket Peter Cave Bluff
This image was created with a Hasselblad X2D, using the camera’s focus bracketing setting. This allows the camera to take multiple photographs of the same subject, and only moves the focus point. So in this case, the camera will take images from infinity all the way to the rocks on the foreground. It’s impossible to manually combine this many photographs with different focal points, however with software like Helicon Focus, you can. I wrote a very detailed post on the process of creating this image here: https://photosofarkansas.com/2025/02/03/02-03-25-focus-bracketing-example-hasselblad-x2d-and-21mm-lens
-
- Helicon Focus errors on image
-
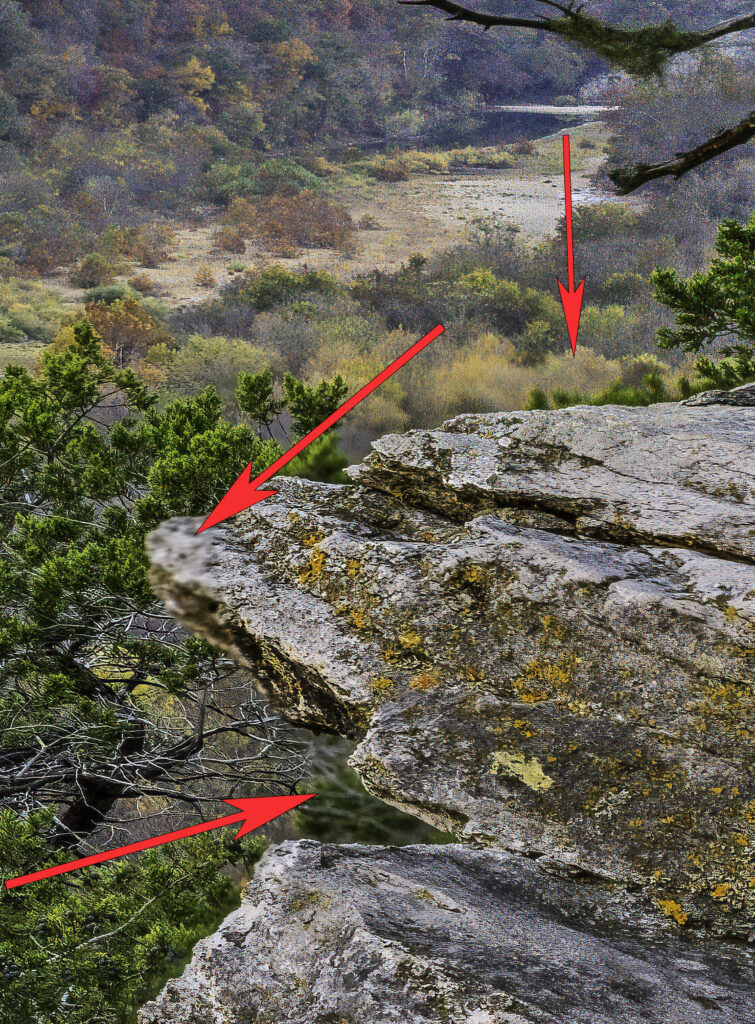
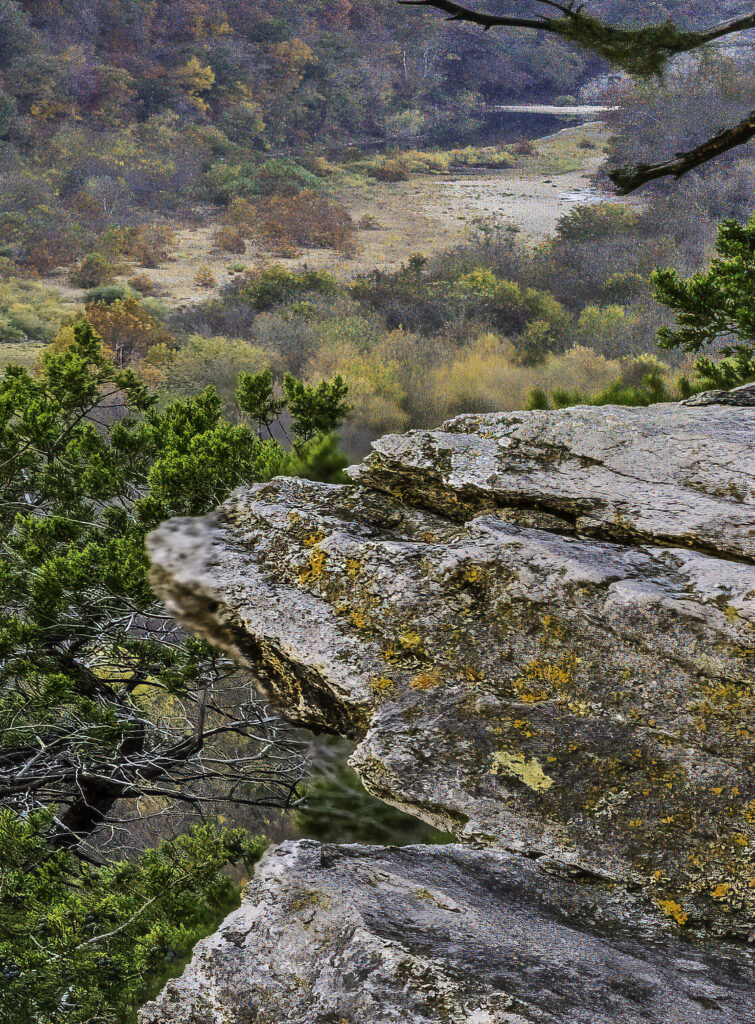
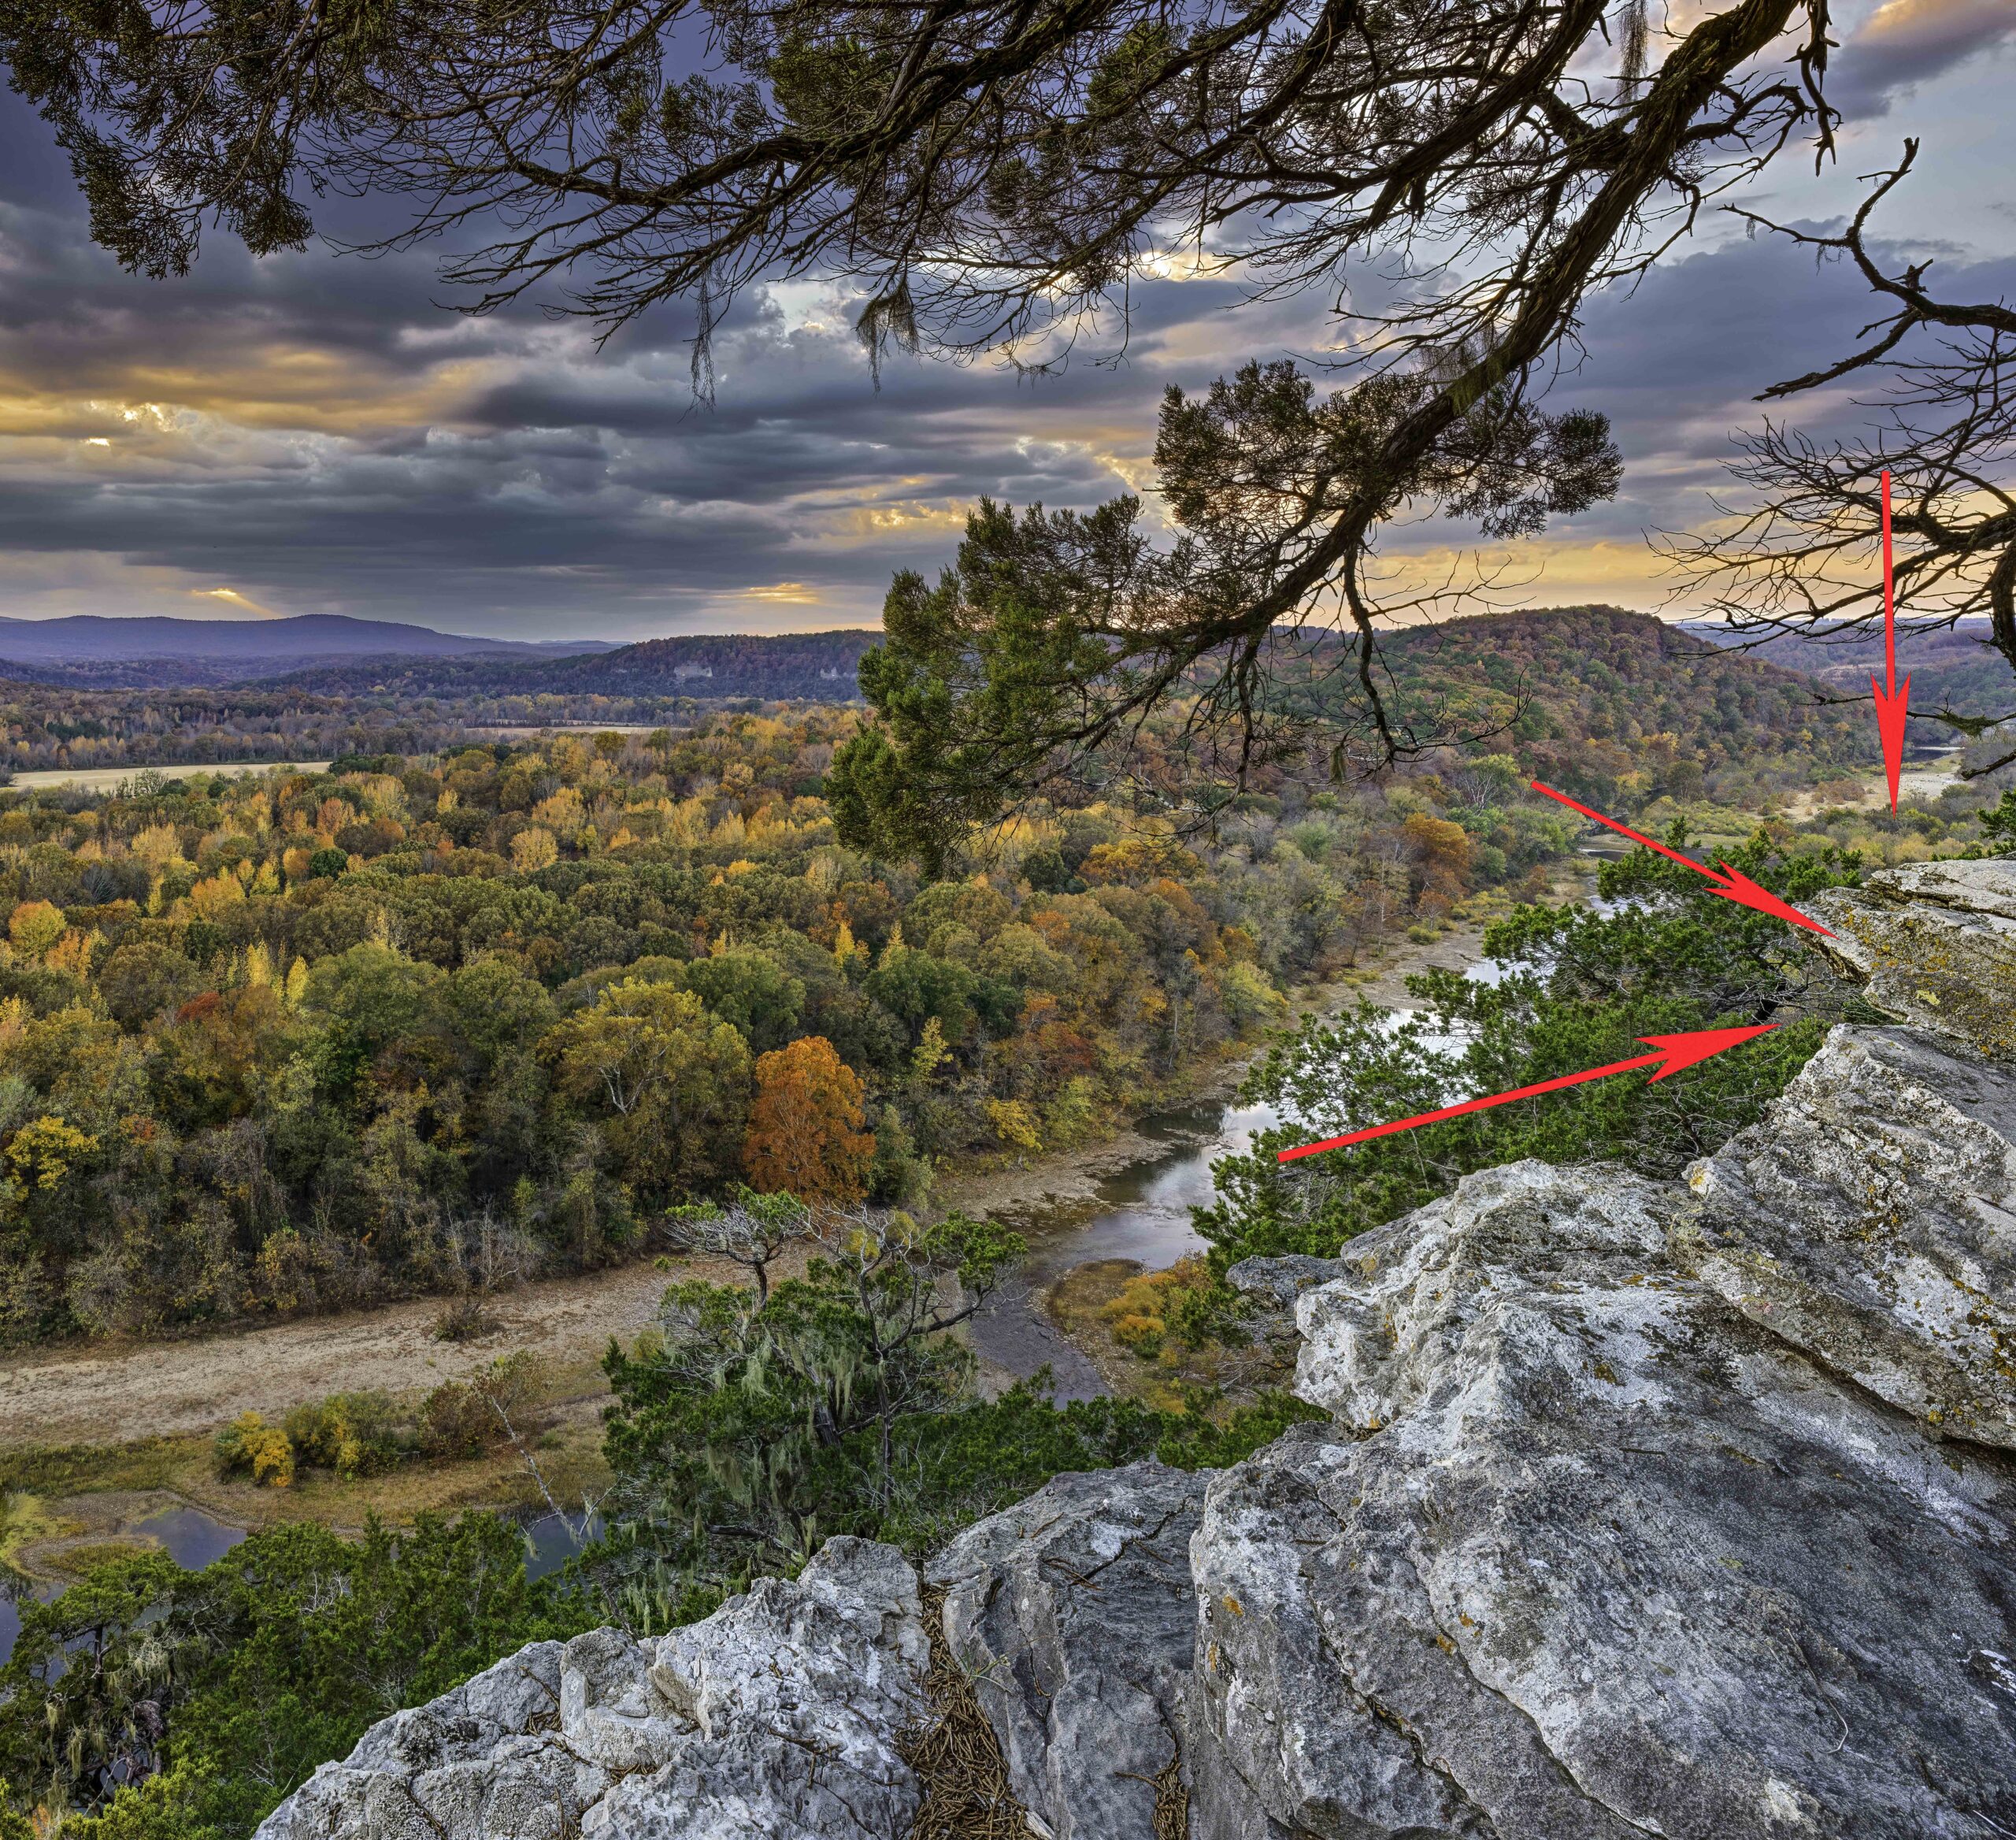
- Errors from First run of Helicon
The image on the right has arrows showing the errors. They are not obvious at first, especially if you are only looking at this image in a screen view, or a jpg. However it’s a 100MP image and when you zoom into it, these errors now start to be more obvious.
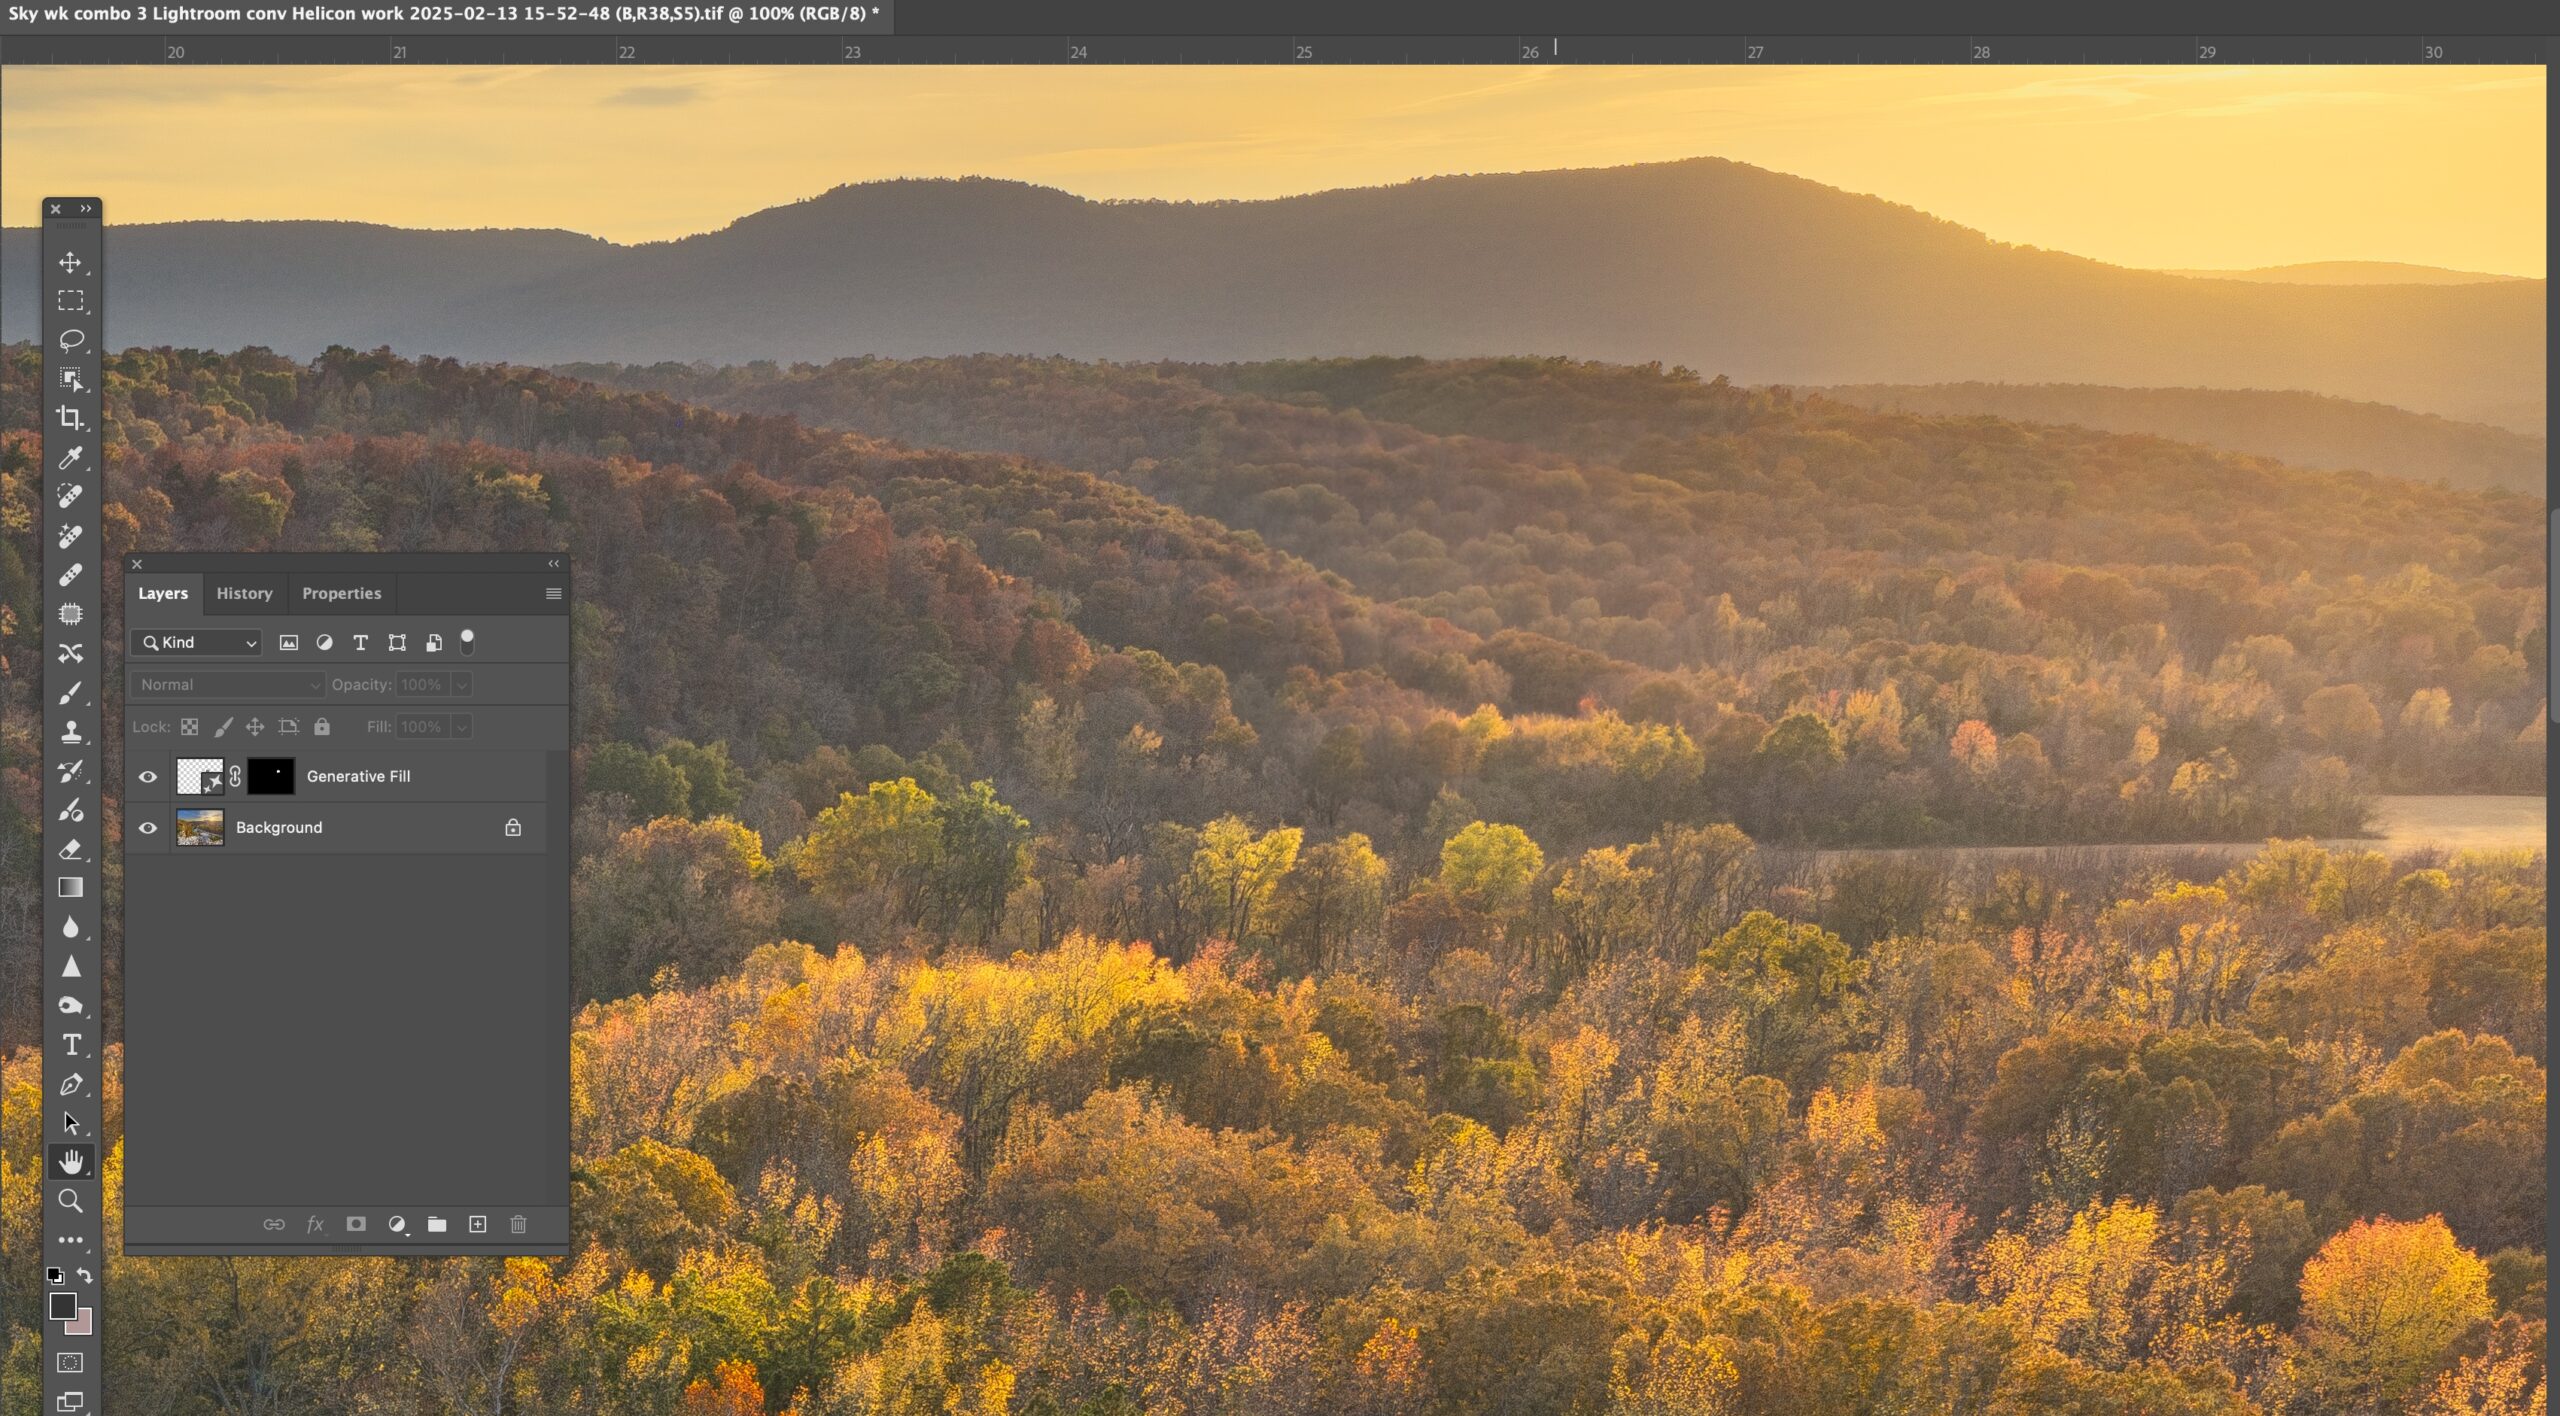
With Helicon, you load in your images, and then select one of three “rendering” method. I usually use option B, set to the Helicon defaults. NOTE, you can change these defaults, but make sure you remember the true defaults that the program started with. Once you change them they stay where you set them, even if close and reload the program. This can be problematic for a later set of images as most times the program defaults are what you need.
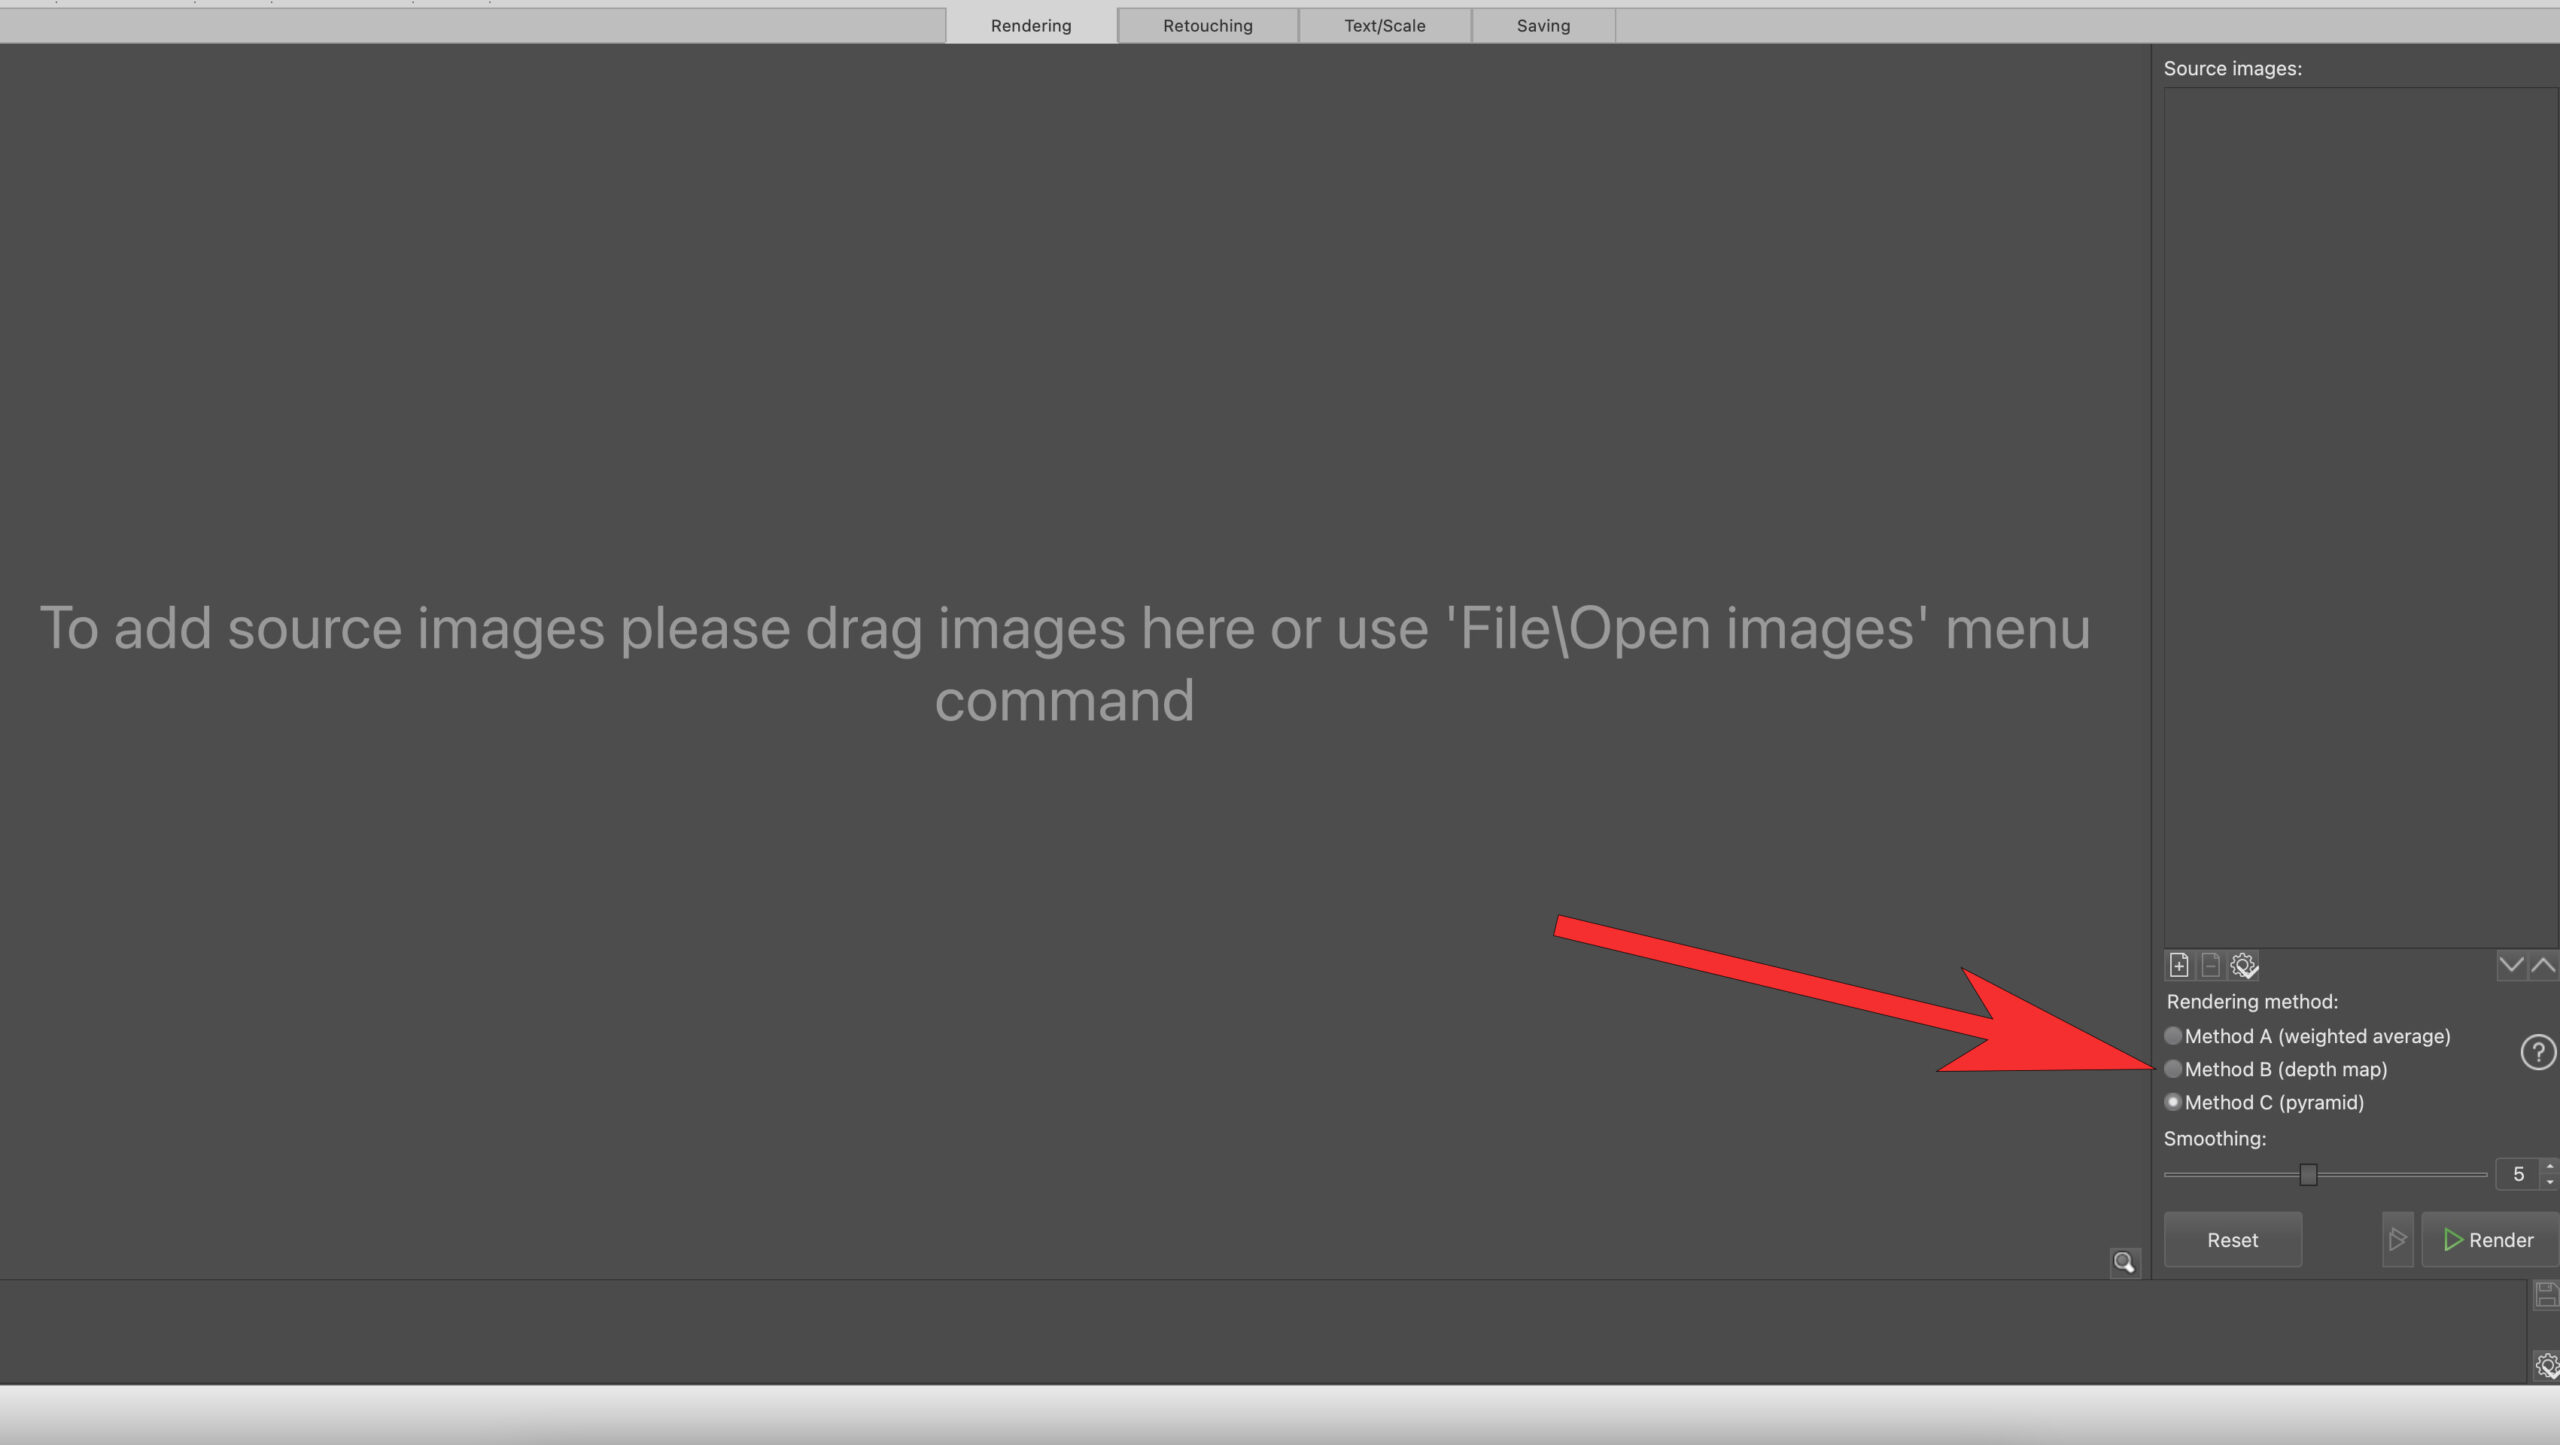
Screenshot of Helicon Focus Main screen
This is a quick screenshot of the main Helicon Focus page. Note the three different methods listed in the lower right corner.
My first thoughts were to just re-load the 7 images and try option B again. Upon doing this the same errors occurred, so I tried Option C and this time I was able to get a perfect separation between the rocks and the area in the distance.
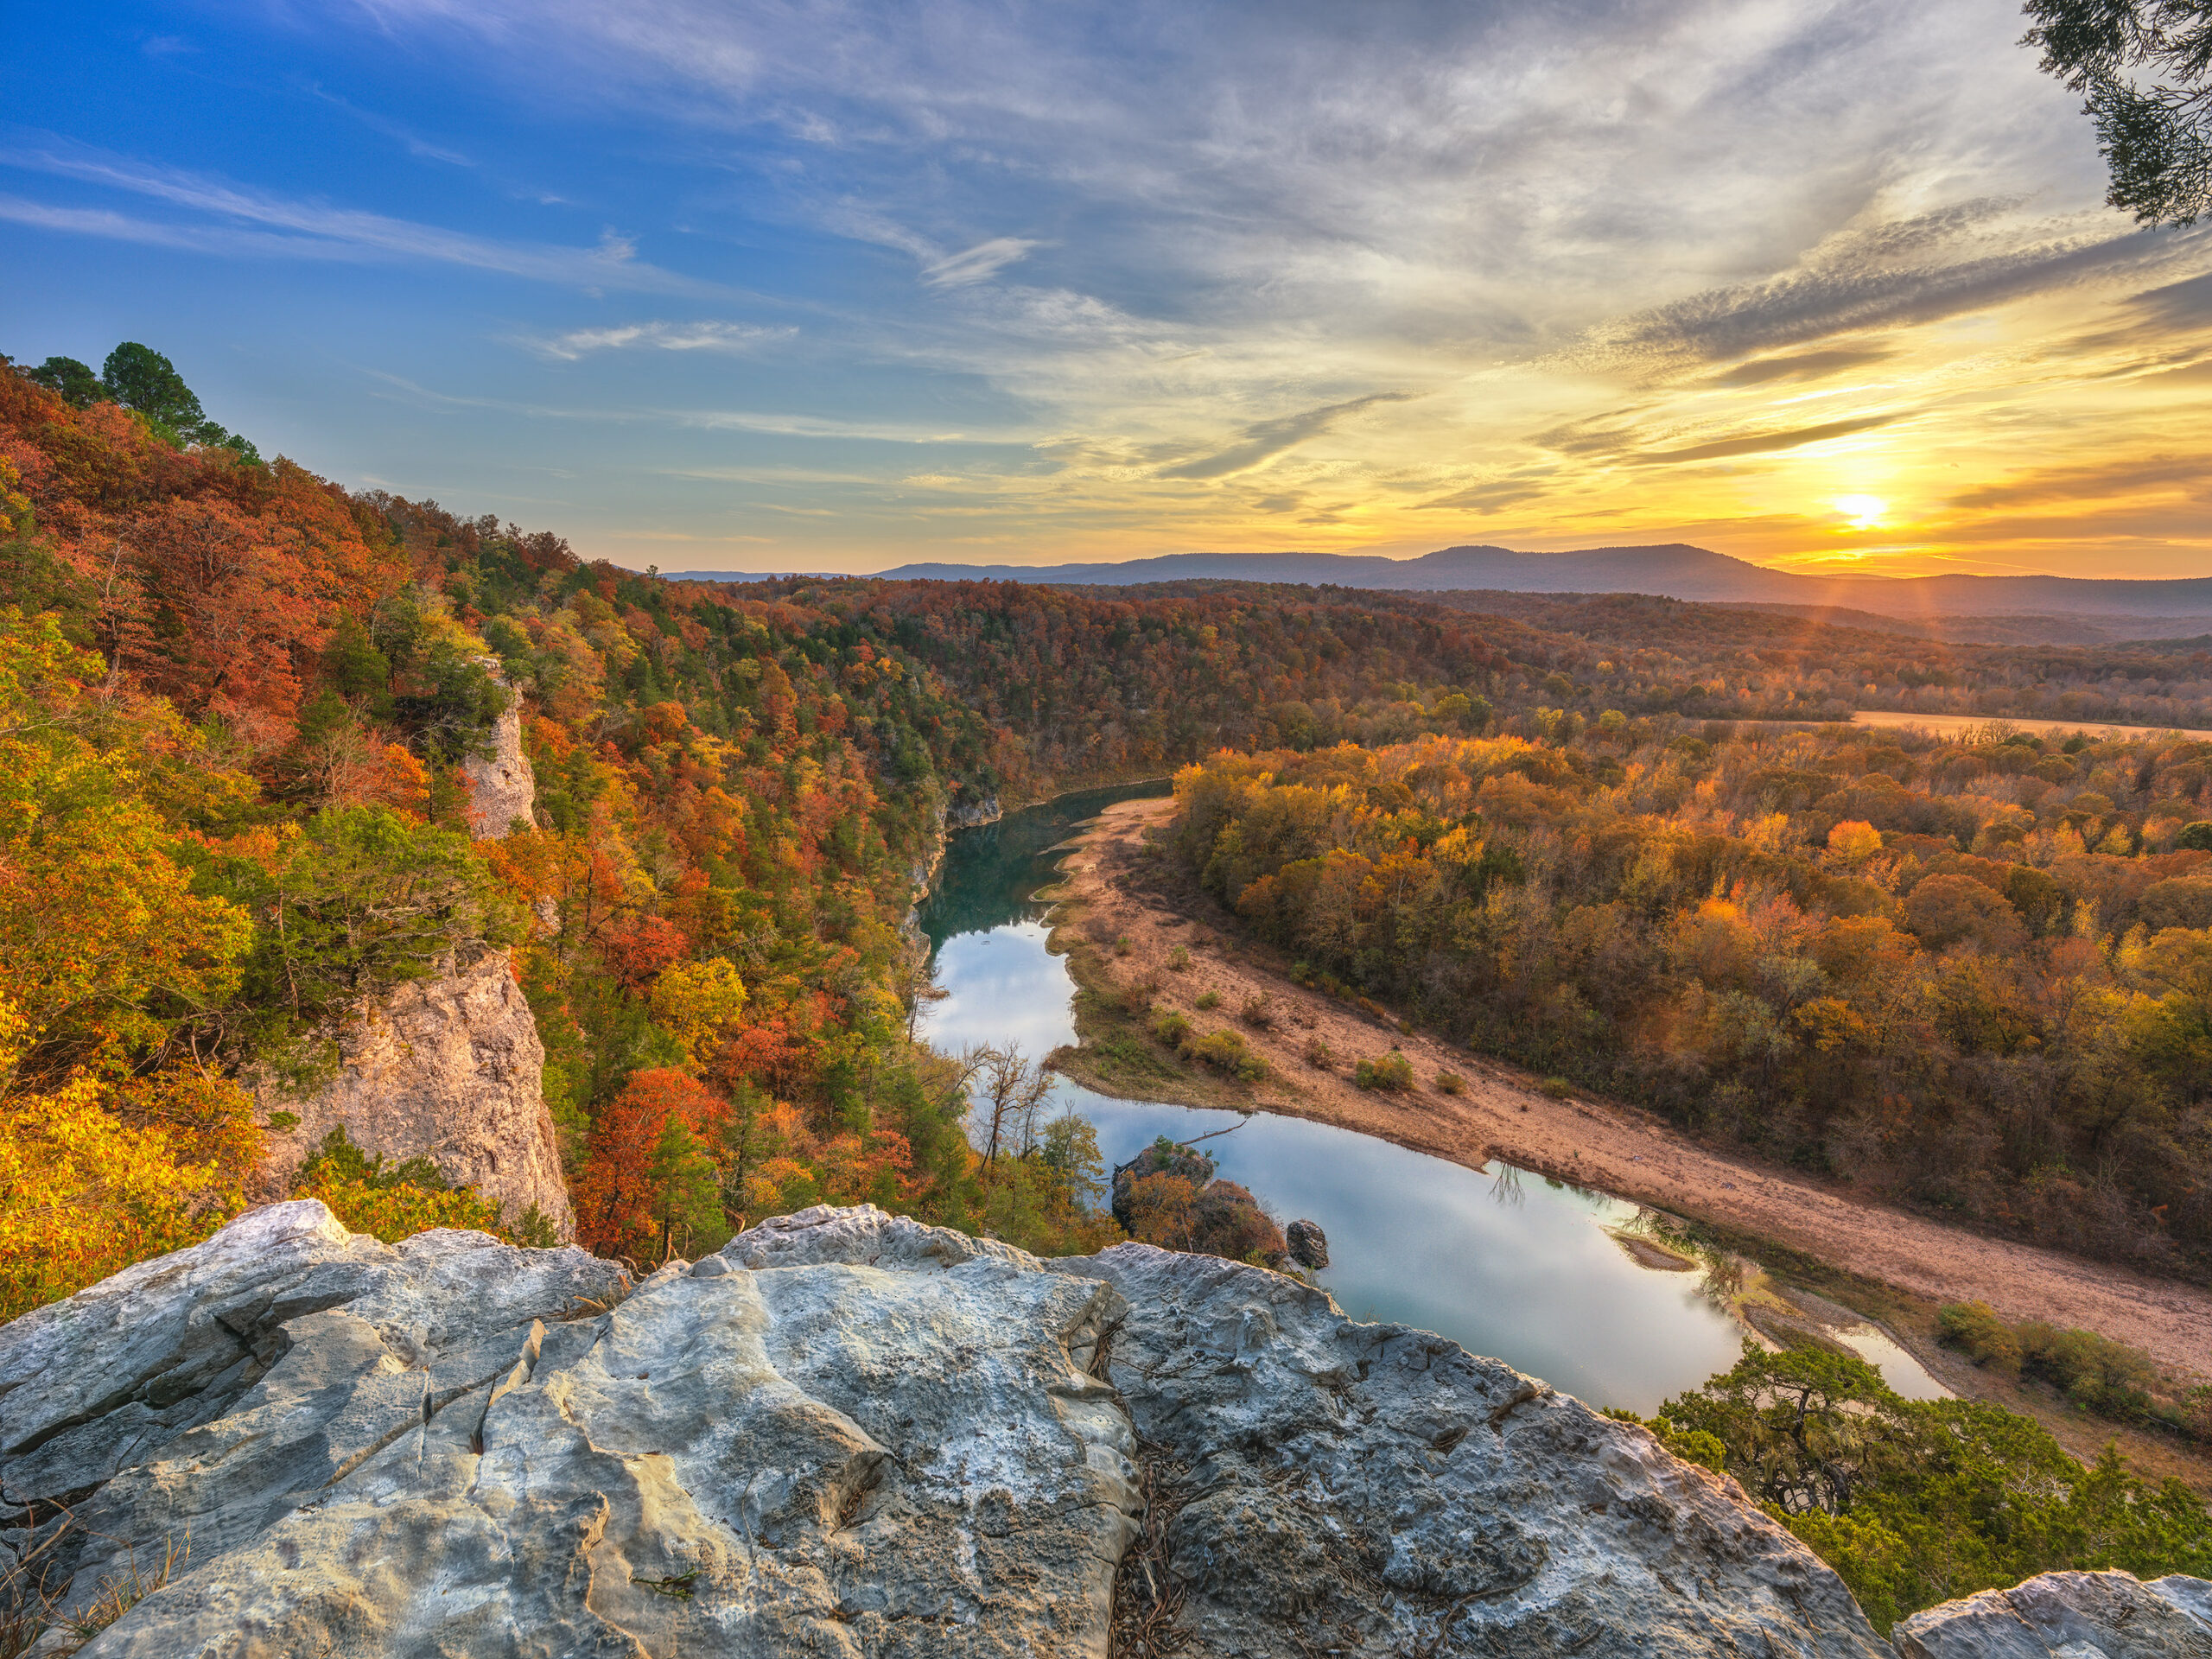
Final view showing fixes
When using Helicon, take make sure you take a few minutes to view the entire image checking to see if any issues with mixed blending occurred. This image was actually a blend of 14 images, 7 were taken for the sky and cedar tree and the remain 7 were taken with exposure set for the foreground and trees in the distance. I was not able to get a single exposure that gave me good shadow recovery and keep the highlights in the sky from blowing out. So I ran 2 sets of 7 images through Helicon and then merged the two. Since I already blended the images with the errors, it was a simple fix to just rework the 2nd set of 7 images with option C and layer the fixed image on top then blend in the correction.
The point of all of this is that if you are only working for TicToc or Instagram use, odds are you would not even notice these errors, but then why would you be using a 100MP camera. My reasoning for 100MP is that I want have the ability to make large prints, and errors such as these would definitely show up in a print larger than 12 x 18.
02/16/25 Using Adobe Generative Fill to remove lens flare–Example an X2D image with 20-35 lens
Sunset from Peter Cave Bluff–Buffalo River in Arkansas
If you like to shoot sunrise or sunset images one of the issues that always has to be considered is lens flare. The effect is destructive as it tends to totally change the color of the subject, remove or change saturation levels, and totally alter the overall color of the image. Depending on the lens the flare tends to be in the corners or off of a diagonal from the sun. There are times where this type of flare can add to the overall image, but most times I find it distracting and destructive. In the past, the only way I knew to remove it was either cloning over the flare with a part of the image that is free of flare or attempting to use software tools like “Content Aware” in Photoshop. I never found content aware to be very effective for this and ended up usually either cropping the photo or using cloning. You can always try to hold your finger over the sun when shooting but this is tedious, and at time hard to due. I used to carry a flare buster to this as I could attach it to the flash bracket on my camera but many times I forgot it and knew I was going to have to work on the flare in post.
It’s also hard at times to see the flare when you are looking through the EVF or viewfinder of your camera, especially if you are using exposure brackets. In the image at the top of this article, you can see the sun was muted through some soft clouds, but there was still a flare issue. The camera I was using was the Hasselblad X2D and the 20-35 lens. I have found that the 20-35 is very flare prone anytime you are working with the sun in the image. The flare is especially large and damaging at times. In the crop below, you can see the amount of flare that occurred.

Discoloration due to flare on Hasselblad 20-35 lens
The flare in this case was rather large, and had the typical rainbow color spectrum on the outside edge. You can clearly see that the colors of the trees have been totally changed by the flare and overall the area has a more yellow look.

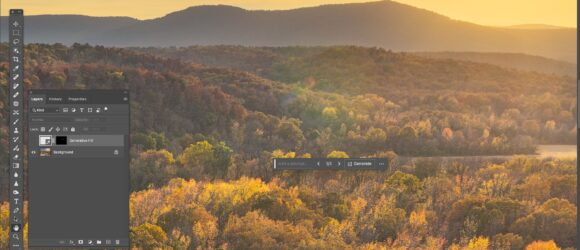
Selection area to remove flare with Generative Fill
In this screenshot, you can see that I used the lasso in Photoshop to select an area which slightly exceeds the amount of the image that is effected by flare. Once you have made a selection, click on “generative fill” and Photoshop will give you three solutions. There is an option to name this fill selection, I never do that. Once you have run the fill process you can then click through the three options to find the one that works best for you. Once you make that decision, simply flatten your layers and you are done. If you don’t feel any of the fills that Photoshop created work, then cancel and start again. Sometimes it can take a few runs to get the best possible solution. However I have always found that Photoshop can get something that works much better than content aware, or cloning.
After Generative Fill has been applied to area on image
Now it’s possible to see the same area after generative fill has been applied. No more flare, or discoloration. A perfect blend.
Written for Photos of Arkansas by Paul Caldwell
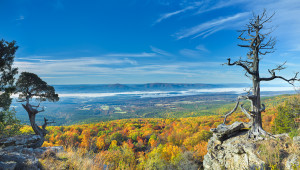
02/16/25 Featured Arkansas Photography–Sunset from Peter Cave Bluff

Sunset from Peter Cave Bluff–Buffalo River in Arkansas
One of my favorite spots to photograph Arkansas is from the Buffalo River. Recently I have started working around the middle river instead of the more popular upper river. The vantage points are just as nice and there are less people. Peter Cave Bluff is a staggered bluff, and has a wonderful view of the Buffalo. Looking upstream, you can see almost all the way to Woolum ford. Looking downstream, you have views of Blue and Red Bluff no1.
This shot was taken as as 5 shot exposure bracket and a Hasselblad X2D with a 21mm lens. Even with 5 shots, I still had trouble with the sun being blown out. I have found that the X2D is very sensitive to direct highlights, more so than the Fuji GFX100. Both cameras are using the same 100MP sensor. I worked two images out of the five. One with the sky and sun and the other had the river and landscape. There was an extreme amount of dynamic range required to capture the entire image. I used F13 on the 21mm lens hoping to get as much of the rocks in the foreground in focus. There was so much wind blowing that afternoon, I decided not to attempt a focus bracket.
I found that once I worked up the final image, I used the latest Topaz sharpening software to attempt to bring the foreground rocks into better focus. The result was not perfect, but still better than where I started. The fall colors were given even more luster by the setting sun. In the image you can see a couple of lines from the sun star I was able to capture. The muted sun in the clouds did not give a normal star and the Hasselblad lenses only allow for a a 8 point star due to their internal aperture.
Written for Photos of Arkansas by Paul Caldwell
03/21/19 Broadway Bridge over the Arkansas River in Little Rock–Featured Arkansas Photography
- At March 20, 2019
- By paul
- In Featured Arkansas Photography
 0
0

Twilight on the Broadway Bridge, Little Rock Arkansas
Taken with a Nikon D850 and 24-70 lens, 4 vertical photos, stitched into 1 landscape panorama.
The new Broadway Bridge in downtown Little Rock/North Little Rock has been a eye catching subject since its’ completion. I wanted to catch the bridge in the magic 30 minutes of light after sundown, when the sky is still showing a slight blue tint. The motion of the cars moving over the bridge turned into a painting of light due the very slow shutter speed I selected of 3 to 5 seconds. This photograph is a combination of 6 different images as I also had to bracket my shutter speed to capture the full dynamic range of the scene.
I used a tripod to keep my scene as level as possible and did not worry about a nodal point. To be honest, way too much is made of finding a nodal point with modern stitching software. You just don’t have to worry about it as much. I had no trouble getting the railing in the immediate foreground to line up at all. I used Phase One’s Capture One software to develop the images and then stitched them together in Lightroom. I also had to work a bit to get the building straightened out since my camera was pointed up slightly. I went ahead and picked a aperture of around F10 to help with the star burst from the street lights.
Written for www.photosofarkansas.com please do not reproduce this image or any of the written material without permission.
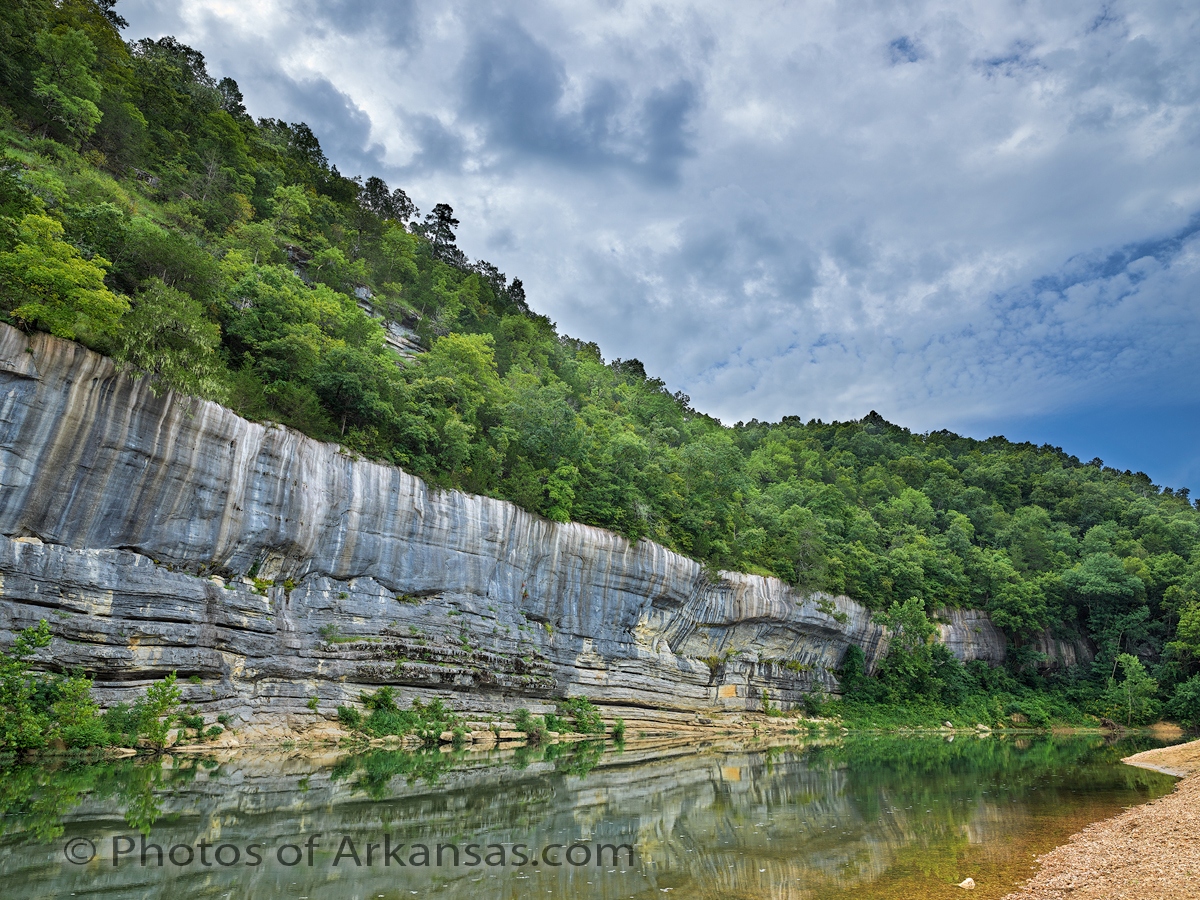
02/20/19 A Tale of two creeks Richland and Falling Water–Featured Arkansas Landscape Photography
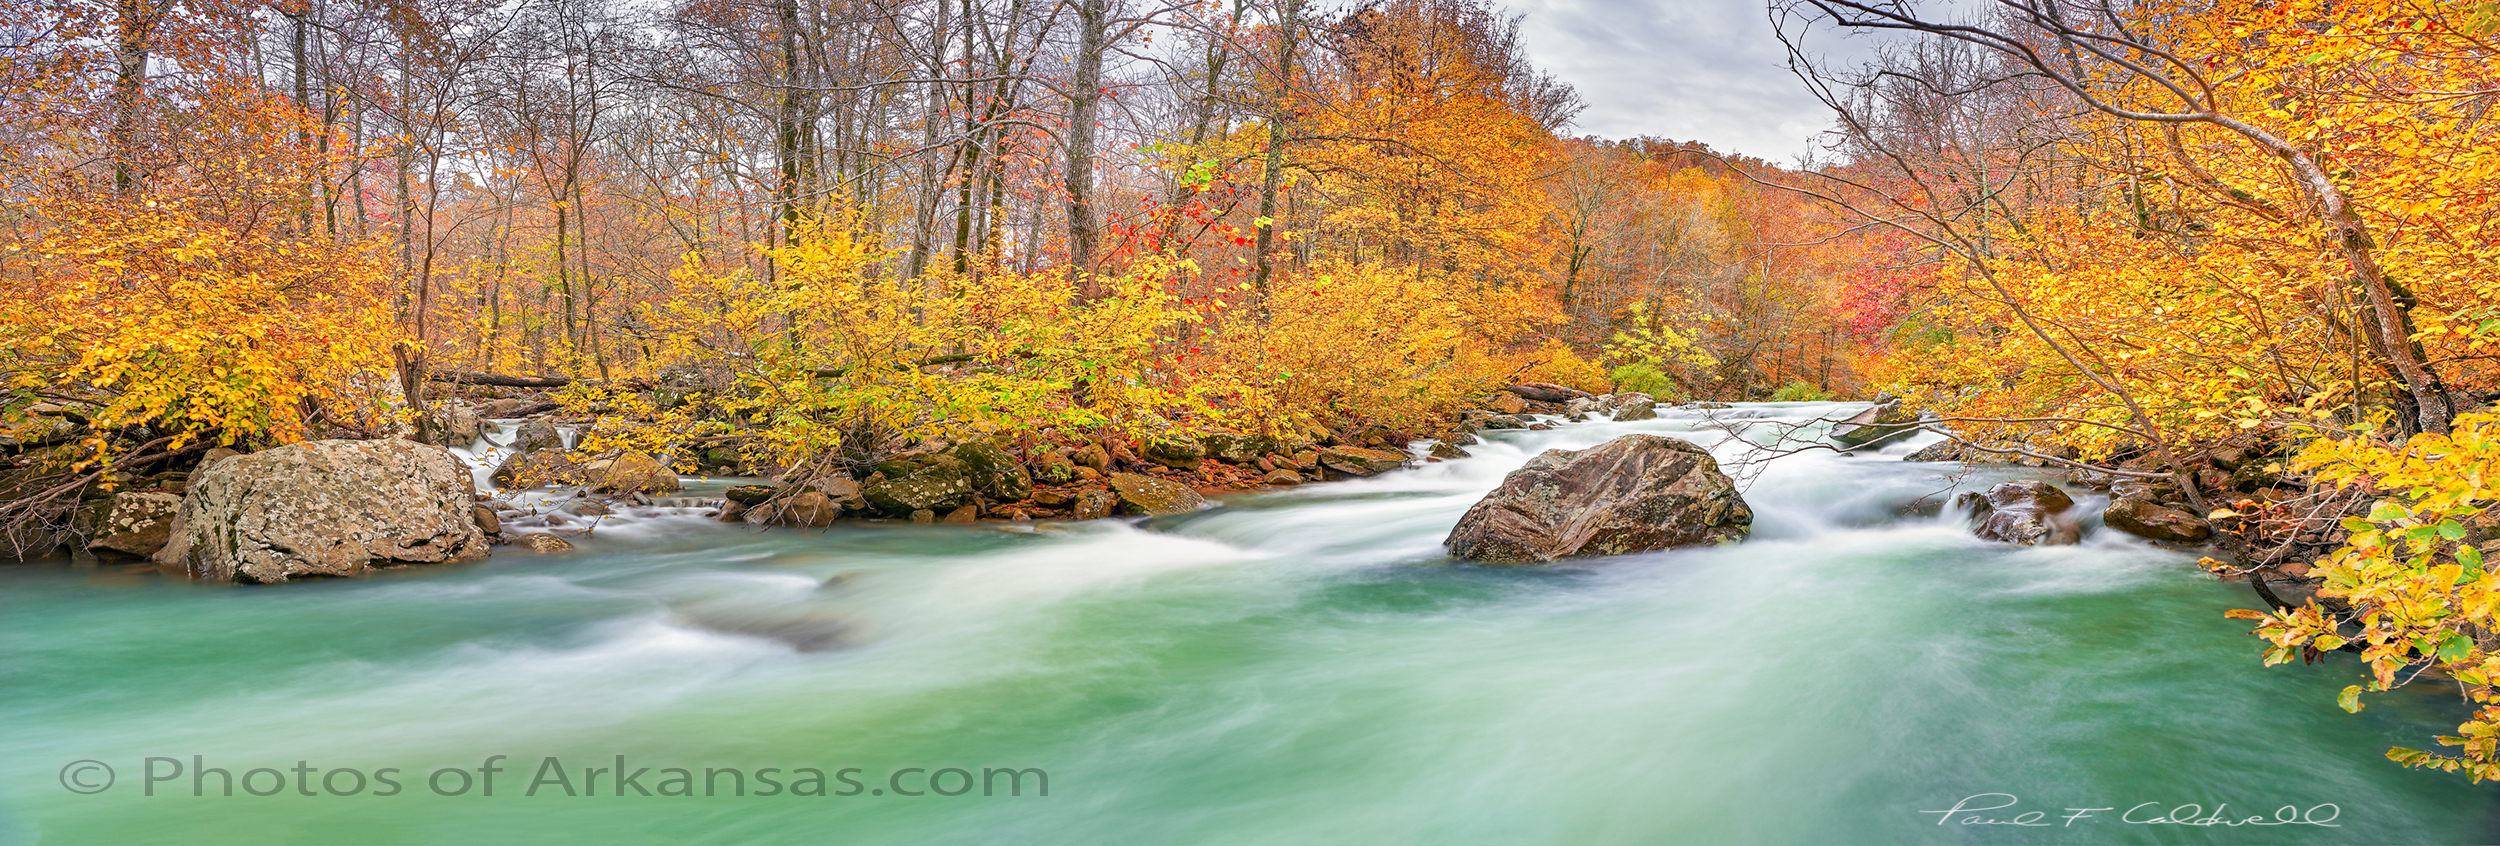
Fall scene featuring Richland and Falling Water Creek at their confluence.
A tale of two Creeks, Falling Water and Richland Creeks, Newton County Arkansas taken November 2018.
Taken with a Nikon D850 and 24-70 lens. Image capture in 3 horizontal images @ 24mm. I used both a CL-PL and ND filter to slow the exposure for the water.
If I had to pick a favorite spot in Arkansas, it would have to be Richland Creek. Most defiant a love/hate relationship as Richland alone has cost me more in camera gear than any other location I like to photograph. Just this fall I lost both a Nikon D850 and 24-70 lens upstream from where this shot was taken. Totally my fault and lucky for me, the creek was much lower so I was able to recover the gear and Nikon USA was able to repair it at a reasonable cost. But that’s another story.
Richland Creek is one of the fascinating creeks in Arkansas. At medium to high water levels it’s a great kayaking stream. The creek is lined with hardwoods most are 2nd generation growth as the creek was logged back in both the great depression and again in the 60’s-70’s. Most of the old growth trees are long gone but if you hike far enough upstream where the mules and loggers never reached you can still find some huge white oaks.
The creek also winds through some of the most remote parts of Arkansas, that are still remaining. Most of the watershed is now a wilderness area. There is a primitive hiking trail that works it’s way up the left side of the creek (left side facing upstream). This trail will lead all the way to Twin Falls and Richland Falls, well worth the trip.
For most the season, Richland hold water, but in the fall it’s very rare to find a good flow like the one shown in this image. Instead the creek is usually barely covering the rocks. The fall colors are getting tricky to catch also. In the past the peak display tended to be around the middle of October now the peak seems to be more in the first week of November. But the display is now hard to catch in full. Notice in this shot most of the larger trees on the left have dropped their leaves, but the willows and smaller hardwoods lining the creek are still in full color. However upstream many of the larger trees are still hold leaves. So you just have to go and see what you have.
To take this shot, I had to wade out into the creek to mid thigh deep. I found a rock that allowed me to place my tripod and camera safely above the creek. Still after the disaster I had just 1 week prior, I was a bit shaky on working in the creek. Still it was just too much not to get out and risk the shot. There was little to no wind and just as I arrived the deeply overcast sky started to breakup and gave me some nice mixed light.
Due to the high water levels, I was able to catch Falling Water Creek on the left of the shot. Falling Water Creek runs into Richland at the Richland Campground. Falling water breaks into several channels near the it’s mouth with Richland and this one is the smallest. It hardly ever flows unless Richland is running at a high level. So I was grateful to catch both creeks in the same shot with some of the most amazing fall color I have seen on the creek.
Written by Paul Caldwell for www.photosofarkansas.com. Please contact the author before using any part of this in a separate publication.
06/18/18 Featured Photography–Clearing morning fog at Pinnacle Mountain
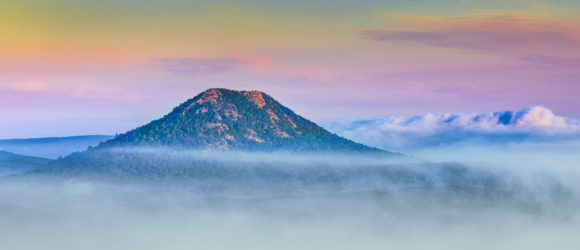

Sunrise through the fog over Pinnacle Mountain
I have a great fondness for the valley of the Little Mamuelle River and Pinnacle mountain. On one side you have the river winding down to the Arkansas River and then across the mountain is Lake Mamuelle. The distinctive shape of Pinnacle makes many feel that Arkansas has a volcano, but no the top is really two separate peaks. Pinnacle is around 650 feet tall and on most mornings where there is fog, you will see the just the top of the mountain poking out. This day was unique since there was a large amount of fog over Lake Mamuelle, which was billowing up like a cloud bank. As the sun rose up, the sky was painted in a wonderful separation of pink to light blue and the sun hitting the face of the mountain just added to the scene.
I used my Phase One IQ3100 for this shot. I was using a tripod and the Phase One 75-150mm lens. However I still cropped into the shot at least by one third as I just wanted to have the mountain by itself. I used Capture One software to work up the raw file and then tweaked the final look and feel in Lightroom and Topaz.
Pinnacle is a great climb for those in good shape, you can climb it from either side from fully maintained trails.
written for www.photosofarkansas.com by Paul Caldwell. This article is copy write protected, please contact me for permission to reprint.
10/14/16 Featured Arkansas Landscape Photography–Sunrise from the summit of Mt. Magazine
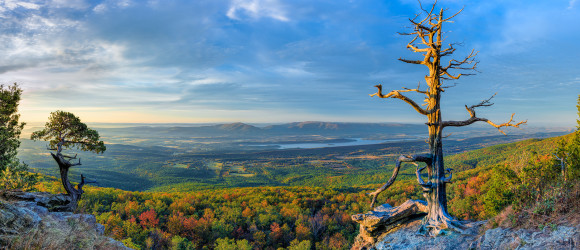

A view to the south from the summit of Mt Magazine, highest point in Arkansas
Taken with a Nikon D810 and 14-24 Lens, @ 24mm in 3 vertical shots, stitched together in Lightroom
The view from the summit of Mt. Magazine offers some amazing vistas, and one of the best is looking out to the due south towards Blue Mt. Lake and Blue Mountain behind it. This shot was taken last year, in late October and I was able to catch the rising sun hitting the rock and old tree in the foreground. Mt. Magazine is the highest place in Arkansas and has a lot to offer the visitor. There is a wonderful lodge where you can spend the night and enjoy a great meal after hiking around on some of the trails. The area is also a favorite for rock climbing and hang gliding.
I like to work this particular spot on Mt. Magazine year round, but the spring and fall are my favorite times. The sun will only come into the frame during December and January, but you can still get great photographs during the rest of the year. The play of light is amazing here.
Mt. Magazine’s summit is 2,700 feet high, and is the highest place in Arkansas. You can see for many miles off in pretty much any direction. The lodge offers a higher vantage point so when you visit make sure stop by.
The view from Mt. Magazine’s north side is just as impressive, so make a point of driving over to that side also. There is a one way drive which has several pull outs for viewing. During the fall you can expect a lot of traffic and a bit of congestion, especially during the weekends. The lodge will be booked up a year in advance for the best dates in the fall so plan accordingly.
This image was taken with aid of a tripod, in 3 vertical segments with a Nikon D810 and 14-24 lens. I used the 24mm focal length and F8 with the base ISO. I did not use a polarizer since I was panning across the scene and knew that would cause problems with composition later. I used Lightroom to work on the raw files, and also to make the panorama. The fall colors were just a few days before peak when this image was taken.
09/22/16 Featured Arkansas Landscape Photography–Sunset at Calico Rock on the White River
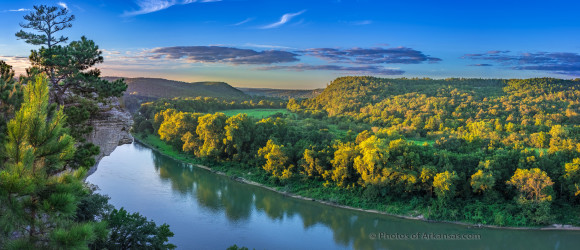
Sunset from Calico Rock on the White River in Arkansas
Taken with a Fuji X-Pro2, ISO 400, 35mm F2.0 lens, at F9, Panorama taken in 4 vertical images, each segment 3 exposures for a total of 12. Worked up in Adobe LR
Calico Rock, is one of the more interesting spots on the White River in Arkansas. You can drive right to it and when you arrive, you have a sweeping view of one of the larger bends of the White River. The bluff is about 150 feet above the river and you really cannot see much of the bluff itself. However there is one vantage spot where you can look to the west an there is a small out cropping that adds a lot to the photograph. Many call this “little Hawksbill Craig” after the larger feature up on the Buffalo River. However I just like to photograph the valley. If you look downstream, you will see the town of Calico Rock on the left hand bank of the river.
This shot was taken in a series of vertical segments, 4 total and for each segment I exposed 3 images. I then worked each of the 3 shots into a HDR balanced image in Lightroom. After that, I took the final 4 images and created a panorama. It’s very important to realize that you do not want to do any work on the individual HDR segments before the panorama merge. I prefer to use the boundary warp feature of Lightroom also as most of panoramas in taken like this will only work in a spherical format and thus your top and bottom edges will have some problems.
The Fuji X-Pro2 makes this very easy with it’s automatic bracketing shutter, where you only have to press the shutter once to fire all 3 brackets.
I have found that Fuji made some very good positive changes to the dynamic range of the X-Pro2 as can be seen in this image. Also Adobe must have done a bit of tweaking to their X-trans conversion for the X-Pro2.
You can get to Calico Rock from Little Rock, in about 3 hours and the drive is quite beautiful.
09/21/16 Featured Arkansas landscape photography–6 finger falls on Falling Water Creek

Late May on 6 finger falls in Newton County
Taken with a Phase One IQ100 and 35mm LS lens, 2 part horizontal pano. Taken in 4 shots to merge later for foreground and background in Helicon Focus
Arkansas has many great streams to hike but one of the best is Falling Water Creek, which is well named as it has a large number of waterfalls it’s entire length before emptying into Richland Creek. Falling water creek has an upper and lower half, and some of the best spots to photograph are on the lower half. There you will find creek wide ledges like 6 finger falls. 6 finger falls, named for the cut outs the creek has made in the ledge, is quite a wonder. It offers great photographic opportunities year round but is best in the fall and spring. You will be lucky to find any water in the creek in the fall and if you do consider yourself lucky. The banks are lined with deciduous trees that offer a great display of fall color.
You will also like the fact that for most of it’s length, falling water creek has a forest service road that parallels it’s length and so offers quick access. This of course means in Arkansas you can expect to find all types of folks here on a good weekend, so plan your trip during the week if at all possible. The forest road is number 1205. Heading due north on the road, falling water creek will be on your right for the upper half, and then after you cross it on the left. For a portion of it’s length, the Ozark Highland trail is just above the road on the right, below the bridge. This is great day hike also.
Make sure to include a trip to the mouth of falling water creek at Richland Creek campground. Richland is the crown jewel of creeks in Arkansas and is also protected as a Wilderness Area, so you can enjoy a day without hearing a 4 wheeler.
08/21/16 Featured Arkansas Landscape Photography–Storm Clouds over Buffalo Point, Buffalo National River Arkansas


The Buffalo River at Buffalo Point in early August with a morning storm rolling in.
Taken with a Phase One IQ100 and Phase One XF/35LS lens, at ISO 100, F12 for 1/40 of a second on tripod, single exposure.
This was taken back in early August 2016 on the Buffalo River in Northwest Arkansas. This part of the river is known as Buffalo Point, and is one of the more popular spots on the river. It features one of the larger campgrounds on the Buffalo along with hundreds of miles of hiking trails. Within 9 miles of Buffalo Point, you can driver over to Rush Arkansas which is an old mining town which dates back to around 1917. There is not much left standing at Rush, but it still offers some nice hiking.
This image shows just how fast conditions can change. I walked down to the river before sunrise. This particular bluff is on the east side of the river, thus will not get any sunlight until mid day. It’s a great spot to catch a sunset if the clouds lineup, but you also can expect to find hundreds of people wandering around the beach which just add confusion to both the scene and water. On this morning I was hoping to catch the area to myself, and for about a magic 40 minutes I had just that. There was almost no wind blowing, so I also was able to get a very nice reflection of the bluff. This bluff is about 80 feet tall and the face about 35 feet or so and it’s one of the classic Ozark bluffs made 100% from limestone so you can expect to get some interesting color from the rock.
I worked the area up and downstream, but this spot was the best as a early morning storm rolled in. When I first arrived there were no clouds in the sky at all just a bit of river fog, but within 30 minutes the top of an old thunderhead came over the river and really added to the shot. The heat and humidity were intense but the photographic opportunities were excellent.
This is single exposure from an IQ100 Phase One digital back and I have to say that the overall dynamic range of this back is impressive. The ability to finally cover a shot with just one exposure, knowing that you have room to work up shadows without a bracketing series of exposures is a great feature and long overdue from Phase One.
 From the Blog
- 04/18/25–Looks like Trump’s Tariffs are much ado about NOTHING in regard to photography equipment. April 18, 2025
- 04/09/25 Arkansas Sets new standard for Scientific Ignorance with new law for Ivermectin April 4, 2025
- 04/04/25 The Debacle of the Trump Tariff Plan Continues, with another 1K drop in the Market April 4, 2025
- 04/03/25, Trumps Big Call, the fascination of watching a narcissist at work. April 3, 2025
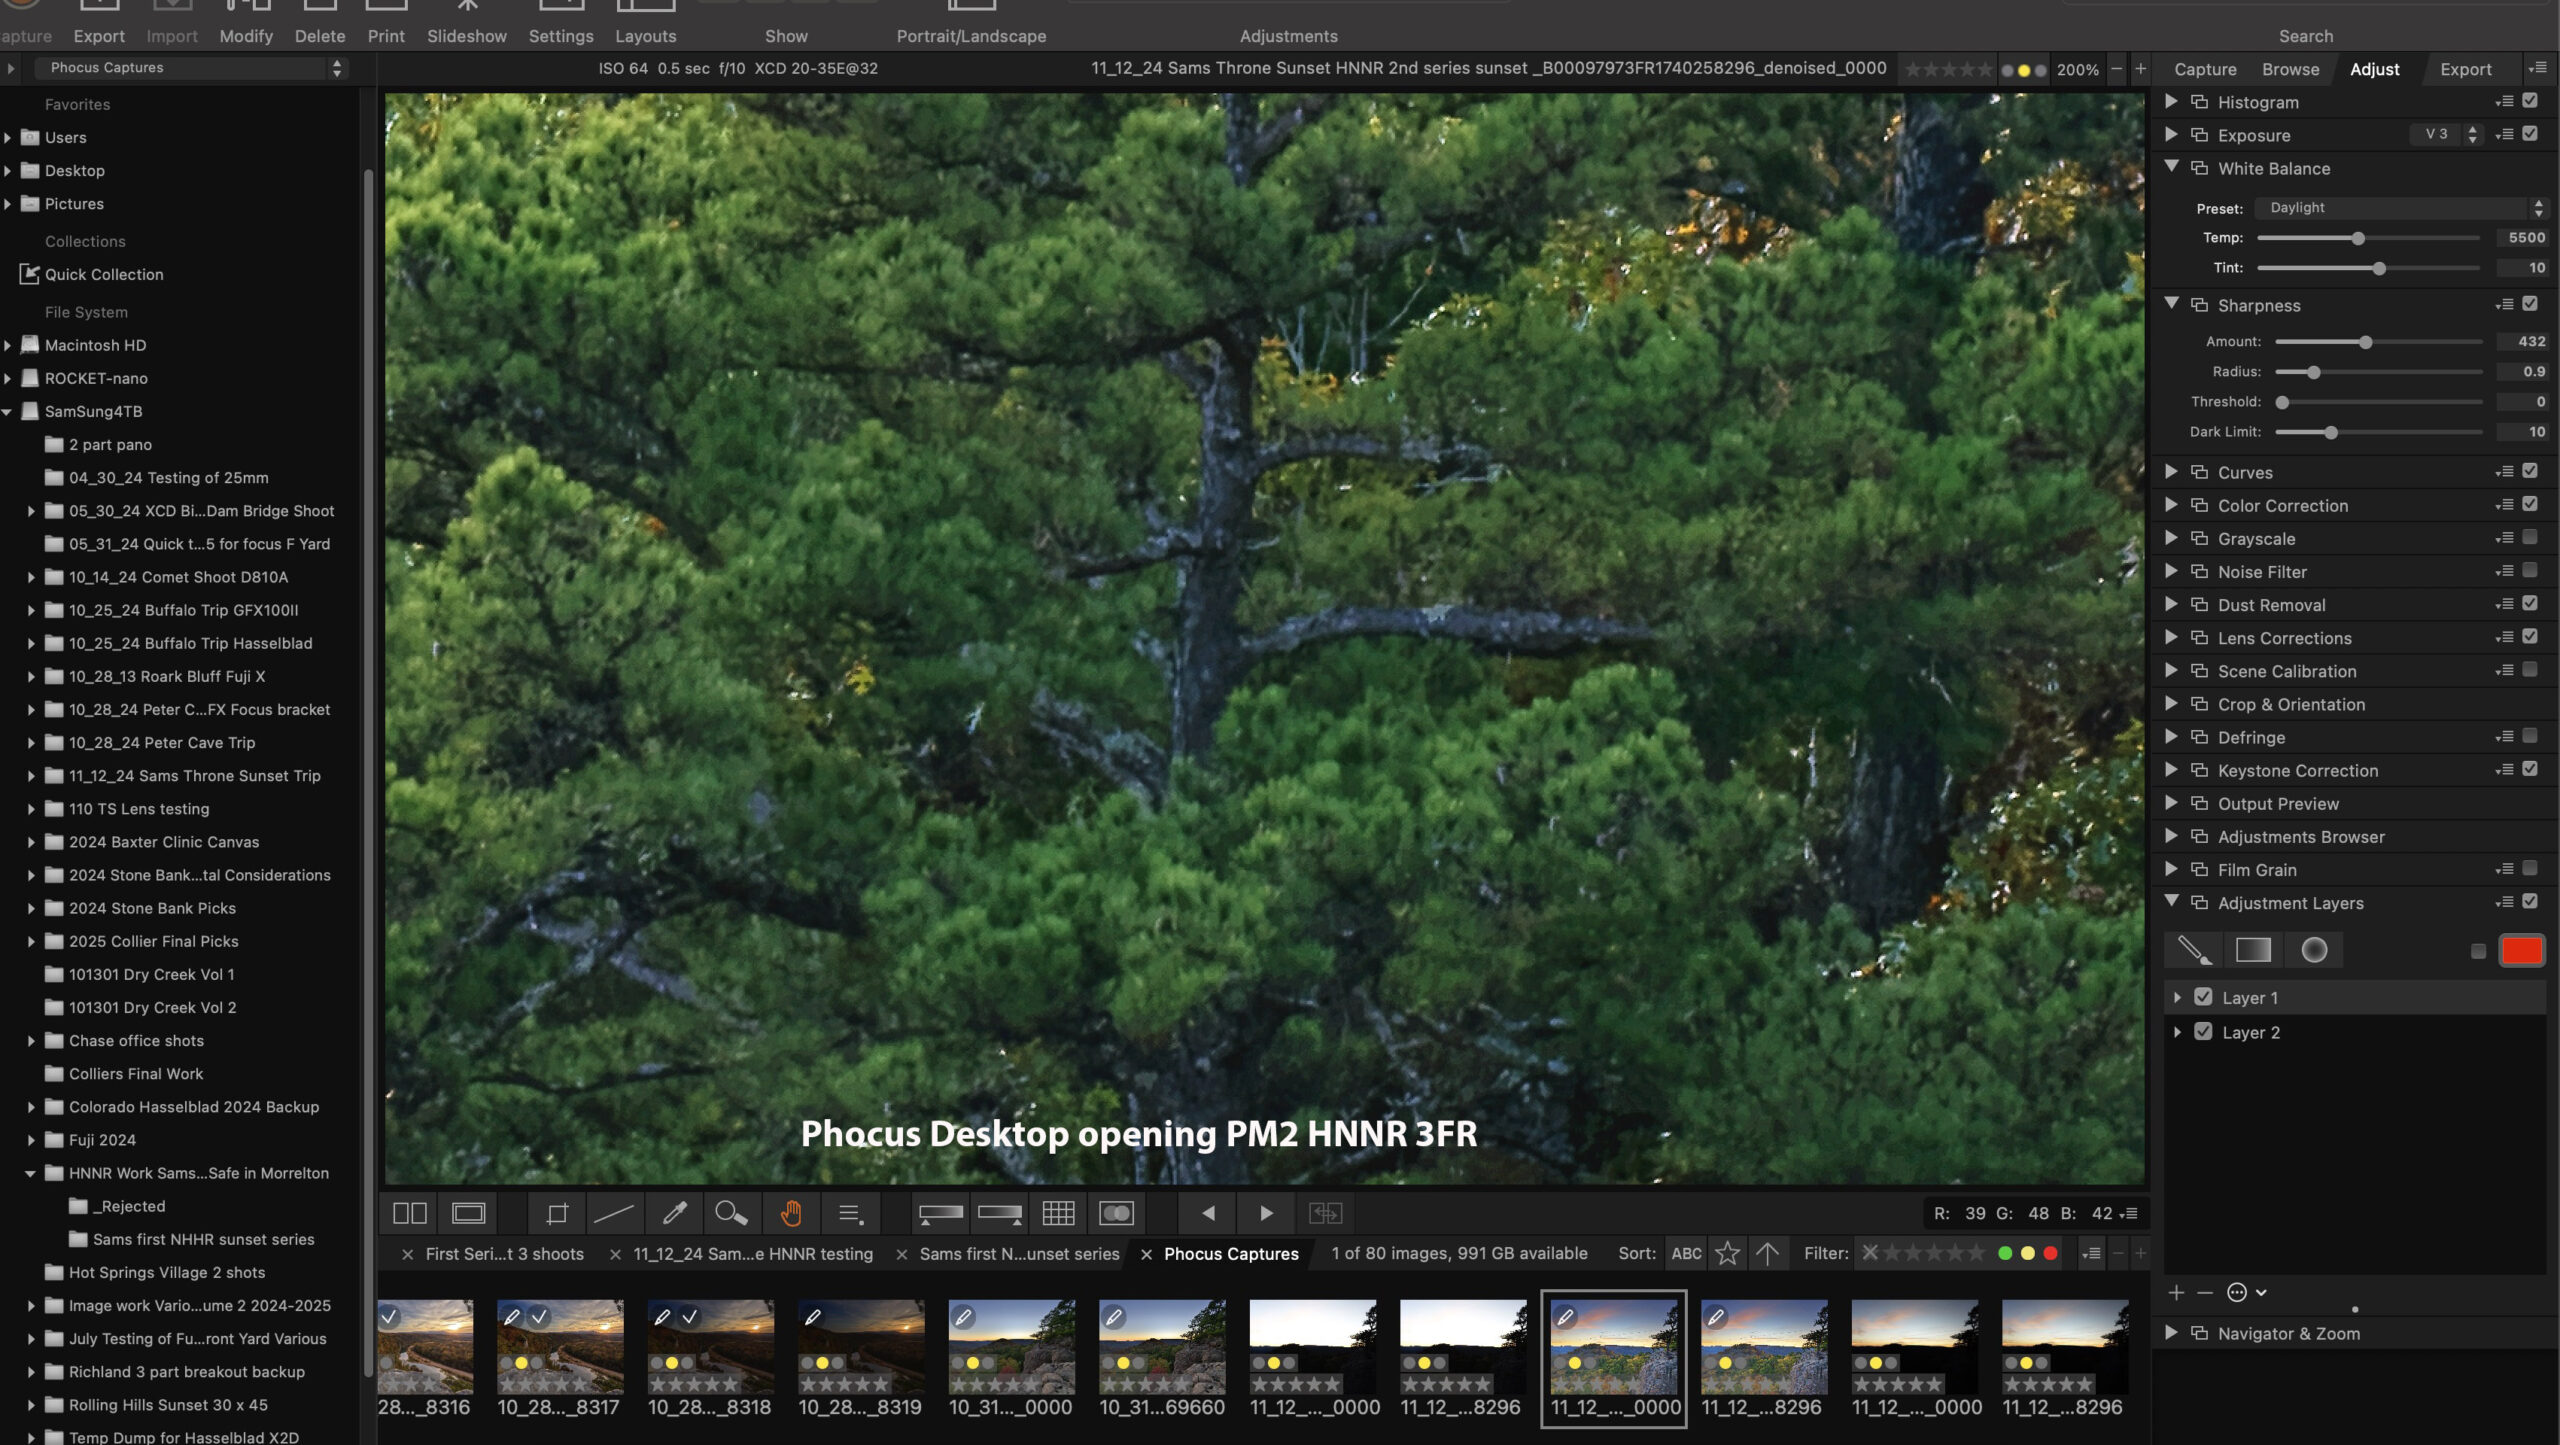
- 03/29/25 Phocus 3.8.5 released, still no fix for the HNNR issue March 29, 2025
- 03/17/25 I have added a new article on the issues of using Hasselblad’s HNNR output with Phocus Desktop 3.8.4 March 20, 2025