03/20/19 Auto Rotate for image playback on Phase One IQ4 still problematic
Yesterday 03/19/2019, Phase One released a new firmware for the IQ4, their top end Digital back. This is the 2nd official firmware on the back and the first firmware to offer something new (and it brought back a few older IQ3 features see this post).
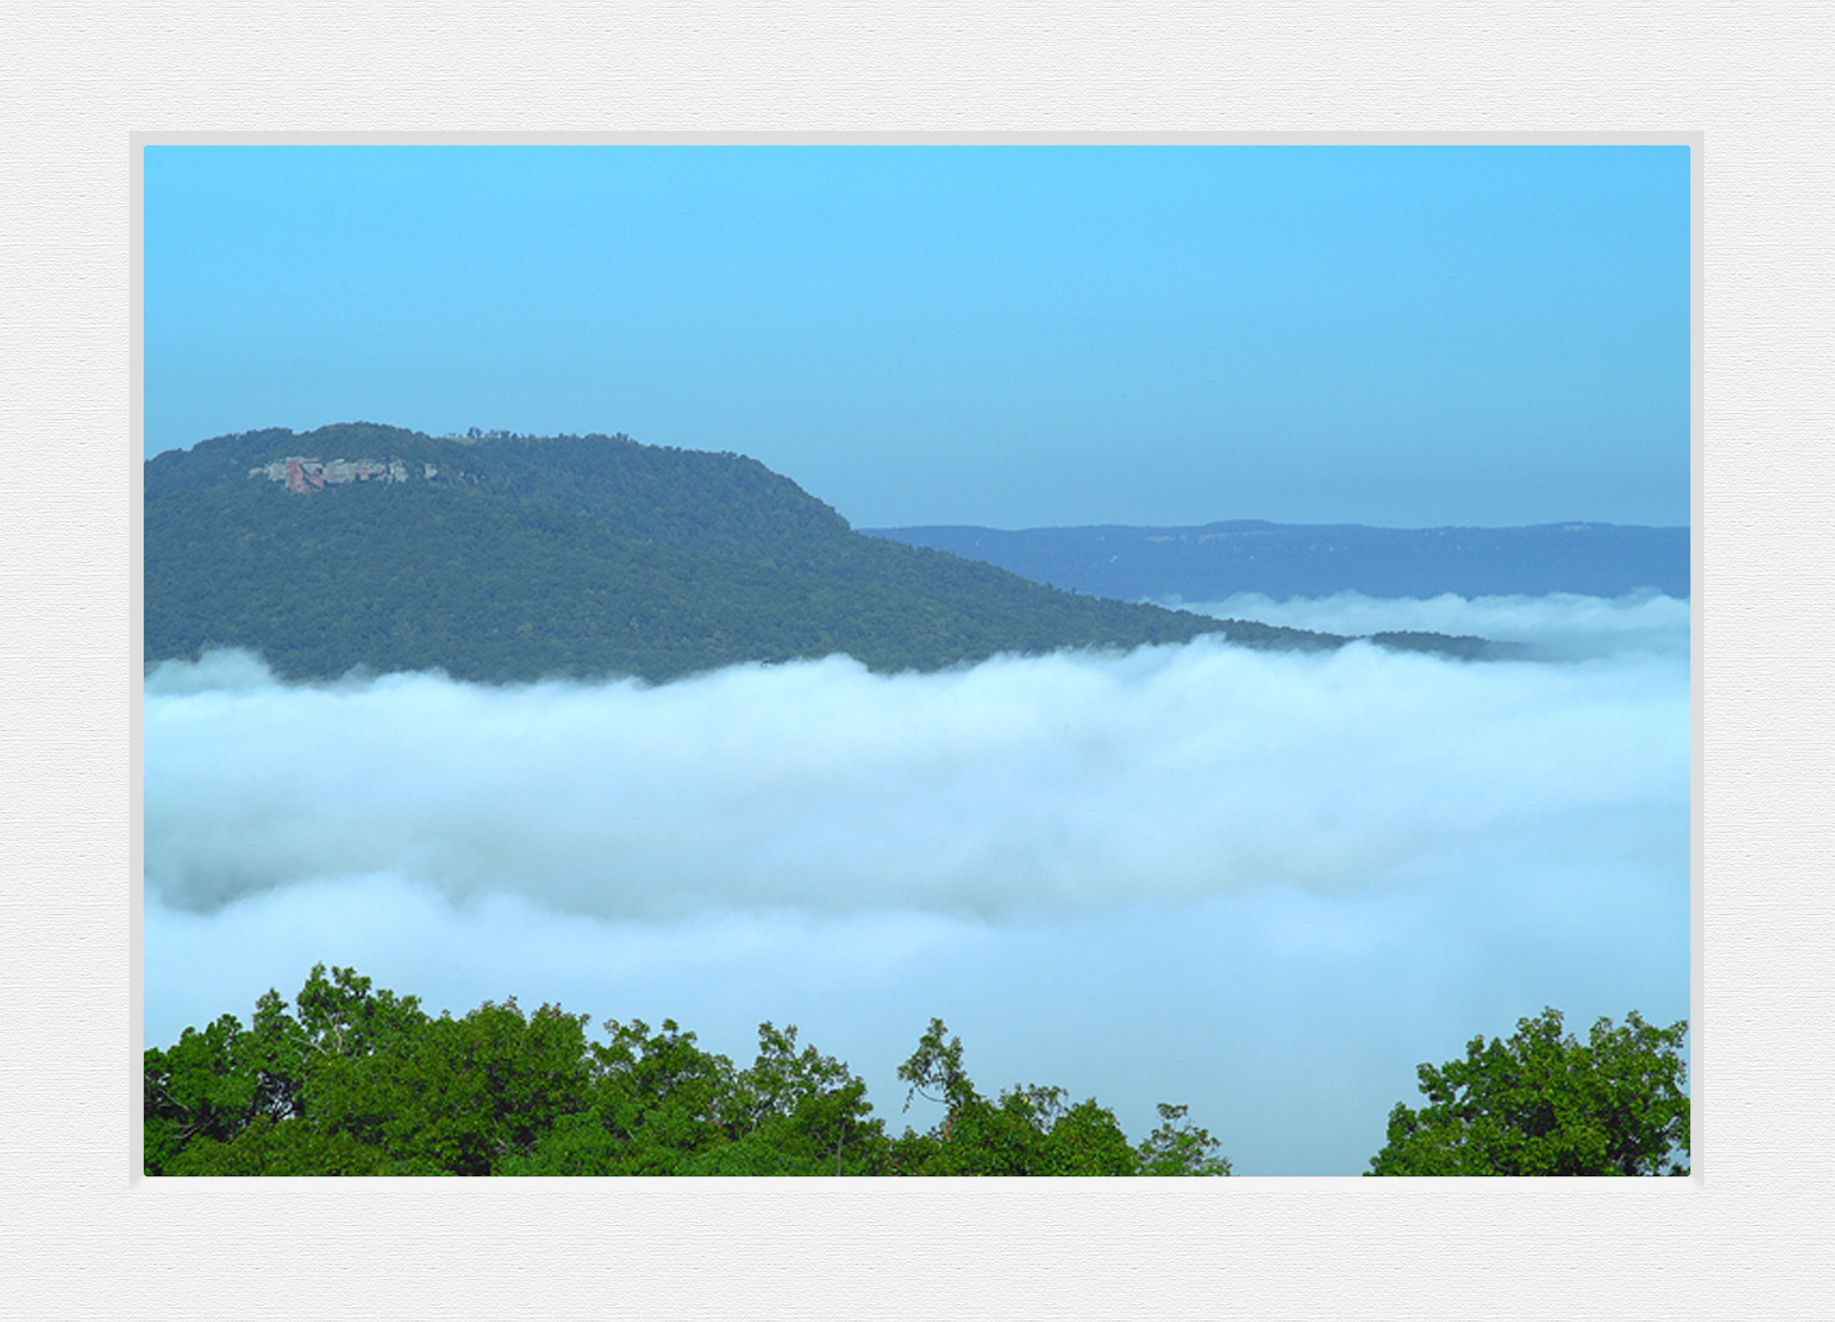
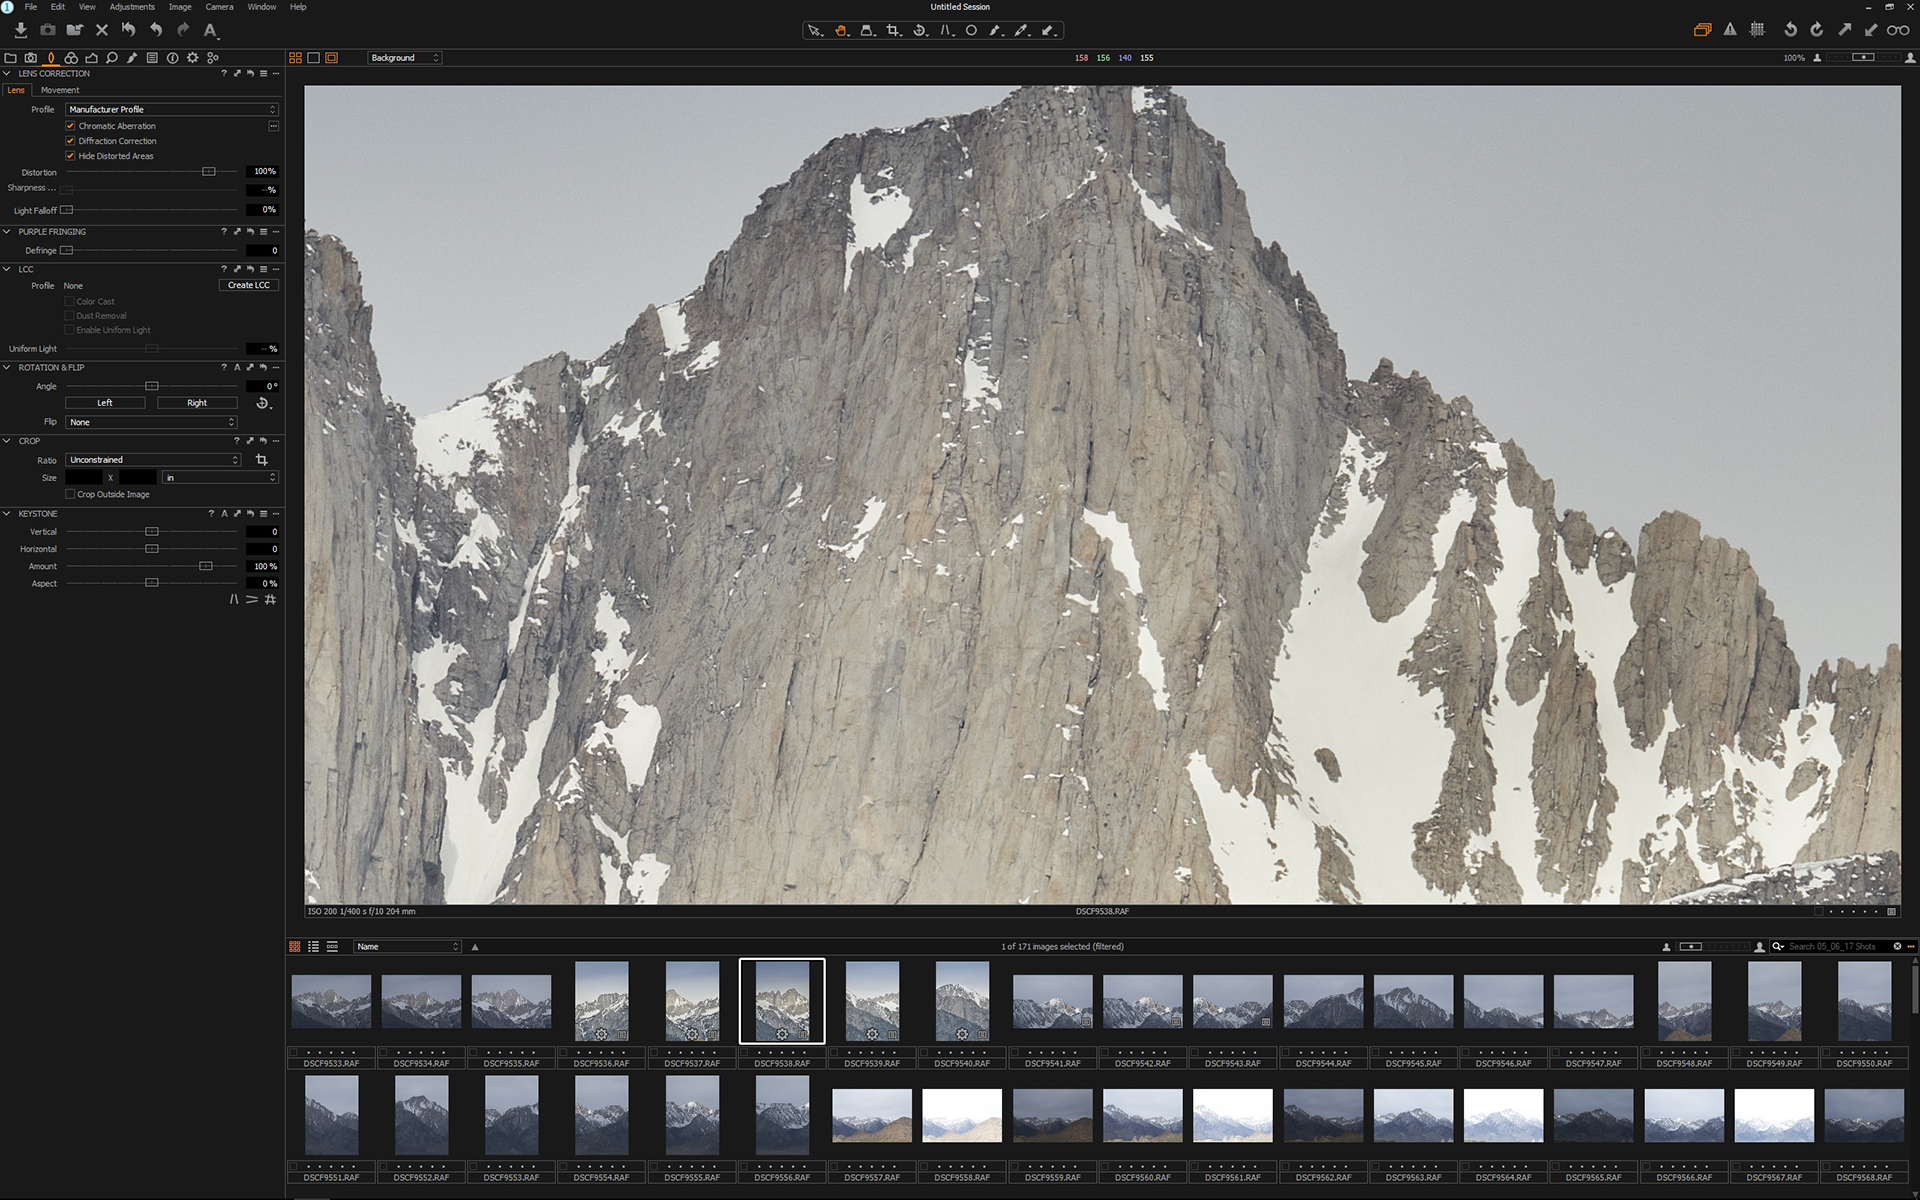
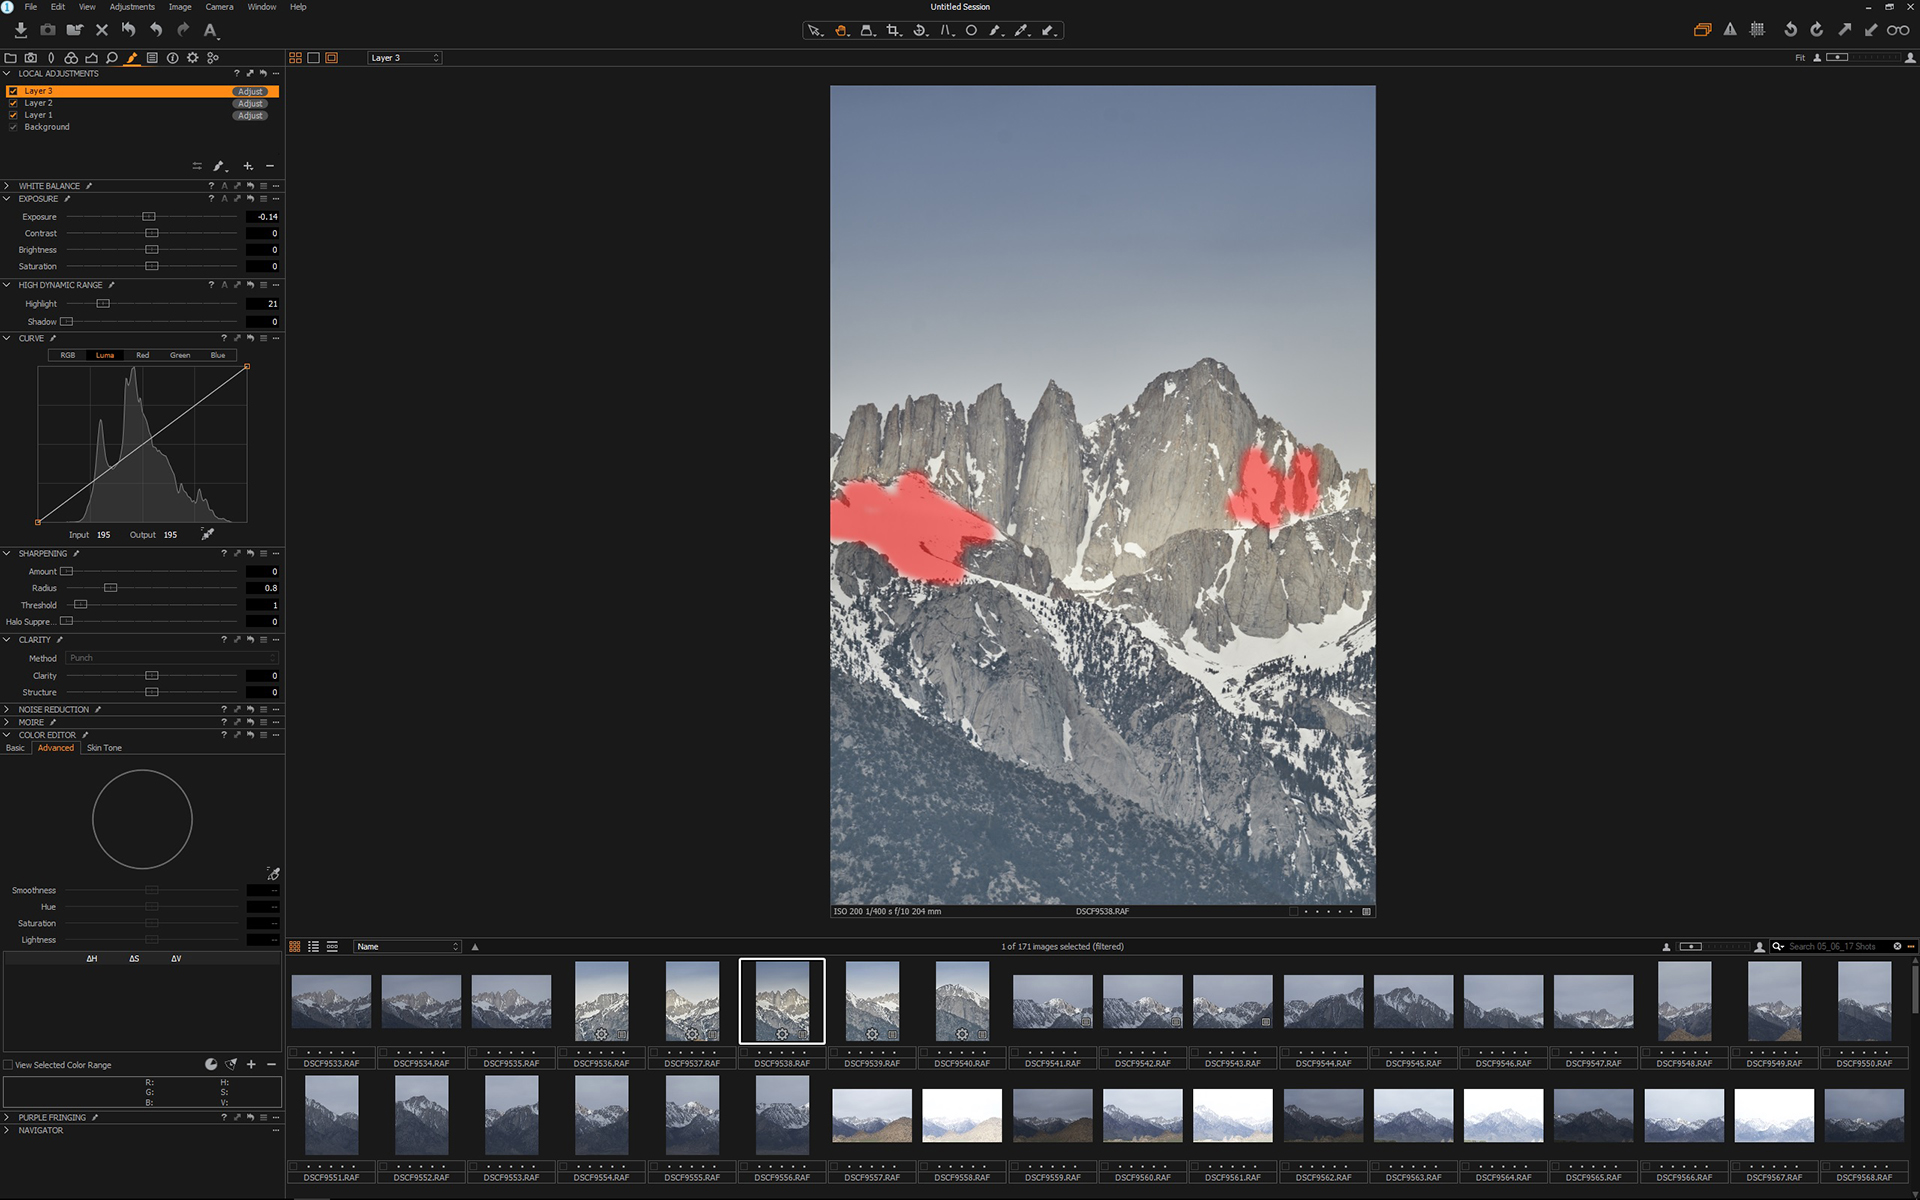
However there is still a small issue with IQ4 playback, autorotation. Auto rotation, is a feature that Phase One along with all other camera manufacturers usually include for playback of a portrait orientation image. When you take an image in portrait mode, (with the camera vertical), the image will playback in the same vertical orientation.
-
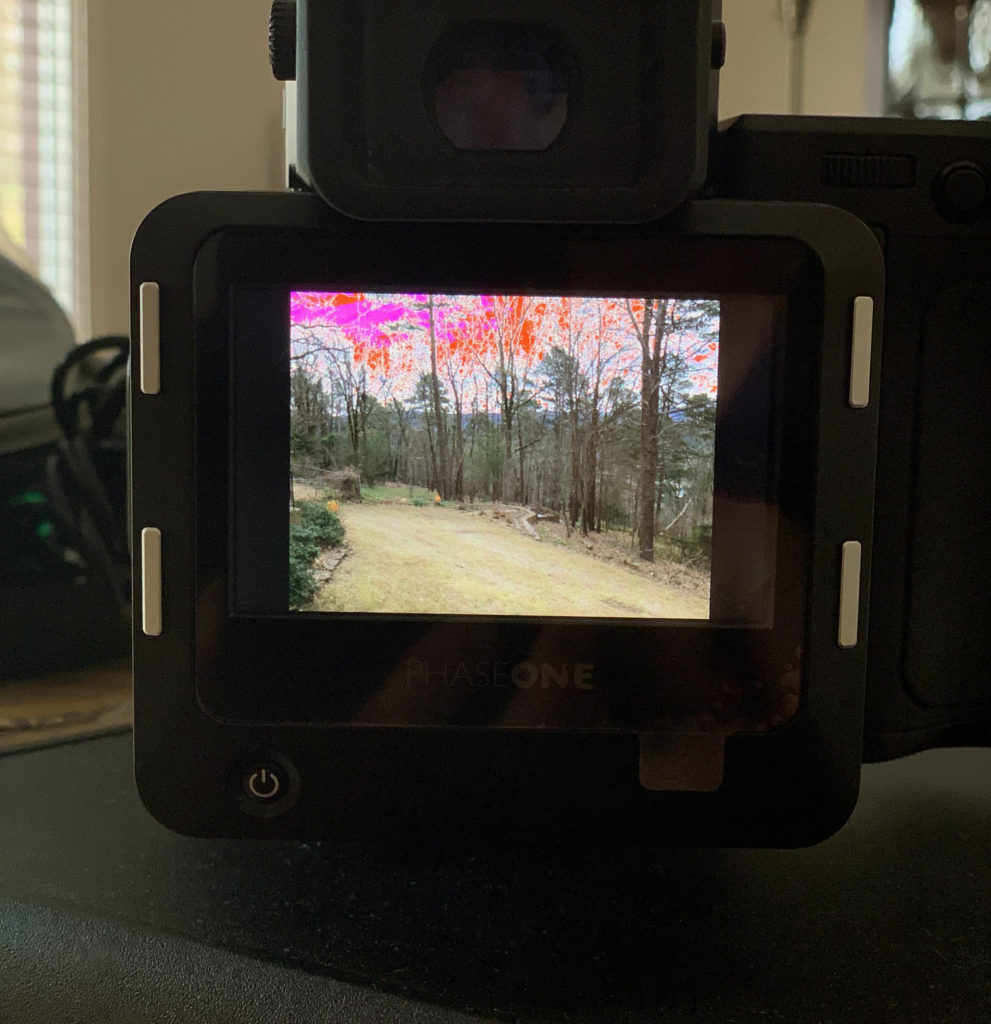
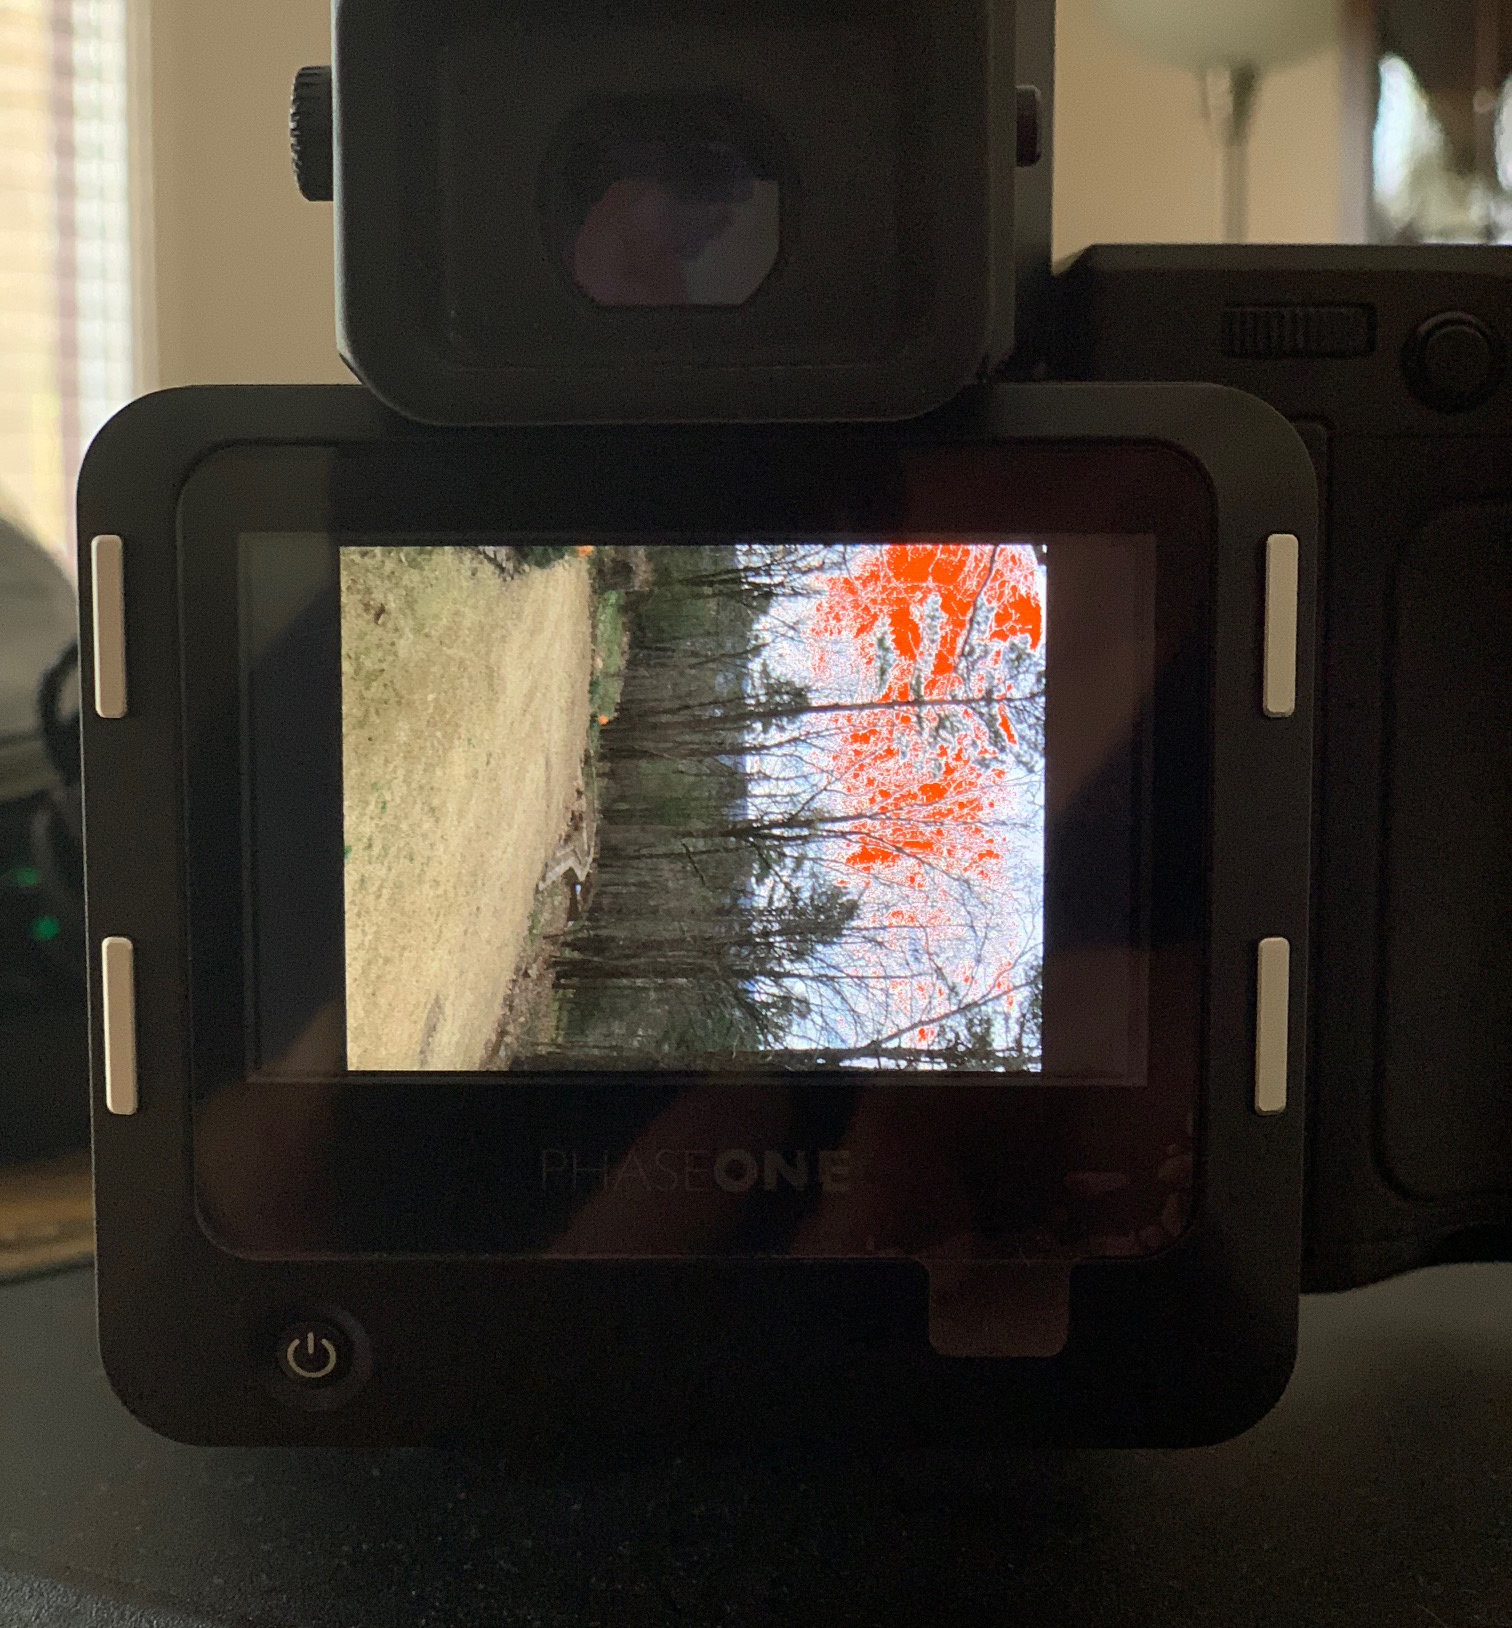
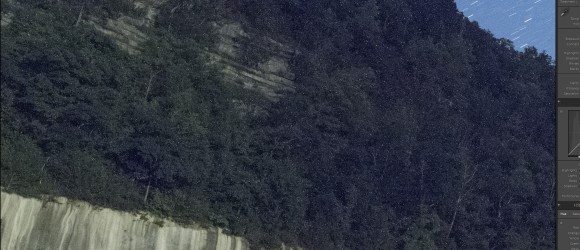
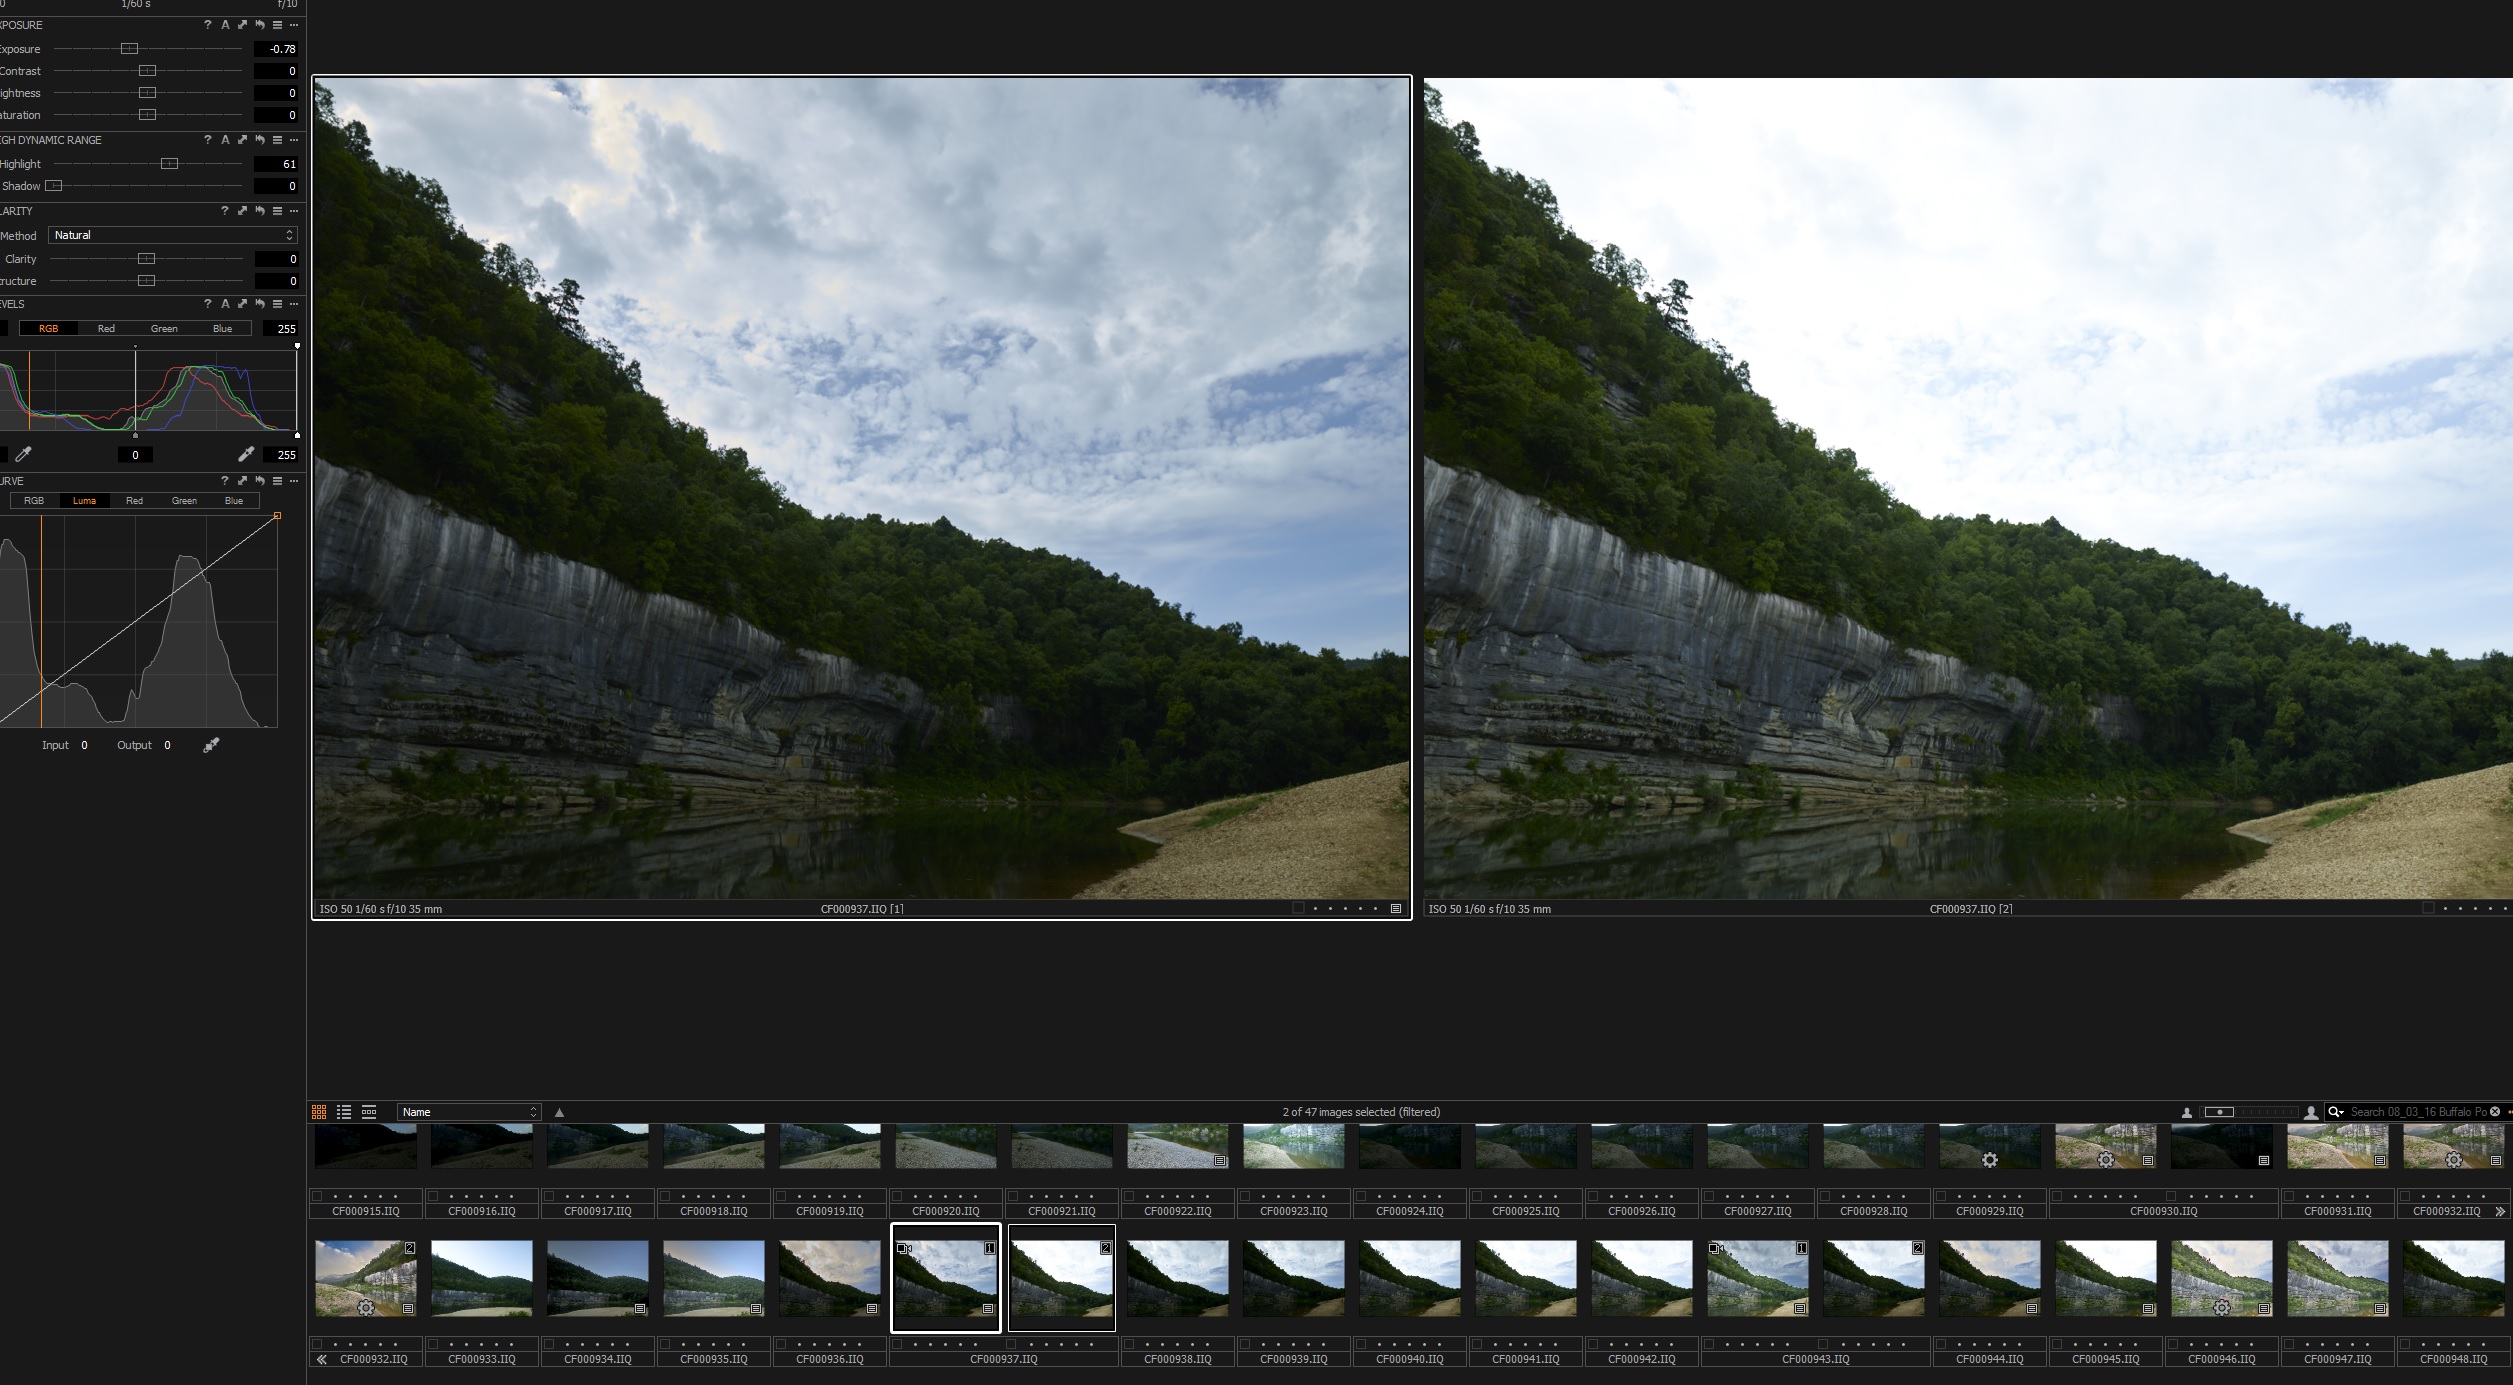
- Phase One IQ4 Landscape orientation image playback correct
-
- Phase One IQ4 Portrait orientation image no Auto Rotation on Playback
The image on the left shows a IQ4 image taken with a XF and 55mm LS Phase One Lens. The image is displayed correctly, as the the image was captured in landscape orientation and playback keeps it there. However the image on the right is showing a portrait orientation image and how it’s played back. The image should be vertical however the back is playing it back in landscape mode.
What is interesting is as long as the IQ4 stays in the portrait orientation, the image during playback is displayed correctly. But once you rotate the back to the horizontal (landscape) orientation, from that point on, all portrait orientation images will be displayed in the horizontal orientation. So when you shoot with the IQ4 in portrait mode, make sure you check your images before rotating the camera from that position. Attempting to check a vertical image displayed horizontally is very difficult.
For my work, this is problematic since I take 65% to 75% of my work in portrait mode since I want to blend the multiple portrait images into a panorama. For now you have to remember to preview your work while the camera is still in the portrait orientation.
Another interesting observation is that when you load the files into a Capture One 12 session, all the vertical images will start out in the horizontal orientation, but as Capture One creates the previews the images will rotate back to the correct vertical orientation.
Hopefully Phase One will resolve this soon but it looks like it will have to come with another firmware update.
03/18/19 IQ4-150 Firmware 1.03.26 – Released–It’s official now!!
It’s now official. You can update your Phase One IQ4 to the latest firmware which is 1.03.26.
The process itself will take approximately 8 to 10 minutes and the last four minutes, the back will power off the LCD and only gives a blue light blinking at the bottom. I found that a bit disconcerting, but overall the process did work as it’s supposed to.
With this update you gain a few new features for the IQ4 and get back a couple of IQ3 features that should have been there from the start, (unless Phase One replaced them with something better which the did not).
Old IQ3 features that have now been returned:
- Power share: which allows the XF and IQ digital back to share power. Important for field use as the IQ4 uses about 1/3 to 1/2 more battery in normal use. Power share allows the XF to send power to the IQ4 once the IQ4 battery reaches a certain level of discharge. This is a good thing since the XF takes very little power compared to the IQ4.
- Auto Gain for Live View: simple feature that has been in place with all IQ CMOS backs, since the days of the IQ250 back in 2012. Left off the IQ4 for some reason. With auto gain Live View you the back will pick an ISO level depending on the ambient lighting. It also added a bit more contrast to the Live View screen which I felt helped in critical focus. This feature was removed with the IQ4, and has not been available since December 2018. Instead Phase One offered Exposure simulation which showed allowed the Live View to display a representation of the currently selected ISO/Shutter Speed/Aperture. Great in good light outdoor, not so great in low light (sunrise or sunset). I have not tried the new Auto gain yet, but hopefully it will work as well as it did on the IQ2 and IQ3 backs. You also have the ability to use the Auto Gain Live view with your selected aperture, or wide open which is a great feature.
New IQ4 features that have been added:
- Live View zoom up to 400%. You now have the ability to zoom into your Live View screen as much as 400%. The details are still present and the ability to achieve very sharp critical focus on smaller distant details in a scene has improved.
- Self timer for ES (electronic shutter). Pretty straight forward, you now can trip a self timer while in the ES. Not that big a deal for me as I have a remote 12 pin that allows me to fire the ES without having to press the shutter button on the IQ4 LCD.
- While in Live View, 3x (triple) tap will take you all the way to 400% and or you can use a two finger pinch to zoom to any level from 0 to 400. Nice addition.
- The brightness slider for Auto Gain Live View is easily accessed view a single swipe from the left side of the LCD.
- AFr Zoom to Focus on the IQ4 with the XF Focus & Recompose feature
Overall, these are great improvements for the new IQ4, and hopefully they will assist photographers in the field.
However a few pretty important features still seem to be lacking surprisingly.
Auto Rotate: Simply stated if you take a vertical image the image will be displayed vertically in playback. Currently the IQ4 displays such an image horizontally. I still find this really disappointing as I show a lot of panoramas and use the vertical orientation to stitch with. I cannot think of any $99.00 point and shoot camera that can’t do this, and it surprises me that Phase One did not include this in December and now almost 4 months later still can’t implement it!. This is shooting preview 101, basic stuff and Phase One will require yet another firmware update to implement this.
Adhoc, where is it. Phase One seems to have a totally different direction now. I guess more pointed at studio work. Since day 1 of the previous IQ backs that had wifi, there was an adhoc option. Simply and clean created a static ip address that you could connect to in the field and thus use Capture Pilot from an iOS device. Phase One now only allows Capture Pilot use if you are connected to wifi over a router, again what the heck? Who thought this was a good idea? You have a great solution for field use of your software tool for iOS devices and then you just cut it off. Phase One has made limited low level statements that “adhoc” will return with a later firmware update. I still feel this won’t be possible as much system boards on PC’s or Mac, have all the networking capability hard wired in. Hopefully Phase had a way to implement adhoc without issuing an EC (engineer change) which would require all existing IQ4’s to be returned to the factory.
Heat and battery life, no mention as to if anything is being done to help on this. Currently a 3400 millamp Phase One battery will show totally drained when there is still over 20% of the battery left. The IQ4 also gets considerably hotter than the IQ3 and Phase One left out the feature that showed existing heat of the back that was quite popular for the IQ3. I wonder why?
written for www.photosofarkansas.com by Paul Caldwell please do not reproduce any of this content without permission.
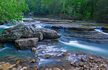
02/20/19 A Tale of two creeks Richland and Falling Water–Featured Arkansas Landscape Photography
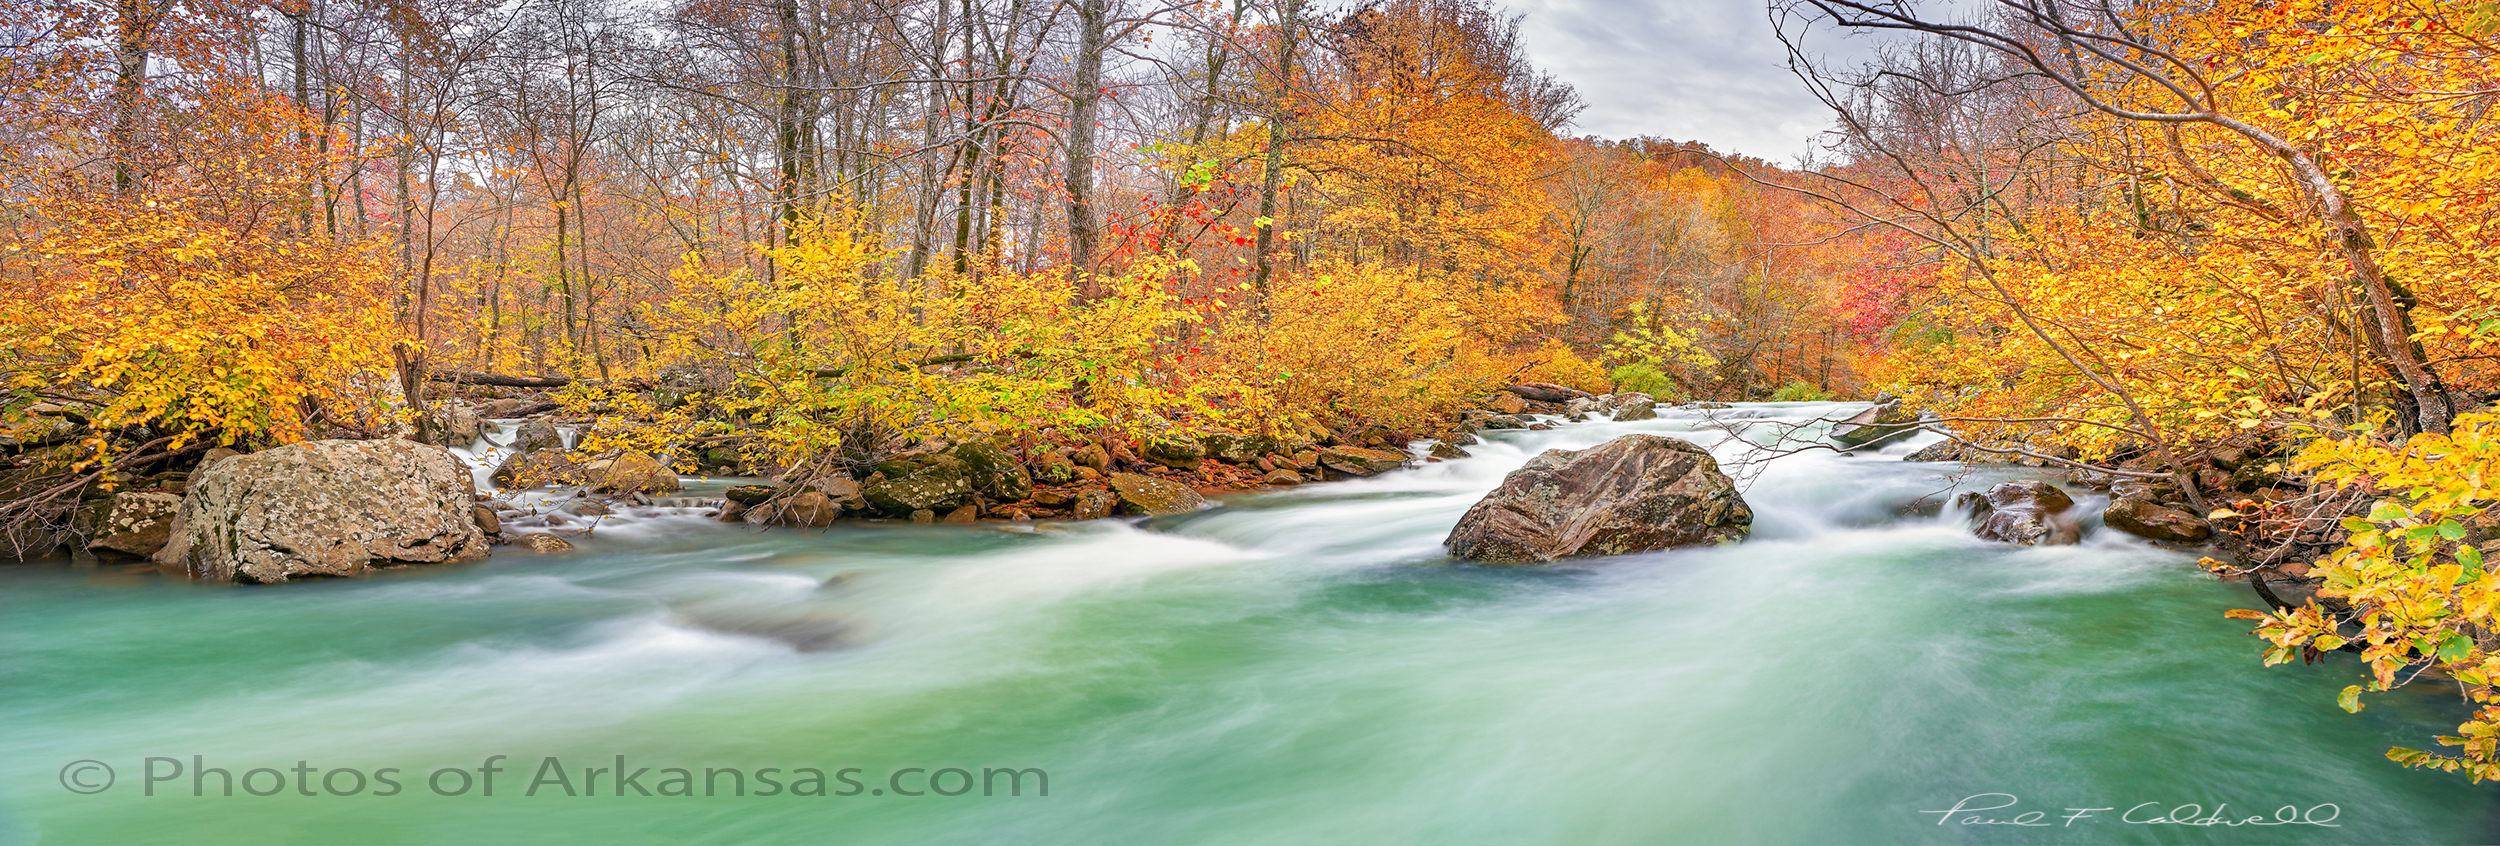
Fall scene featuring Richland and Falling Water Creek at their confluence.
A tale of two Creeks, Falling Water and Richland Creeks, Newton County Arkansas taken November 2018.
Taken with a Nikon D850 and 24-70 lens. Image capture in 3 horizontal images @ 24mm. I used both a CL-PL and ND filter to slow the exposure for the water.
If I had to pick a favorite spot in Arkansas, it would have to be Richland Creek. Most defiant a love/hate relationship as Richland alone has cost me more in camera gear than any other location I like to photograph. Just this fall I lost both a Nikon D850 and 24-70 lens upstream from where this shot was taken. Totally my fault and lucky for me, the creek was much lower so I was able to recover the gear and Nikon USA was able to repair it at a reasonable cost. But that’s another story.
Richland Creek is one of the fascinating creeks in Arkansas. At medium to high water levels it’s a great kayaking stream. The creek is lined with hardwoods most are 2nd generation growth as the creek was logged back in both the great depression and again in the 60’s-70’s. Most of the old growth trees are long gone but if you hike far enough upstream where the mules and loggers never reached you can still find some huge white oaks.
The creek also winds through some of the most remote parts of Arkansas, that are still remaining. Most of the watershed is now a wilderness area. There is a primitive hiking trail that works it’s way up the left side of the creek (left side facing upstream). This trail will lead all the way to Twin Falls and Richland Falls, well worth the trip.
For most the season, Richland hold water, but in the fall it’s very rare to find a good flow like the one shown in this image. Instead the creek is usually barely covering the rocks. The fall colors are getting tricky to catch also. In the past the peak display tended to be around the middle of October now the peak seems to be more in the first week of November. But the display is now hard to catch in full. Notice in this shot most of the larger trees on the left have dropped their leaves, but the willows and smaller hardwoods lining the creek are still in full color. However upstream many of the larger trees are still hold leaves. So you just have to go and see what you have.
To take this shot, I had to wade out into the creek to mid thigh deep. I found a rock that allowed me to place my tripod and camera safely above the creek. Still after the disaster I had just 1 week prior, I was a bit shaky on working in the creek. Still it was just too much not to get out and risk the shot. There was little to no wind and just as I arrived the deeply overcast sky started to breakup and gave me some nice mixed light.
Due to the high water levels, I was able to catch Falling Water Creek on the left of the shot. Falling Water Creek runs into Richland at the Richland Campground. Falling water breaks into several channels near the it’s mouth with Richland and this one is the smallest. It hardly ever flows unless Richland is running at a high level. So I was grateful to catch both creeks in the same shot with some of the most amazing fall color I have seen on the creek.
Written by Paul Caldwell for www.photosofarkansas.com. Please contact the author before using any part of this in a separate publication.
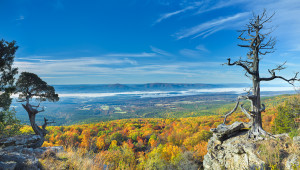
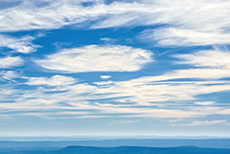
06/18/18 Featured Photography–Clearing morning fog at Pinnacle Mountain
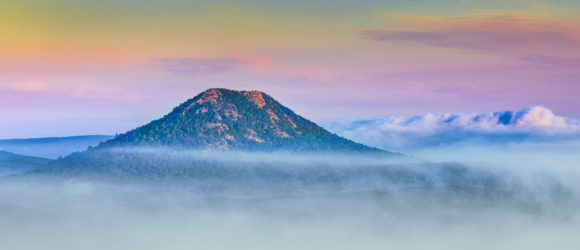

Sunrise through the fog over Pinnacle Mountain
I have a great fondness for the valley of the Little Mamuelle River and Pinnacle mountain. On one side you have the river winding down to the Arkansas River and then across the mountain is Lake Mamuelle. The distinctive shape of Pinnacle makes many feel that Arkansas has a volcano, but no the top is really two separate peaks. Pinnacle is around 650 feet tall and on most mornings where there is fog, you will see the just the top of the mountain poking out. This day was unique since there was a large amount of fog over Lake Mamuelle, which was billowing up like a cloud bank. As the sun rose up, the sky was painted in a wonderful separation of pink to light blue and the sun hitting the face of the mountain just added to the scene.
I used my Phase One IQ3100 for this shot. I was using a tripod and the Phase One 75-150mm lens. However I still cropped into the shot at least by one third as I just wanted to have the mountain by itself. I used Capture One software to work up the raw file and then tweaked the final look and feel in Lightroom and Topaz.
Pinnacle is a great climb for those in good shape, you can climb it from either side from fully maintained trails.
written for www.photosofarkansas.com by Paul Caldwell. This article is copy write protected, please contact me for permission to reprint.
08/01/17 Working up a Western Panorama from a telephoto lens–Fuji 100-400
- At August 03, 2017
- By paul
- In Articles/Reviews, Fuji Gear
 2
2
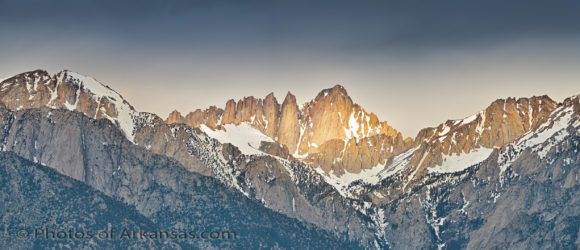
There are many times I like to take a moderate to medium length telephoto lens and stitch up a 3 to 5 part panorama. The telephoto lens works great on subject matter that I want to reach a bit, like in this example below of a mid morning shot of Mt. Whitney.

Sunlight on Mt. Whitney near Lone Pine California
For this shot, I used a Fuji X-T2 and the Fuji 100-400 zoom lens. I wanted to be able to hand hold this panorama and not mess with a tripod and leveling base as this just adds more time. On this day, the light was hard to work with as there was partial cloud cover. The light was spotty and I knew that to get this shot, I would have to move fast. The Fuji 100-400 pared with the X-T2 allows me to work totally hand held since the lens offers image stabilization and the stabilization is excellent. Since I was using the telephoto, I wanted to maximize the amount of coverage, so I took the scene in 5 vertical shots. I did not bracket the exposure, but the X-T2 does make that process easy when needed. I stayed at the base ISO of 200 and in fact did under expose the foreground just a bit.
To start the process, I used Capture One to work up the raw files. With the latest version of Capture One, the raw conversion for Fuji x-trans raw is about the best I have seen. This is version 10.1.2 of Capture One. I use Capture One is session mode, which mean, I only import the images I want to work on and Capture One puts a sub folder with the raw files where all of the image info is kept. This is unlike Lightroom’s catalog approach.
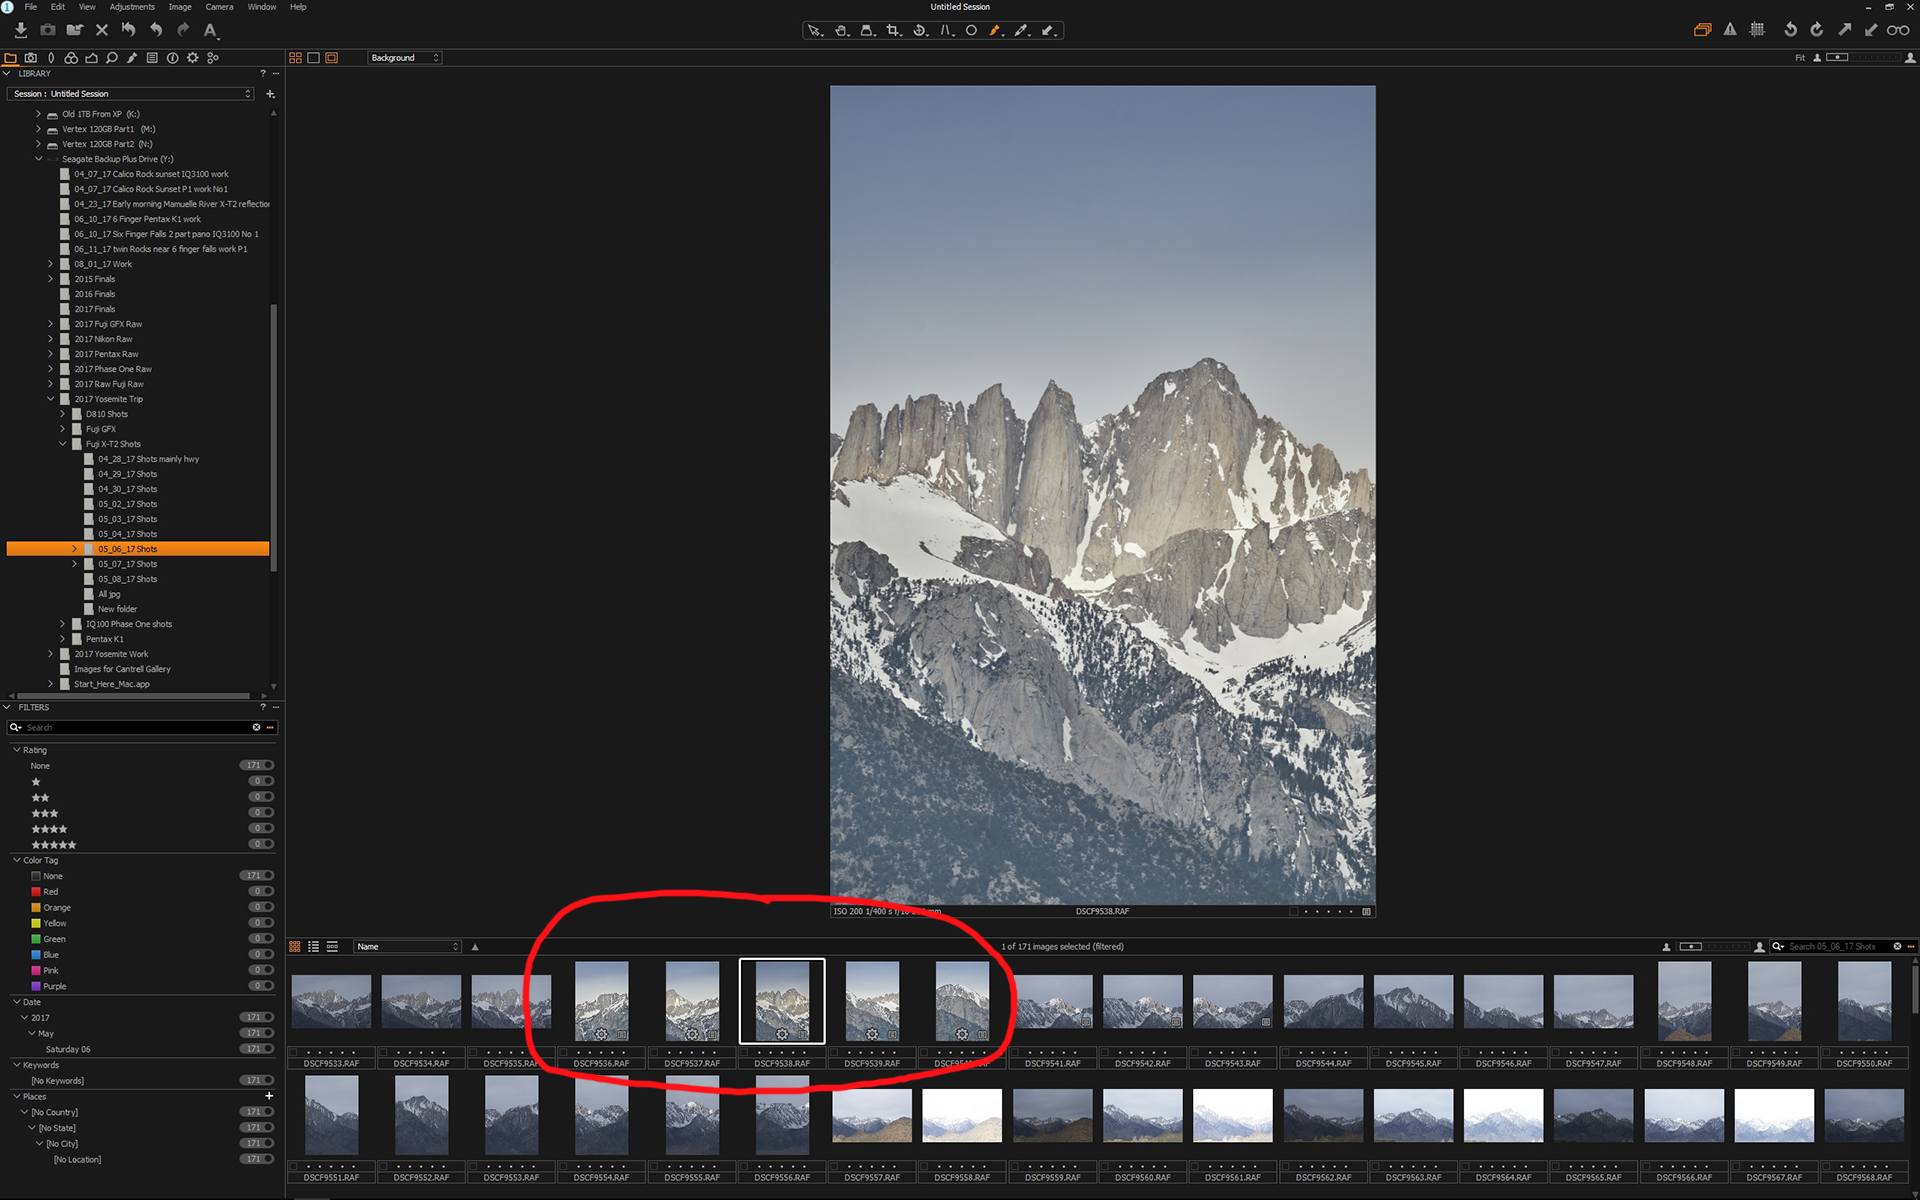
Main screen of Capture One with Fuji files
Yes it’s easier to just import these 5 raw files into LR, then do a pano merge. However Adobe’s “one and done” approach to raw conversion has been applied to the Fuji x-trans conversion. Adobe has done very little over the past 2 years to improve the rendering and many times I still will see what I call the plastic look to finer details. This is tragic as the X-T2 can actually pull quite a bit of detail from most images. I also feel that Lightroom/ACR conversion just don’t have the same clean noise free look that Capture One can obtain. Lightroom tends to over emphasize the edges of subject matter and it can’t pull the same fine clean details out of shadows that the latest version of Capture One can. In these two screen shots shown below you can see how well the rock on the face of Mt. Whitney has been rendered, but also look at the trees growing on the lower slopes as these are not only well rendered, but very clean and noise free.
Capture One screen shot showing great details on rock face
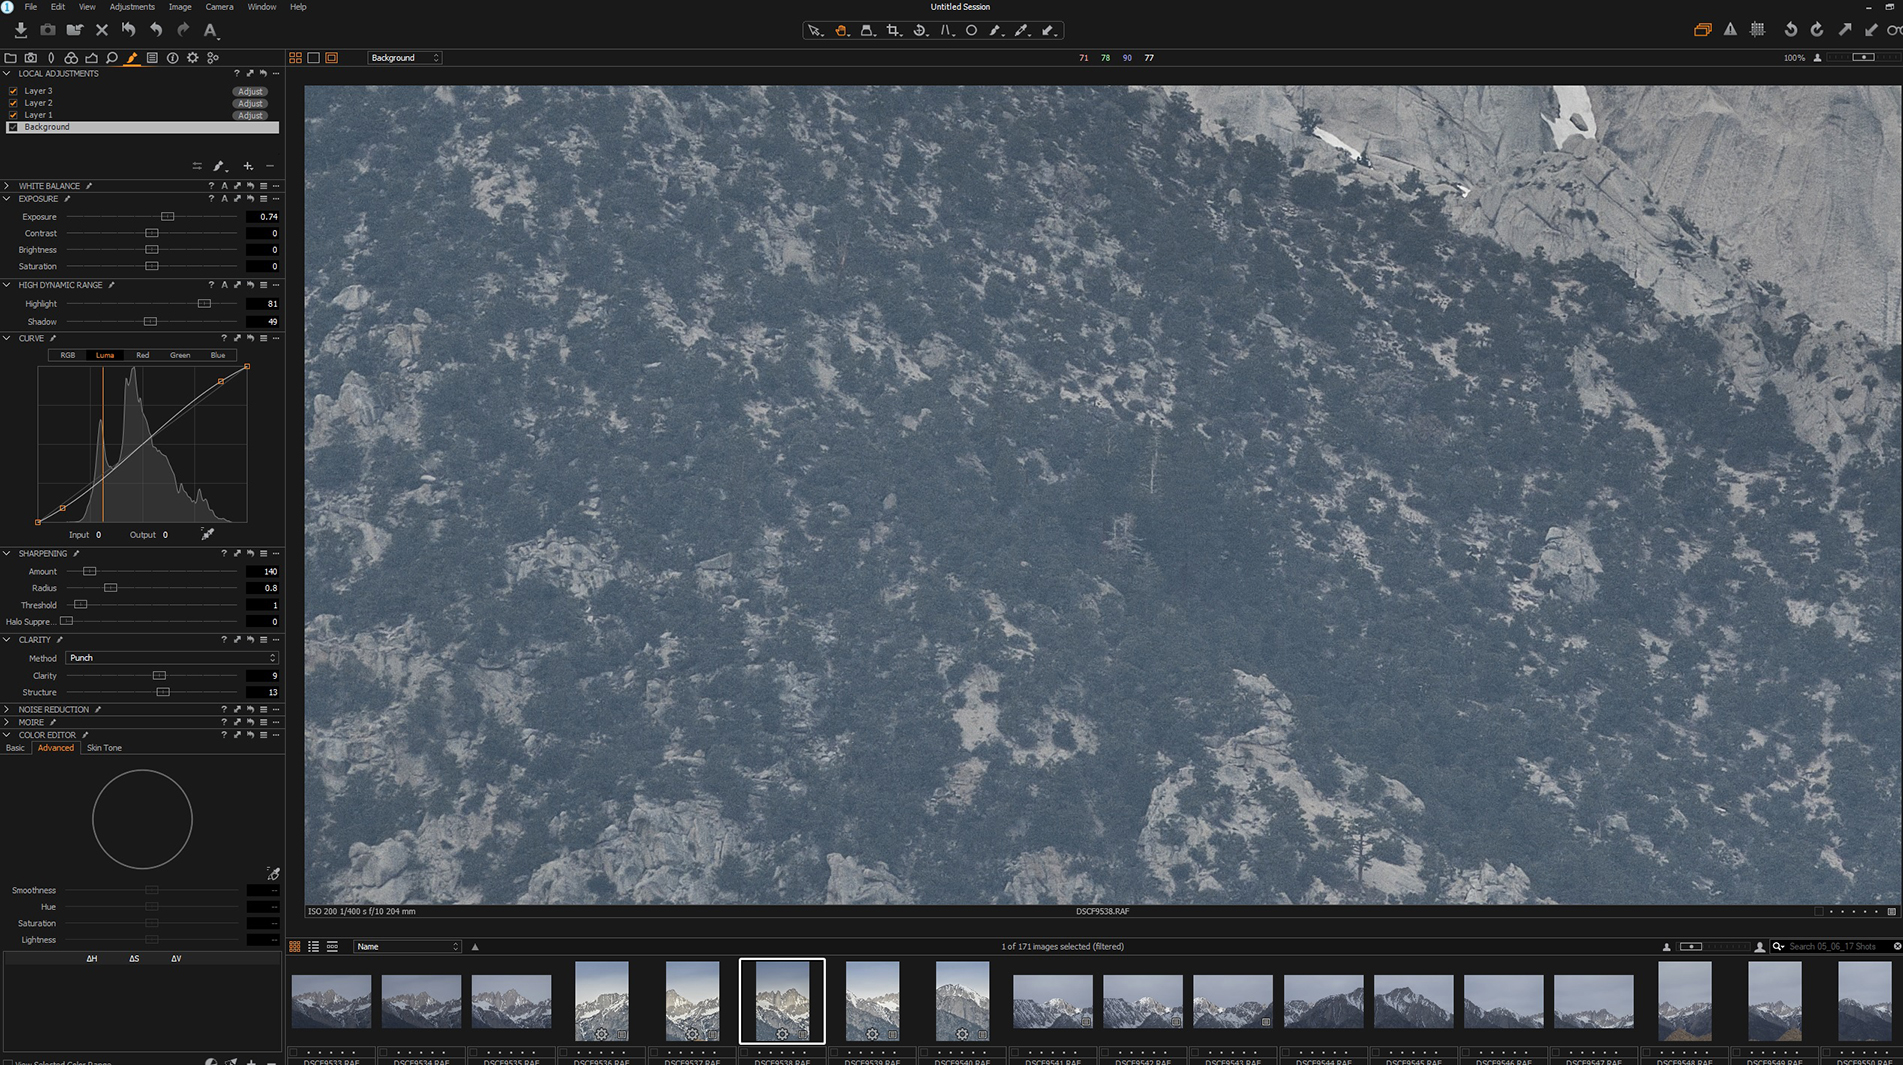
Capture One screen shot showing details in shadow areas
You will need to pay close attention to the 5 separate files and make sure that you have attempted to keep the white balance the same between all 5, and also your exposure. This can hurt you later on in the panorama stitching as if one image or part of an image is darker than the rest, the resulting final image will show a demarcation line at the edge and ruin the stitch. This is most common in a pure blue sky. In fact if I am only working with pure blue for sky, I will not attempt this in Capture One as you can almost never get a clean sky with out the darkening towards the edge. This type of panorama will just work better if you stitch from raw files in Lightroom.
For these 5 images I did do some slight image adjustment work and I did this using layers within Capture One. If my images are all close in exposure I will often work on just one and then copy the layer to the rest of the images. You will have to make some small changes to the masks. In this case the edges of the mountains, vs the sky, but this process is very easy to do in Capture One.
In the first layer I have worked on the foreground, pushing up the shadows, and attempting to pull up a bit more of details by adding some structure.
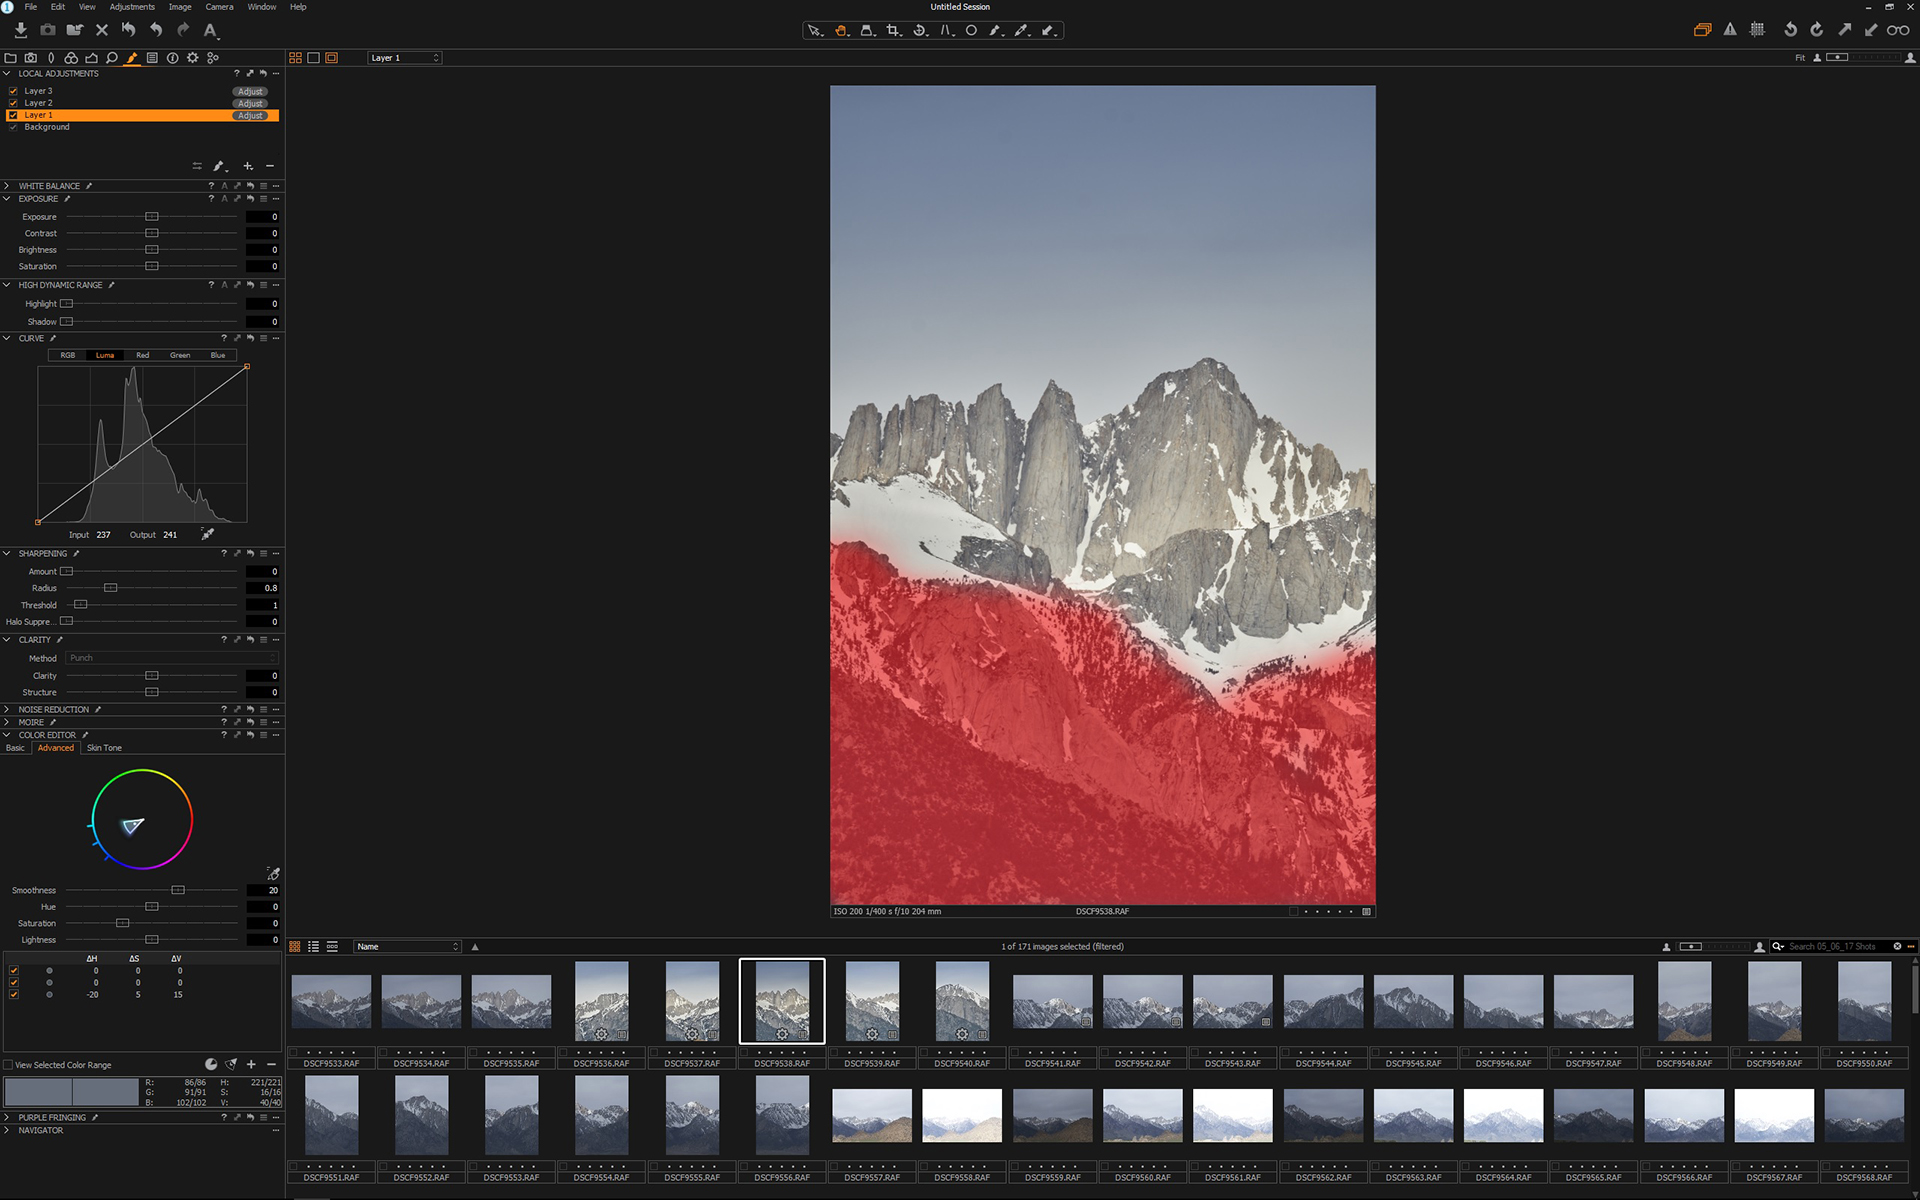
Capture One layer work for Fuji No 1
In the 2nd layer I worked the Gradient Mask to pull down the sky and worked a bit on the white balance of just the sky. Capture One has a superior White Balance tool to Lightroom as you can still use an eye dropper to sample just the white balance in the areas under the mask.
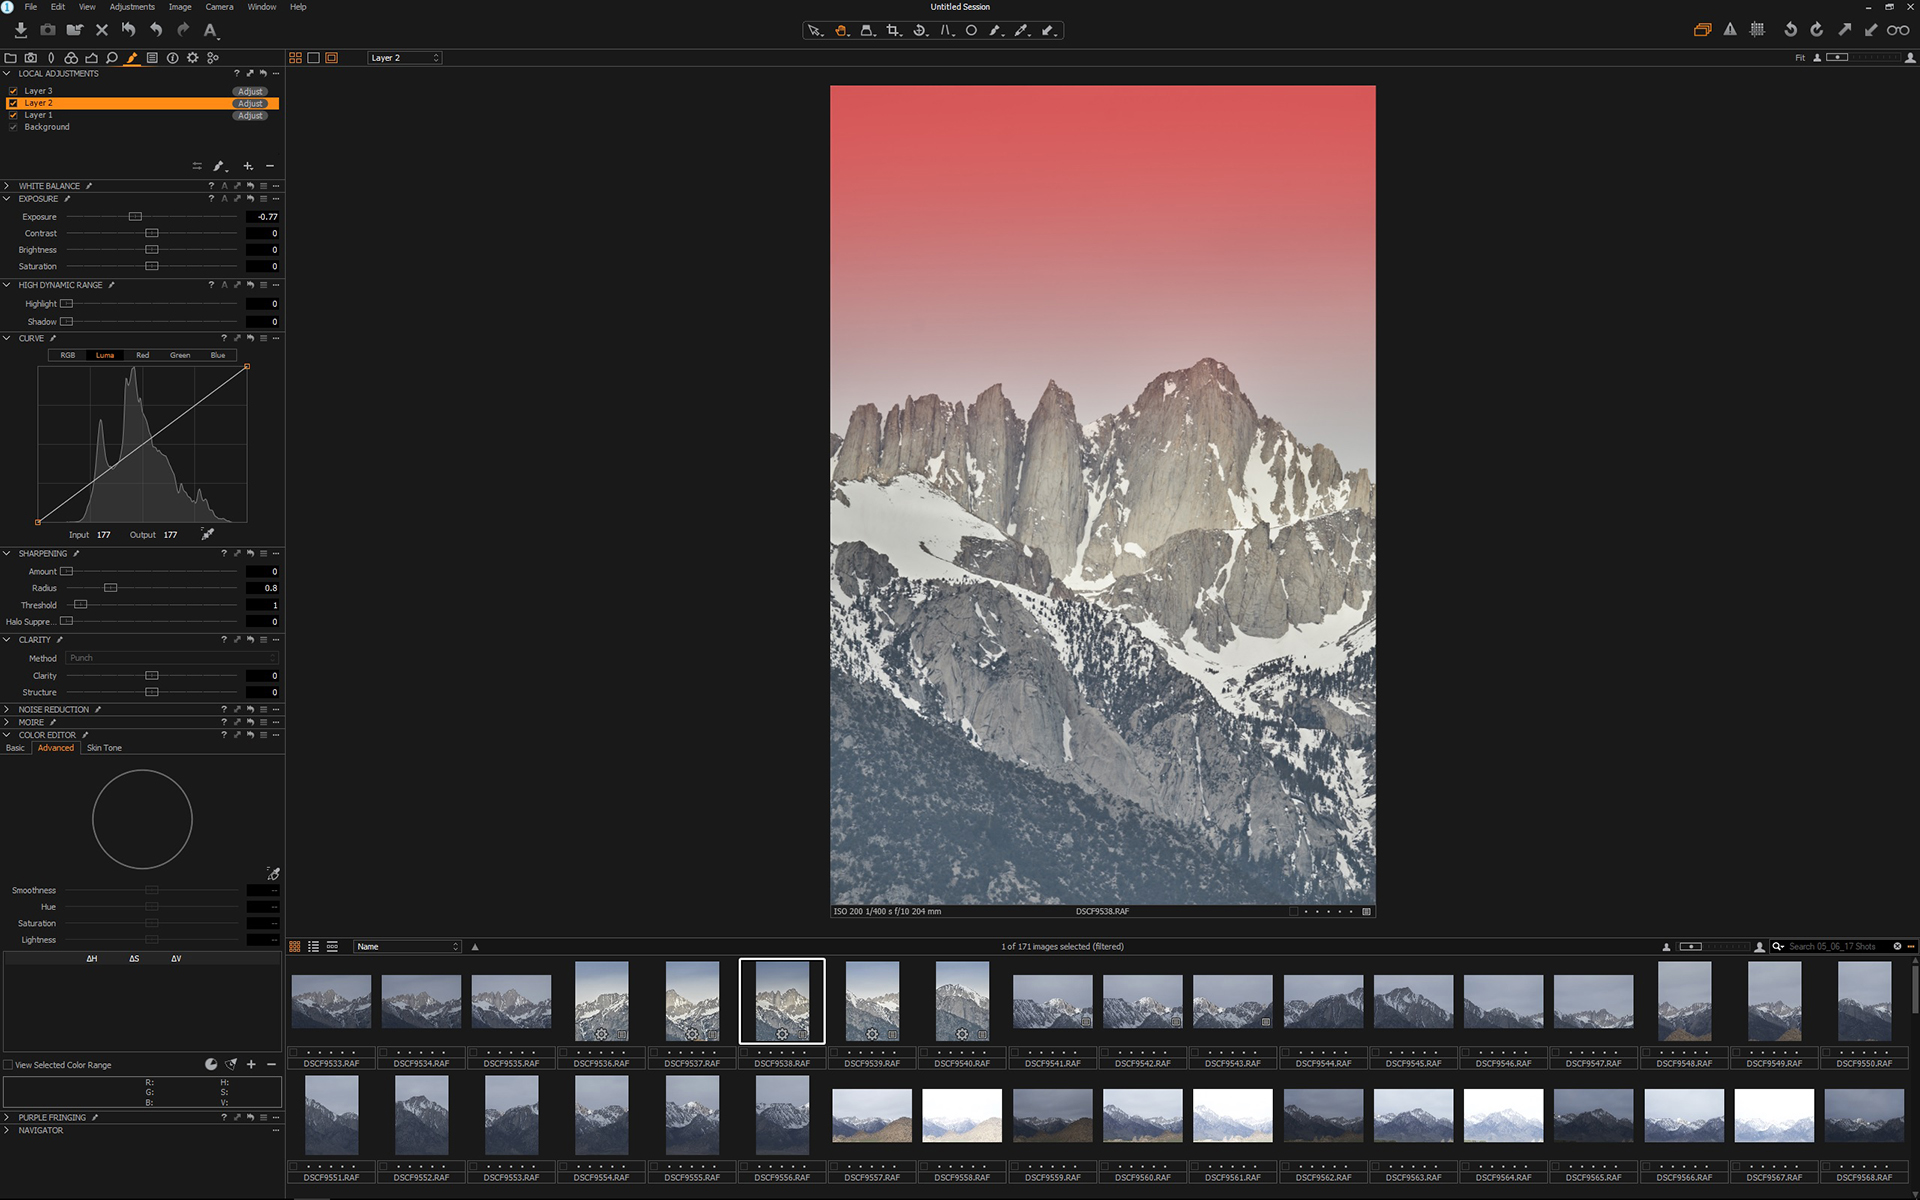
Capture One layer work Fuji No 2
Lastly I pulled down the areas of the brightest snow on the mountain as I knew as I worked up the panorama in Lightroom it would attempt to blow out the highlights, which is a huge issue with Lightroom panoramas that has existed from day one (remember Adobe has a “one and done” approach to everything).
Capture One layer for for Fuji No 3
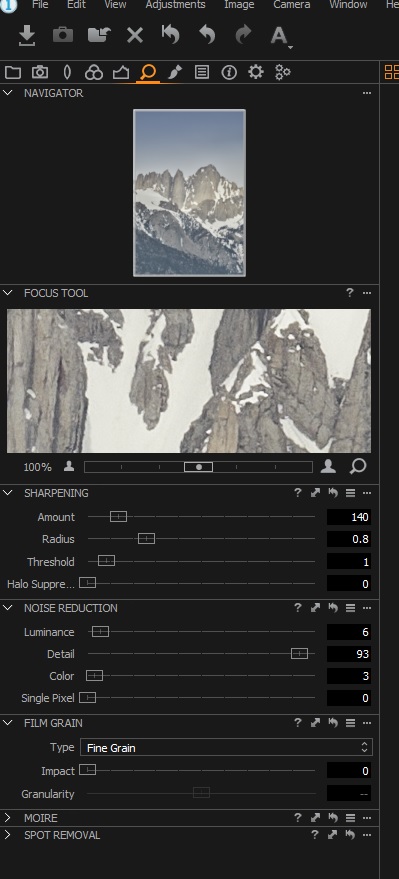
With the 5 images where I wanted them exposure and white balance wise, I then made universal changes to sharpening. Capture One now has a diffraction correction in it’s sharpening tool set and I always pick that. It’s under the Lens icon in the tools. You also need to go to the main sharpening tool (which looks like a magnifying glass) and change the default noise reduction. Move the Luminace and color noise all the way to the left and slide the details slider to the right to around 85 to 90 percent. This will make a huge difference on Fuji images. Note, if you are working in a ISO at 800 or higher, you will need to be less aggressive with this as Fuji gets pretty noisy past ISO 800 in most cases.
Examples of both of these:
-
- Diffraction settings
-
- Default sharpening settings
Now all you need to do is export the images. For this process you have two options.
- You can select to edit the images directly in Adobe CC Photoshop. With this method, C1 will export the image to CC and 16 bit tifs and each image will open independently in C1. You will need to save each image then use the Automate function to reopen the images into a panorama.
- You can export the images as 16 bit tifs and then import them to Lightroom. This what I do the most often. Lightroom has a good panorama merge tool that offers “boundary warp” which makes single row stitching very straight forward.
Once in Lightroom, the tiffs will be ready to made into a panorama using the Lightroom panorama merge tool.
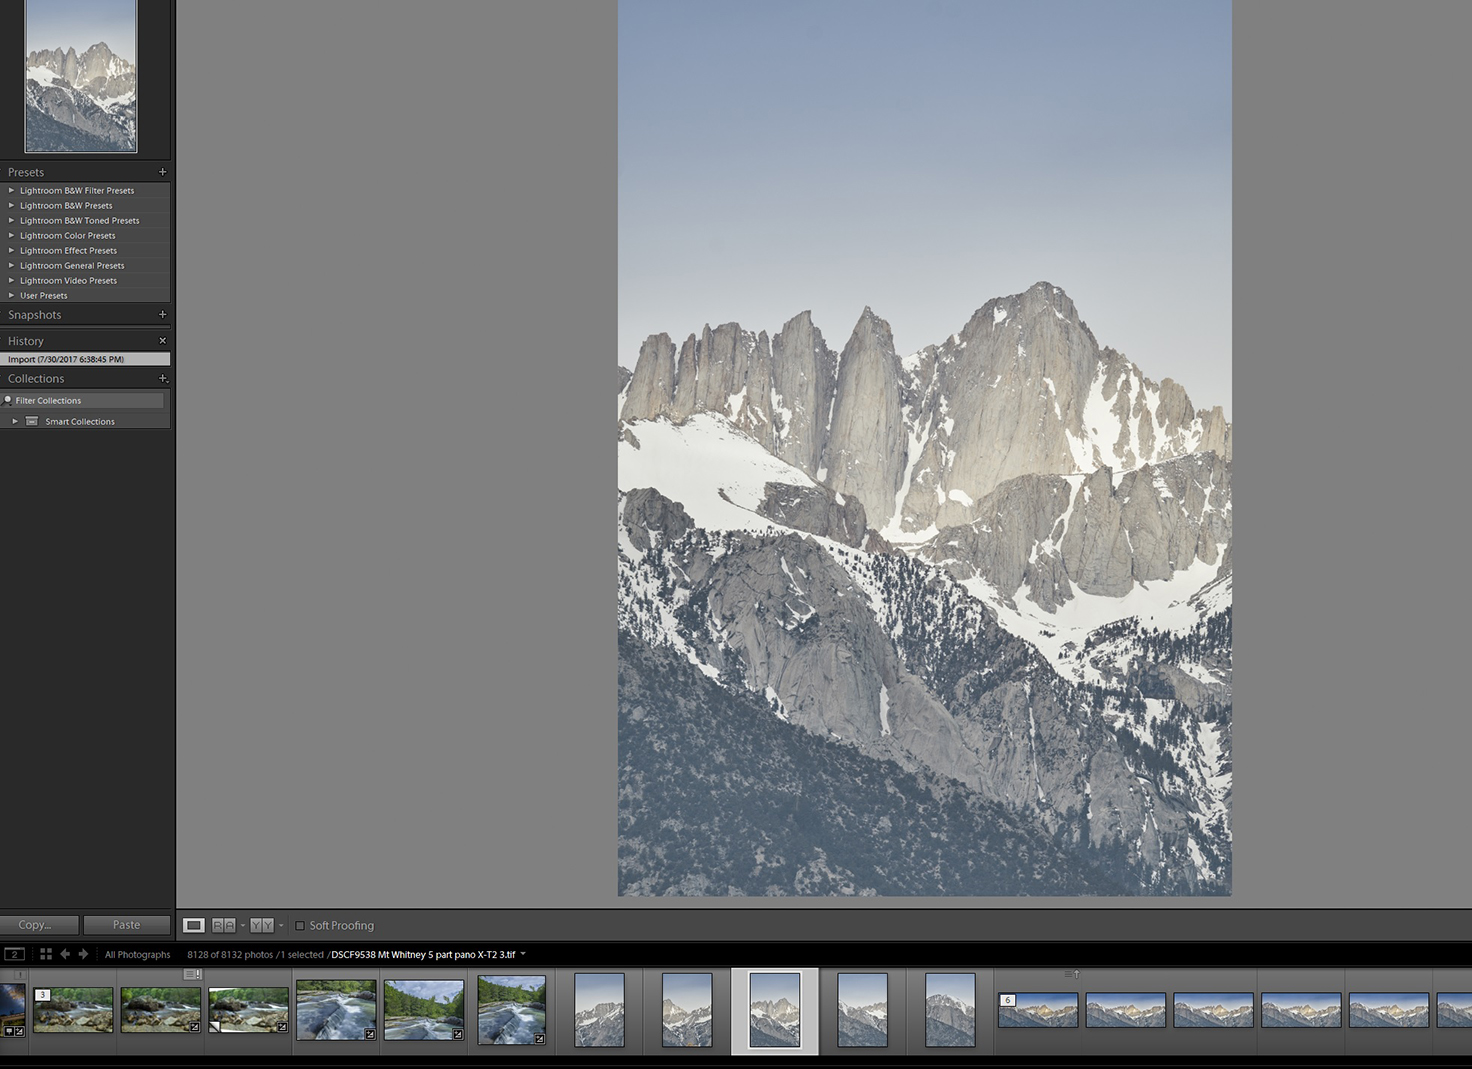
LR import main screen for a panorama merge
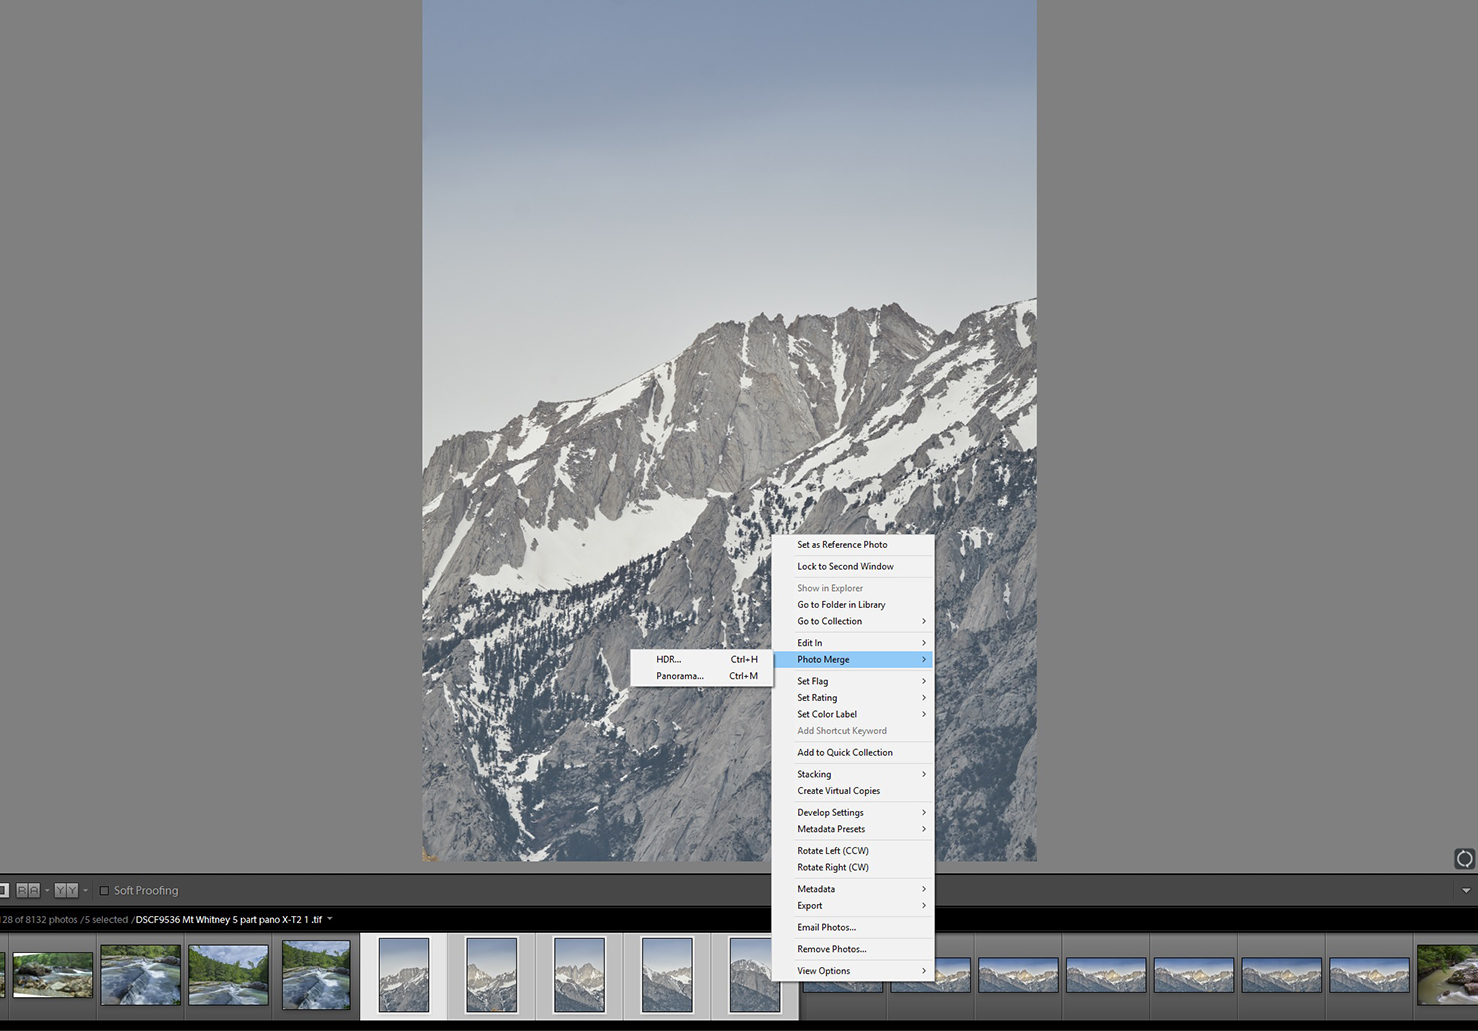
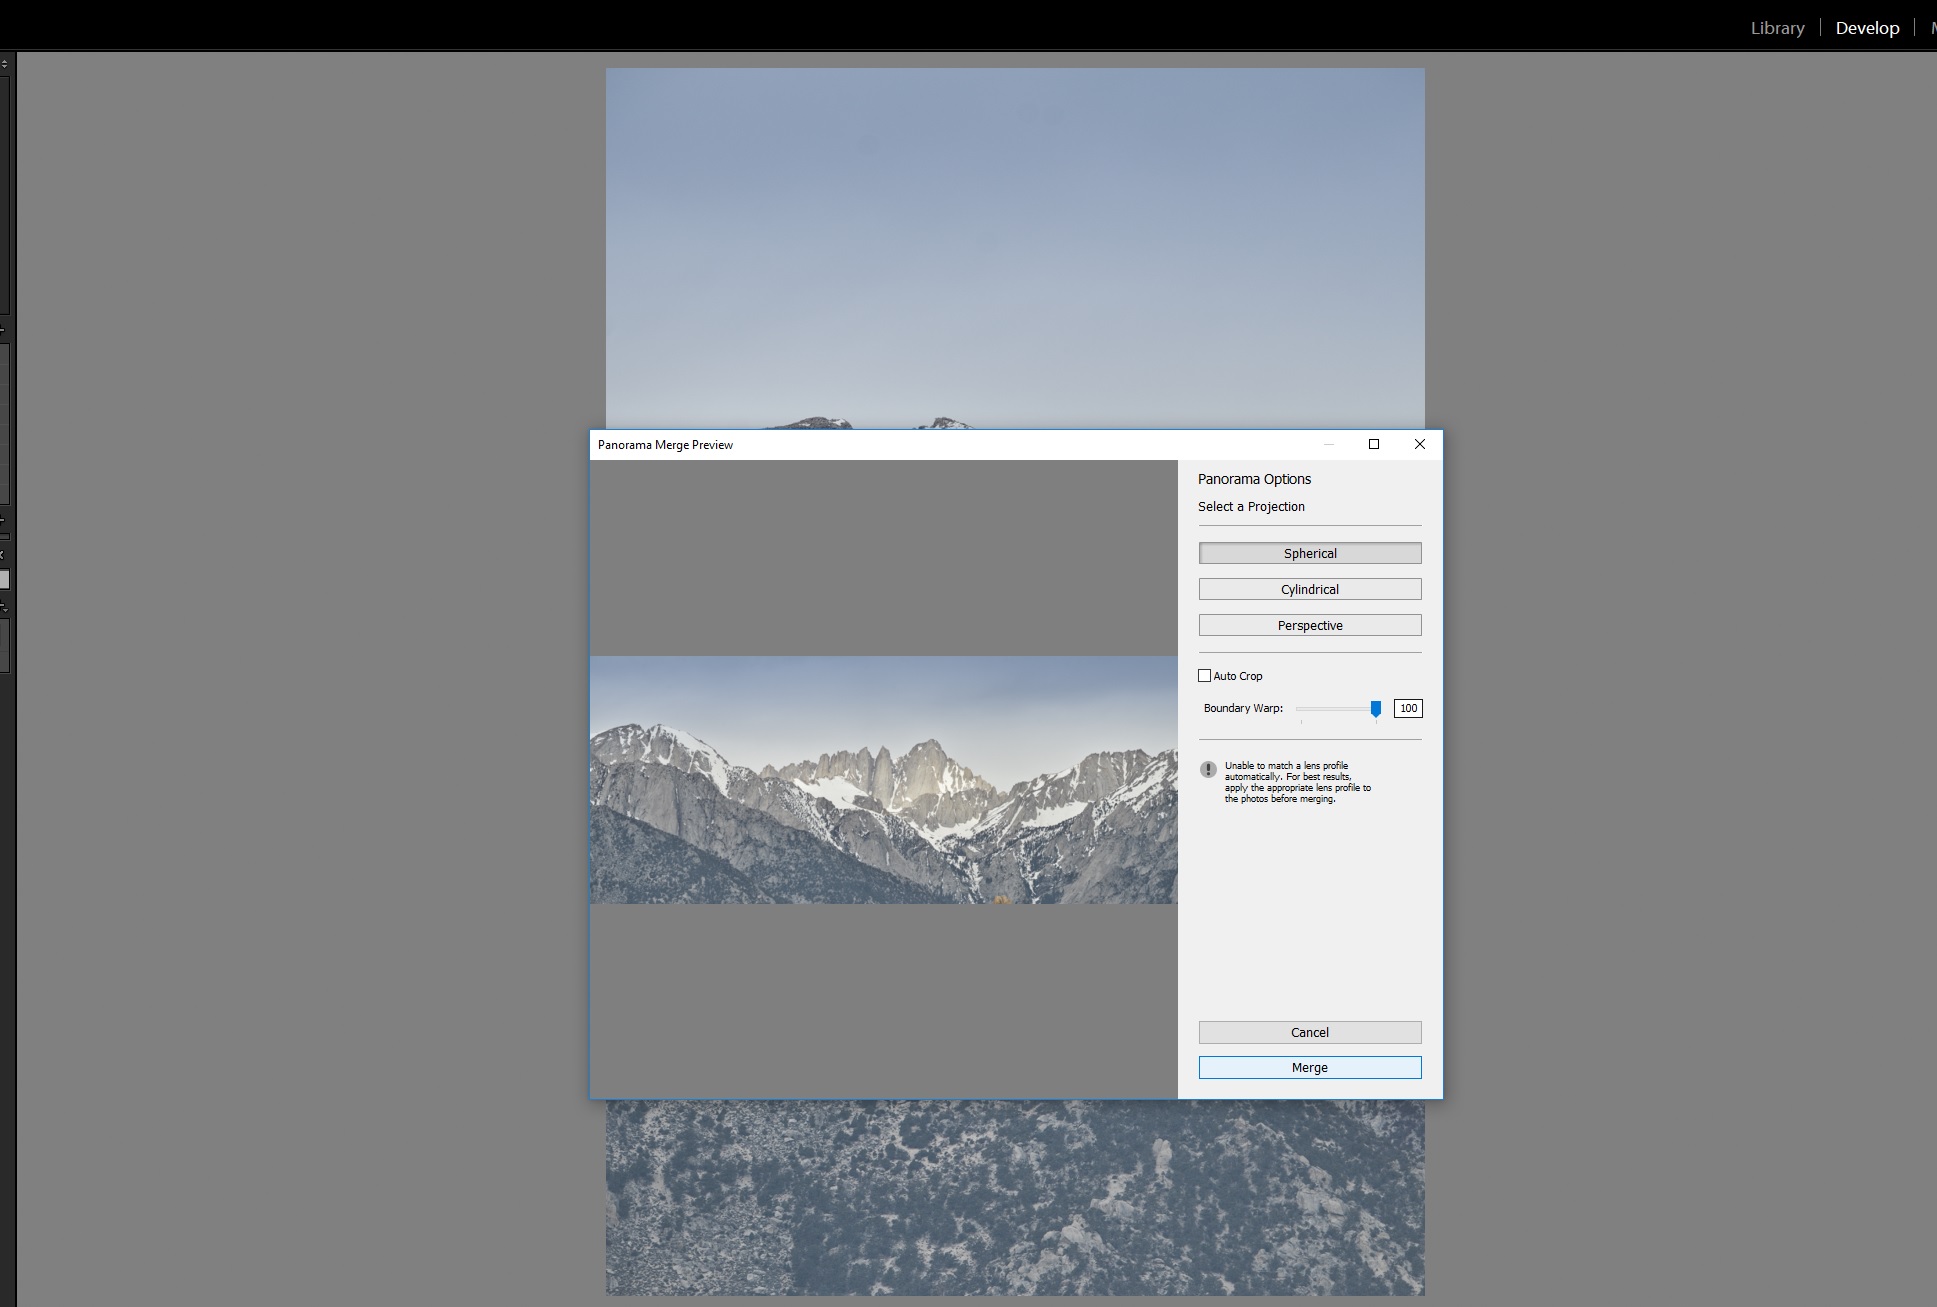
Now select the 5 images and then right click to get the menu drop down box and select photo merge, and in the sub drop down pick panorama.
LR panorama selection screen
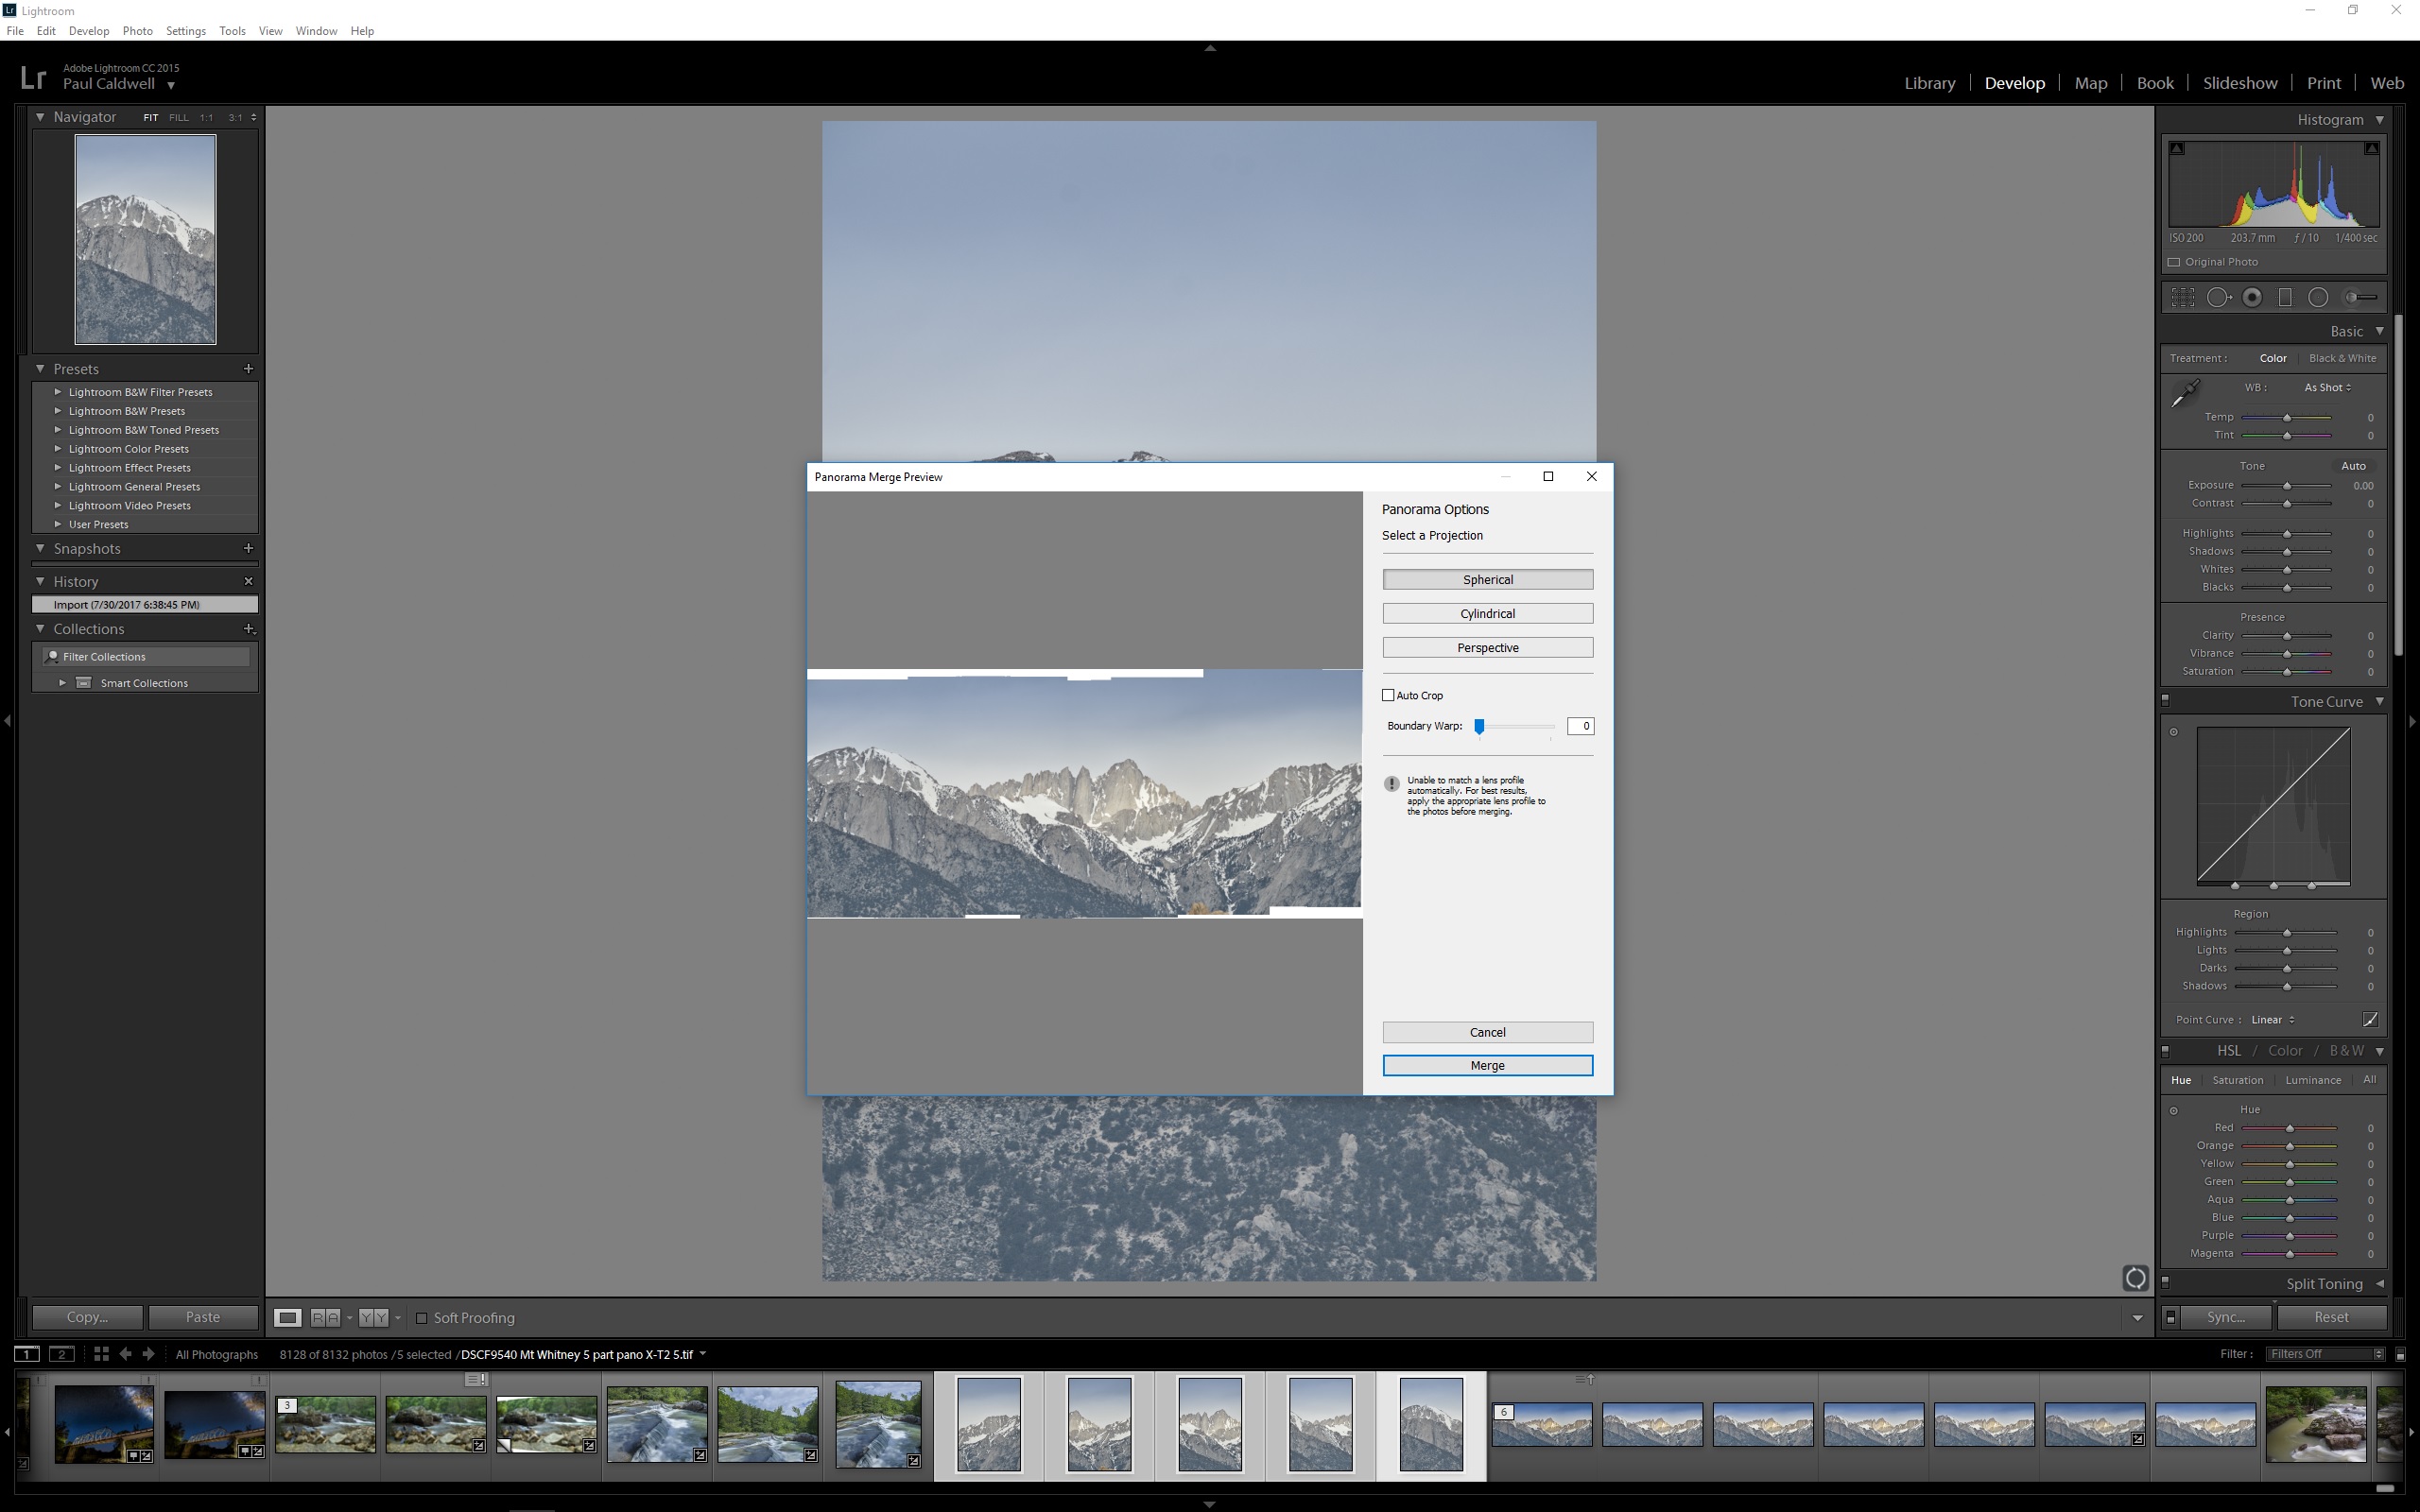
Once this is done Lightroom will bring up the panorama dialog box and I tend to just pick whatever Lightroom defaults to which for a hand held panorama most times will be spherical or cylindrical. Perspective will only work with the correct nodal point and the camera being level neither of which I was able to do in this case. Setting up a telephoto lens to it’s respective nodal point is not easy and being level meant using a tripod. As shown in the images below, Lightroom will pull the images together as best as it can. As long as the panorama is only a single row stitch, Lightroom will odds are do a good job, in fact I find it does a much better job at balancing out the exposures of the separate frames. Much better than the stand alone tools like Ptgui or Kolor Autopano. I only use this as a last resort if Lightroom or Adobe CC Photoshop cannot get a solution that works. Once you have the image put together by Lightroom, make sure to select boundary warp. This is the single great asset from Lightroom that really no other panorama stitching program offers (which has always surprised me).
-
- Lightroom stitching attempt before boudary warp
-
- Lightroom final stitching with boundary warp
Once you “merge” you will end up with a very nice 5 part panorama. In this case I have gained a huge amount of resolution over just taking this scene with one 24 megapixel frame from the X-T2. Instead of 24 megapixels, my overall resolution is approaching 100 megapixels. This allows me to have quite a bit more leeway with the final image, both from a printing and cropping standpoint.
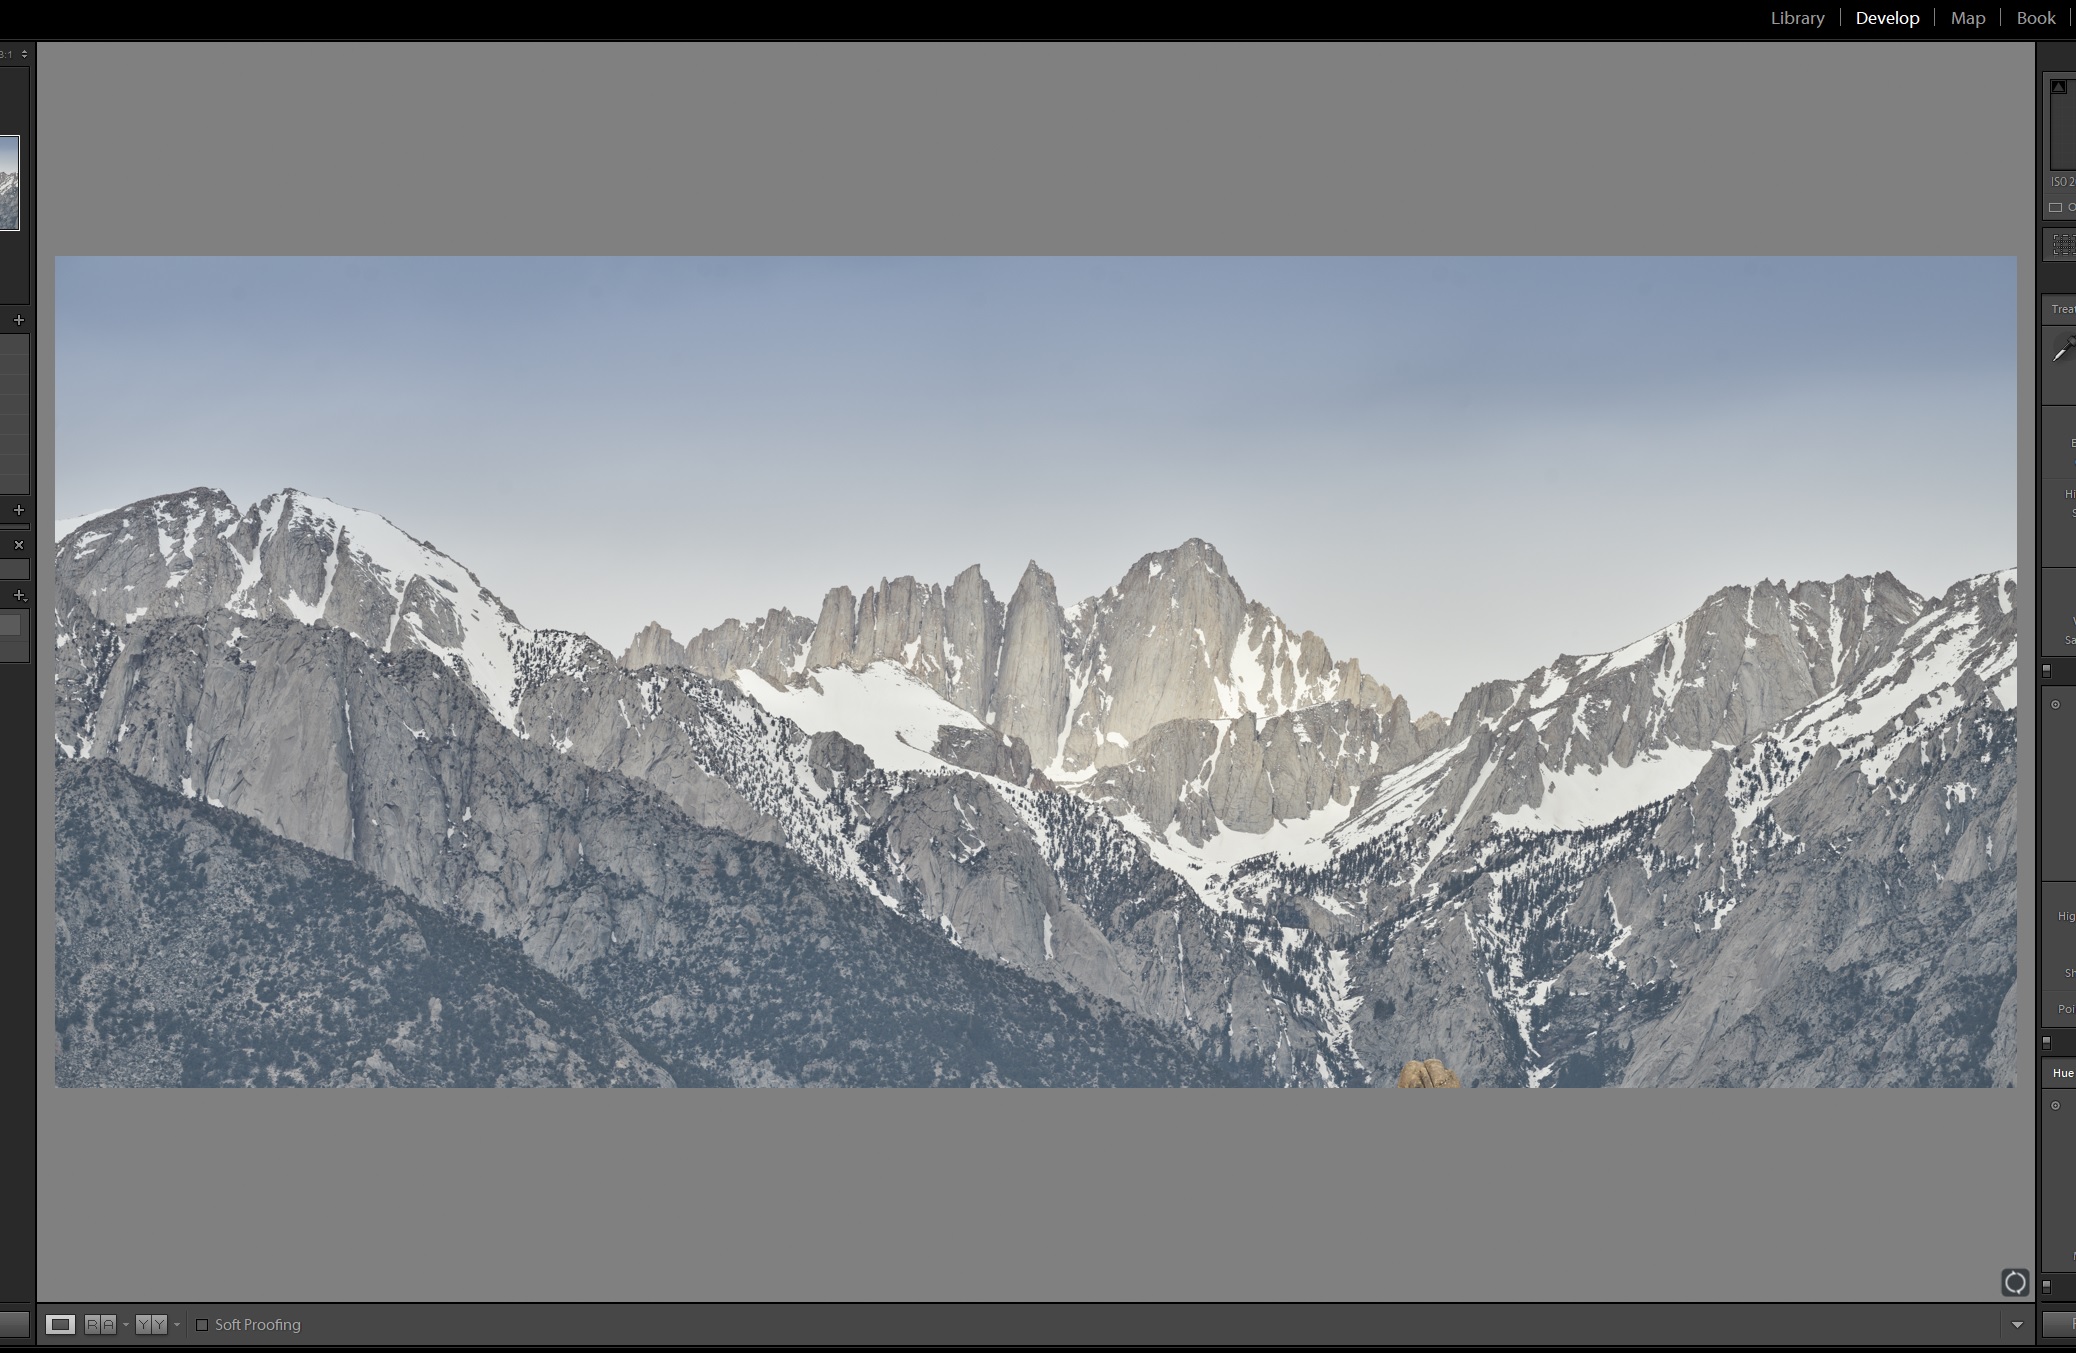
Final 5 part panorama from a Fuji X-T2
To get the final image, I did the following:
- I did a bit of image refinement with the image in Lightroom
- Then I selected the “edit in” option in Lightroom to take the image to Adobe Photoshop
- While Photoshop, I worked on the image with Topaz Clarity to help pull out the light on Mt. Whitney. my goal was to make the mountain stand out. I also did some curves corrections on the rock.
- Saving the image in Photoshop also places the image back in Lightroom where I then did a final White balance on the sky to get the color I wanted, less blue.
- My final step was to pull back the snow which had started to blow out and do the final sharpening on the image with Picurre Plus. Do this I had to go back to Photoshop.
This is great way to extend the resolution of any camera. There are times I can setup a large medium format camera and take the same image in one frame, but many times this not possible as I do not want to be carrying a huge Medium Format camera around all day. My age and older body just don’t allow for that anymore. Instead I often will prefer to take along my Fuji X-T2 with 5 lenses, 16mm 1.4, 23mm 1.4, 59mm 1.2, 10-24mm F4 and 100-400mm F4.5-5.6. All of these lenses render an excellent image with a lot of details. The 100-400 is especially sharp throughout the zoom range and is a joy to work with in the field.
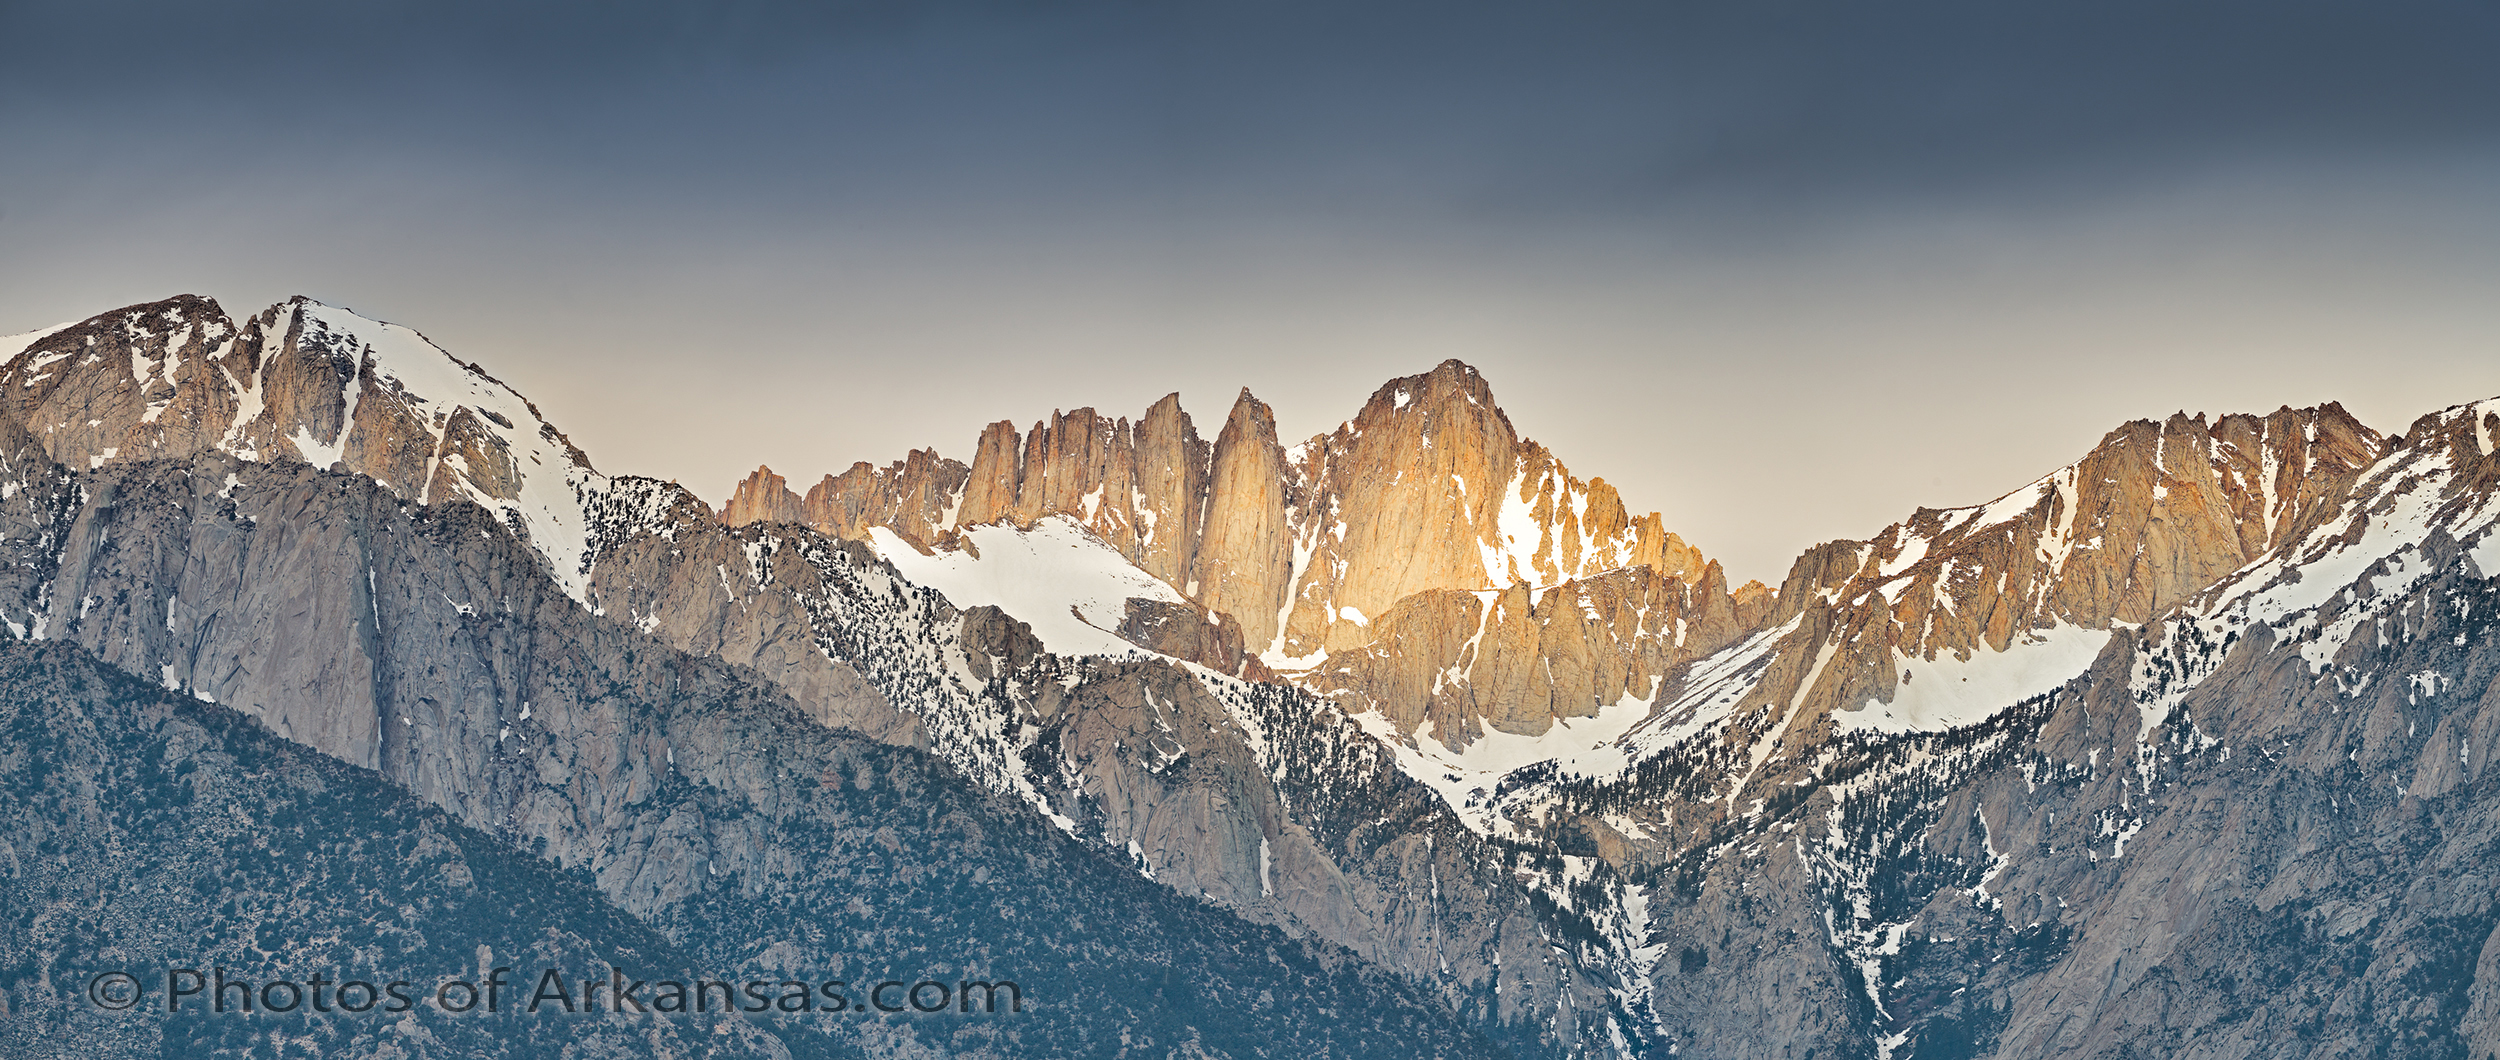
Sunlight on Mt. Whitney near Lone Pine California
Written for photosofarkansas, by Paul Caldwell 08/02/17.
06/25/17 Examples of Pixel Shift with motion correction between Adobe LR and Silkypix
- At June 27, 2017
- By paul
- In Articles/Reviews, Pentax Cameras
- 0
The Pentax K1, has gotten some good and bad press lately, but one review on Dpreview over a month ago really started a negative chain reaction. This review has since been corrected, but as with many things, first impressions tend to be the most important.
I wanted to attach 3 images, from a test I was working on yesterday. Good lighting, and a bit of wind. The wind was not consistent and tended to hit different parts of my scene with more or less force. What is so impressive to me is just how bad the LR conversion is vs the one from Silkypix. If all you have is LR or ACR for the K1, you really need to look to Silkypix for now. I have no faith that Adobe will attempt to revisit their current conversion for Pixel Shift on the K1, and I base this on the fact that Adobe never has fixed their less than stellar conversion for the Fuji X-trans files. The problems with that conversion have been known about now for over 2 years.
There are three images attached, the first two are Silkypix conversions on image 724 and a follow on image 725. The third image is LR’s conversion of the same file. The point being that if you are only using LR for Pixel shift raw conversions, you are more than likely missing a lot. The LR image is totally blurred and basically worthless, where as the exact same raw file from Silkypix is very good, in fact amazing, when compare the two conversions. The other Silkypix conversion is from the next shot, 725. I included this to show how the shadow area to the left of center improves considerably. Both conversions have a bit of trouble on the same part of the file in image 724, however more than likely the Silkypix conversion of 724 would hold up.
These conversions were done only for the effect to show the differences in blur recovery. By default I feel Silkypix has too much sharpening applied and a bit too my saturation. But a small price to pay for recovery of the image. You can also see in first two files that the part of the tree just to the left of center, in the shade, is still having trouble, even with Silkypix, as it’s blurred. However I took several test files and in the very next frame you can see much more detail in this same part of the image.
So for now, if you are using pixel shift or testing it, outdoors make sure you work with Silkypix Developer’s Studio. You can download the software for a 30 free trial and it’s not inexpensive at $295.00. It’s a issue to take into consideration if you are looking at the K1 as the extra cost of this software takes the K1 into the $2,100.00 range. Still a margin compared to other cameras in this class.
I would like to see Pentax step and address this software issue, by at least giving a coupon or discount towards the full Silkypix software, as their version which ships with the camera might as well just be left out of the box.
Paul Caldwell
Pentax K1 White Dot Issue on Longer Exposures–Same as the other cameras using the Sony 36MP chip
Example of Pentax k1 White Dot issue–Click on image to view in better detail
With the introduction of the full frame Pentax K1, Ricoh Imaging appears to have made a giant stride forwards with technology, however it appears that they overlooked one critical issue with the 36MP Sony sensor–White Dots with longer exposures.
I have worked with the K1 now for several months and have found it to be an excellent platform for most photography, however one of my main reasons for the investment in the K1 was astro-photography. Night sky work, not telescope work. Photography of both the MilkyWay and star trails. Both of these forms of photography require long exposures and in most cases multiple stacked exposures for the best results. What you quickly find, that when used in this fashion, the K1 creates thousands to millions of fine white dots, as shown in the photo above. These are not traditional noise, as we know it, as that tends show up as stuck pixel (red, green and blue) or extra grain in the shot. This exact same problem was visible in early shots taken with the Nikon D810, and Nikon quickly recalled all the early shipping D810’s and made some type of a firmware and hardware fix. It was not a standard firmware fix, as the camera had to be sent to a Nikon service center for the fix. But it worked!!. The D800e also had the same problem, but Nikon did not fix these with a recall, they just fixed the problem on later shipping cameras. I know this because I owned 2 D800e’s and the first camera had the issue terribly and the 2nd camera was clean. My D810 also showed the problem immediately but was much better after the Nikon fix.
Read more about the Nikon recall here–Nikon Recall for White Dots.
Read more about the Nikon D800e Problem here–Nikon D800e White Dots.
I have noticed this issue in all my long exposures with the K1, from 30 seconds to 2.5 minutes, at ISO ranges from 320 to 5000. The issue becomes worse over time so it’s fair to state that it’s a temperature related issue from the sensor, just like Nikon noted. How does this issue effect your photography? Read more below.
Photographer’s Notes:
- The main concern here is that the millions of white dots are not easily removed in post. Currently Adobe Lightroom does nothing to remove them and Phase One’s Capture One with the single pixel noise reduction slider will take most of them out, albeit at a possible loss of details.
- Where will you see this issue? With any long exposure of 30 seconds or more and if the outdoor temperature is above 85 degrees F, expect the problem to be very severe.
- Will you see this issue with Astrotracer photography? Yes, with the Astrotracer feature of the camera enabled, you will see the white dots unless you turn on the “Long exposure noise reduction” feature in the camera
- OK, if I can remove them with the “Long Exposure Noise Reduction” what is the big deal” Good question and I will answer this in more details later on, but the main reason is that LENR (long exposure noise reduction) requires the camera to take another exposure the same length as the previous exposure so you are wasting battery life, shooting time, and heating the sensor up.
- Why do the White dots bother Stacking work? The white dots remain fixed throughout the exposures, however over time expect to gain a few thousands more. If you are stacking and want to remove gaps created by stacking, the white dots become very problematic.
Read more about why stacking for star trails is important here: Stacking for better night photography.
Why the White Dots are a concern for Night Photography:
There are many reason, but for sure 2 come to mind immediately.
If you stack for star trails. This allows you to use partial moonlight to illuminate the foreground of your subject which gives you a much more natural look to your image. Stacking requires a intervalometer to be used as you need to have a timer and control over the interval, which in this case is 1. The fact that the intervalometer will close the shutter between each stack, means you will have a slight gap in your star trails. This is easily fixed with the use of software that will slightly rotate your final image to cover up the gaps. Examples of this type of software are “Star Tracer” If you rotate the images with the white dots, they become dotted lines though out the entire file and contrast sharply with you star trails, in effect ruining the image. There is no easy way to remove all the millions of dotted lines either.
So this says you have to work up the images in a raw converter that will removed the dots to a good degree and so far the only software I have found that will do this is Capture One, by Phase One. You are eliminated from any Adobe product like ACR or Lightroom as both just seem to magnify the dots. Also any image work, where you might add clarity to help brighten the stars will also brighten the white dots.
If you use the Pentax LENR (long exposure noise reduction) most of the white dots are taken out, but this brings up some more issues.
The LENR takes an exposure that is just as long as the original, so if you just complete a 2 minute exposure, the camera will lock up while it takes a 2nd matching dark frame. You cannot make any other adjustments to the camera or view anything during this time frame. The resulting dark frame create a much larger gap in your star trails photography, and Star Tracer can remove them, but at a huge price since your image will heavily blurred by the rotation to fix this large a gap. Sure you cut back on the time from 2 minutes to 30 seconds, but then you more than likely will have to increase your ISO to a point that the increase in will degrade your details in the foreground portion of your image. But that still may be something I try with the K1 and Star Tracer to see if I can get an acceptable solution.
LENR is also very wasteful. Thing about it, you are just using up both battery life and possibly heating up your sensor due to extra processing going on. The use of LENR, also precludes using a intervalometer as it will throw off your sequence. If you are set to shoot at an interval of 1 for 2 minutes etc. then when the dark frame kicks in it will start to run into your actual next exposure time, and shorten it. This also adds up over time and creates unbalanced exposures.
If you are using Pentax Astrotracer for night shots of the Milky Way, odds are you should go ahead and enable LENR, as the max time you are going to kept out of the camera is 5 minutes and the difference in the images is most impressive. This also precludes you using Pixel shift for night work something I was curious about since pixel shift seems to give better results at higher ISOs with the K1. But if you are working traditional star trails, then LENR is not a great idea and thus you have to consider using Capture One for your raw. Make another note, do not capture as jpg as even Capture One won’t remove the white dots from jpgs, they are fixed forever in the image.
Here is an example from the same crop shown at the top of this article that was worked in Capture One. Click on the file to view at 100% and you can see that Phase One has done a very good job here on the raw conversion for the K1, as most the white dots are removed.
Example of the Capture One and white dot removal
08/16/16 Capture One “Error when processing a file” in Windows
If you use Capture One for raw processing, over the years Phase One has continued to bring new useful enhancements to this particular software. If you own and use any Phase One digital back you will most likely use Capture One for the vast majority of processing. As these new features roll out, it seems that Phase One is not able to keep up with basic and simple errors. Errors that are not catastrophic but errors that still take a lot to time away from processing out files. If you work with Capture One in either Win7, Win8 or Win10, you may have received this type of error during an attempt to process a file: Click on image to view it larger.
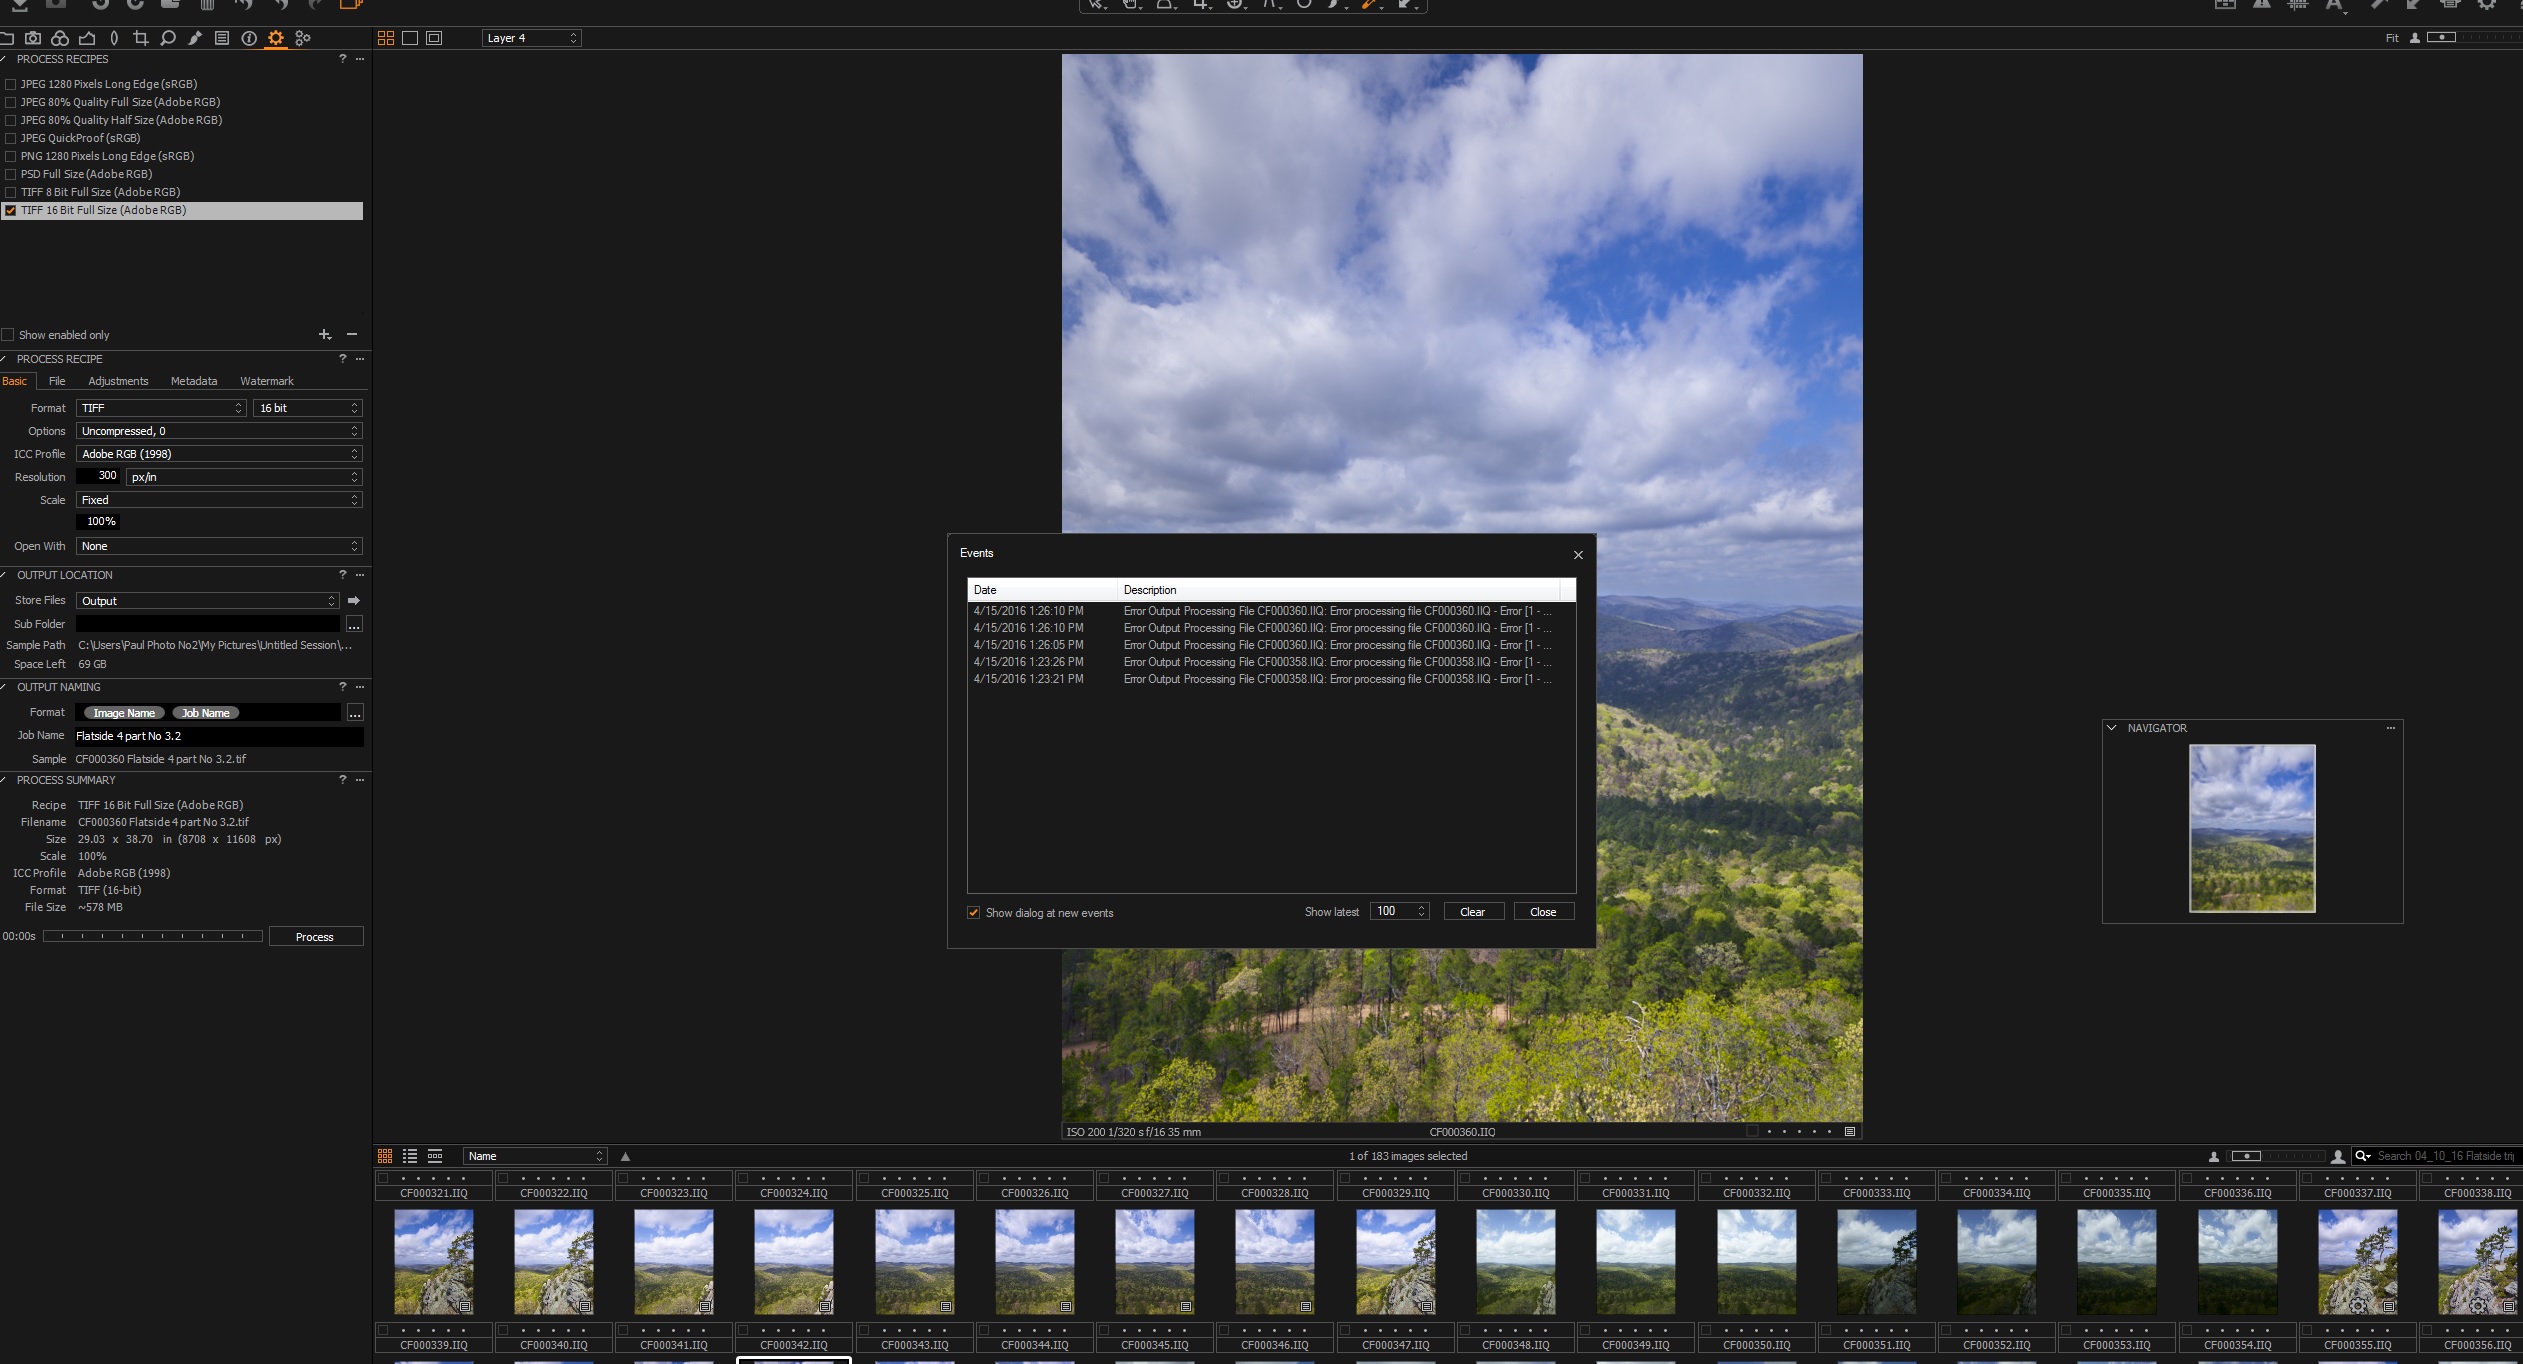
Error screen from Capture One while processing a file.
This problem has something to do with how Capture One hands off processing to Open CL and nvidia cards. The error occurs like playing Russian Roulette, as you never know exactly when it will start to show up. Sometimes I will get it on the first image I process, others times after 5 or or 10 images have been processed. However once the error occurs, then you can expect to continue over an over and until you close C1 and reopen it. Each time you get the error, you have to click to close the error box and then attempt to reprocess out the image. Sometimes you can get the image to go ahead on the next attempt other times you may get this error 5, 10, 15, 20 times. It’s as if the particular file has been marked by C1. Here are some typical questions and answers.
- If you are a batch processing person, then this error is even worse, as odds are out of 20 files 3 may not process, so you have to manually go back and edit your processing to see which files did not run. This takes even more time. So for me batch is out.
- When did this error show up? It appeared with C1 Vr 9 and has continued through all new releases.
- Did I attempt to open a case with Phase One? Yes I opened a case, and Phase One’s answer was the usual “remove all instances of C1 on your PC and reinstall it based on our posted instructions”.
- Did that fix the problem? NO
- Have I opened a case via a dealer? Yes,
- Did that help? Yes, Phase One came back to me with a script to totally disable Open CL on my PC
- Is that a good solution? No as Capture One is very dependent on Open CL for both zooming to 100%, drawing masks, and working with local adjustments.
- Does this happen with any camera file or only a Phase raw file? Yes it happens, on Nikon, Sony, Fuji, Canon and Phase One
- Do you have this occur on only 1 PC or multiples? Yes ever PC I own (6) will get this error with C1 Vr 9, Pro or Data Back release
- If you run the script does the error go away? Yes
- Is your Nvidia card current on all of it’s various drivers? Yes
- Are you the only person getting this error? NO, I have reported on the Luminous Landscape forums and have received plenty of responses that other photographers running windows are also getting this error
- Has anyone on the Luminous Landscape forum from Phase One attempted to help? NO
- Is this a big issue that disrupts workflow? YES last night alone to process only 3 IQ100 files, it took me 5 different attempts
Surprisingly Phase One does not seem to notice this issue when they test on their side, personally I don’t buy that. Phase One’s first answer was that I was running a Nvidia GTX960 card which is not on the list of supported video cards by Capture One. Everyone one knows that is total BS, but you have to make the change. So I did, and purchased a GTX970 card, did the error go away or decrease in frequency? No. Did I expect that it would? No.
Here is link to the Luminous Landscape post that has more details.
I can only assume that this is a timing issue between C1 and the Nvidia card and that if for some millisecond there is a hiccup in communication. I even took the steps to removed all instances of any older Nvidia drivers from my PC, which is an time consuming process but the error still continues. All of my desktop PC’s run Nvidia cards, GTX970’s but the MacPro 15″ (under bootcamp and win10) is using an Intel graphics card and I believe the Surface Pro 3 and 2 both use Intel graphic cards also. All of these machine get the error at sometime. The desktop PC’s are either a 3.4Ghz i7 or a 4.0Ghz i7 on Asus boards.
This is not the first time that Capture One developed a troublesome issue with windows as for most of the time Capture One Vr 8 was out there was a terrible error where if you minimized C1 to the taskbar then attempted to reopen it, C1 froze and had to be forced closed. Sometimes this error created a need to have the PC rebooted.
My experience with C1 goes way to back to the 3.7.x versions and I have used it continuously since. There are many processing features in Capture One that are essential to my workflow so for now, I will just keep on closing the error out and trying again, but it would nice for Phase One to figure out this issue and I do hope that it does not transfer to Capture One 10, which I assume is coming soon.
Photographer Notes:
I am a working photographer, mainly working with landscape imaging. Capture One is my go to raw converter for all Phase One raw files (P45, IQ160, IQ260, IQ280, IQ180 IQ150 and IQ100) along with Fuji and Nikon raw files. I have just started working with the Pentax K1 and have found that Capture One has an excellent profile for this camera, however Capture One does not support the pixel shift format from the K1, but that is another topic.
This error can become very disruptive at times especially if you are attempting to process out more than 10 files at a time as more than likely of the 10 3 will error out. It also eliminates the use of the batch processing feature for larger jobs since the time it takes to reconcile the batch takes too long.
It is my hope that Phase One will address this in a future release however my feelings are until more photographers raise up the issue Phase One will not focus on it.
Phase One/Capture One is a much more Mac centric program and the development always seems to fall first to the Mac side of the software and eventually to the Windows side even thought worldwide the number of Windows licenses vastly outnumbers Mac
08/15/16 A close look at the Dynamic Range of the Phase One IQ100
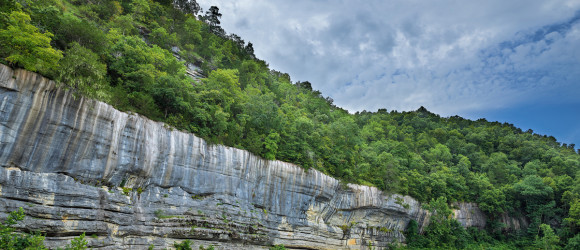
I have been using the IQ100 now for several months, and have noticed that there are some interesting facets to the dynamic range of this digital back. Lets take a more detailed look at this particular image taken on the Buffalo River, in Arkansas
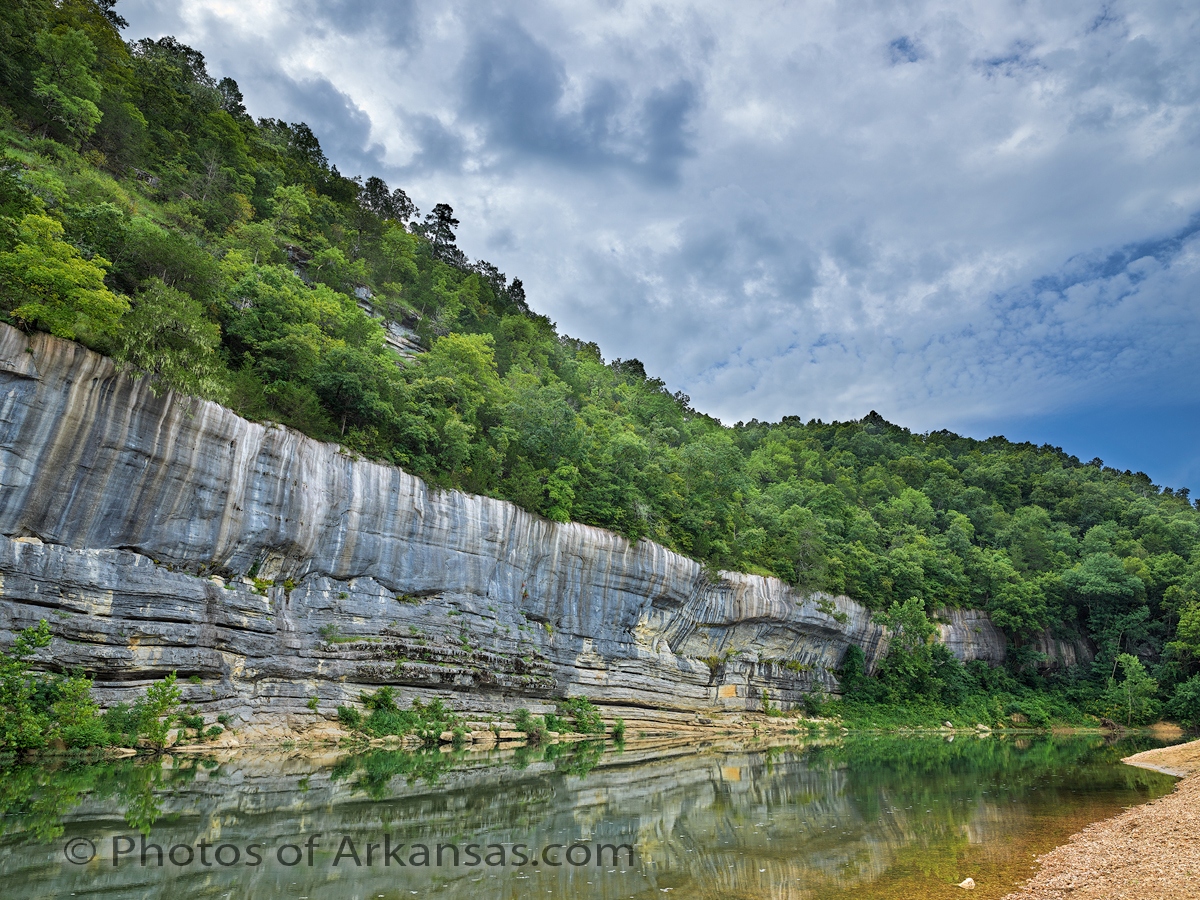
The Buffalo River at Buffalo Point in early August with a morning storm rolling in.
The IQ100 is of course the first 100MP digital camera ever marketed, was introduced in January of 2016 by Phase One, and so far has had a very good reception. I was very interested in the previous IQ250, 50MP digital back, however it has a 1:3 crop factor, which for my work, (example this image) would have been too much to sacrifice. I use wide angle lenses in most of work unless I am stitching and the 30 percent loss in focal view was too much for me. But I easily saw with the IQ250 the massive advantages that CMOS had over the traditional CCD Phase One backs. This showed up for me in two main areas, noise and dynamic range. These both have many definitions but for me it’s simple:
Noise, how much noise will I see in areas of shadow, at base ISO and at higher ISO. If I push an image, how much detail is lost to noise in the shadows. With a CCD back, there was never too much room here even at base ISO of 50
Dynamic Range, with one single exposure, what can I capture? If I adjust for highlights, will my shadows be filled with too much noise or vise versa. Also how well does my color saturation hold up at higher ISO ranges. With CCD digital backs, the color saturation fell off very quickly once past the base ISO. You might be able to get one more stop before the saturation was lost.
Moving to the IQ100 from the IQ260 I was hoping to see similar if not greater dynamic range at base ISO to the Nikon D810. I still regard the Nikon D810 as the flagship for dynamic range at base ISO of 64. With the Nikon D810 it’s easy to push a single exposure as much as 2.5 stops and still have wonderful details in the areas of shadow. Phase One (P1) rates the IQ100 at a base ISO of 50 so I was hoping to be able to get at least 2 stops of details when shooting at ISO 50. So on my first couple of outings with the IQ100, I mainly used ISO50 and planned to push the shots when necessary. I quickly found out that this the chip in the IQ100 (made by Sony) behaves differently that the 36MP chip in the D810 (also by Sony).
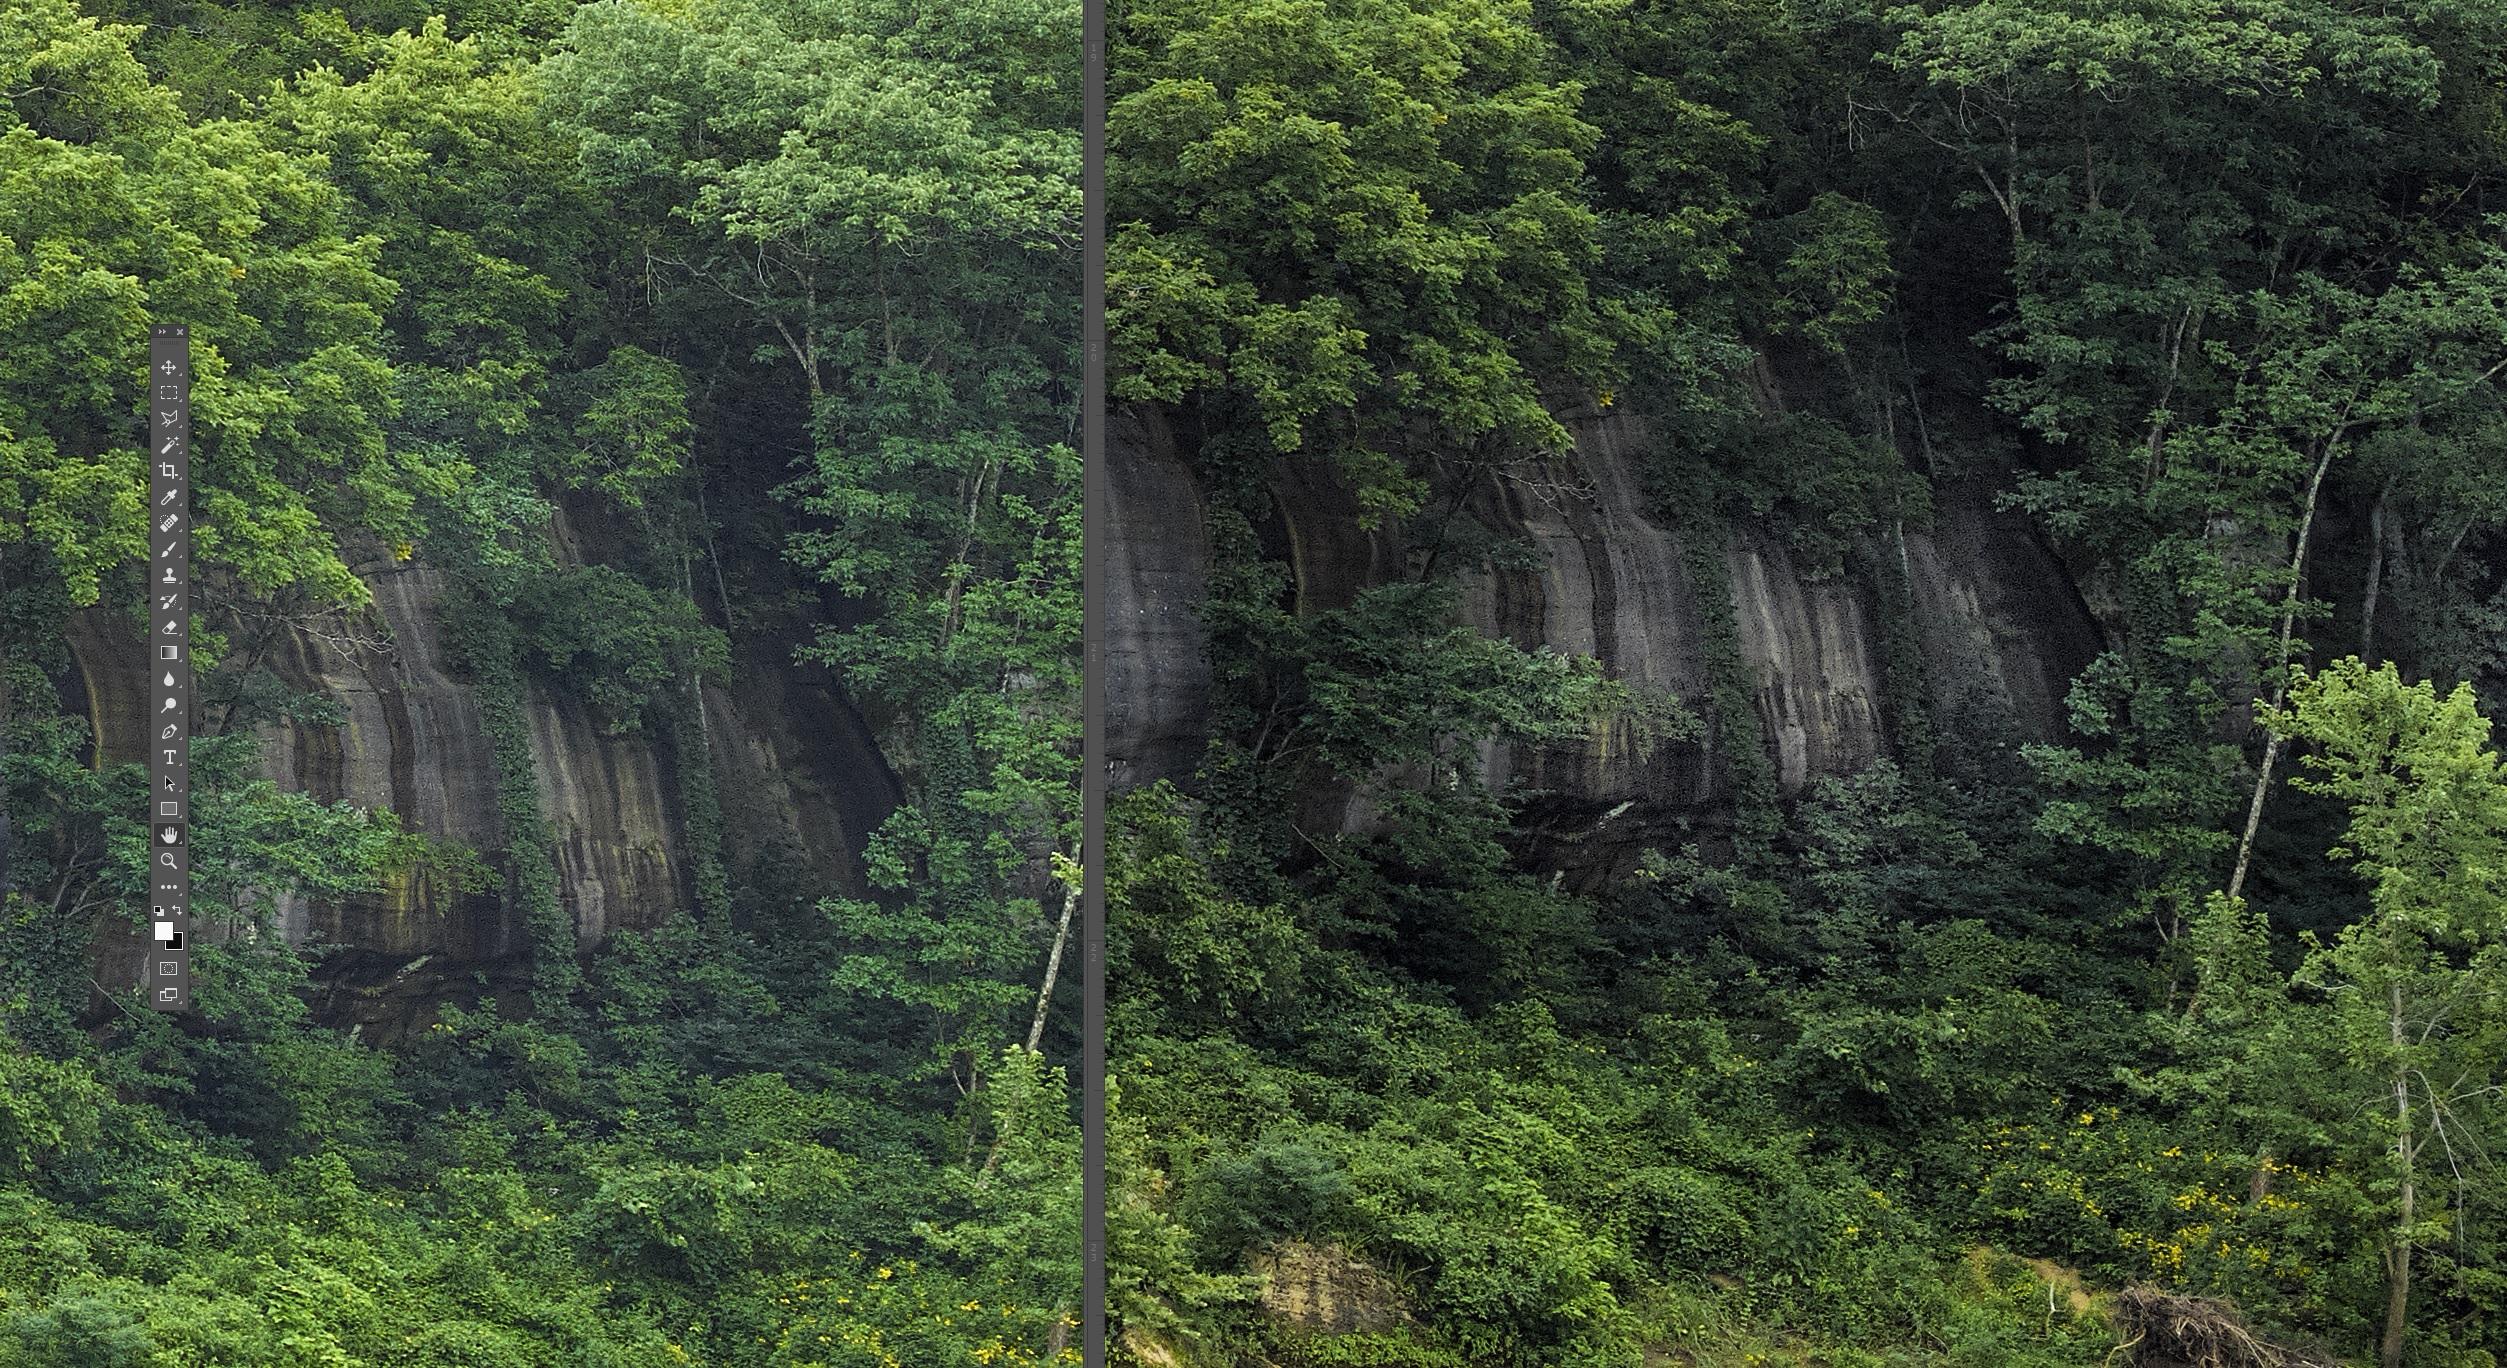
In working at base ISO 50, it became apparent to me that a shadow push of even 1 stop may be enough to cause you to lose details in the shadows, and also a huge amount of color saturation. This was a surprise to me as I had expected to get even better push than what I was seeing with the D810. However it was also soon apparent that the IQ100 has quite a bit of leeway with highlights, much more so than any of the CCD backs I have used from Phase One in the past. You can easily let your highlights go past 1 to 1.5 stops and still regain the finer whites. If you combine the “highlights” slider in Capture One, along the exposure slider, there is a lot of recovery. Looking at the example below: Click on the image to view it larger
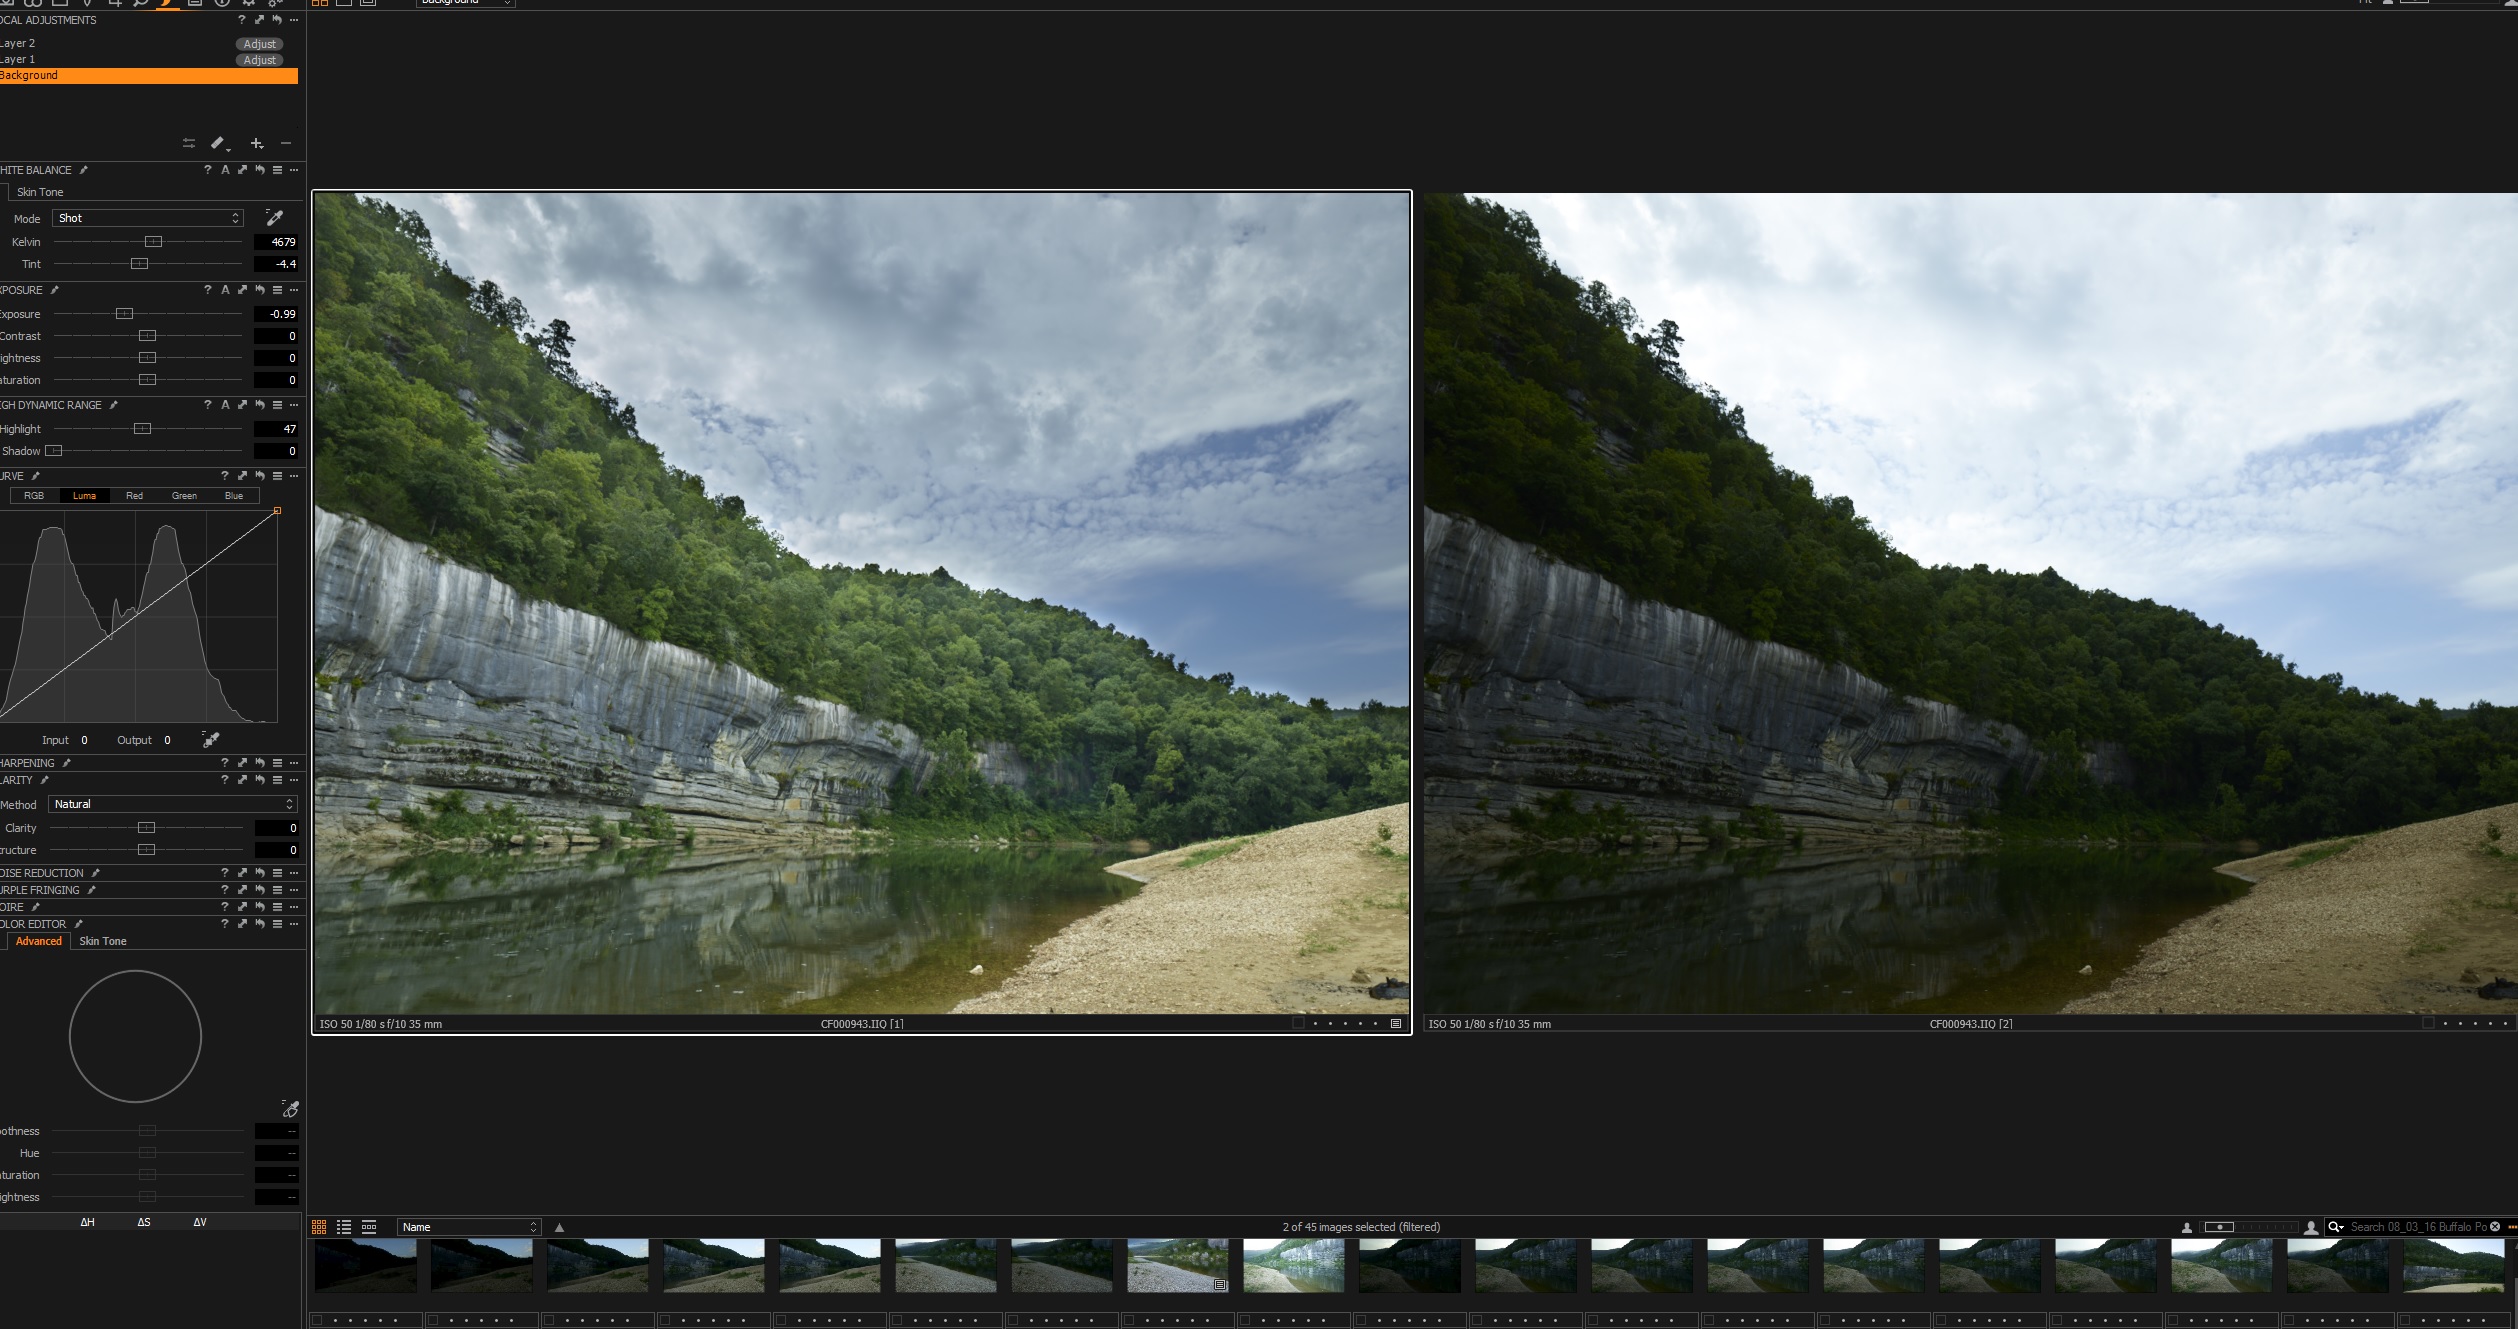
Screen shots of IQ100 image side by side
The image on the right side is the base image before any adjustments, the image on the left side, I just pulled the overall exposure down from center to -99 (almost 1 stop) and then adjusted the highlights to 47 from the far left. This pulled back all of the sky and actually provided some very nice cloud features. I then just added a local adjustment layer to the lower portion of the file, (non sky) and pulled up the overall exposure then added one more adjustment layer to tweak a few dark areas. Overall the end result to me is very nice and again is testimony to just how much range is in a single exposure from this chip. The take away is for sure feel free to let your highlights go a bit so that you can pull in a bit more shadow details.
Here another example.
2nd Example of highlight range IQ100
Here the original raw file is on the left side. Initial thoughts are that the sky is pretty blown, but with just a bit of highlight adjustment and overall exposure work, you can pull back the sky to a very manageable level. The bluff and trees will easily recover to most of their full detail with a bit of shadow recovery and local adjustment layer to work only on that part of the image.
From my photography I feel if there is a downside to the IQ100 dynamic range, it would be in the shadow recovery. Here you have to be very careful as just one stop or two can make a huge difference between good details and color in the shadows. Lets go back to an example from the same set of images. If you look at the image at the top of this article, you can see that towards the far right on the bluff there is a dark area. I shot this scene in several brackets at both ISO 50 and 100 as I was unsure as to just how the clouds would capture. As it turned out, the clouds/sky were not the problem, but the dark shadows were. Look at this comparison: make sure to click on the image to view it full screen.
IQ100 side by side for shadow details
The image on the left was shot at ISO 50 at 1/25th of a second, F12, and the image on the left was taken immediately next at ISO50 and 1/60th of a second F12. If you click on the image, you can see that the bluff and trees along the bluff are almost devoid of color and there is considerably more noise. Both of these screen crops are from sharpened final images. The image on the left holds the green down into the shadows where as the same part of the image on the right is starting to lose the color fidelity. The color you may be able to pull back with some work in Photoshop, but the noise and loss of overall details you will never get back. So the point, is that you really need to watch your exposure and if you are unsure, bracket the frames. Just a difference in 1/25th and 1/60th can make a big improvement in the overall quality of the final image.
Photographer’s Notes:
I feel that there is considerably more dynamic range in the IQ100 CMOS back, over similar CCD backs like the IQ260 and IQ380 (60 and 80MP respectively)
The IQ100 has a tendency to push to a green overall tint and it seems that the greens can easily be come over saturated.
When working in mixed outdoor lighting, I would recommend exposing to the right, and pushing the highlights, as from my shooting experience you can easily recover 1 stop and possibly 1.5 stops in the highlights.
The shadows will quickly loss details and color if underexposed, even at base ISO of 50 or one push to ISO100. Once these details are lost you will not be able to get them back easily.
Considering that the 100MP back will start to suffer softness from diffraction at apertures past F11, you need to balance your shooting between both shutter speeds (subject allowing) and ISO.
When working on a single file, don’t be fooled into thinking that you have lost your highlights as you will be surprised to see just how much dynamic range and malleability is available in these fantastic files.
02/05/16 Featured Landscape Photography–Wintertime on White Oak Mountain near Hector Arkansas

PLEASE NOTE: All of the photography of this website is the property of www.photosofarkansas.com and is copy right protected. Do not copy any of the images on this site to paste on Facebook, Pintrest, or any other website without the permission of Paul Caldwell. Years of time have gone into capturing these photographs, please respect that. I do not take copy right infringement lightly. If you have a need to display any of my work on your site ASK me before you Copy & Paste.
Taken with a Phase One XF camera & IQ260, 55mm LS lens and CL-PL. Image is composite of 3 vertical images with the 55LS set to it’s nodal point.
This past winter I started trying to find some new places to photograph in Arkansas. I have worked Falling Water Creek and Richland for years and still love that part of Arkansas, but I felt it was time to move on. I had heard a lot about White Oak Mountain from Chris Kennedy and wanted get a look at the area in winter. If you hike into a spot in Arkansas for the first time, I always recommend coming in winter or early spring as you will see a lot more of the surrounding areas. Later on in summer the trees will hide a lot and the undergrowth makes hiking in general much harder.
White Oak Mountain, is actually a long ridge that runs east and west near Hector Arkansas. To get there, you need to drive to Hector, through the town and as soon as cross a small bridge over a minor creek, you will see a dirt road heading up to the right. Stay on this road for about 7 miles, there will be some turn offs but once you find the right spot, you can hike right down into a great creek valley. This creek has a nice run which offers several nice smallish waterfalls in quick succession. If you hike up the far hillside, you can find some much more dramatic waterfalls, but these will only be running after a locally heavy rain.
What I found most interesting on White Oak mountain was the number large boulders that were just laying in the creek. This reminded me of Richland creek, however the terrain is a bit more open than on Richland.
Once you are done in the creek valley walking is very easy and you can make good headway. There is a RV trail and a marked hiking trail that will take you down to the creek. This creek outwardly appears to be about 1/5 the volume of Richland creek, but the unique geography surrounding the creek makes the hike worth a trip. I would warn anyone that crossing this creek in high water could be a bit dangerous as the bottom is full of large mossy rocks easy to slip on.
I hope to make another trip here in the future to see what the area looks like in Spring with more water running.
To capture this photograph, I used a Phase One XF camera with a IQ260 Medium Format back and 55mm LS lens. The photograph was taken with a nodal panorama setup and I used the captures to make the one horizontal shot. To slow the water down I used ISO50 on my camera and a polarizer. As you can see in the photograph, the light was already marching up the far side of the valley, so I did not need a ND filter. The raw files were converted in Capture One software and then I used PtGui to stitch the 3 images together. I then added a bit of Topaz clarity to my liking.
 From the Blog
- Errors with High Resolution Mode, Panasonic LUMIX S1RII July 4, 2025
- 05/08/25 Capture One, big announcement, at least for portrait photographers May 8, 2025
- 05/03/25 Trump’s Tariffs finally start to hit Photography Equipment. May 3, 2025
- Firmware 4.1.0 for X2D? April 21, 2025
- 04/18/25–Looks like Trump’s Tariffs are much ado about NOTHING in regard to photography equipment. April 18, 2025
- 04/09/25 Arkansas Sets new standard for Scientific Ignorance with new law for Ivermectin April 4, 2025