Errors with Panasonic LUMIX S1RII High Resolution mode (Adobe Only)
- At July 04, 2025
- By paul
- In Articles/Reviews, Panasonic Camera
 0
0
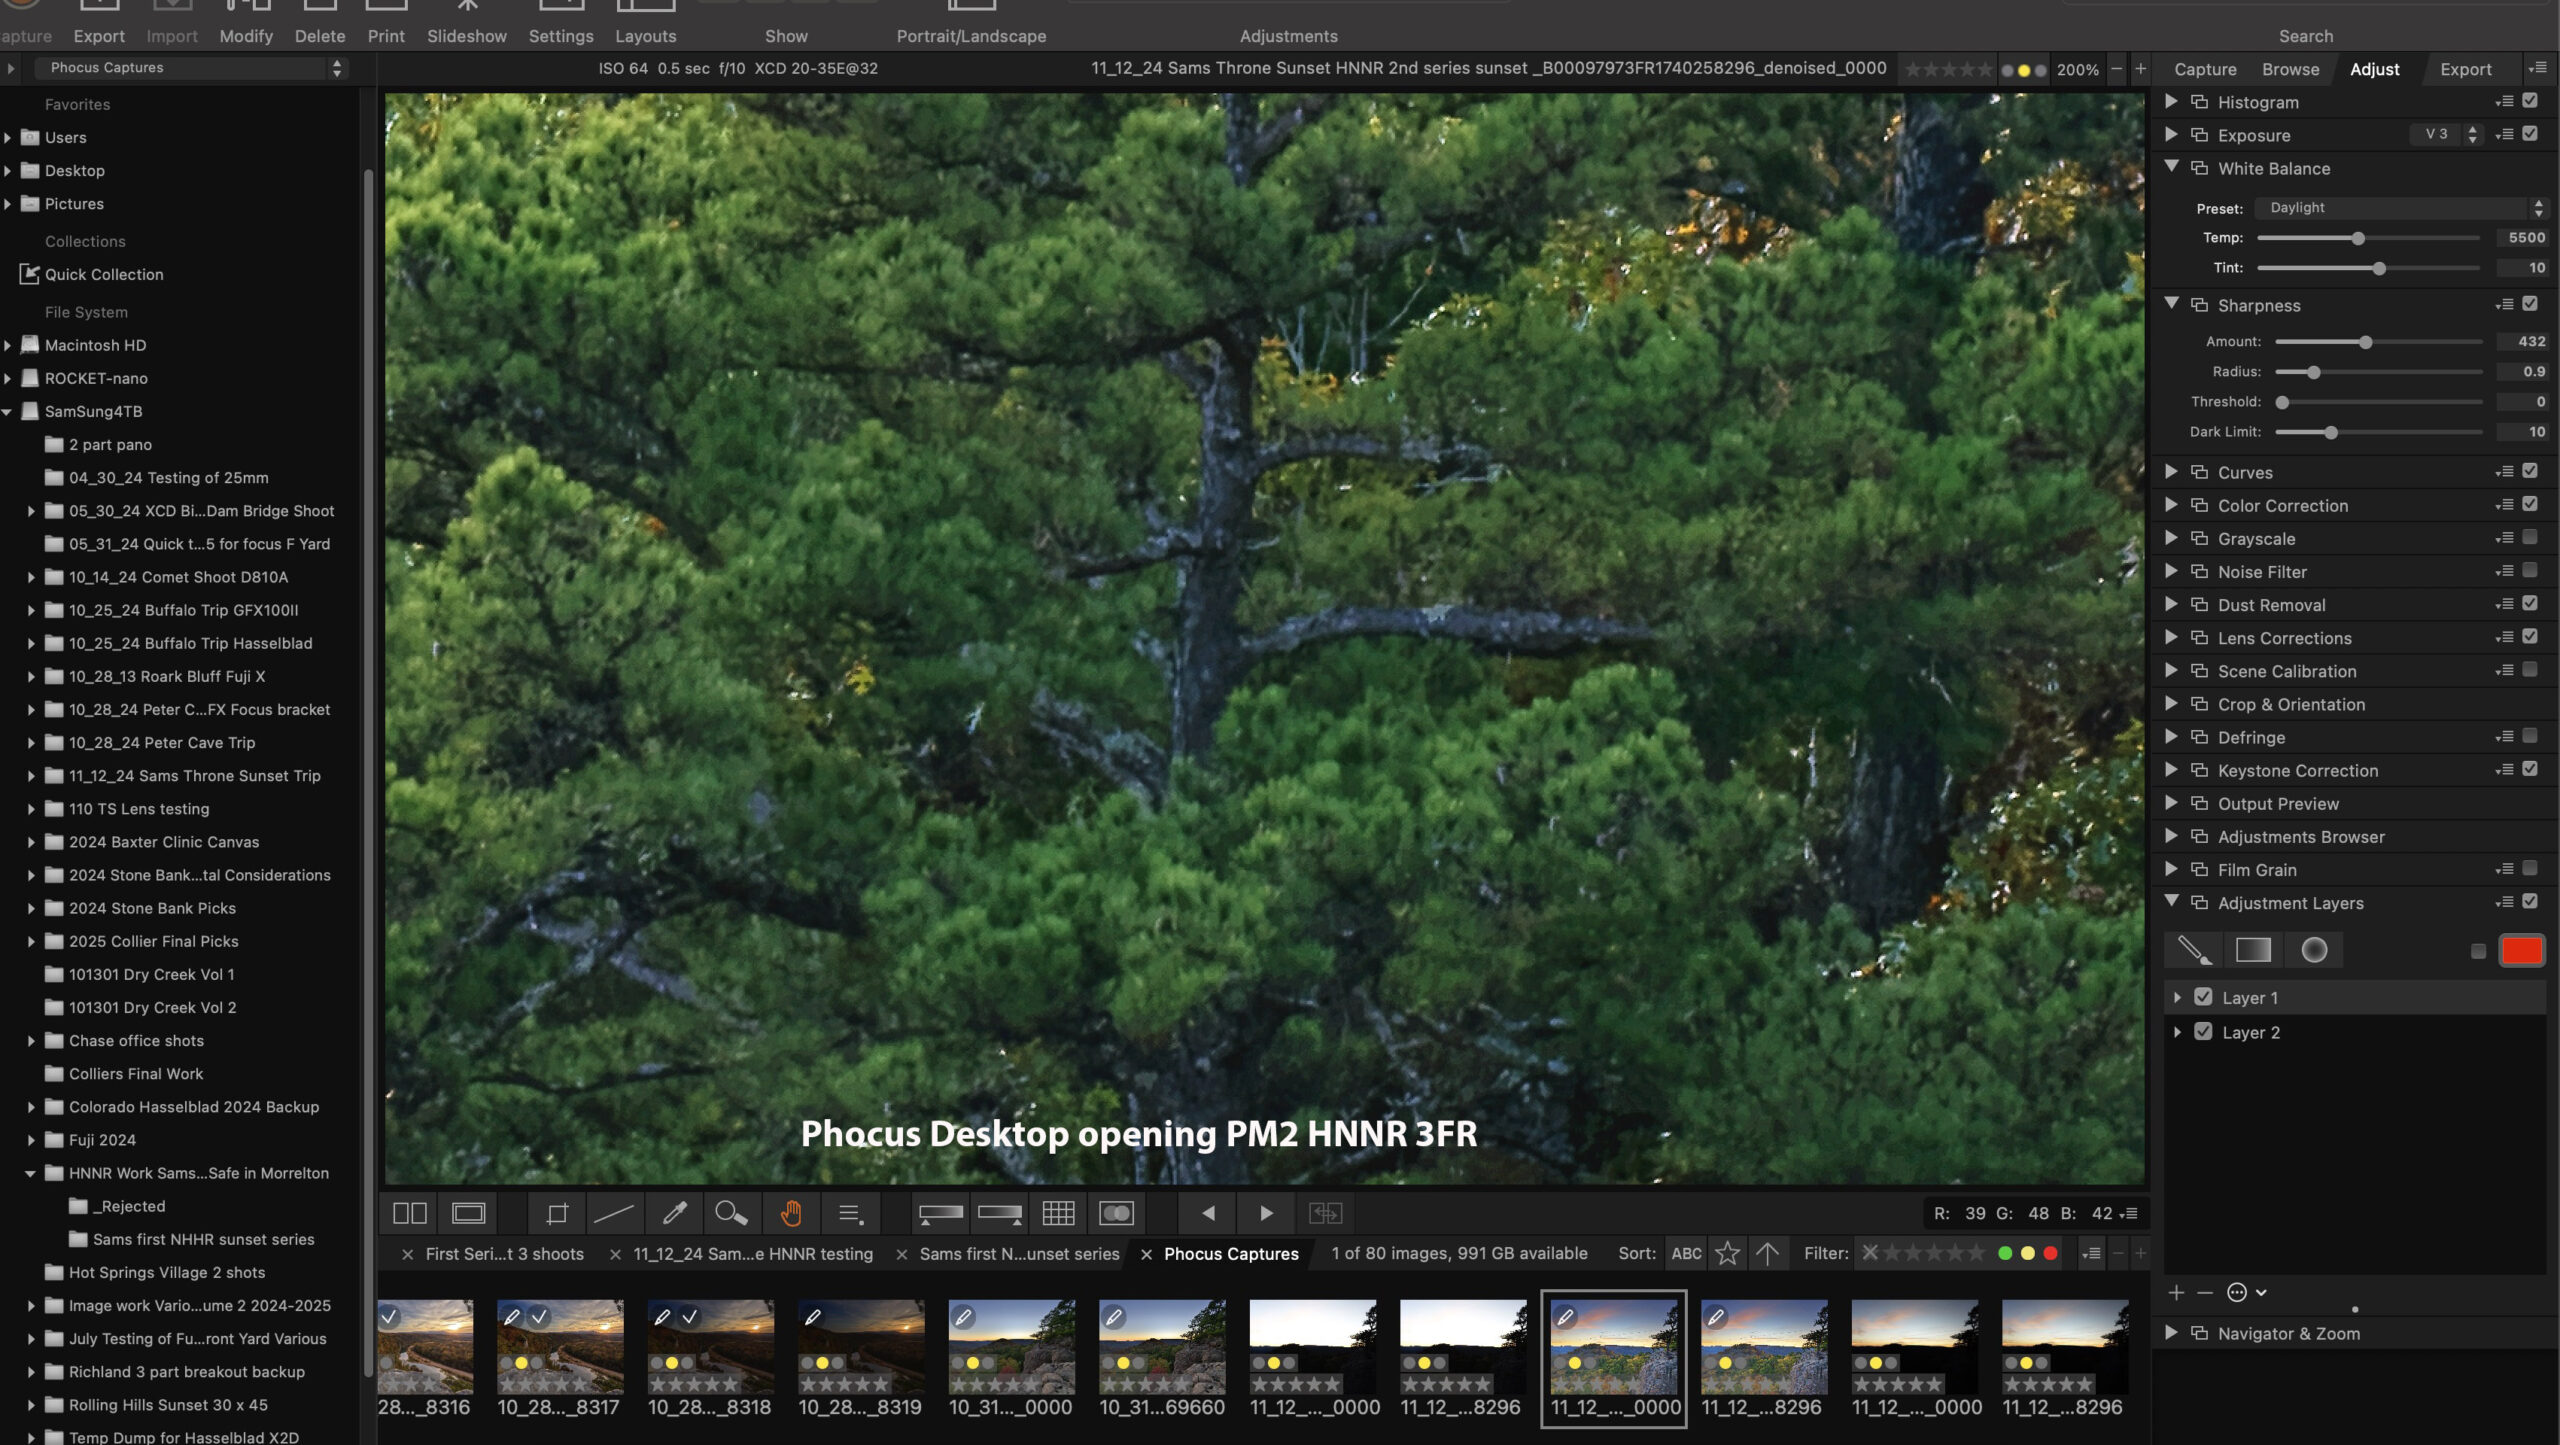
If you are working with the new Panasonic S1RII, and taking photographs with the High Resolution mode which will generate a 178MP raw file and attempt to use any of the current Adobe raw conversion software products (Lightroom, Lightroom Classic, or ACR) you will eventually get an error. The error in Lightroom classic will state” Image appears to be unsupported or damaged”, ACR gives a different error but will not open the image.

Lightroom Error on High Resolution images from Panasonic S1RII
This is an example of what you will see. Note the image is underexposed intentionally however since Lightroom cannot open the file no changes can be made. This error will happen with all (3) of the High Resolution modes with the S1RII. From the testing I have done with a S1RII, I have found this to be the case:
- Dxo Pure raw 5 will work via a stand alone or plug in for Lightroom, this creates a dng, which Lr will work with.
- Lightroom and ACR will open about 40 to 50% of the High resolution images the rest will fail with the above error. (Lr 14.4) On Mac
- Capture One (latest version 16+) has no issues with any of the 3 modes
- ON1, will fail with all the modes currently. However I have been told a fix is being worked up.
I have attempted several times to contact Panasonic Lumix Tech support on this issue, but so far, I have had no success, in fact I was surprised to find that Panasonic’s tech support is terrible. No response to a ticket I opened over a week ago, and there is no real way to reach anyone. Their Lumix website is great for marketing and discussion of the features of the various Lumix cameras, but for a pro series camera, they are terribly lacking in support.
I have also reached out to the authors of the S1RII review on Dpreview.com to make them aware of this issue. I have heard back from both of them and I hope that one of them will take the issue up to both Panasonic and Adobe.
I attempted to open a ticket with Adobe tech support also, that is a total waste of time. My first contact was with a AI bot, totally worthless and I feel an insult to my profession. The second time I was supposedly chatting with a real person, but got nowhere. They could not understand this problem had nothing to do with computers, but instead was with Camera Raw. Adobe tech support is also terrible. No way to open a ticket and if there is a way to talk with a knowledgeable human being, after over 3 hours of trying I was not able to find any.
Written for Photosofarkansas by Paul Caldwell, please ask for permission before using this article in any other web based platform or written article. All the information in this article is based on my personal experience and testing with the S1RII.
03/17/25 Hasselblad–Major Disconnect with HNNR and Phocus, Please Fix
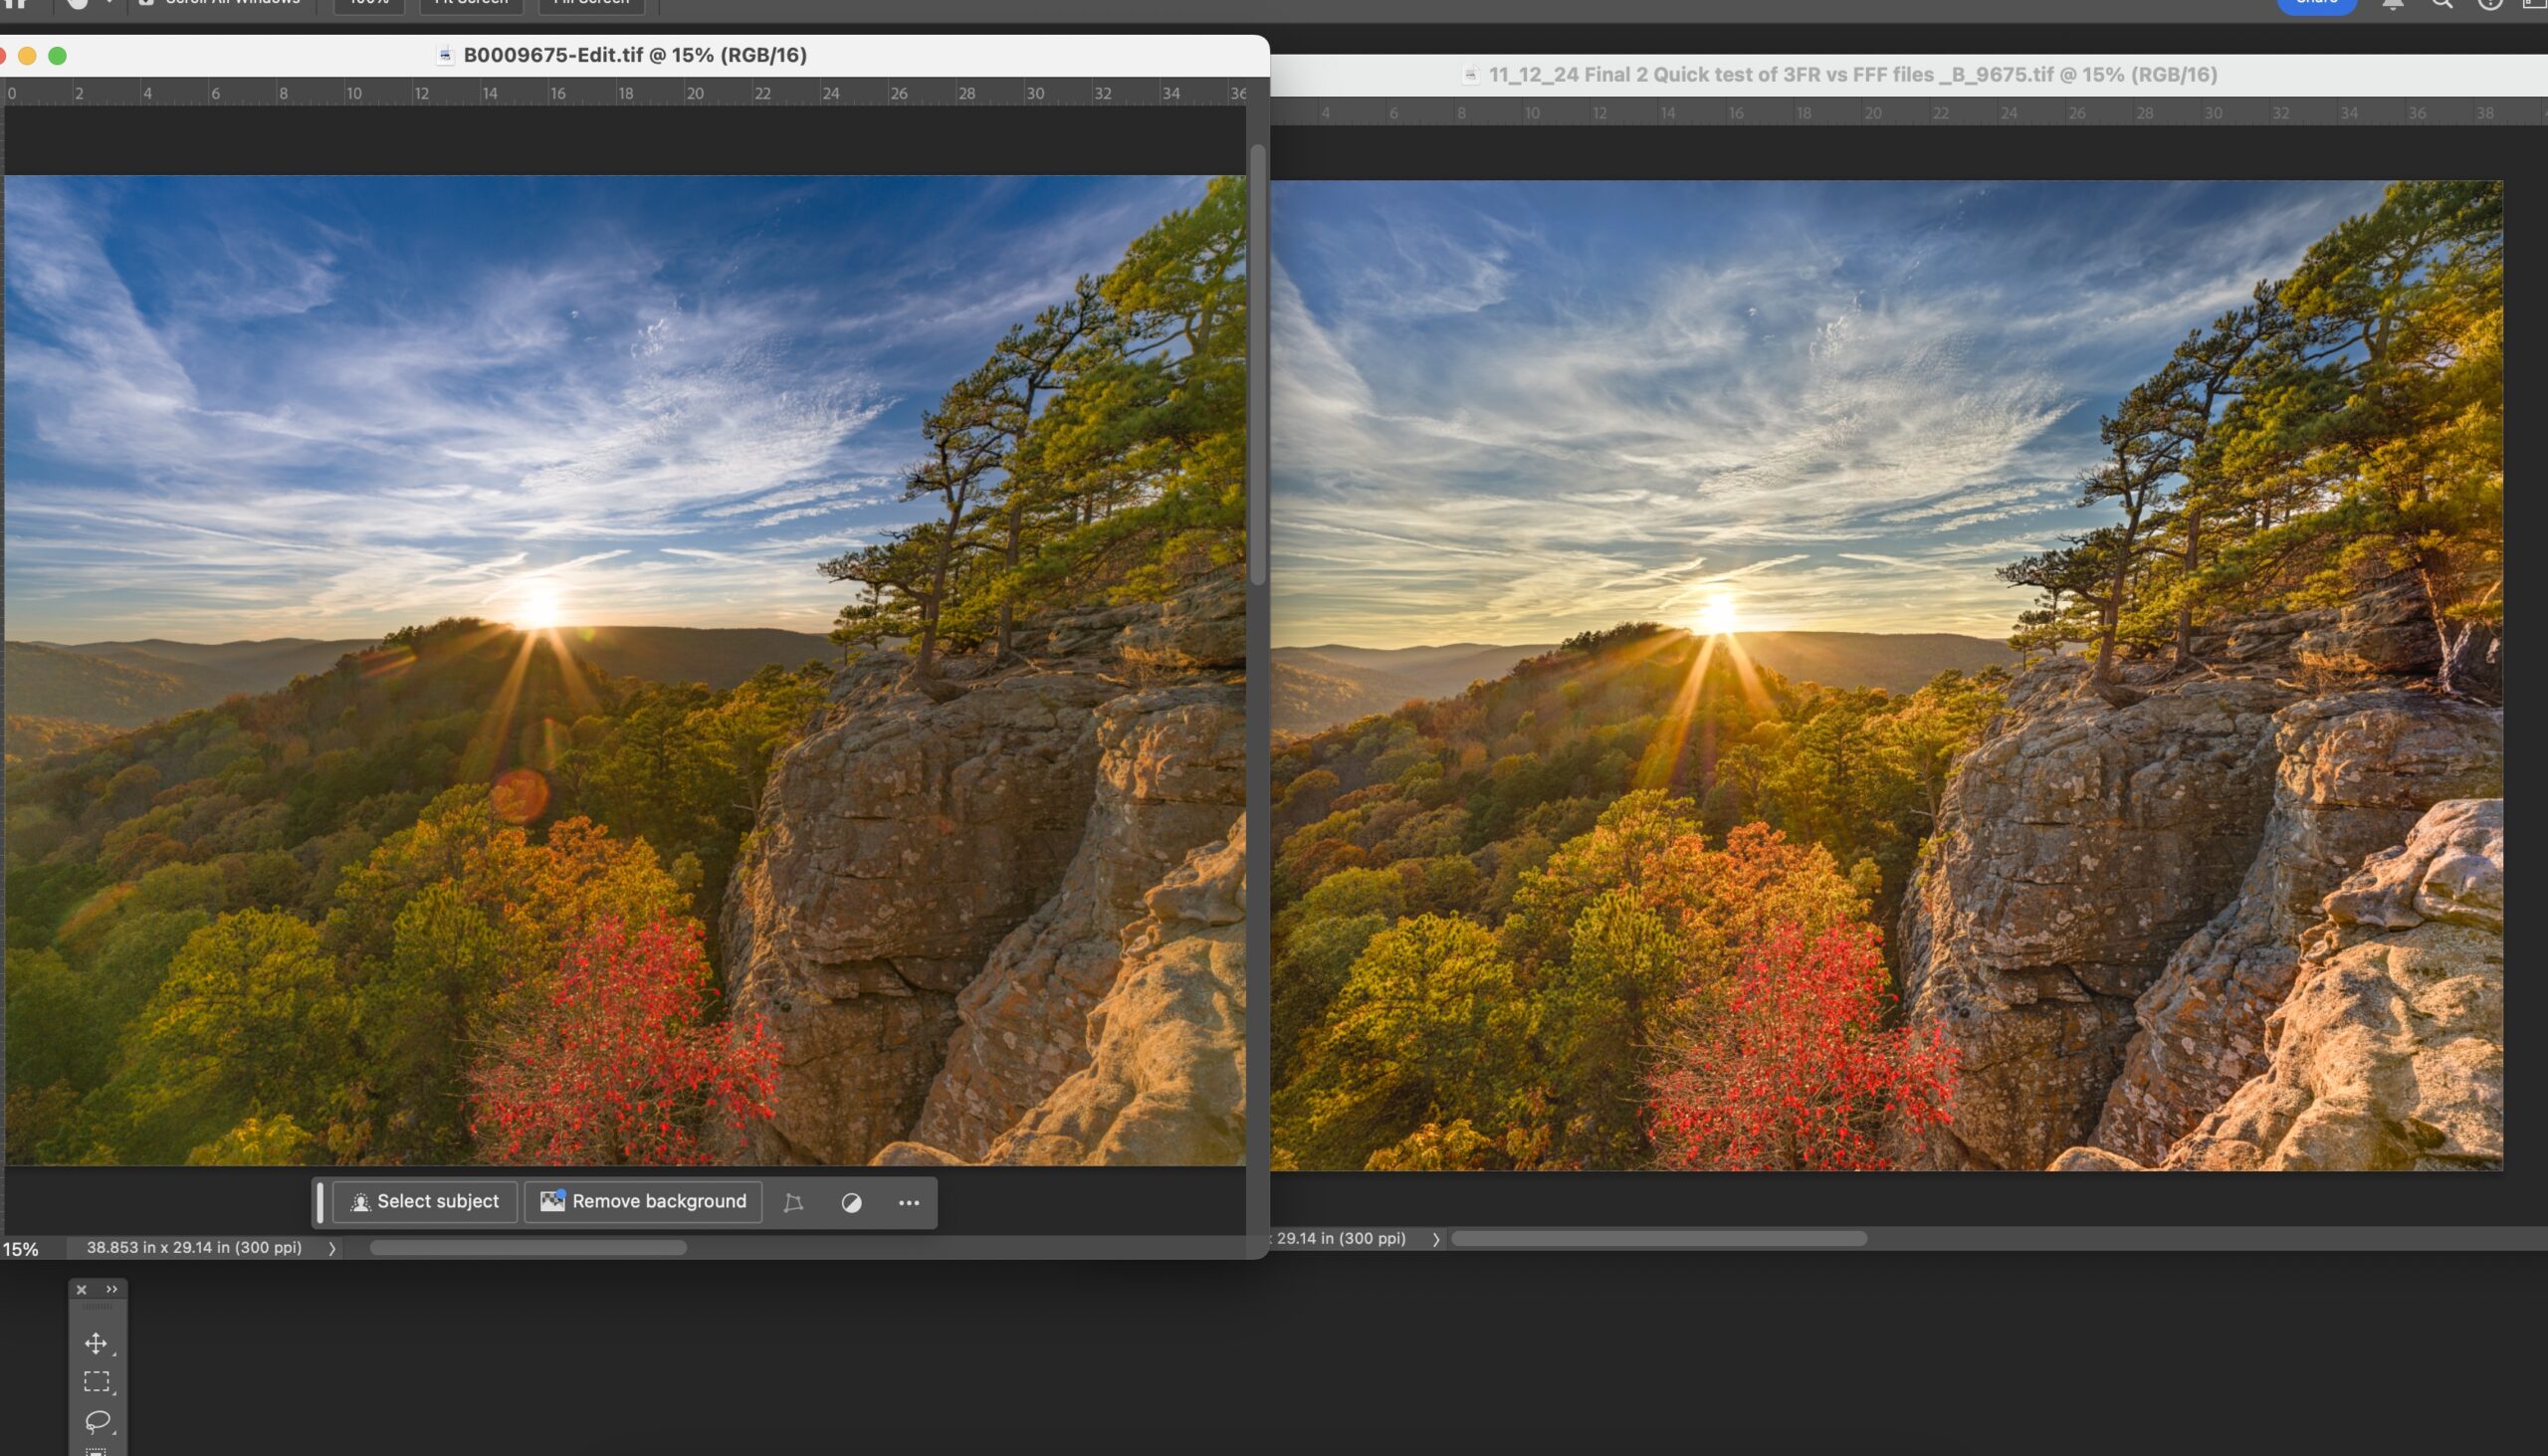
By now most folks shooting Hasselblad digital realize that with Phocus Mobile 2, Hasselblad released HNNR, which is their AI ruled noise reduction application. And the good news is HNNR does an excellent job of removing both excess noise and more importantly hot pixels, (which for me become problematic at times with the X2D). However besides the terrible workflow to get to HNNR there is a much bigger issue. If you use HNNR and create a new 3FR raw, you can no longer use Phocus Desktop software on these files as Phocus desktop adds extra noise reduction and in most cases, removes all the finer details. The catch: if you can’t use Phocus Desktop, you can no longer take advantage of HNCS.
For me purchasing the X2D camera and lenses was all about HNCS. I had read enough about it for years but until you try their software you can’t really see the difference. And there is a difference. You see much better colors, shadow recovery, and even at times better details. If you are using Lr/ACR with the X2D or any other Hasselblad camera, I feel you are missing out on the single most important aspect of their system.
I finally reached out to Hasselblad support about this problem and their response was less then stellar: “From my understanding, noise reduction for Phocus desktop is automated and cannot be disabled. This is an intentional feature that likely will not be removed anytime soon.” So this implies that for the near and far term if you want to use Phocus desktop to enable HNCS, then you can’t use HNNR!. Personally I can’t believe this is the response and that they are not able to add a feature to Phocus so that this issue doesn’t occur on import. Adobe seems able to do it why not Hasselblad, after all it’s their software? Amazing.
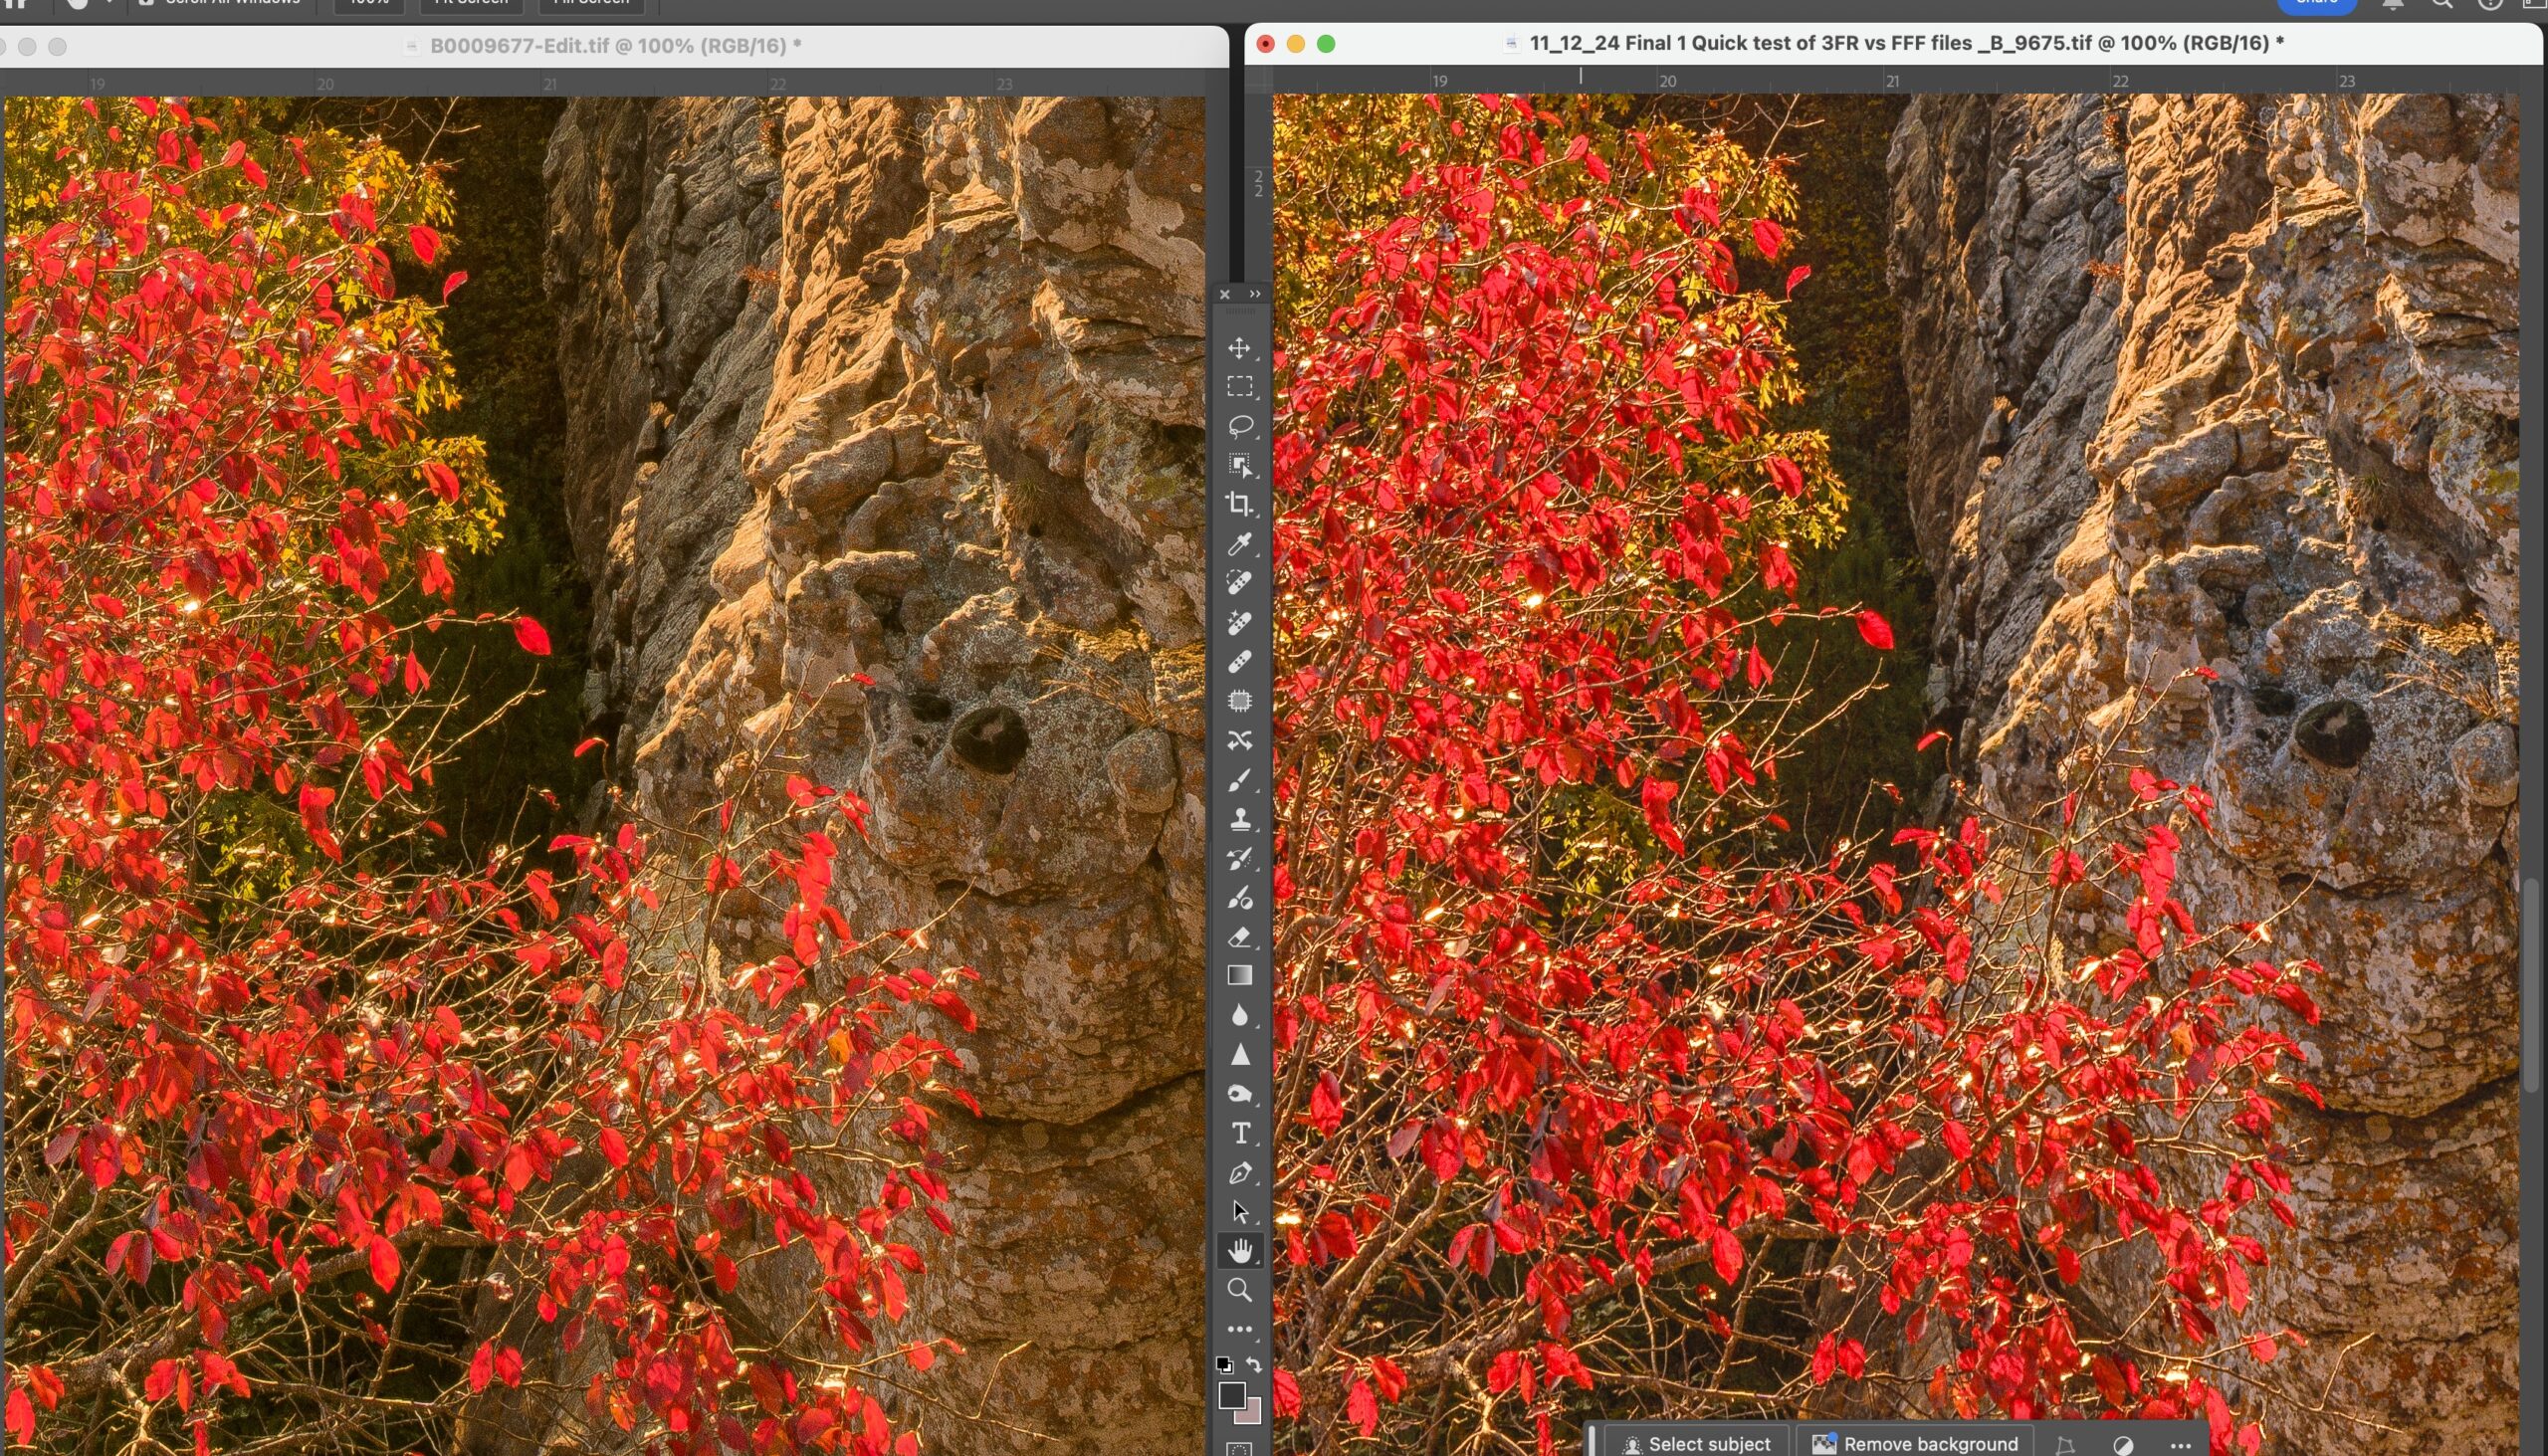
Just to show that the issue is not minor I have included some screen shots to show examples.
Example taken from Phocus Desktop 3.8.4 on a MacBook Pro M1
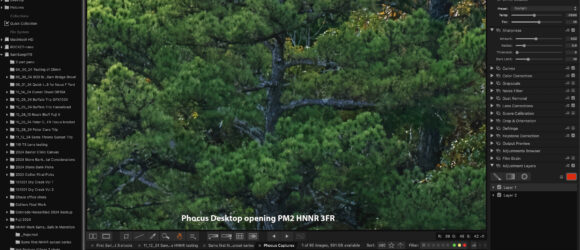
This screen shot shows a Phocus Mobile 2 HNNR after importing to Phocus, I hope that you can see just how smeared the pine tree needles are.
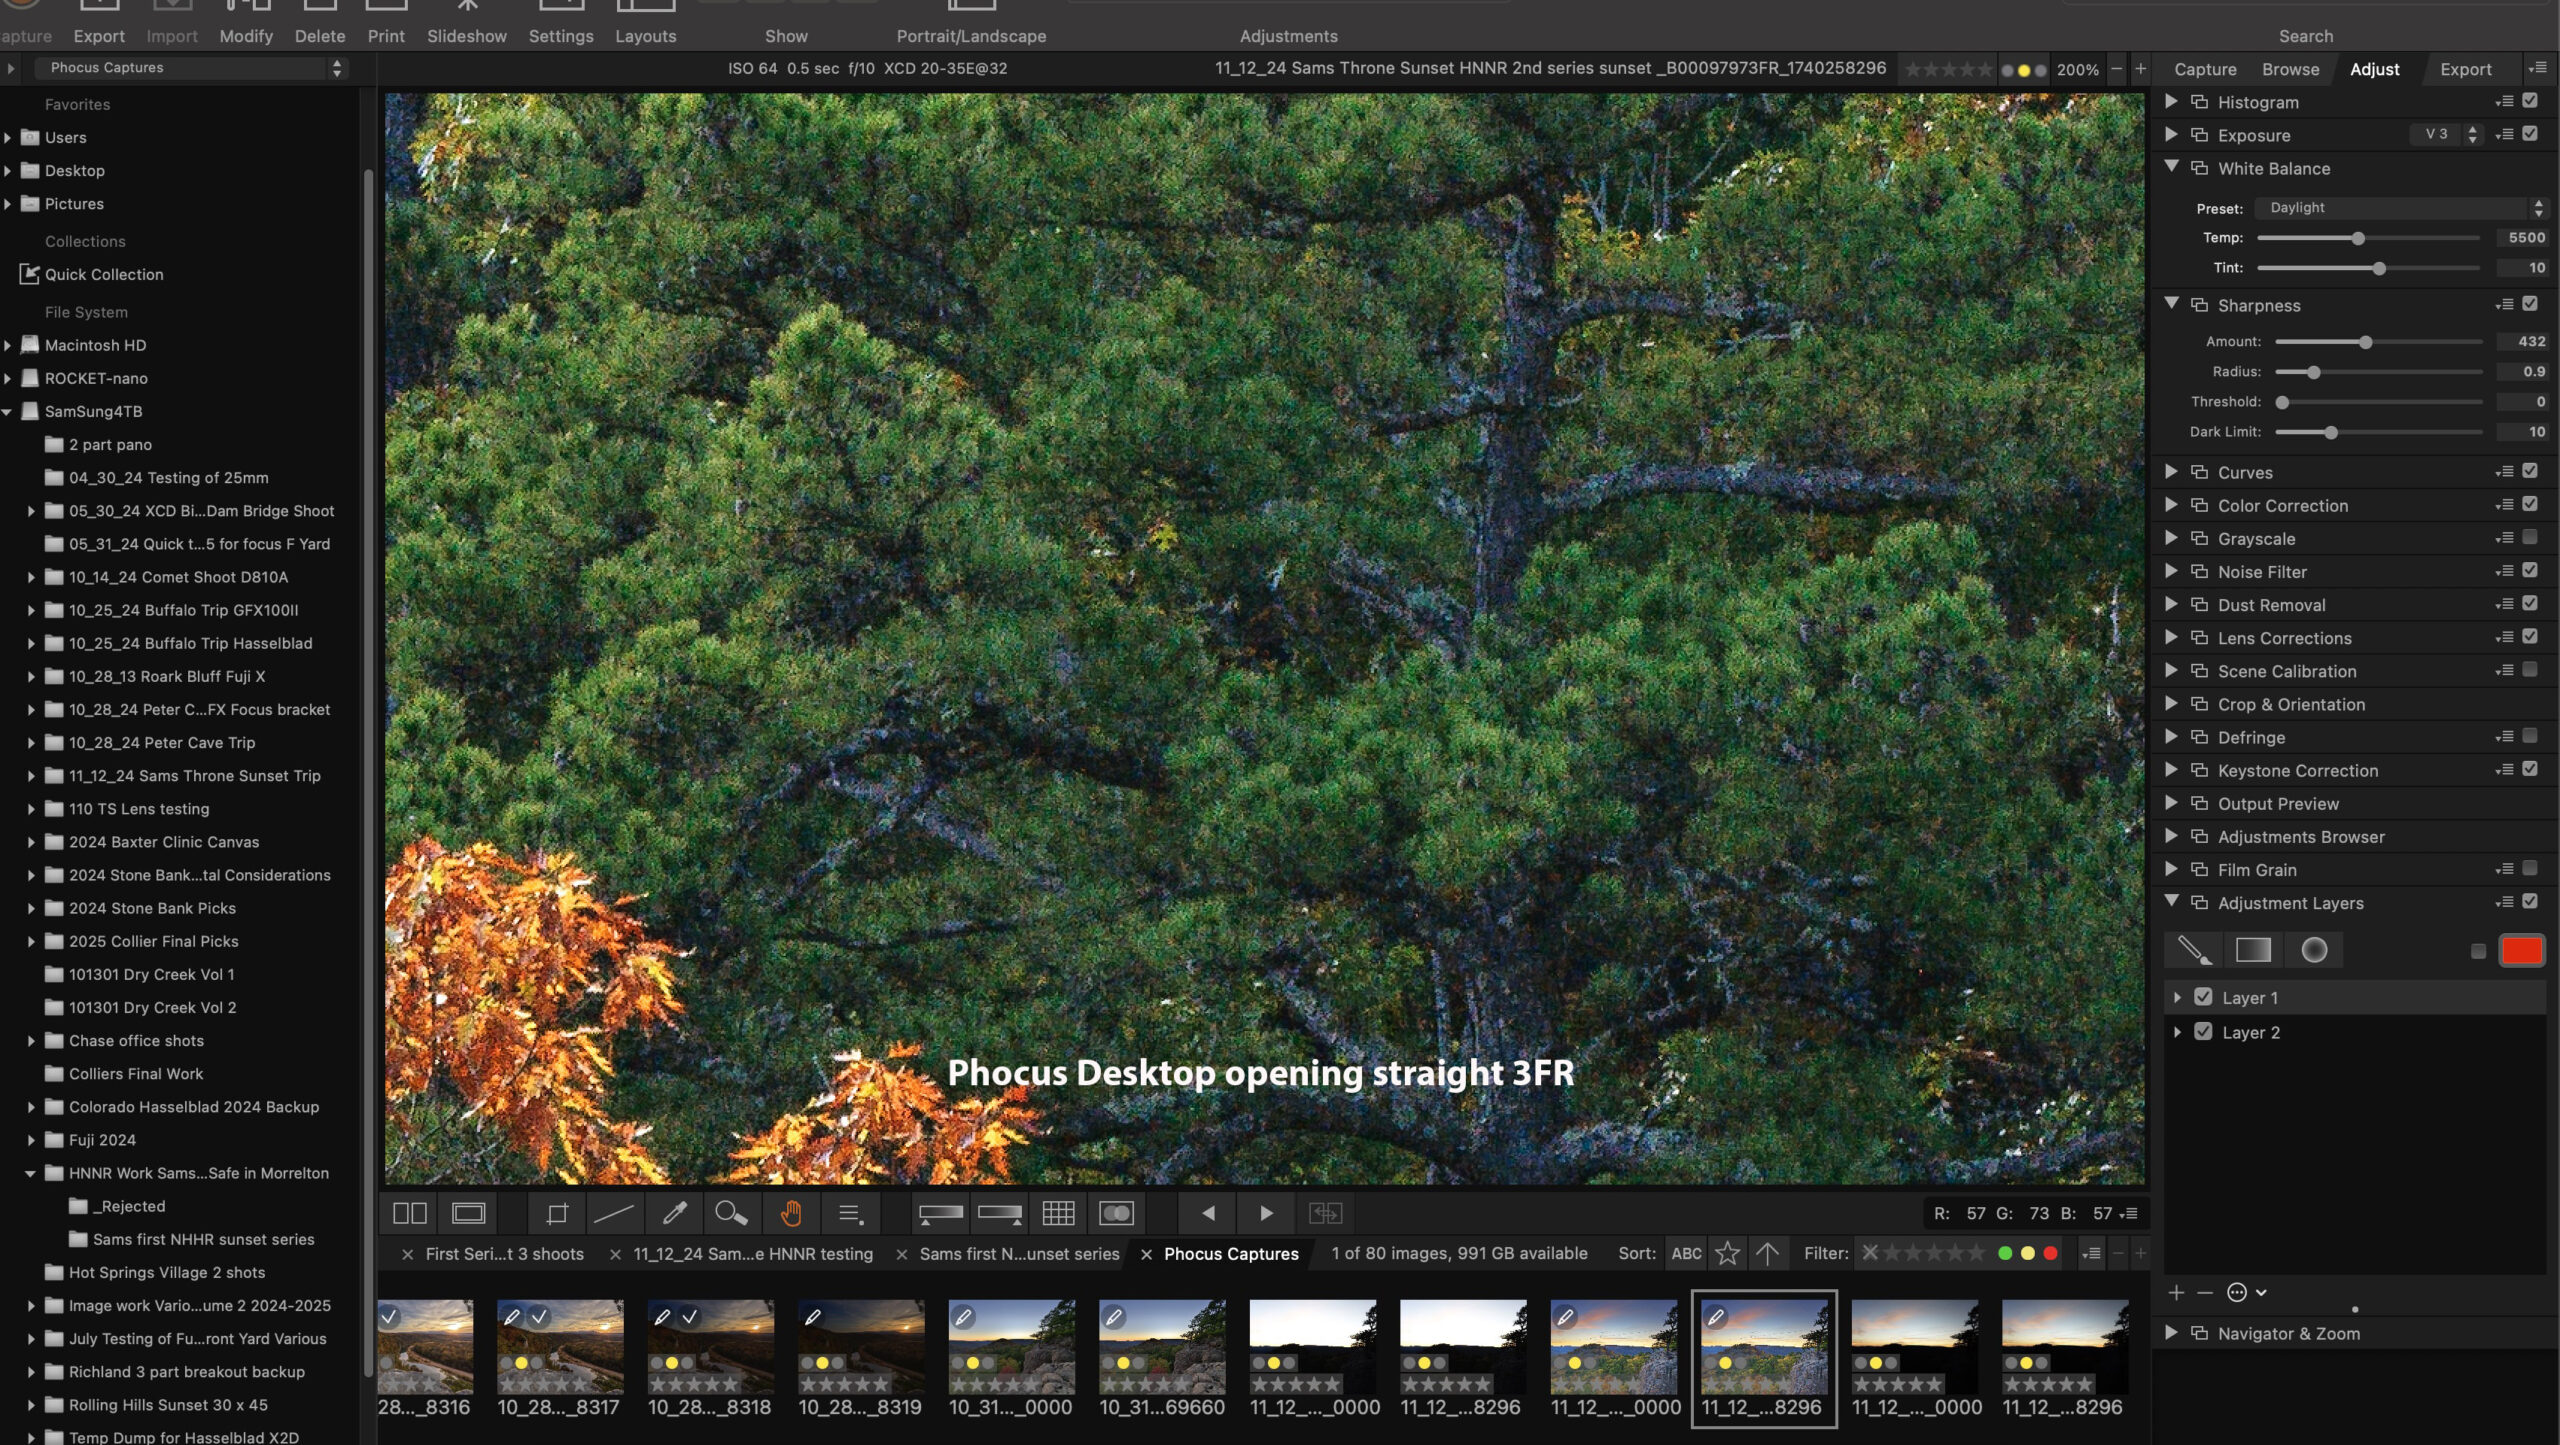
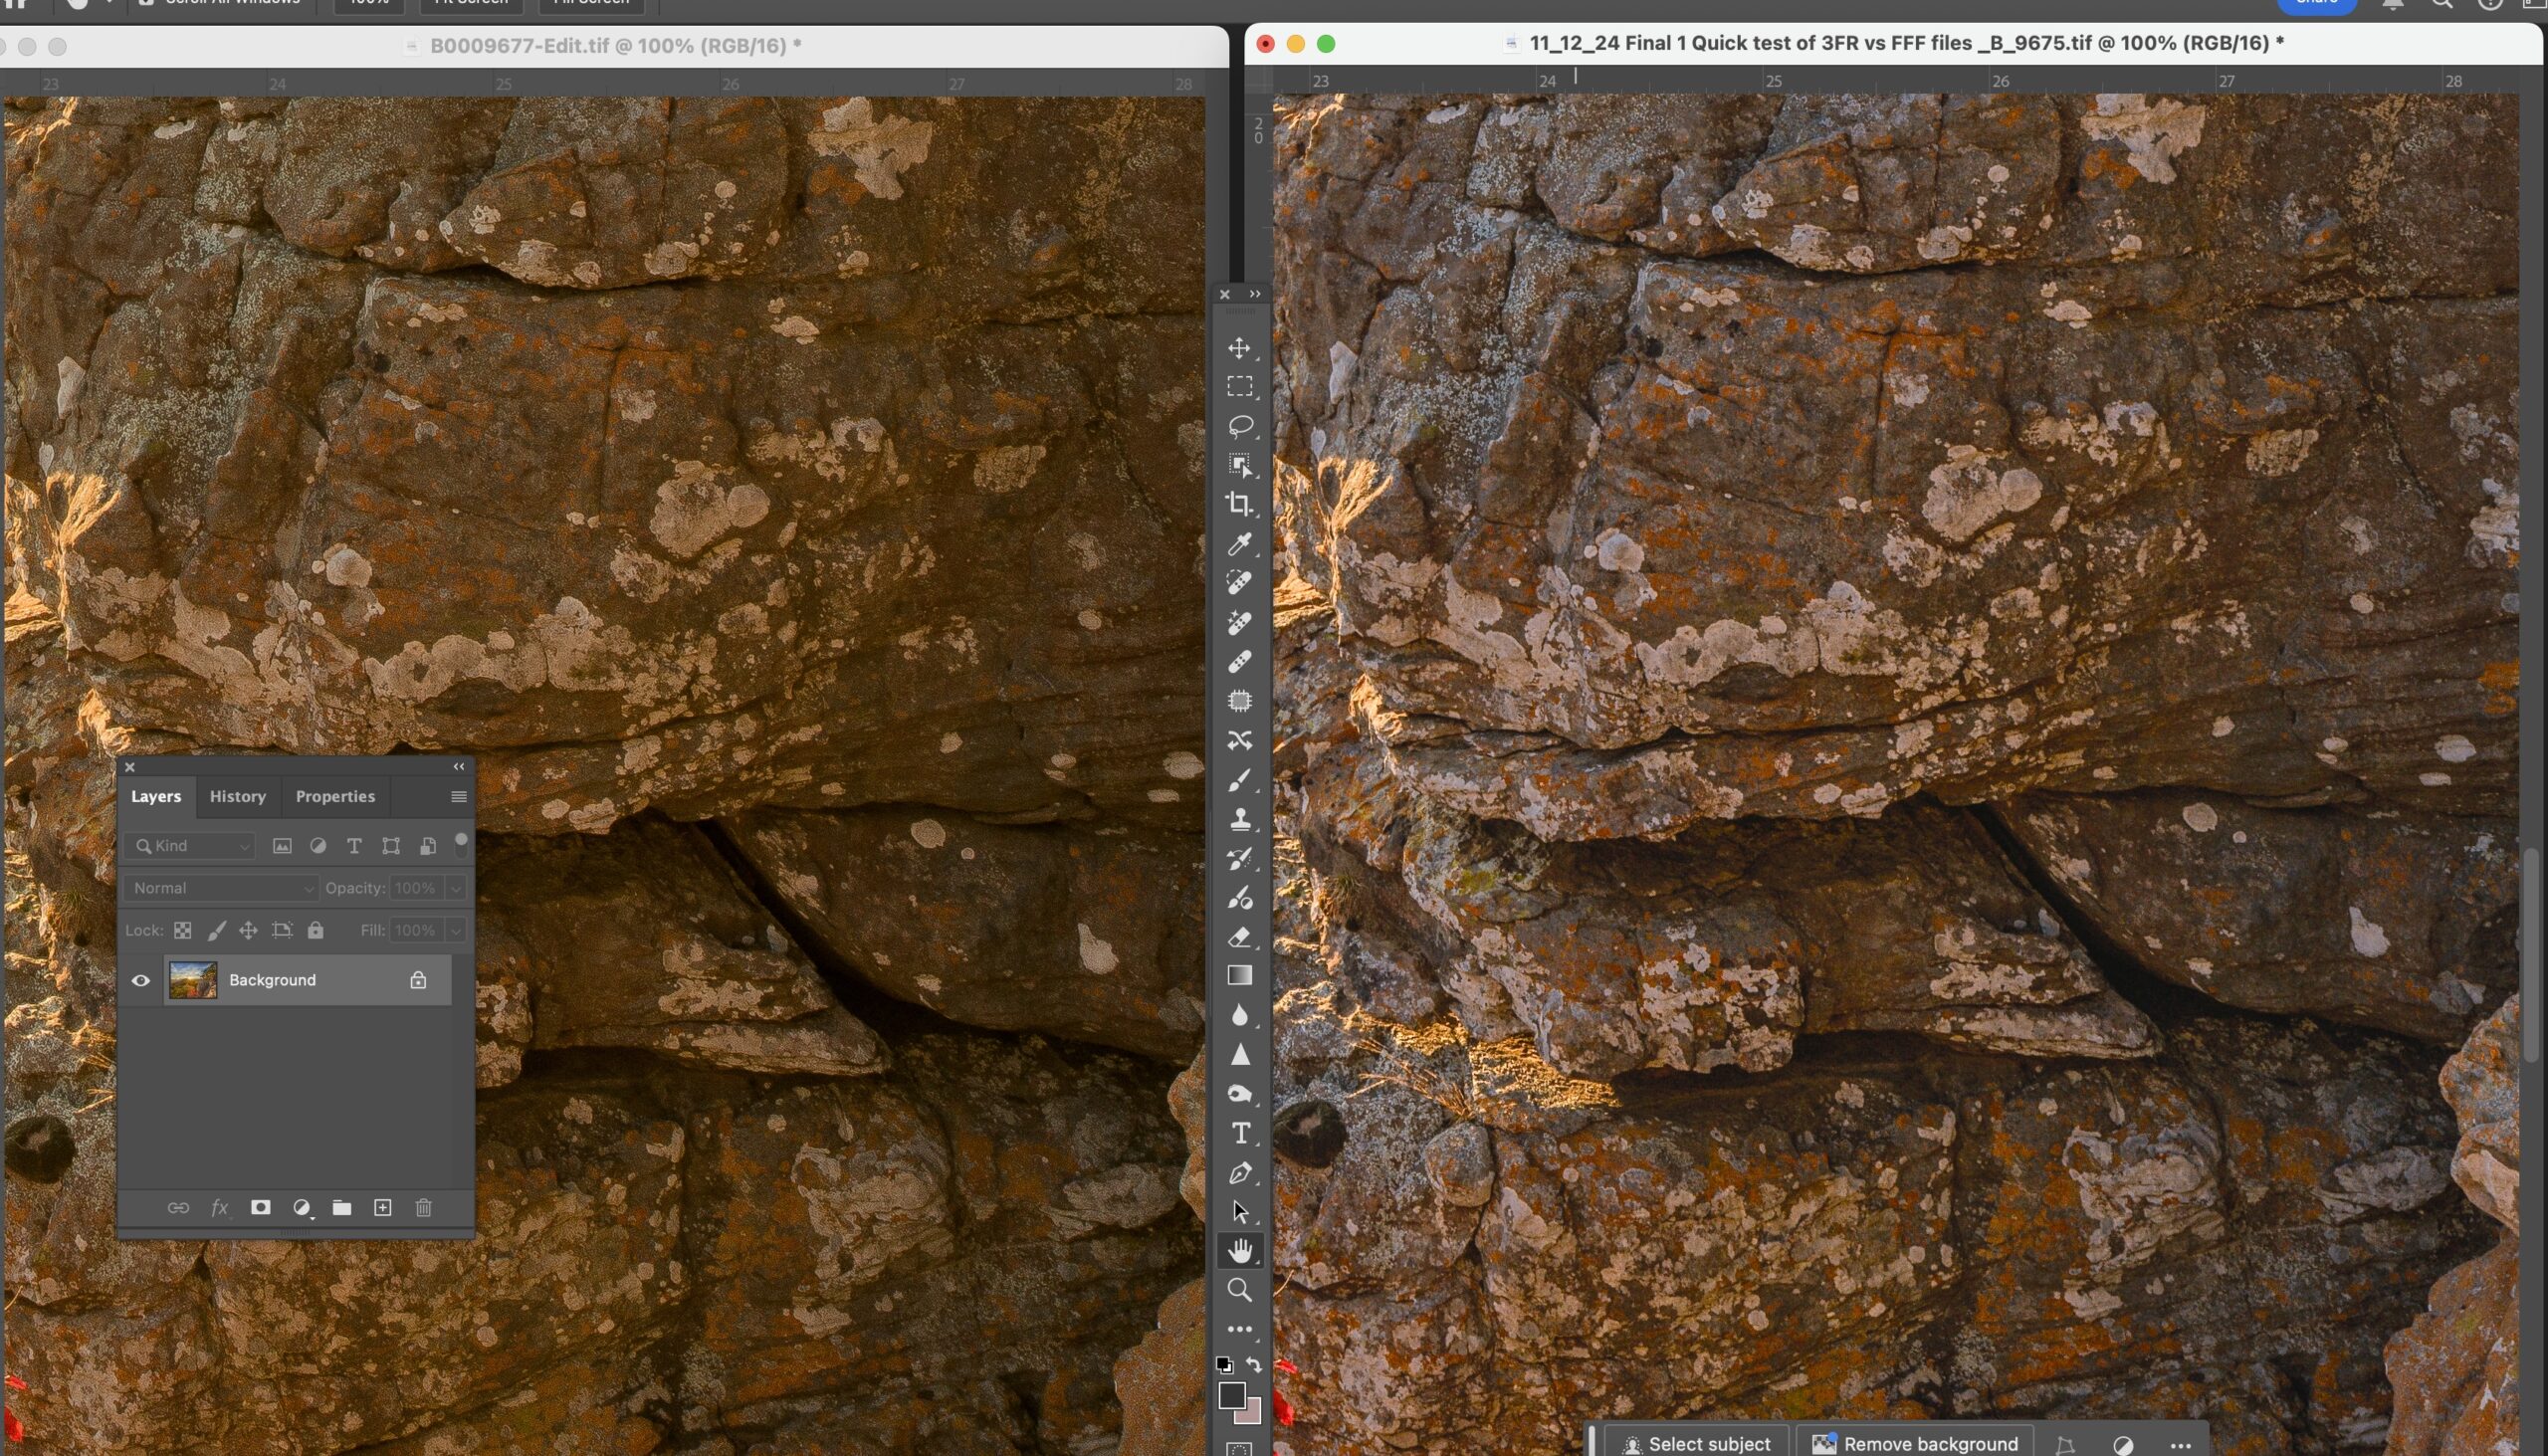
Direct Phocus import Screenshot Phocus Desktop 3.8.4 MacBook Pro M1
This is the same image as a straight 3FR imported straight Phocus. Yes, there is noise in the image I turned off all noise reduction in Phocus to show as much as detail as possible. Phocus Desktop can help some on the noise, but will do nothing to remove hot pixel noise, something that HNNR does close to 99%.
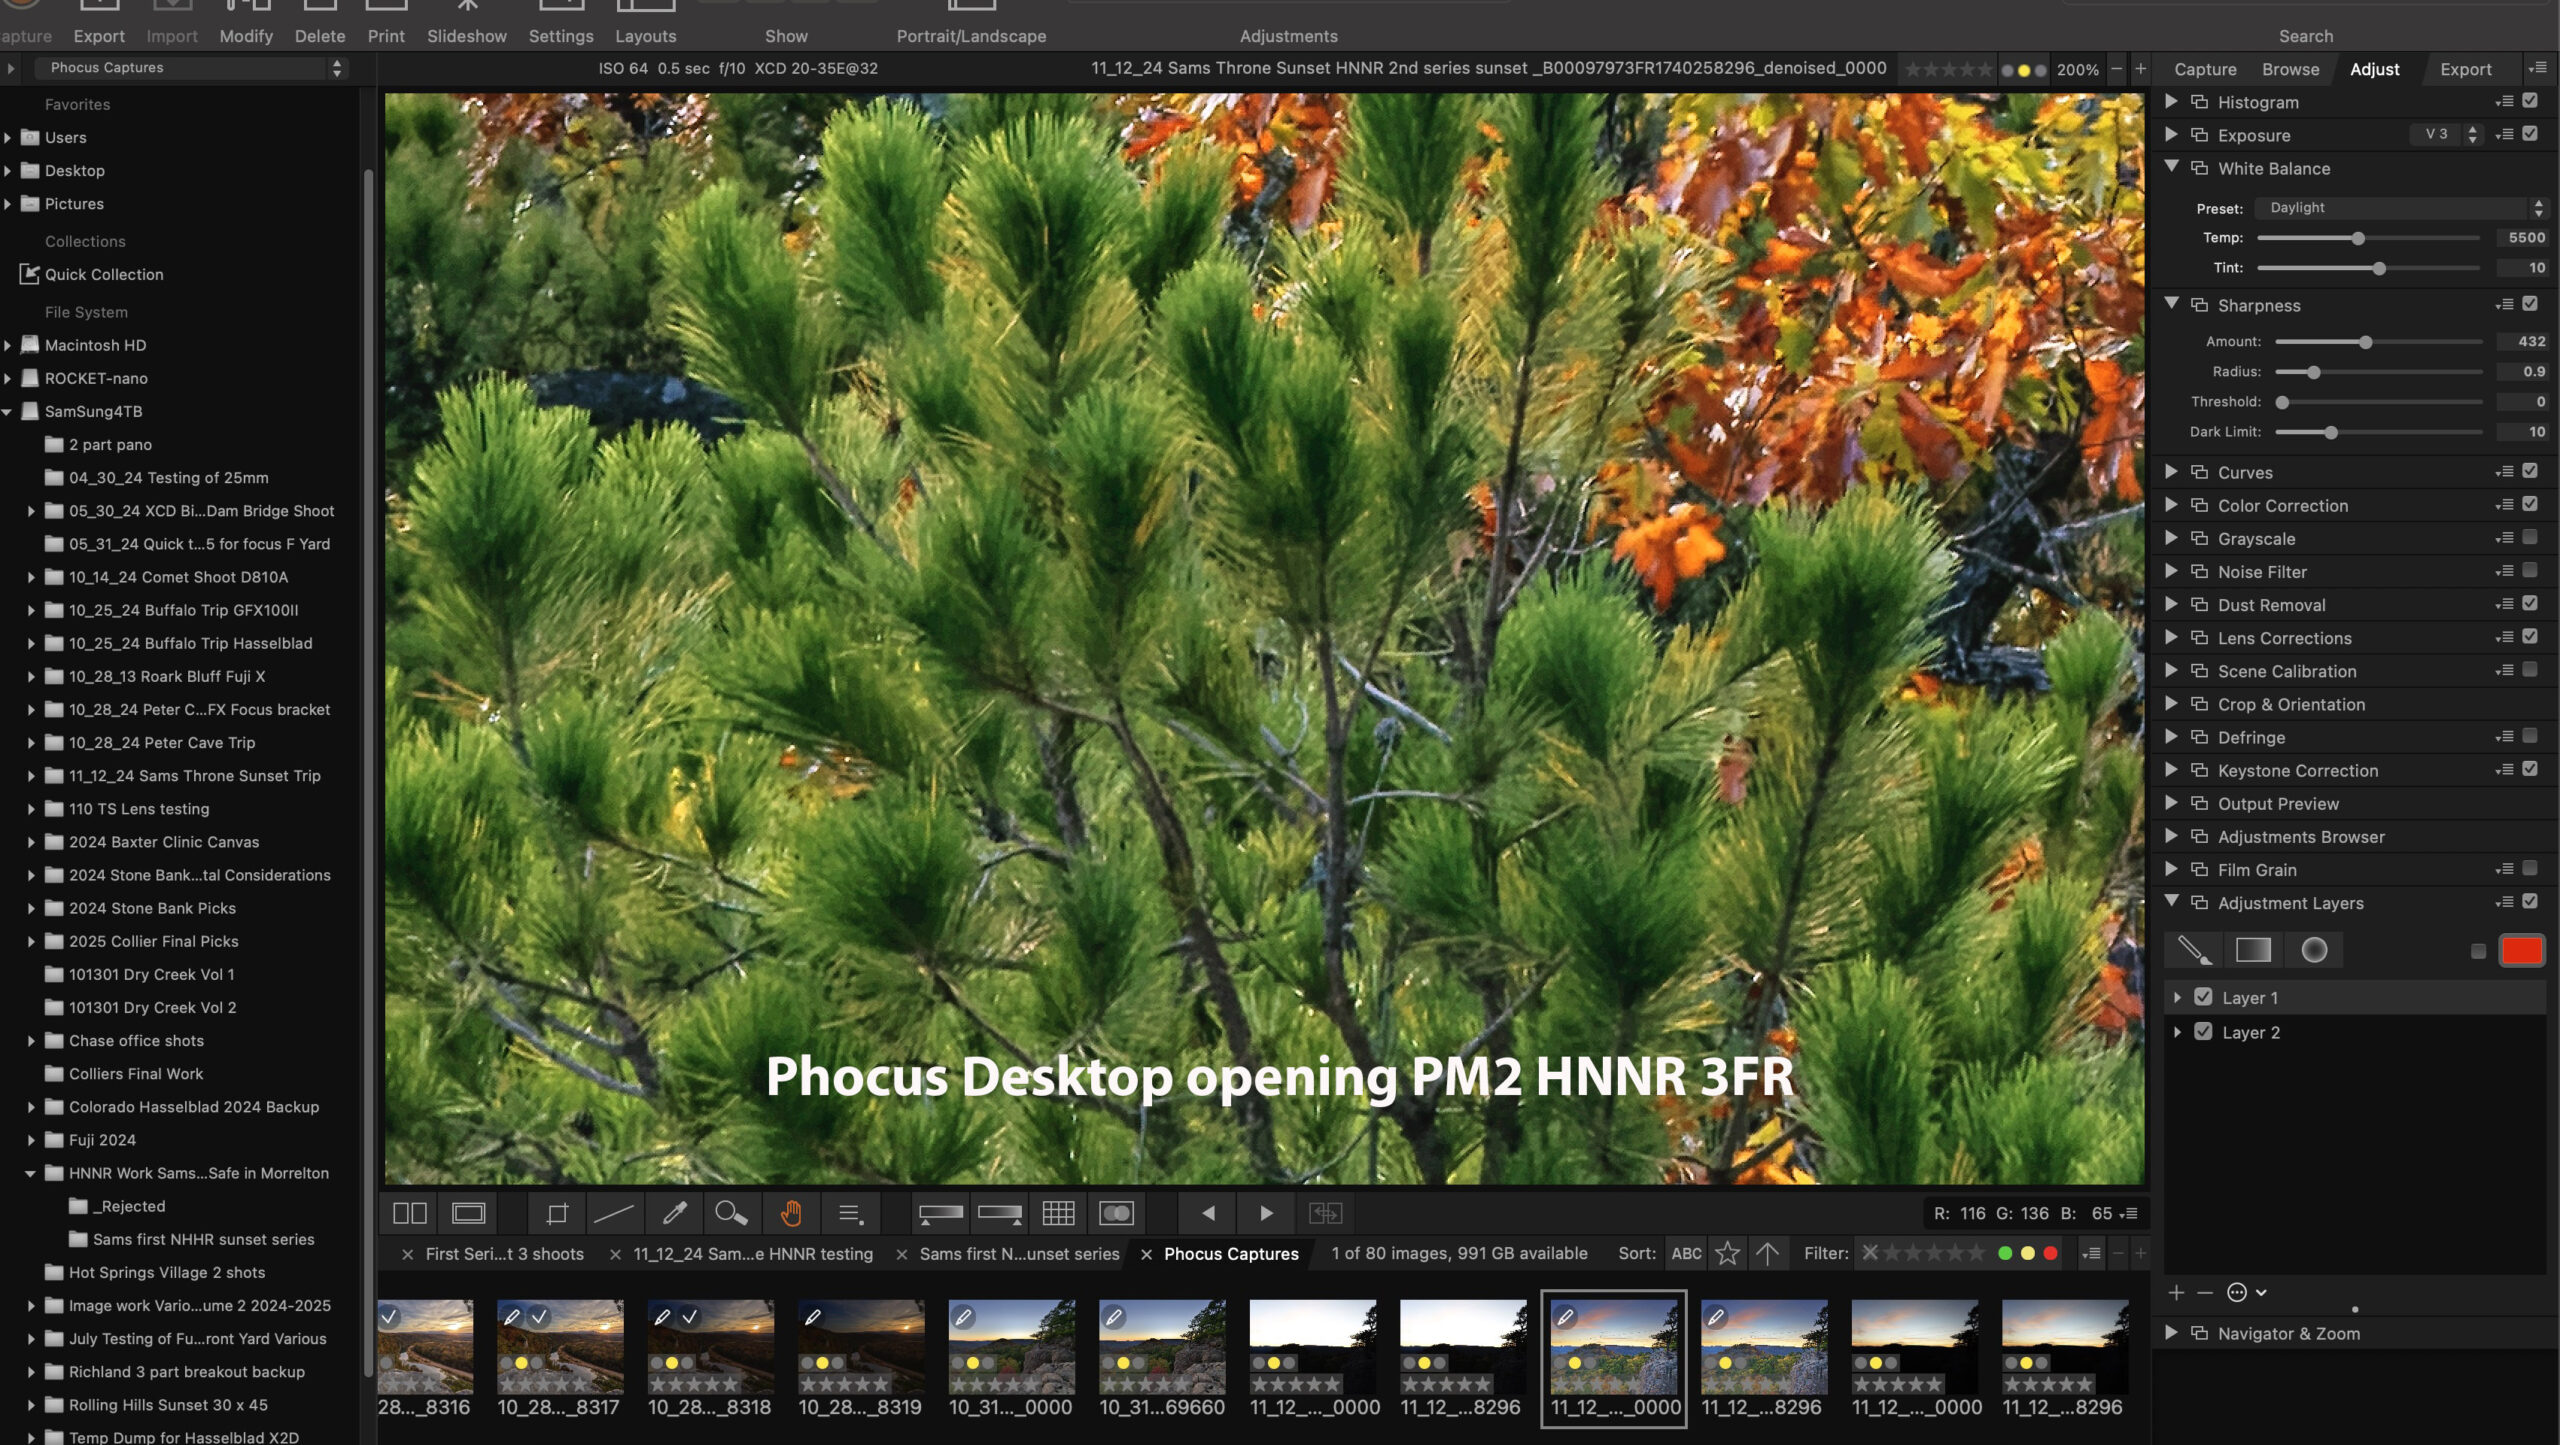
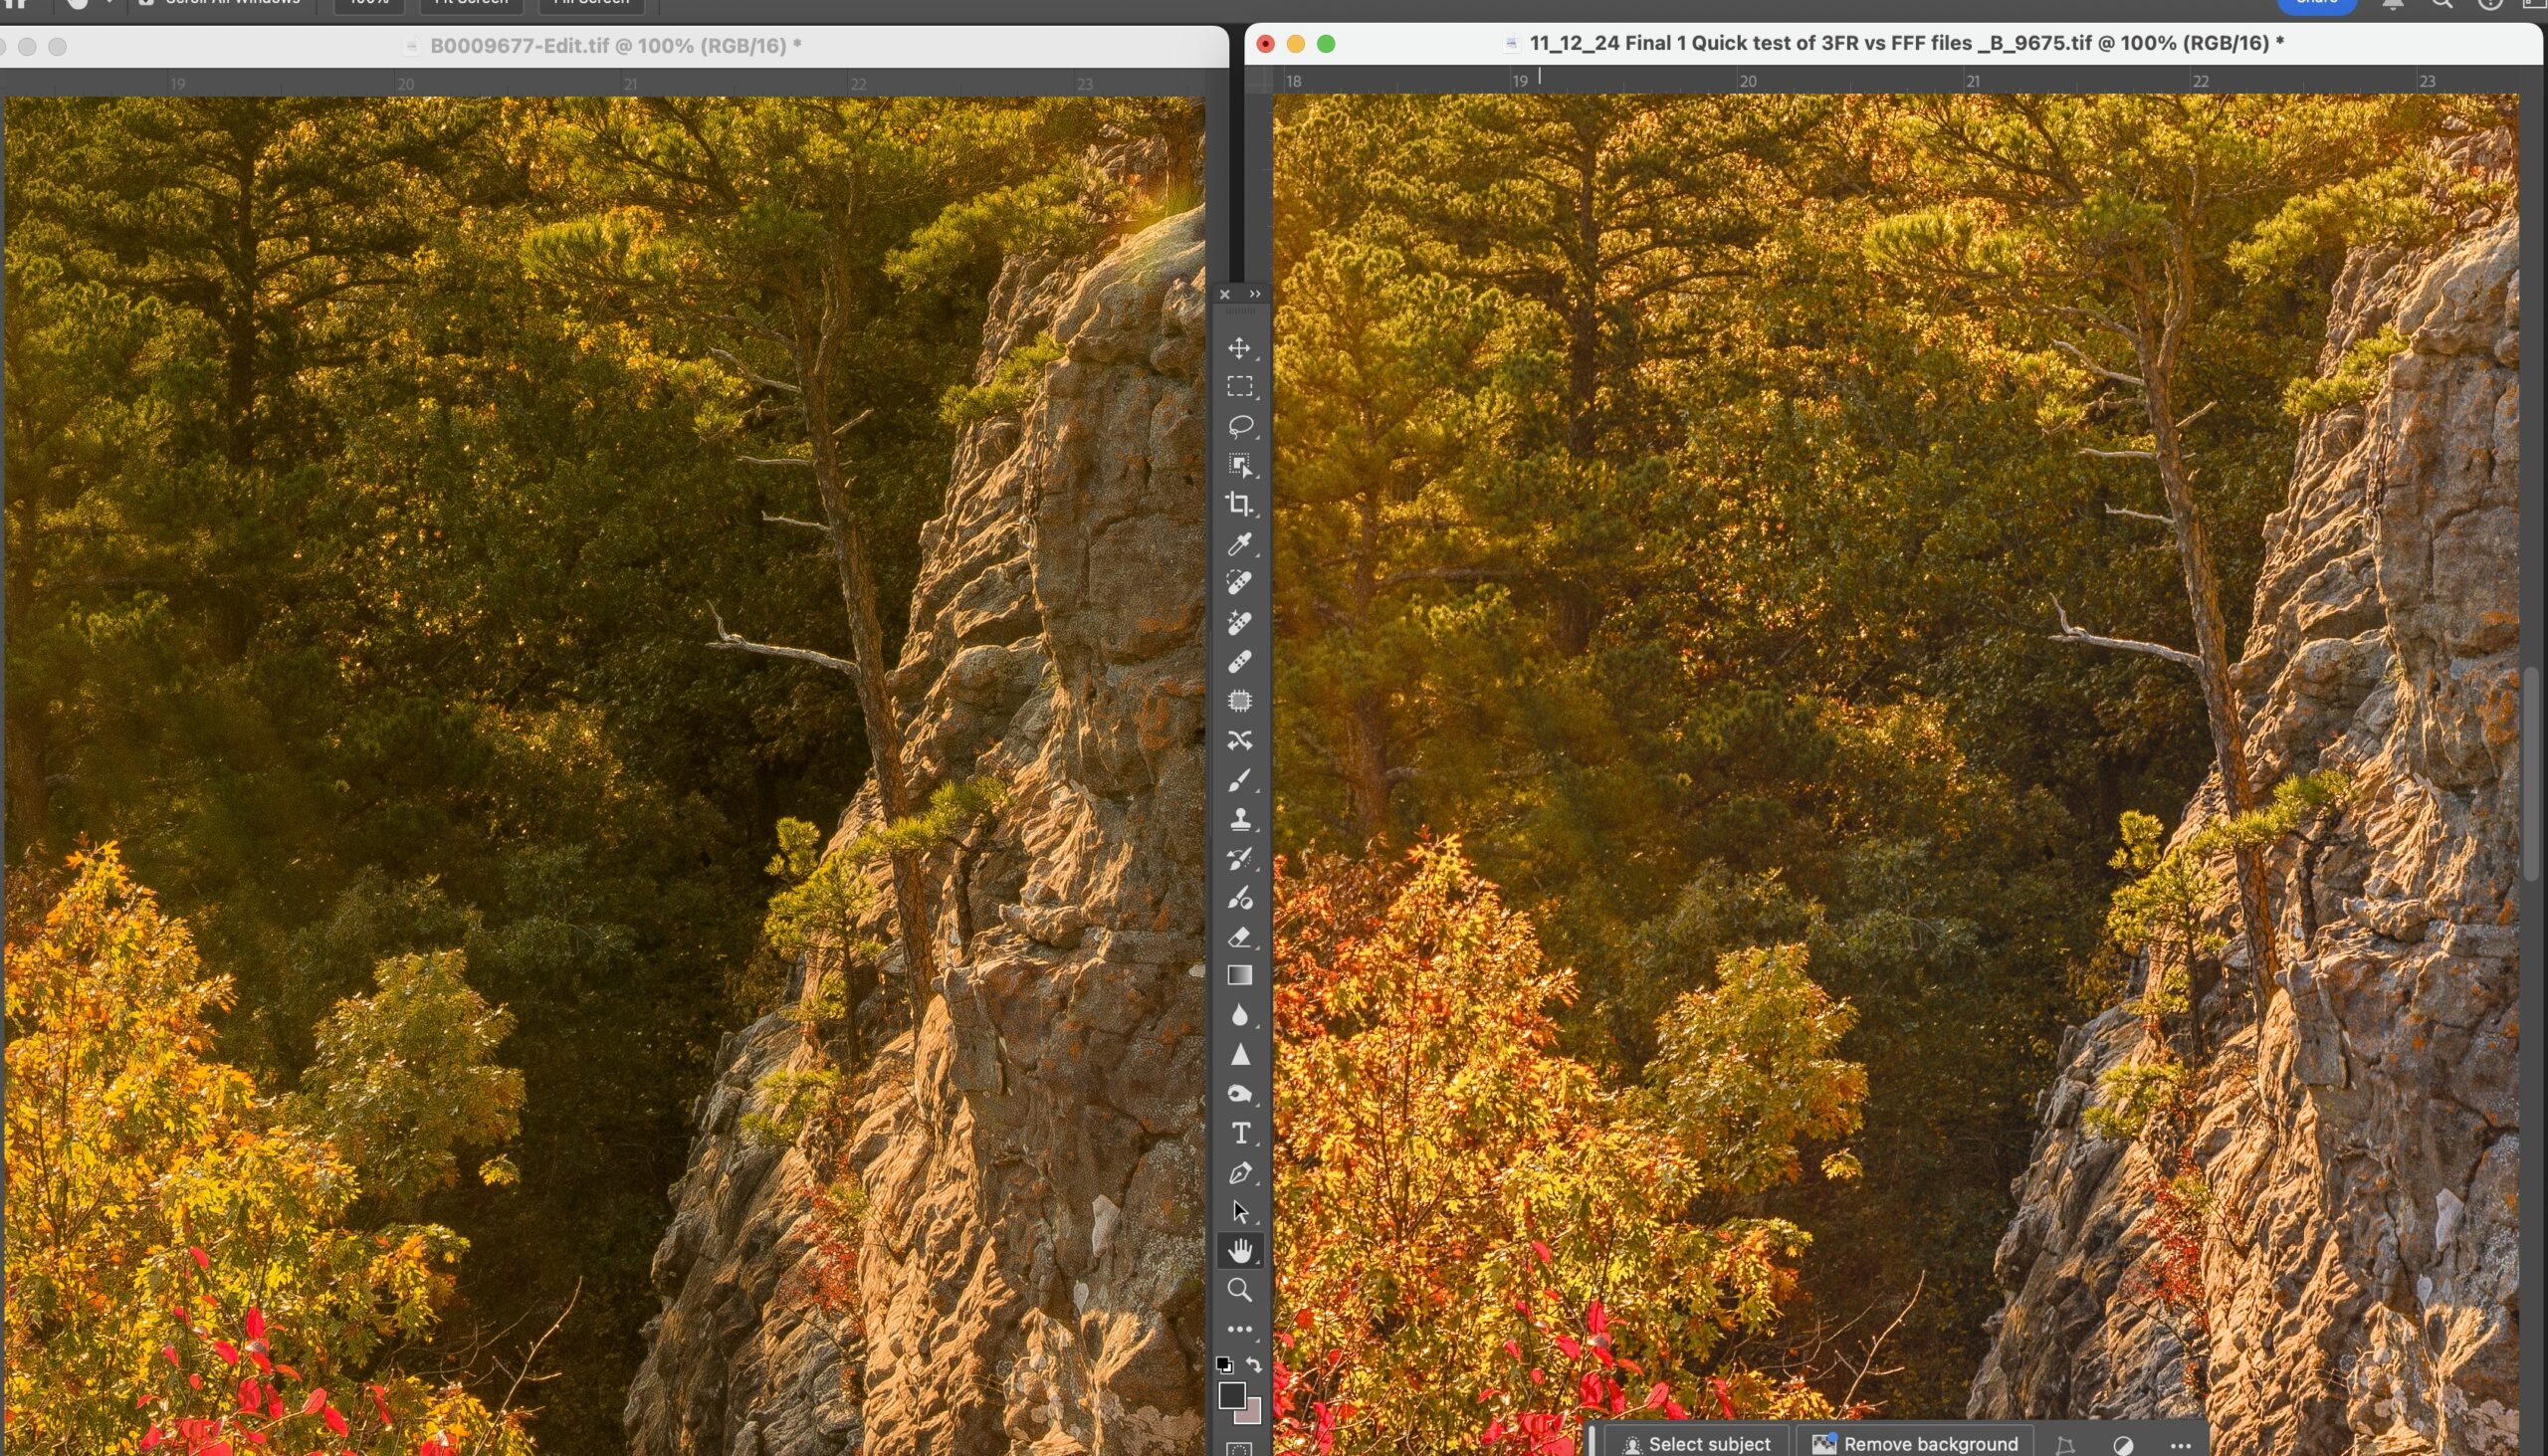
Phocus Desktop import of Phocus Mobile 2 HNNR 3FR, Phocus Desktop 3.84. MacBook Pro M1
Phocus mobile 2 HNNR opened in Phocus, all the details of the pine needles are gone totally smeared.

Phocus Desktop Import of non HNNR treated 3FR, Phocus Desktop 3.84. Macbookpro M1
Another view, straight import into Phocus desktop. Yes, again there is noise, but the details are so much bette and again I had the noise reduction off in Phocus.
One response I received from Hasselblad was to just export the HNNR’s from Phocus Mobile 2 as tif and work on them. Again not what I want to do, I might as well not be shooting raw.
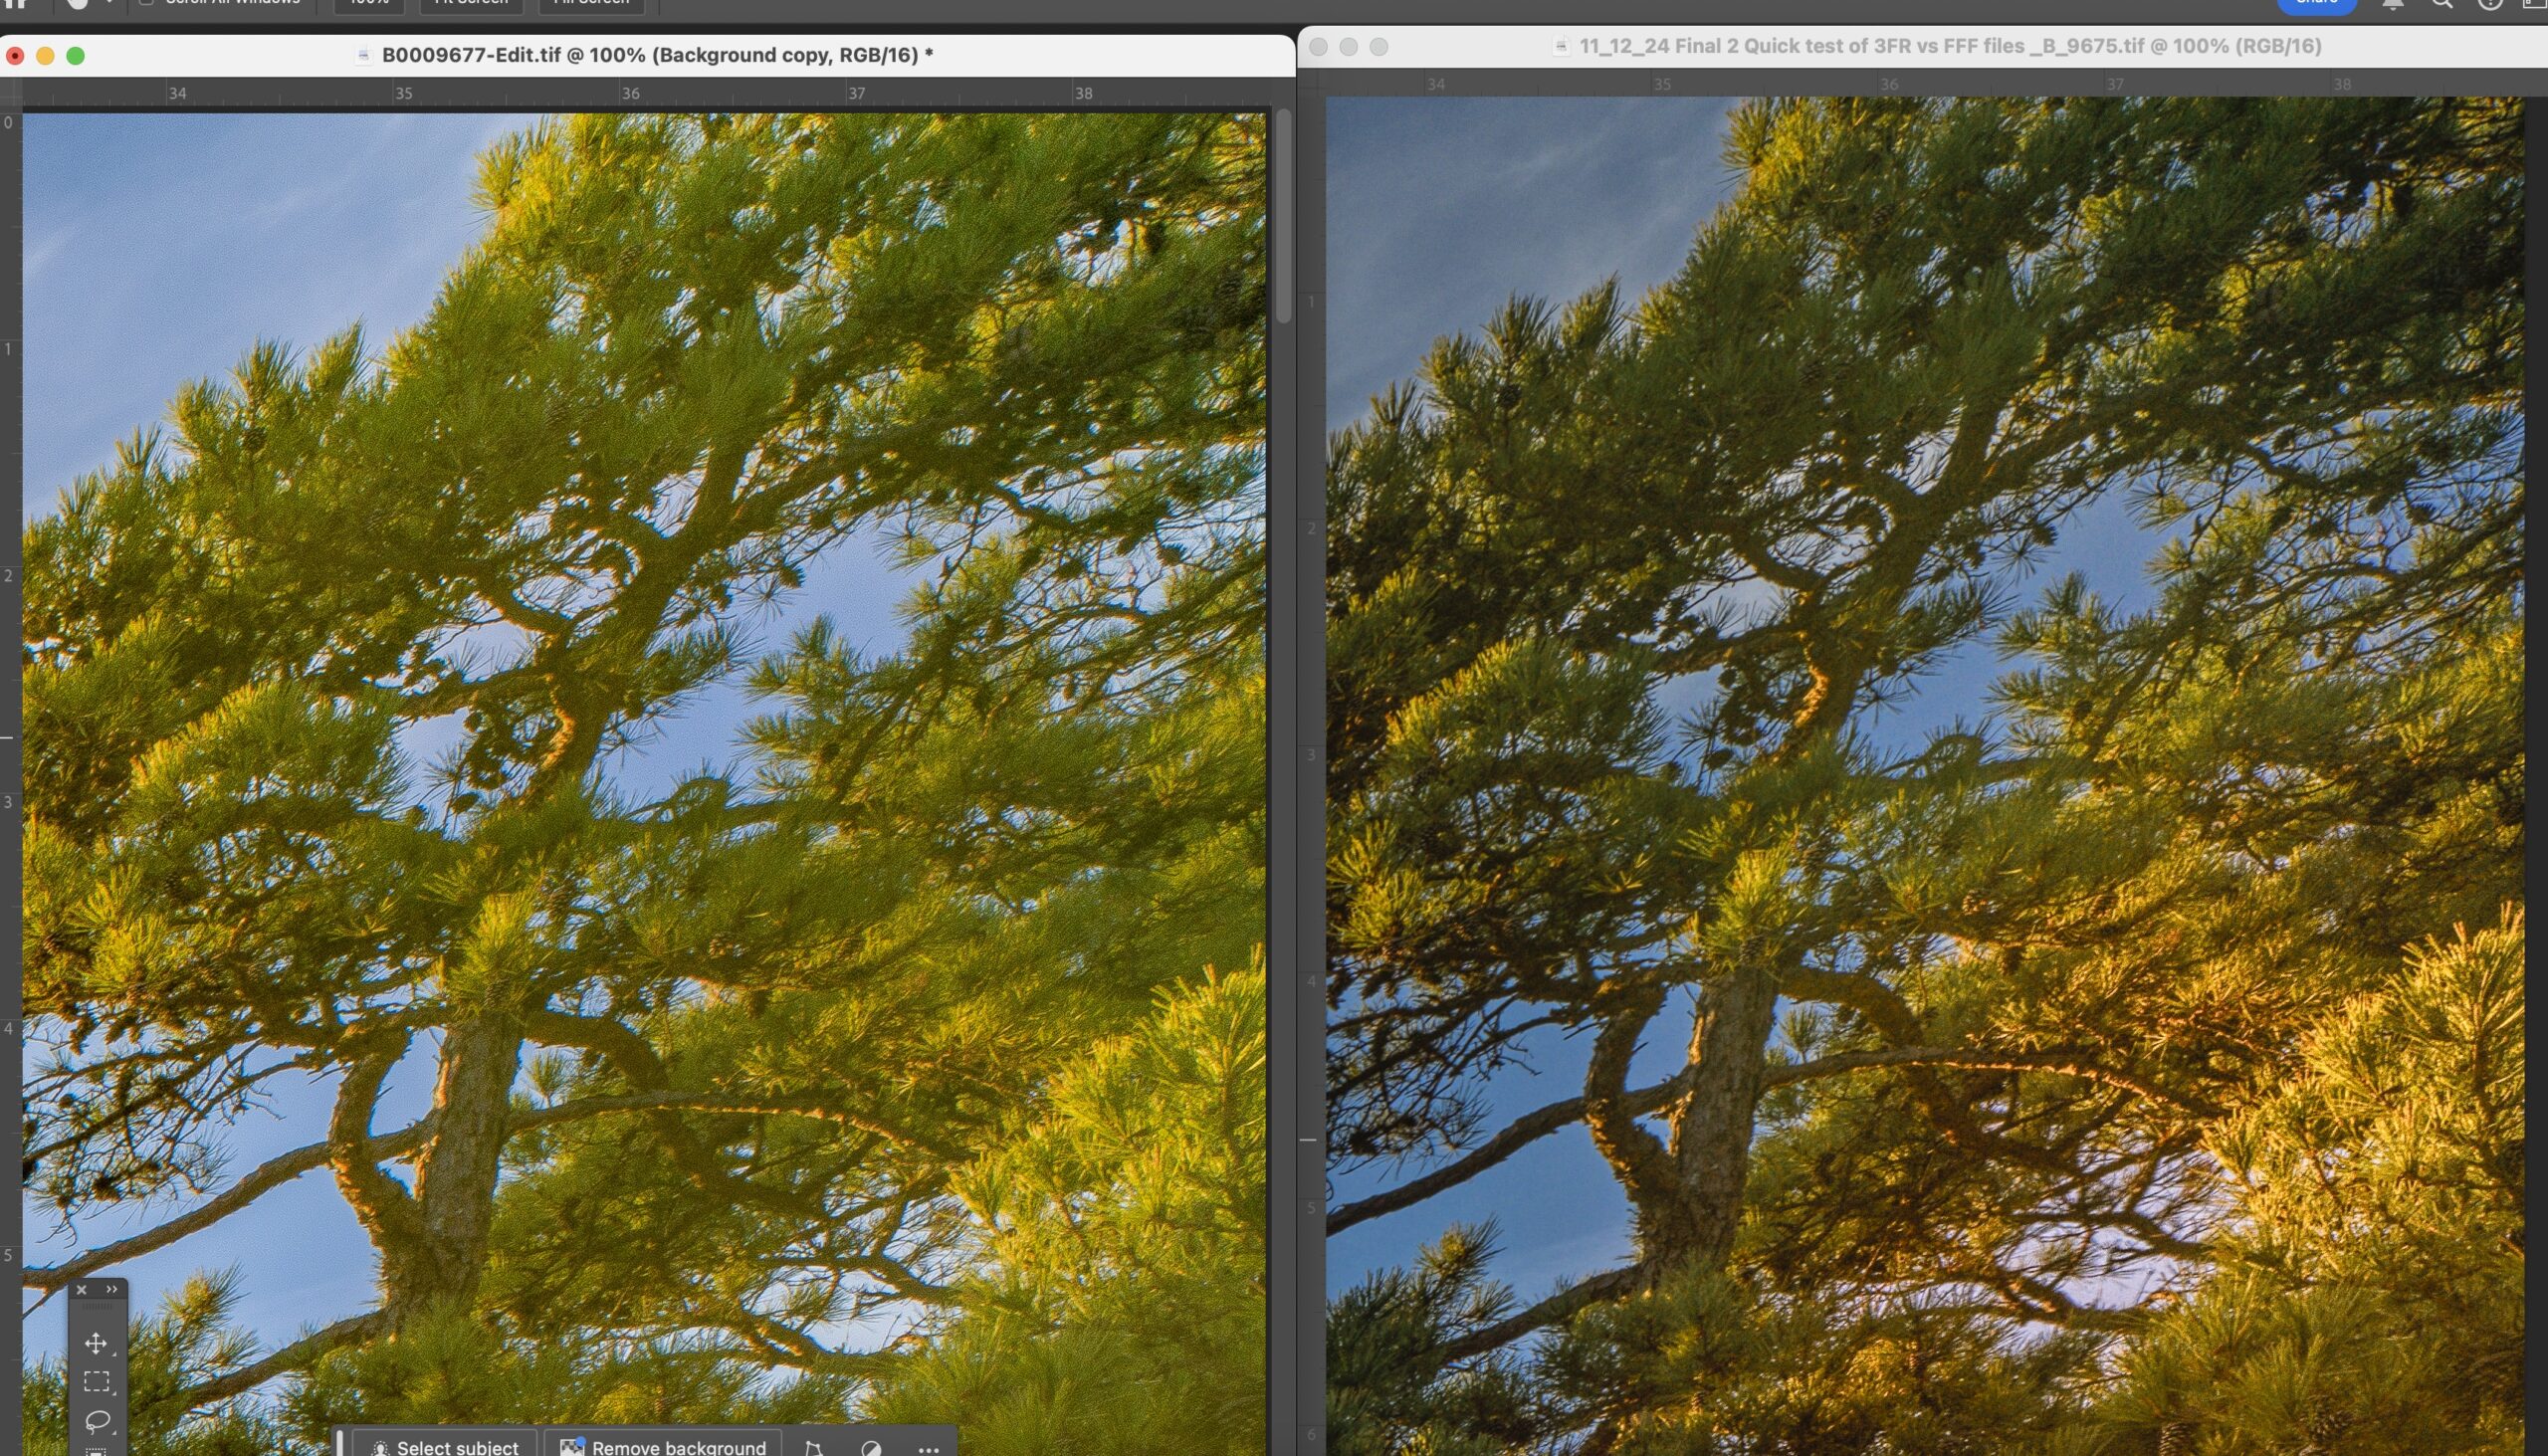
And many still feel that the “camera standard” profile in Lr is OK. I have tried over and over to make this work, but it’s not going to give anywhere the same colors as HNCS. So that’s out. See examples below.
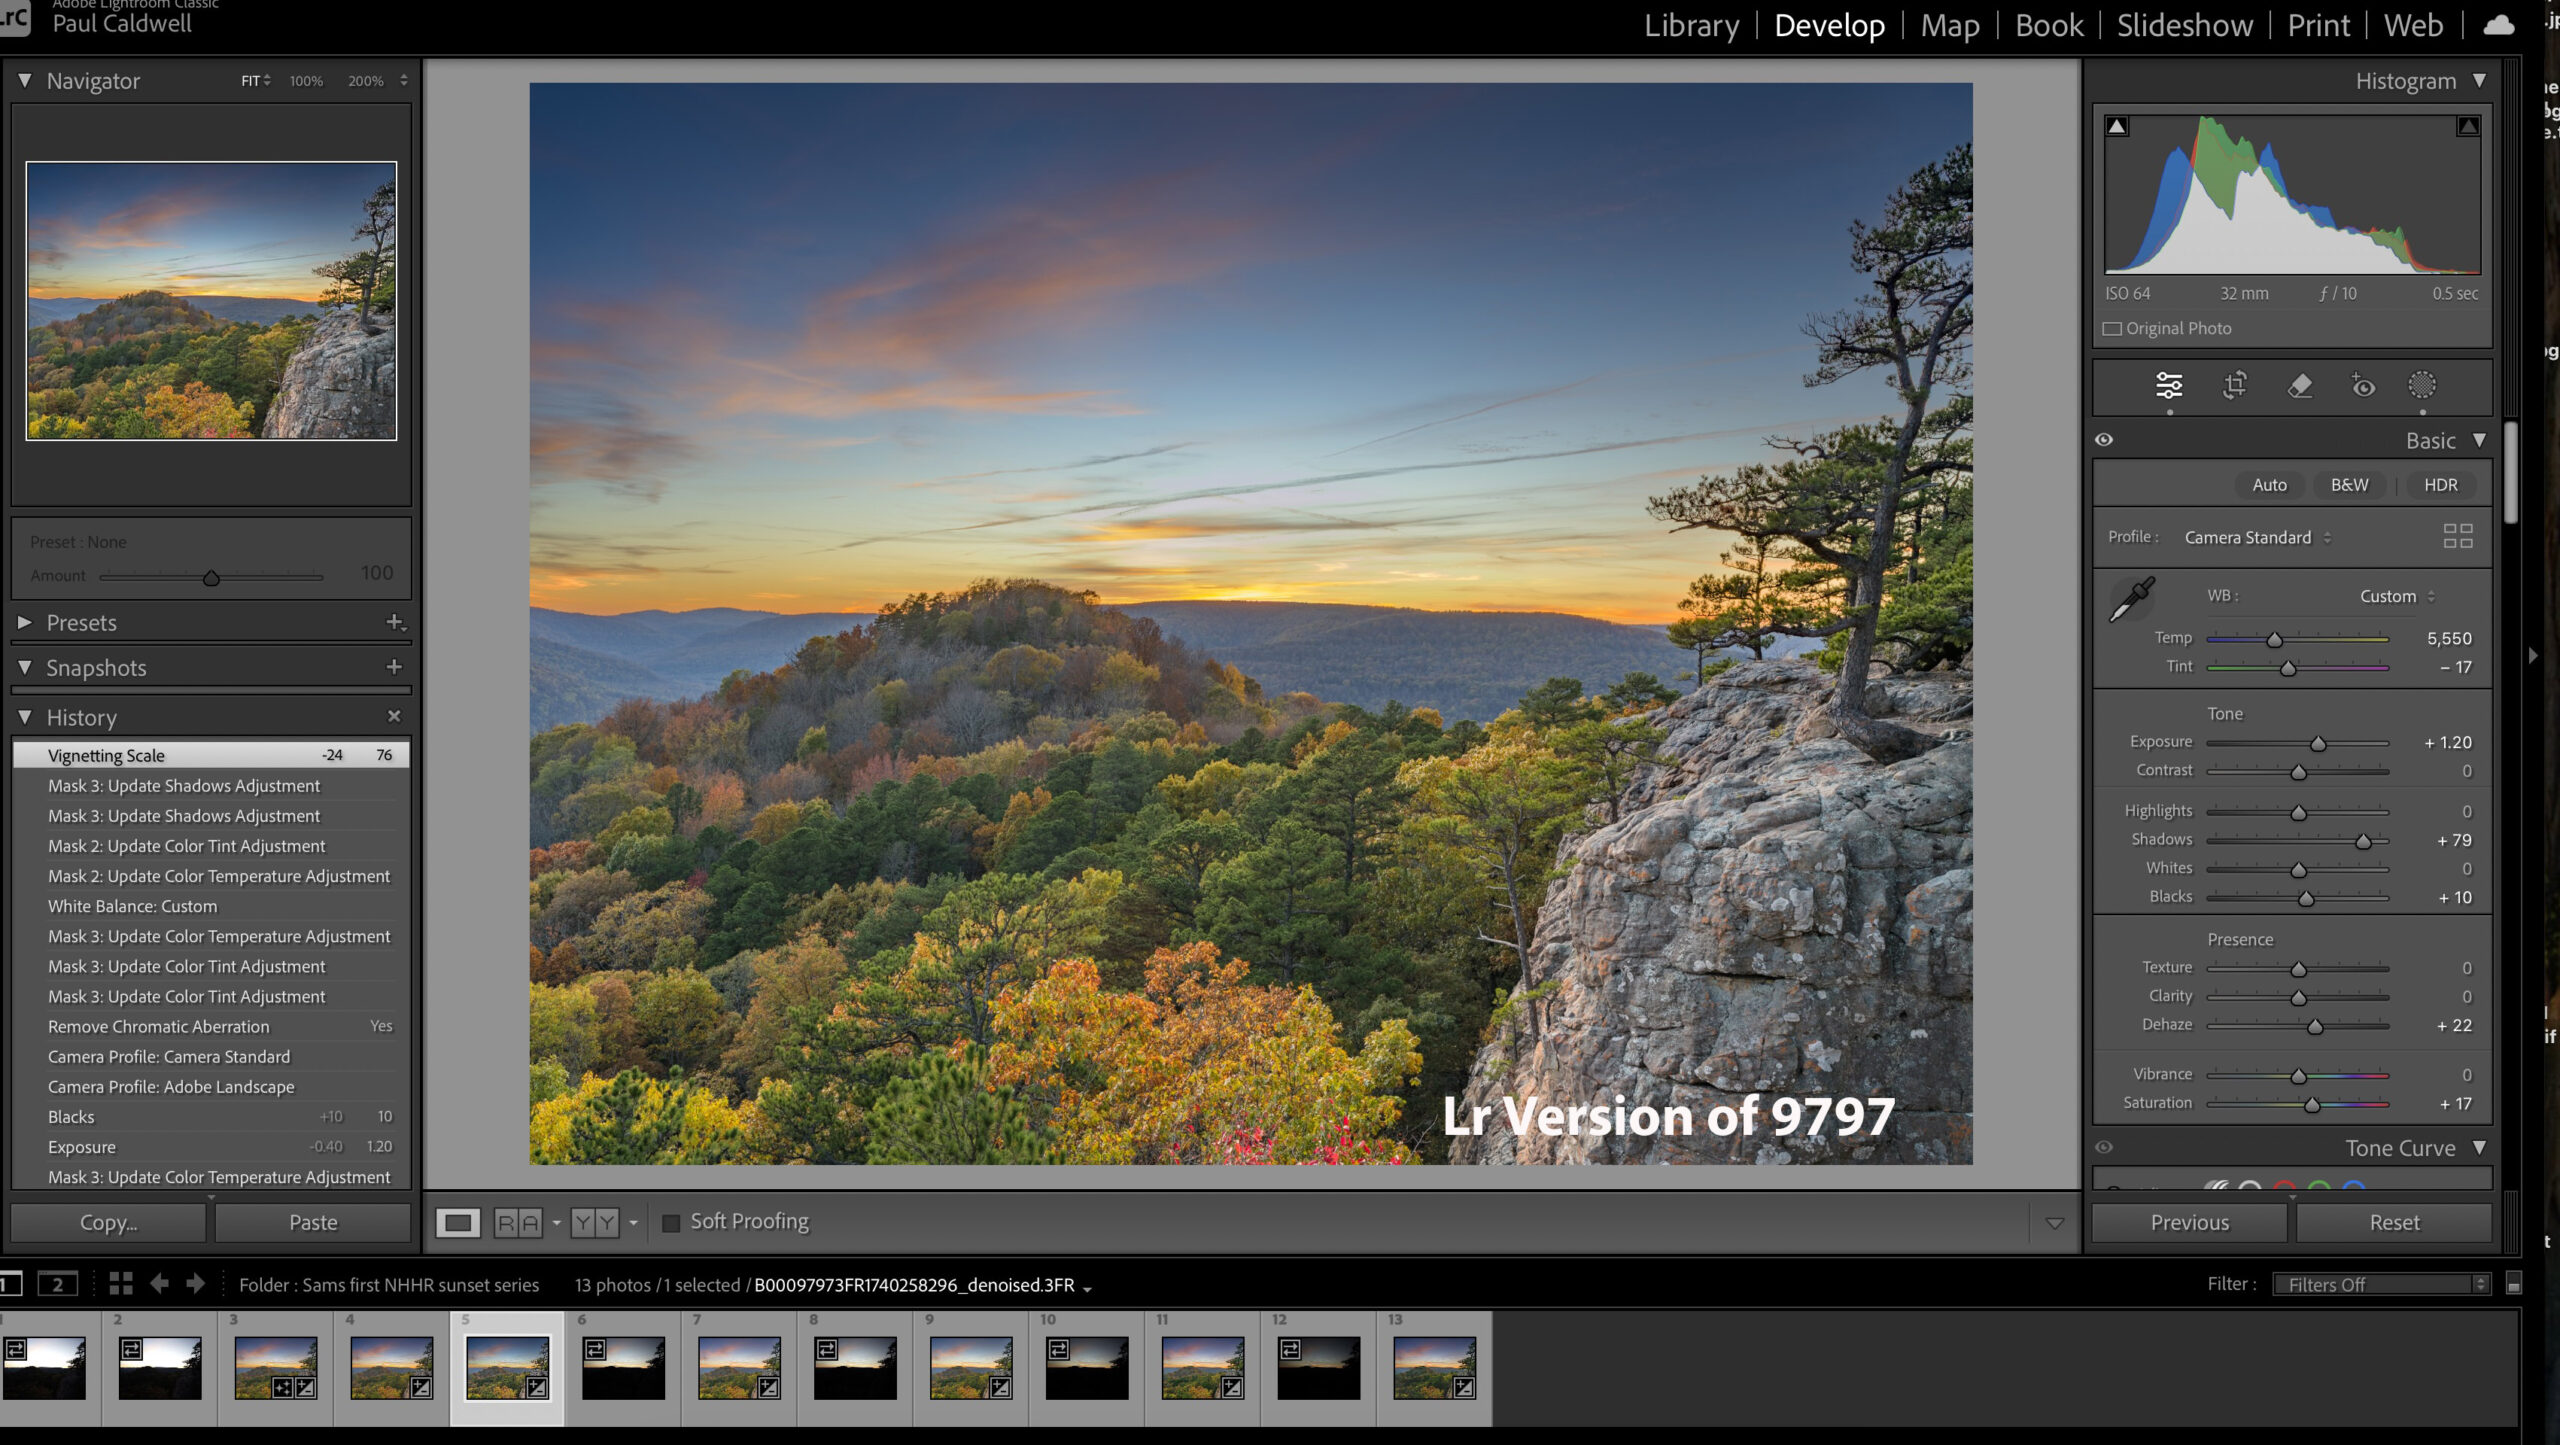
Lr version of 3FR 9797
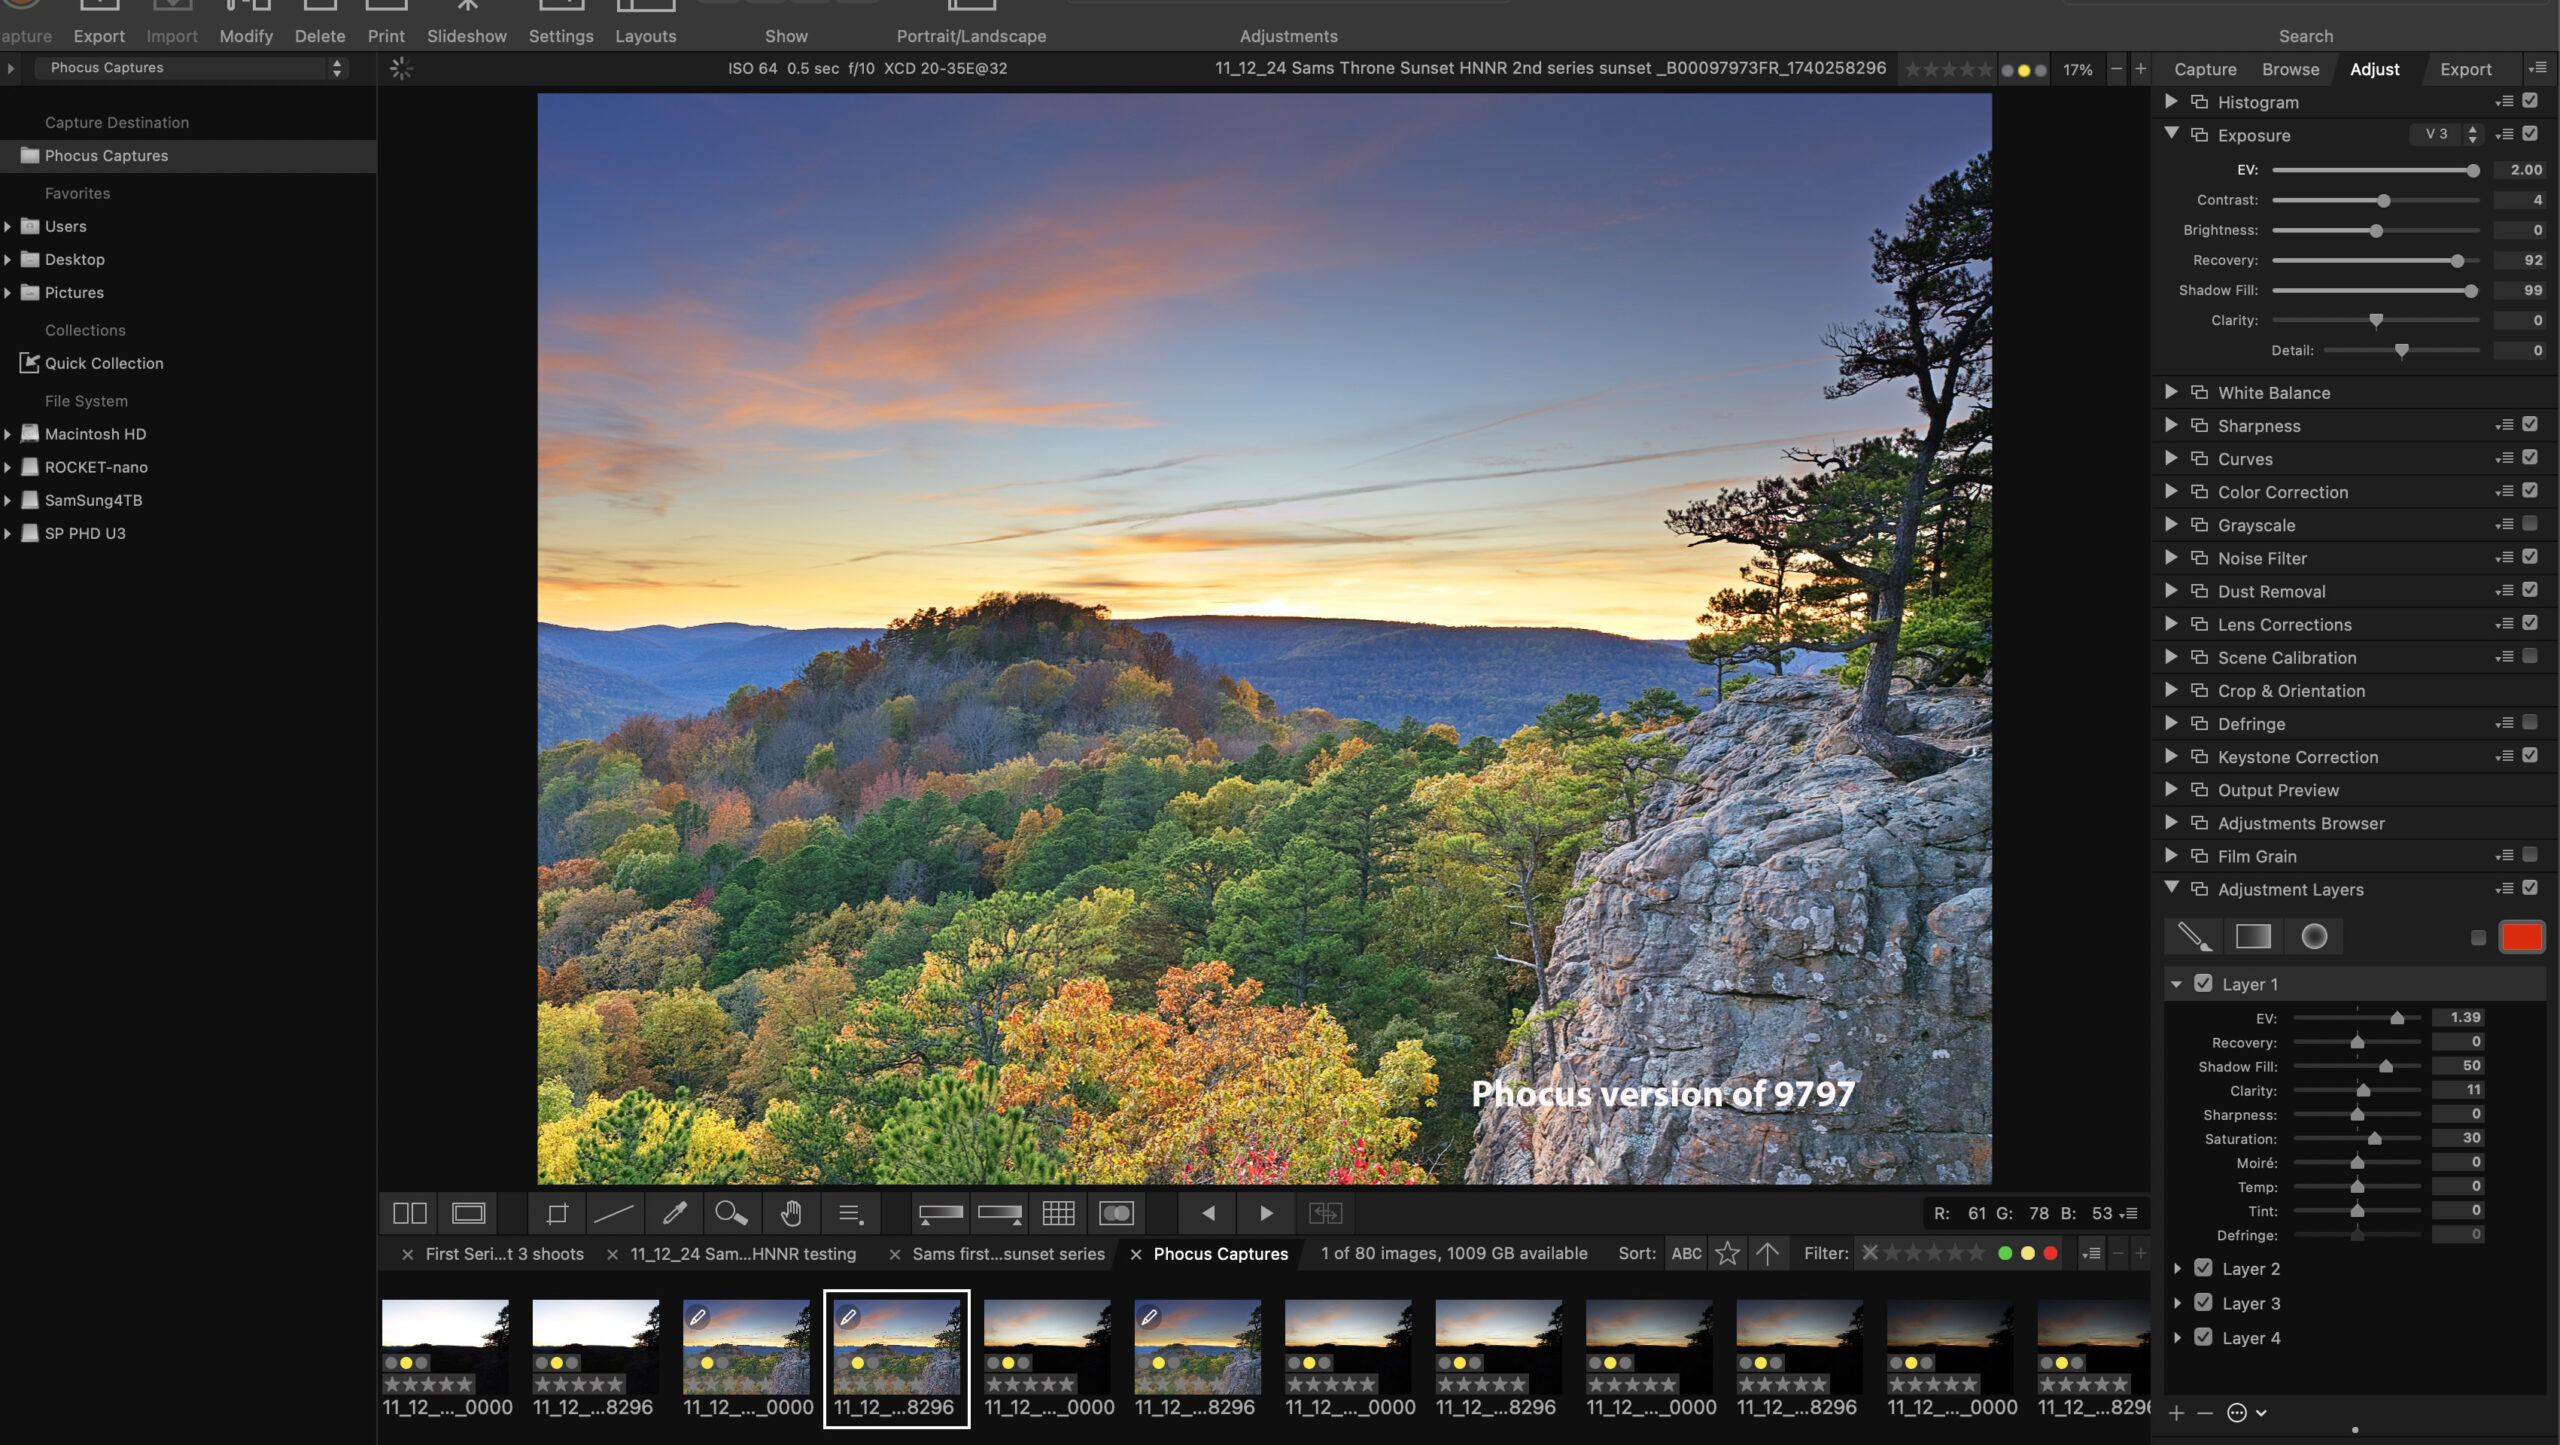
Phocus version of 3FR 9797
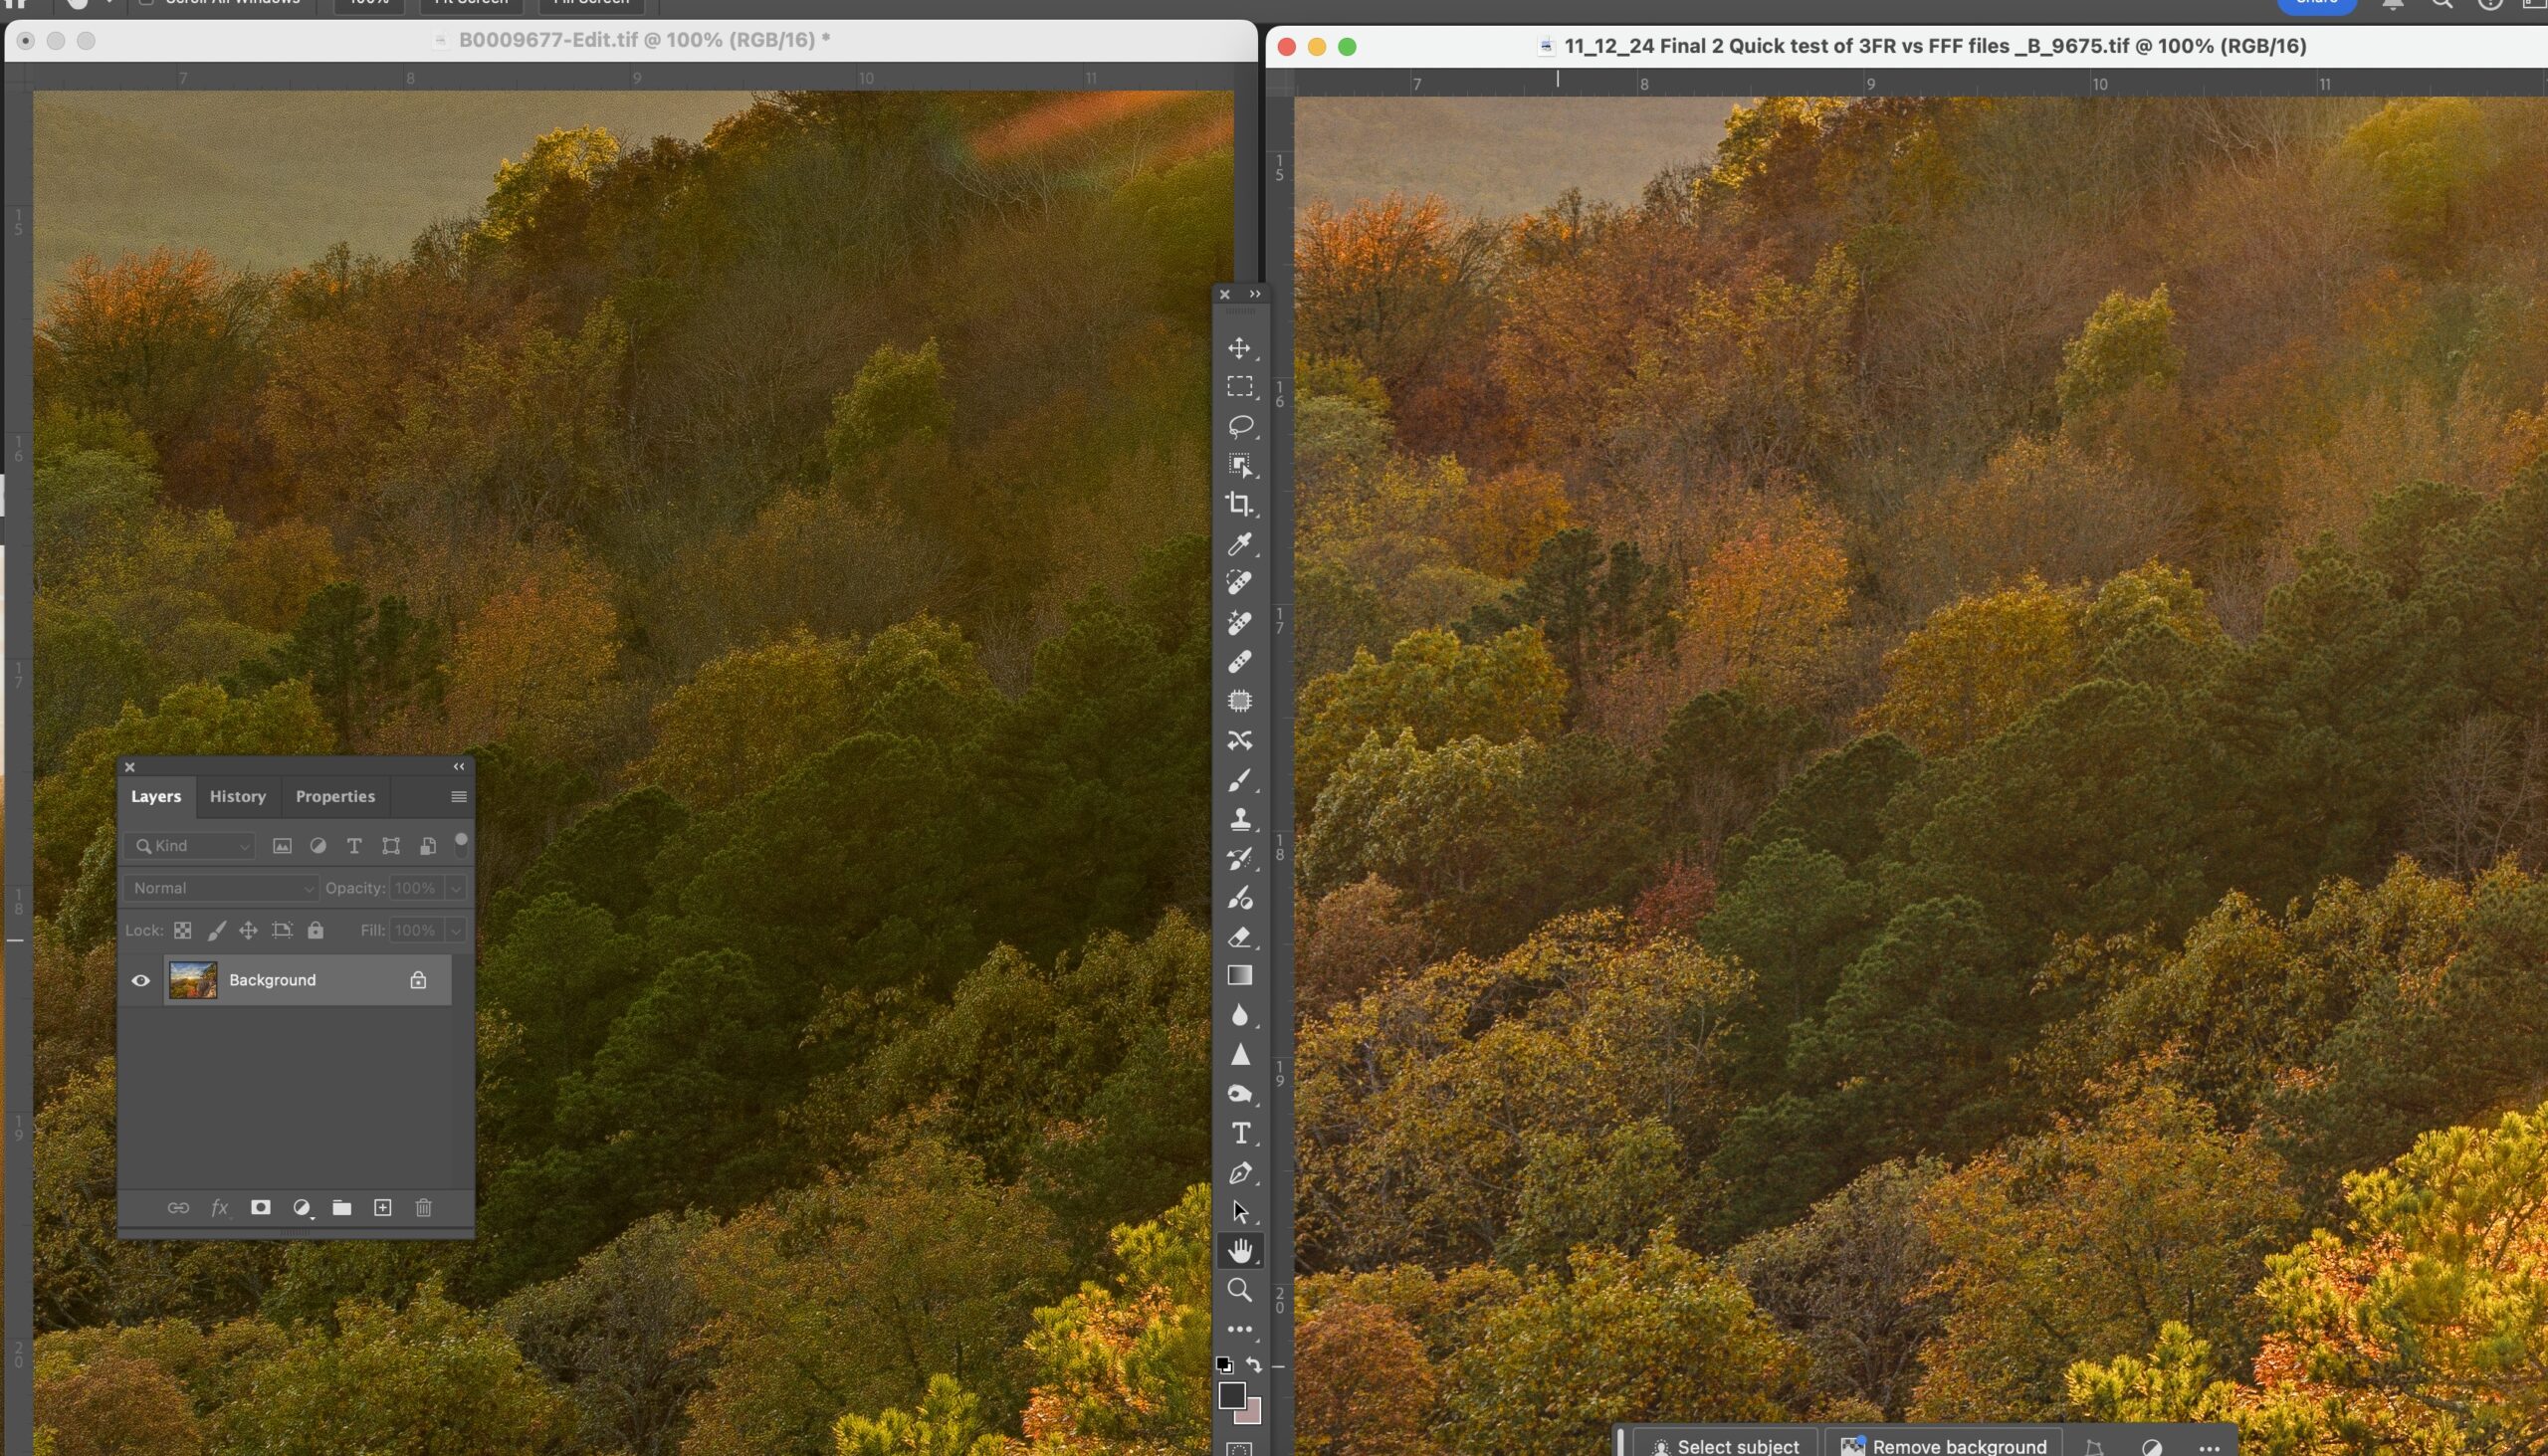
Really the only thing I find that Lr/ACR does better is the ability to save highlights as Phocus even with the recovery slider misses extreme highlights. But in these two examples the greens are so much better along with the overall blend of color and the sky is vastly superior. Shadows are also much better resolved in Phocus as Lr tends to blacken shadows too much.
By creating the HNNR process, Hasselblad has moved quickly to the fore front of noise reduction processing, albeit at a total loss of the cornerstone of their entire digital camera marketing and prowess HNCS. The fact that Hasselblad has not released anything about to an upcoming fix for this issue is frankly an amazing oversight.
NOTE: There is nothing wrong with the 3FR treated with HNNR as seen in this screenshot taken from Lr: The image is clean of basically all noise and it still retains all of the finer details. It’s just that since I have imported a 3FR into Lr, I am forced into the “camera standard” profile and no longer can use HNCS. This is HUGE HUGE issue. Please fix this Hasselblad.
200% view of HNNR 3FR from Phocus Mobile 2 imported to Lr
Notes on comparison images: Please understand that Phocus Desktop has a very limited toolset i.e. sky select is not an option. The image shown of 9797 from Phocus has a lot of problems in the upper right due to the inability to select the sky and then invert it to help pull up the shadows on the trees to the right. This was fixed later on. I wanted to show this view more for the difference in color.
Obvious everyone has different priorities and how they process out files. I used my standard process with in Lr and Phocus to gain what I felt was the best representation of the image. I feel strongly that Lr limits X2D raw conversion with the “camera standard” color profile.
Paul C
Written for Photos of Arkansas by Paul Caldwell 03/17/25, please ask for permission to re-print.
03/10/25 New video on the “New Camera coming from DJI/Hasselblad”

Hasselblad X2D
I just watched yet another click bait video about the “new” camera coming from Hasselblad. The authors hints at 150MP in place of the current 100MP in the X2D. However currently there is not a 150MP cropped sensor chip that I am aware of. The only 150MP chip is in the Phase One IQ4, and that chip will not fit in the body of the X2D. So once again, click and watch, add to their subscription and get them paid. What a joke. It’s amazing to me that people are willing to watch this kind of crap. Do your homework. You can expect an upgrade to the X2D, the current body is long in the tooth and it does need to improved.
I love these folks who post videos like this, total click bait. What’s going to come, new camera, great new sensor?
Anyone who follows the sensor tech knows that there is not a 150MP cropped sensor out there at least so far. That leaves the 150MP sensor in the IQ4 which I don’t believe that will work due to size.
DJI/Hasselbald refreshed the X1D to the X1D II and gave it the features it really needed to compete. It’s safe to assume that this will be a camera with the same sensor, and MAYBE:
AF-C, sensor cleaning cycle, joystick (what a total omission from the first X2D), slight fast and more accurate AF, Newer faster processor. Still 8K, but it might make the original X2D come down in price so a 2nd body might be more affordable. Maybe some form of a remote? Wired or non-wired?
What REALLY needs to be done is have DJI/Hasselblad rework Phocus desktop. Bring it out of the dark ages, and make it work as well as other raw software. I personally love all the comments about how Lr is so close in color. It’s not, period. You purchased the camera hopefully to take advantage of NHCS, and the only solution that gives you that is Phocus. Sadly using Phocus is tedious at best. I would love to watch a video on an updated version of Phocus Desktop, bringing it out of the dark ages.
Just a side note, DJI/Hasselblad brings out HNNR, which give excellent results, however the workflow is terrible. Having to use the Phocus Mobile 2 as the interface, and by using it you no longer can use Phocus Desktop as it applies too much noise reduction to the HNNR files. So great, you have an excellent noise reduction solution that removes 95 to 98 percent of hot pixels, and you lose the ability to have HNCS. This should have been figured out before DJI/Hasselblad released the HNNR, or do they really think you are going to do all your work on a 13 or 10 inch iPad? That’s an insult IMO.
So, instead, let’s bring out an updates X2D.
Paul
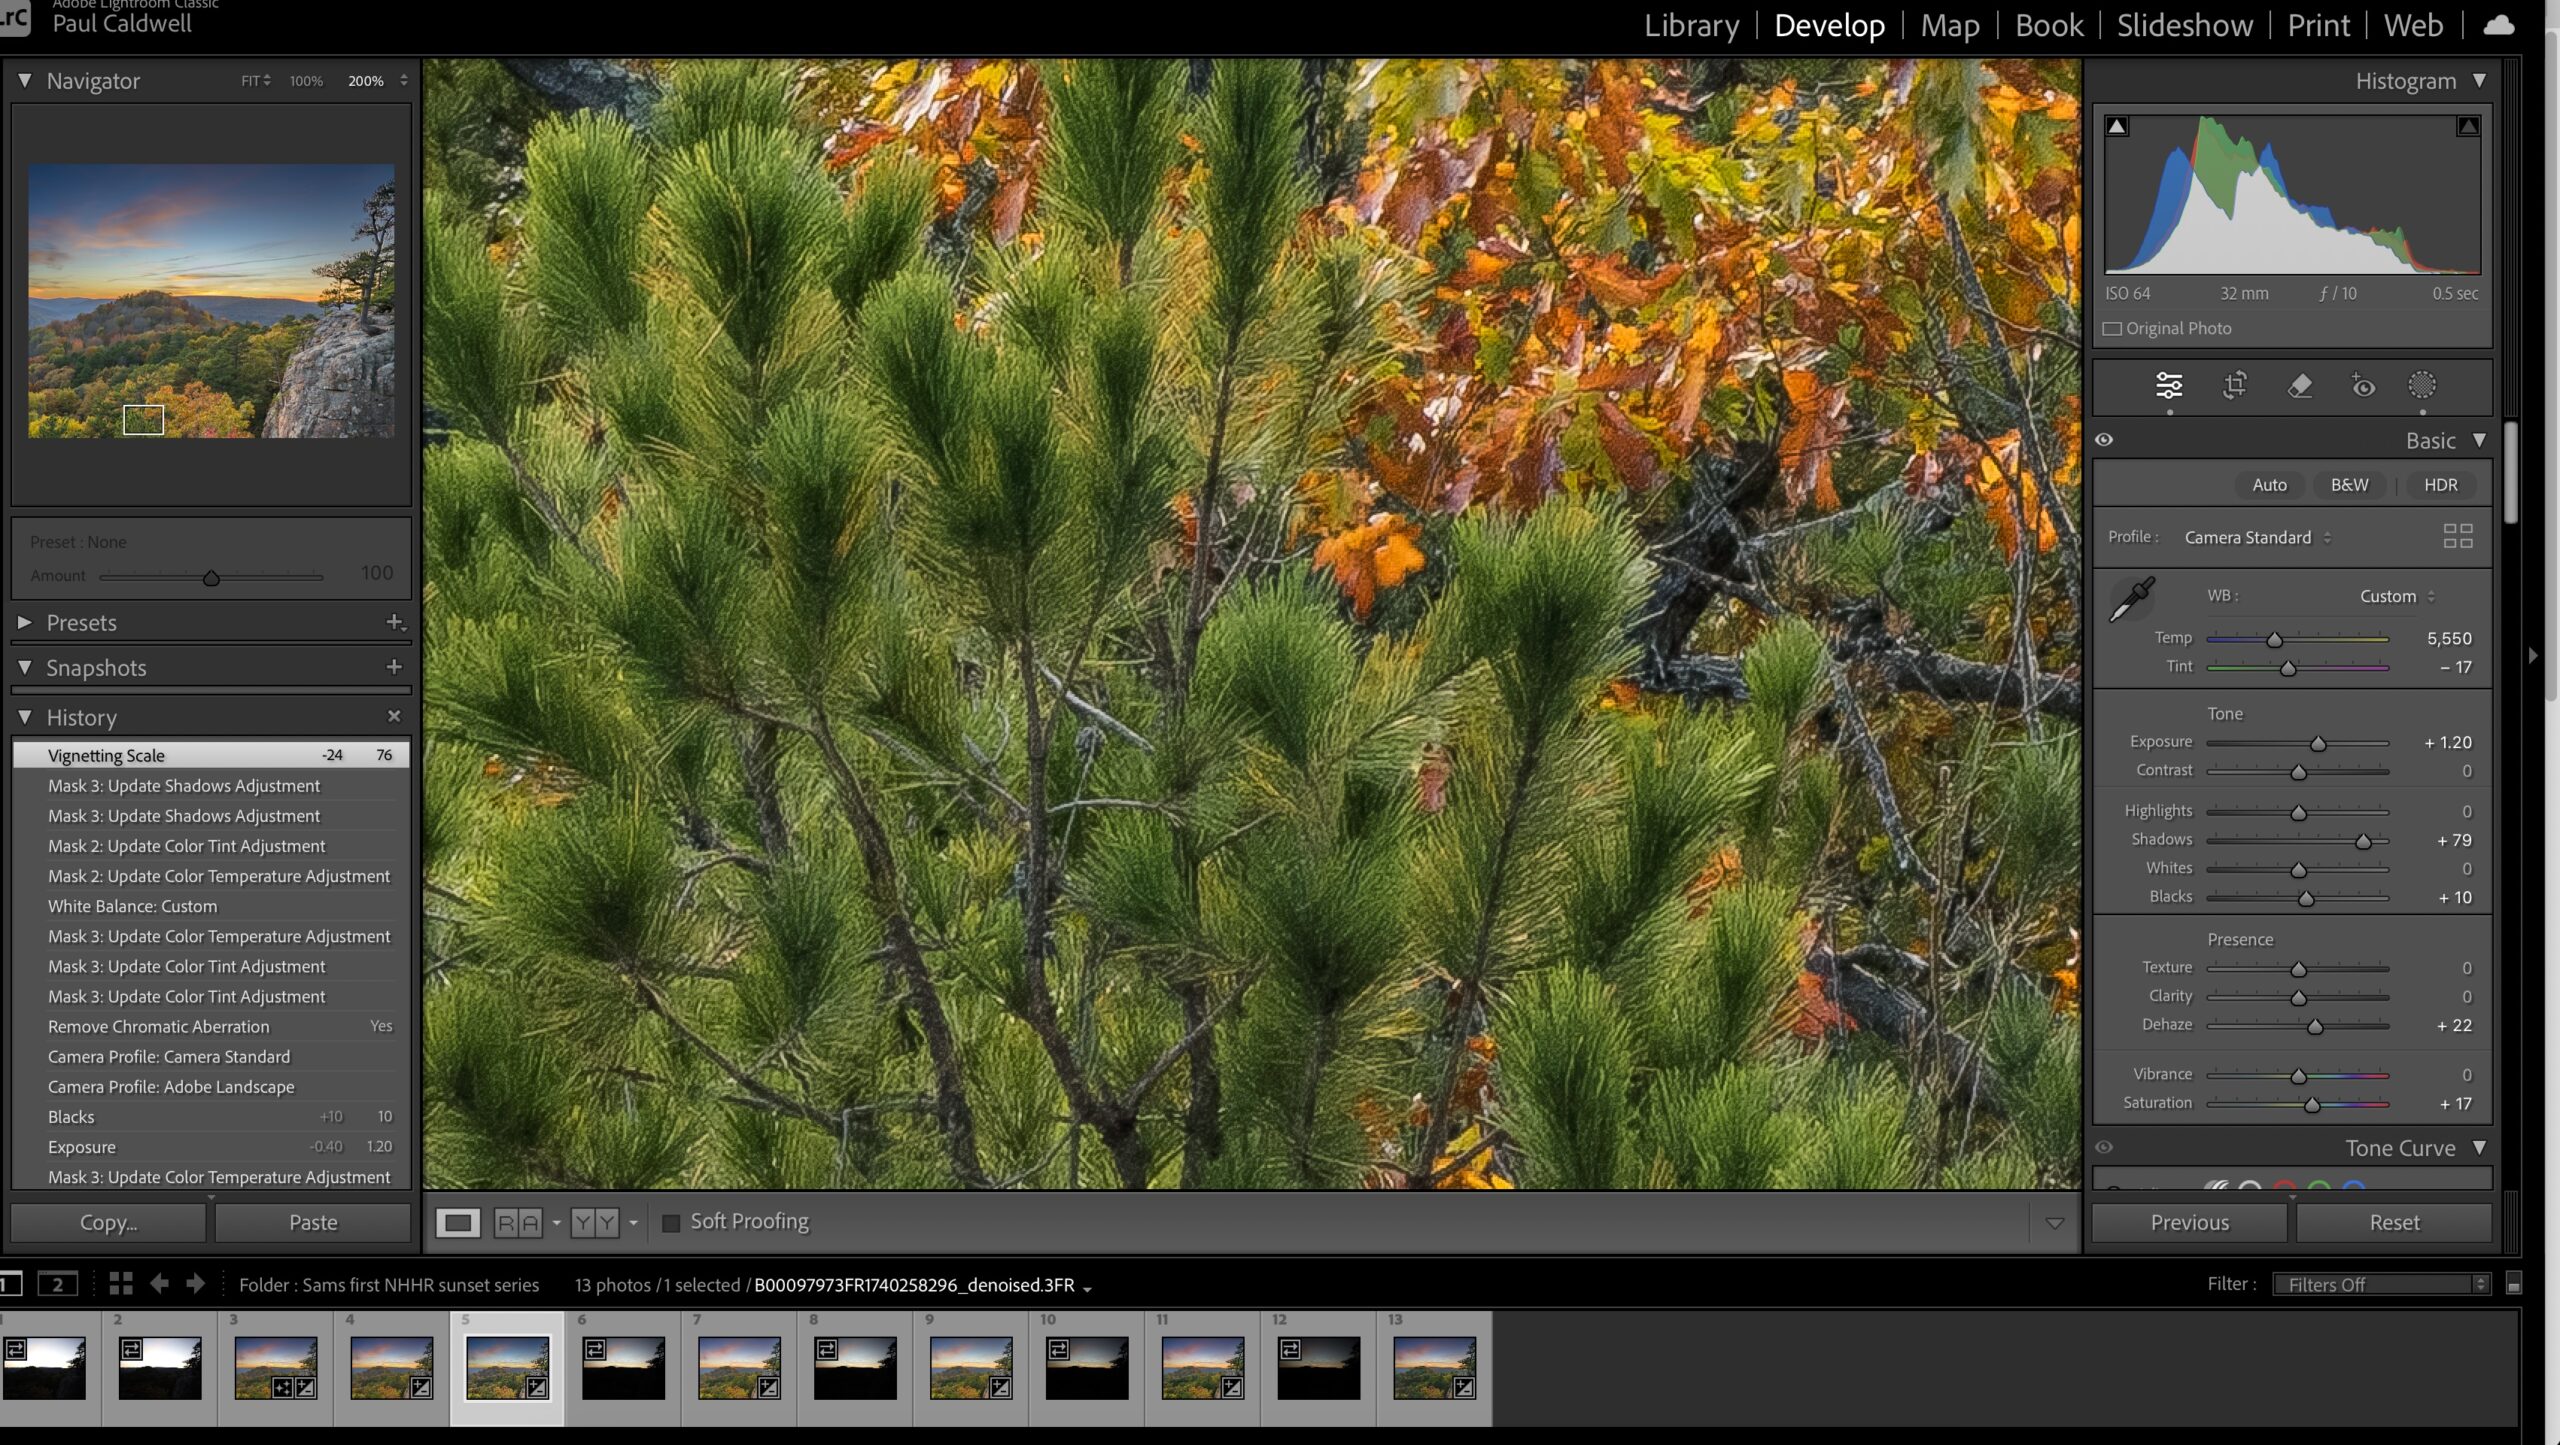
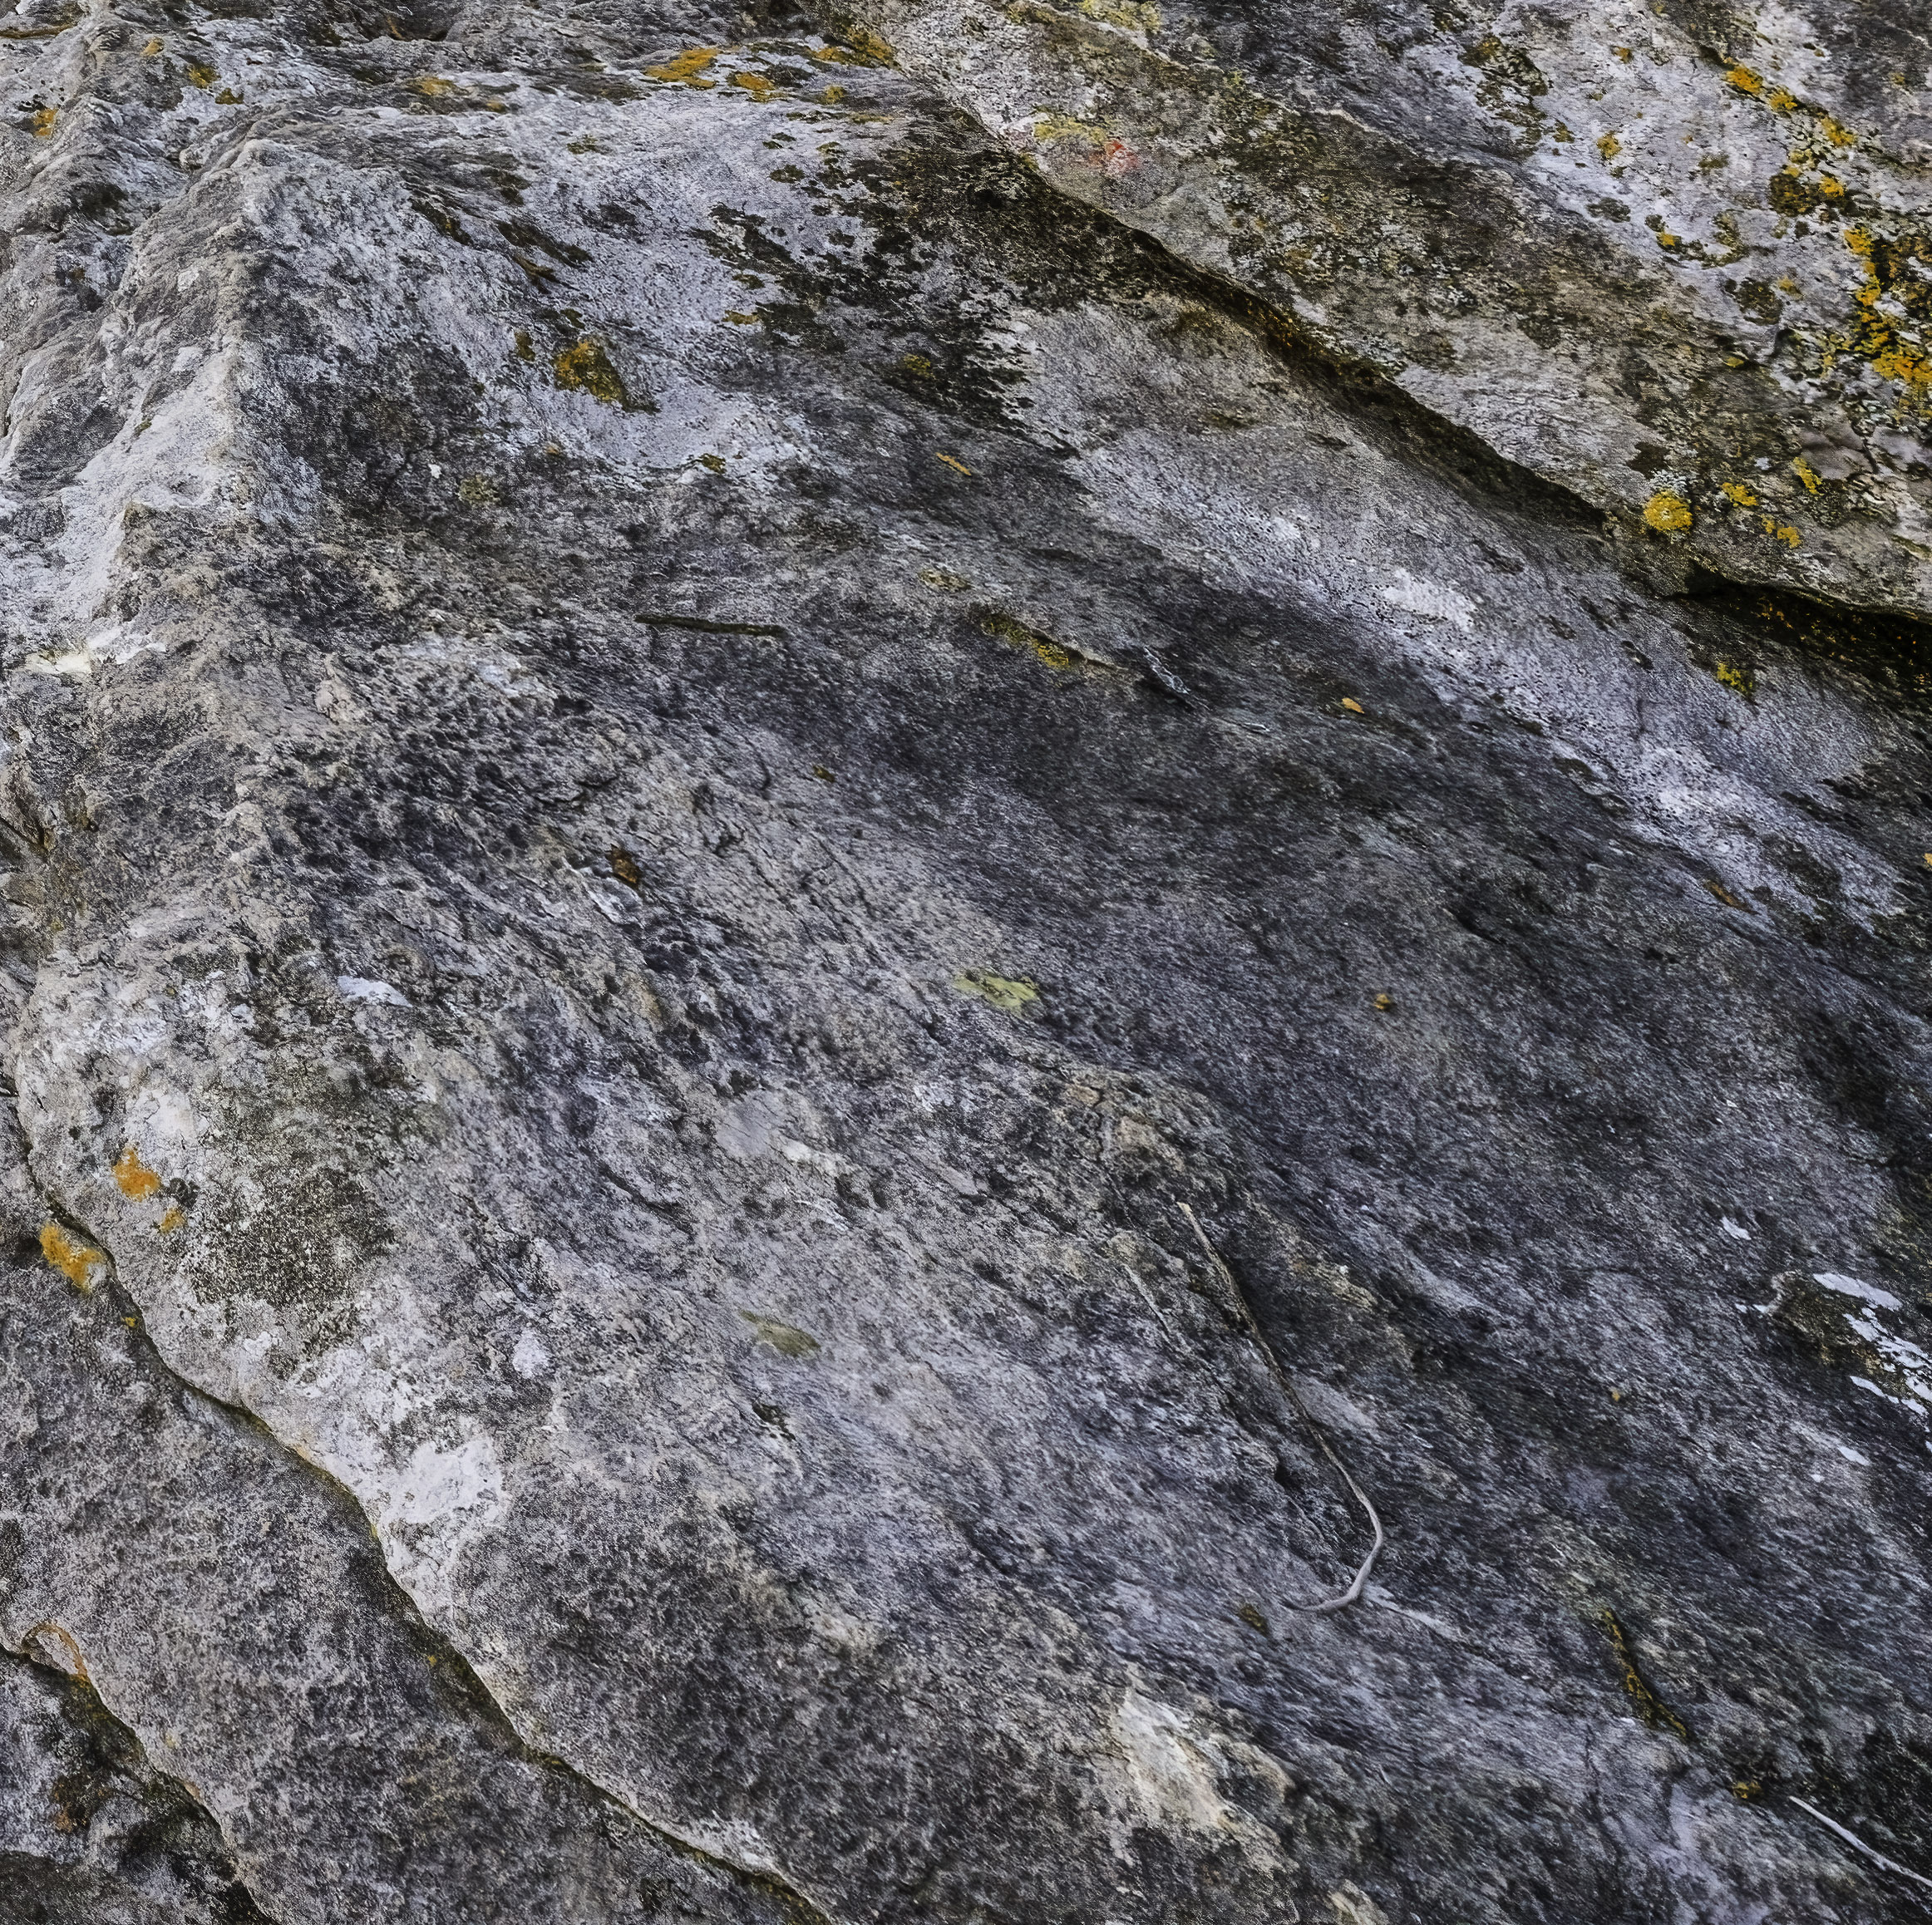
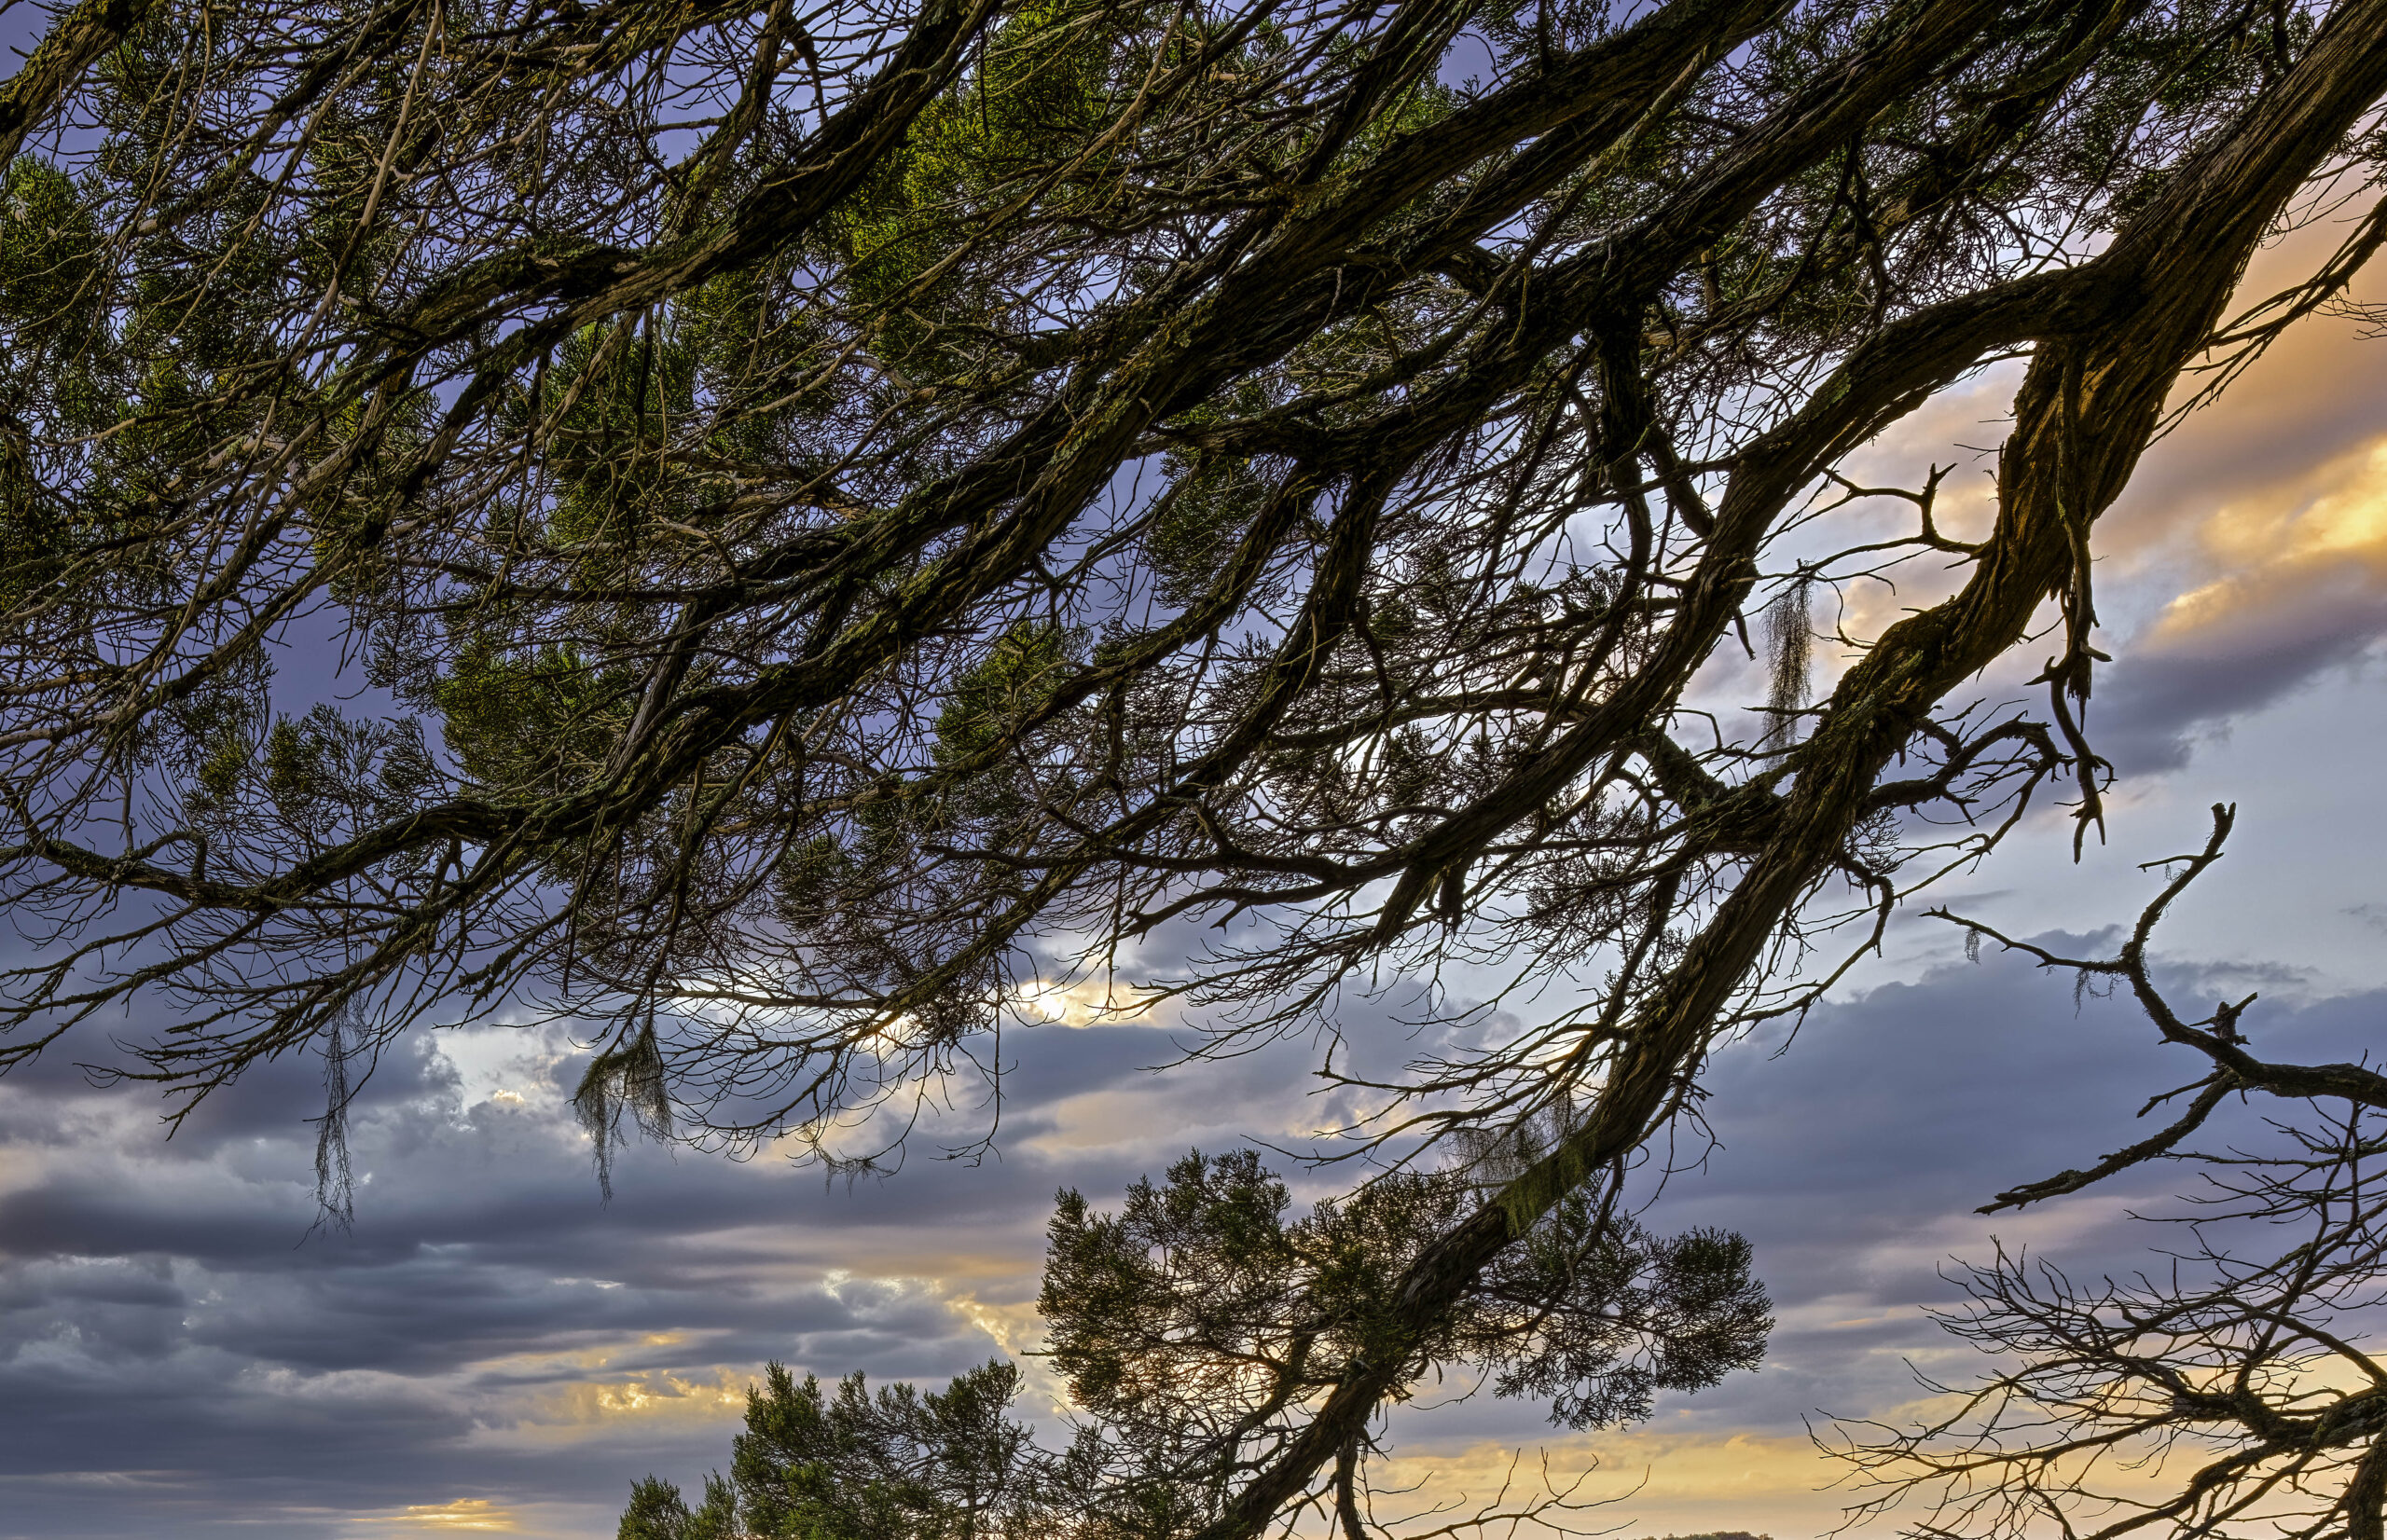
02/28/25 A brief explanation of Helicon Focus, and possible errors
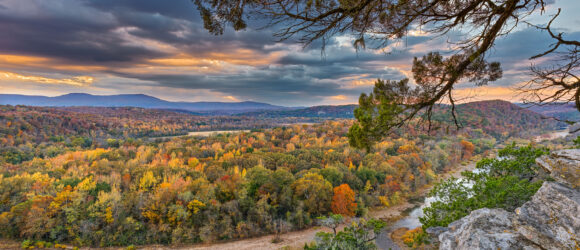

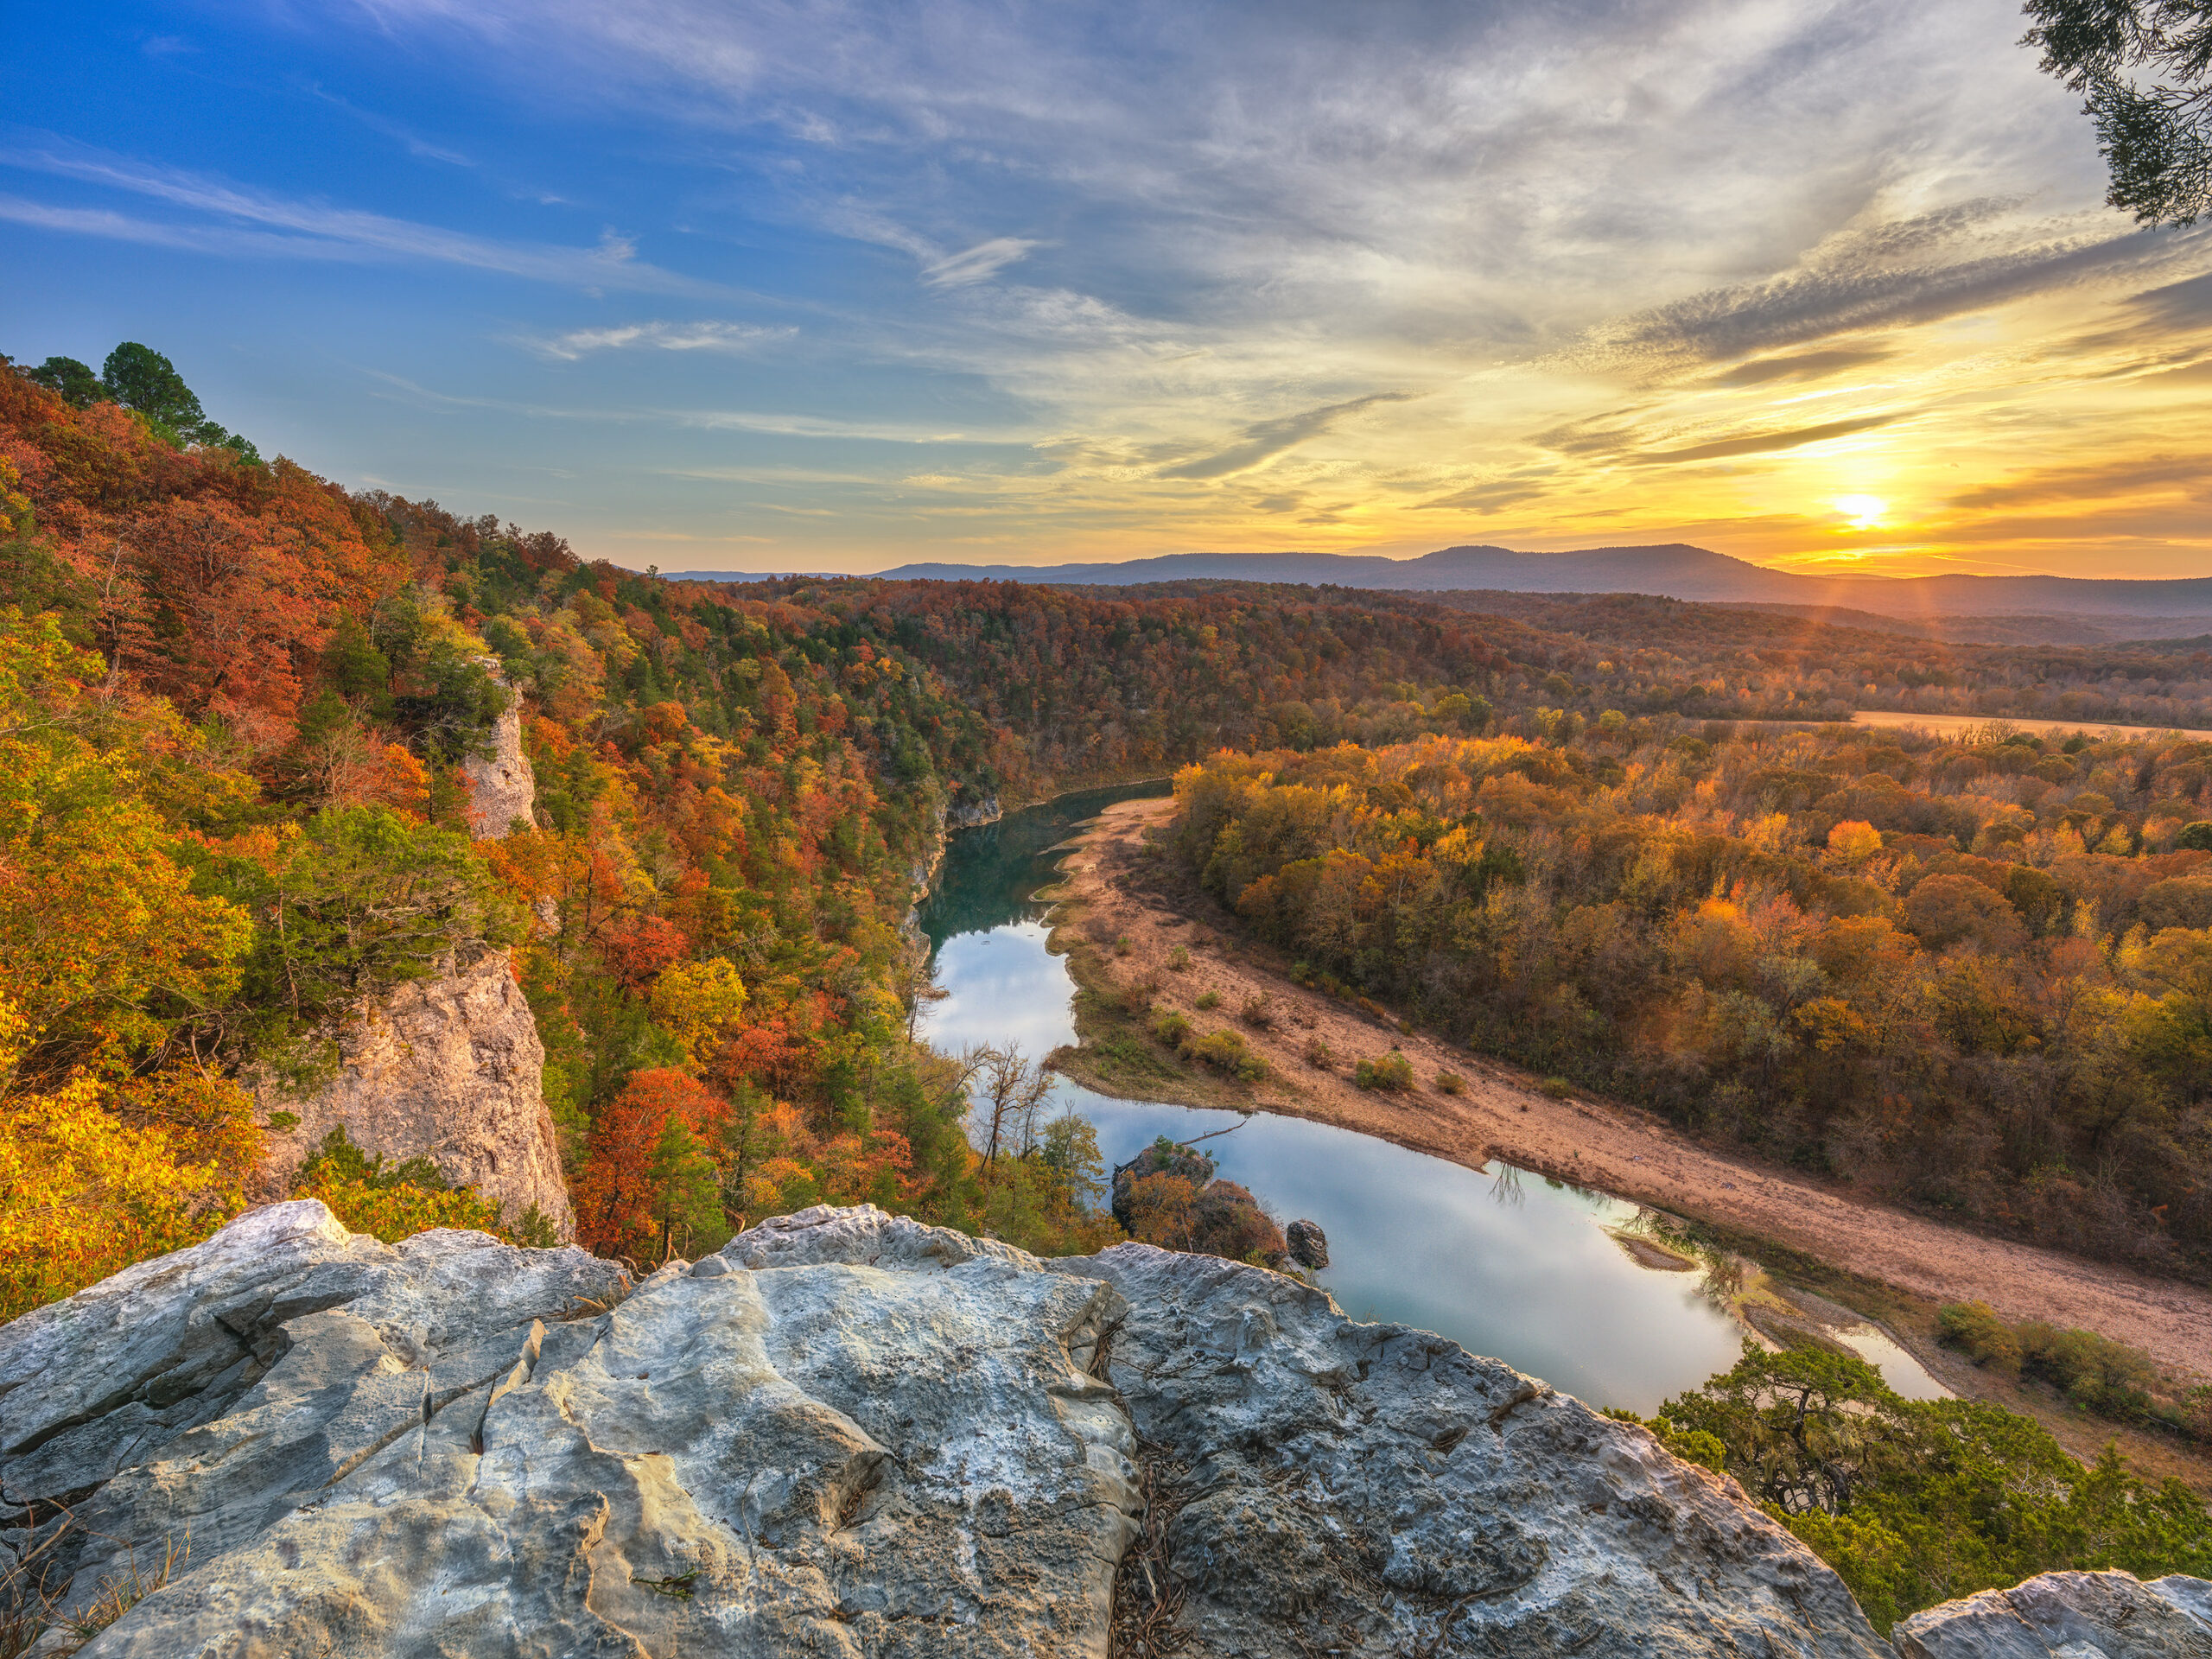
Final from Hasselblad X2D Focus Bracket Peter Cave Bluff
This image was created with a Hasselblad X2D, using the camera’s focus bracketing setting. This allows the camera to take multiple photographs of the same subject, and only moves the focus point. So in this case, the camera will take images from infinity all the way to the rocks on the foreground. It’s impossible to manually combine this many photographs with different focal points, however with software like Helicon Focus, you can. I wrote a very detailed post on the process of creating this image here: https://photosofarkansas.com/2025/02/03/02-03-25-focus-bracketing-example-hasselblad-x2d-and-21mm-lens
-
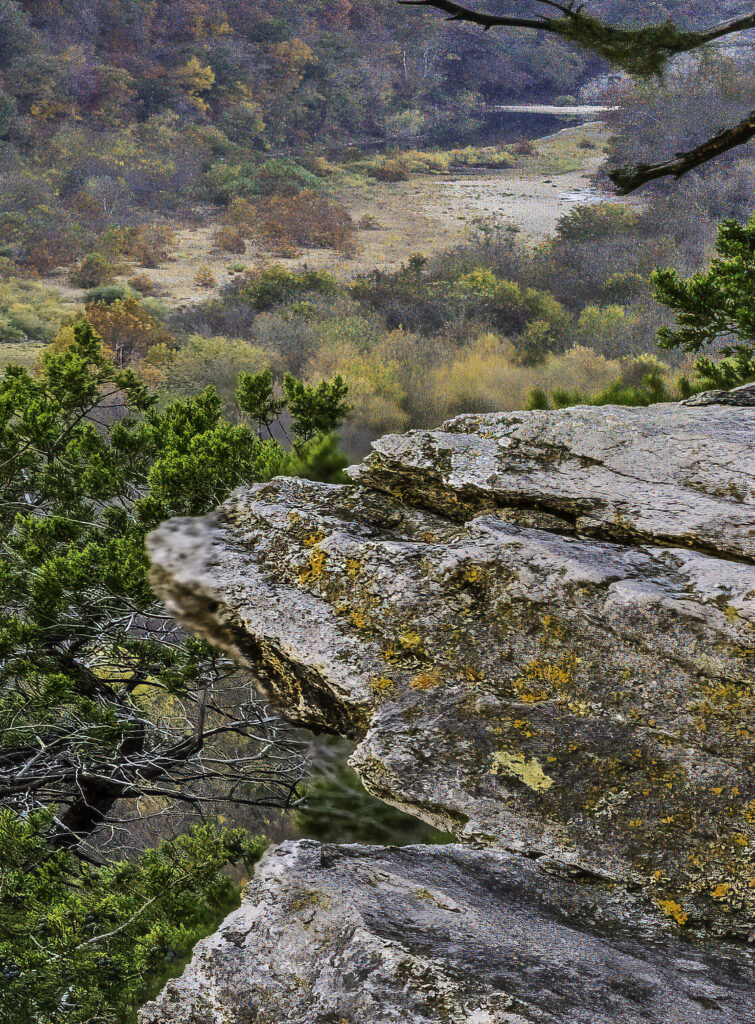
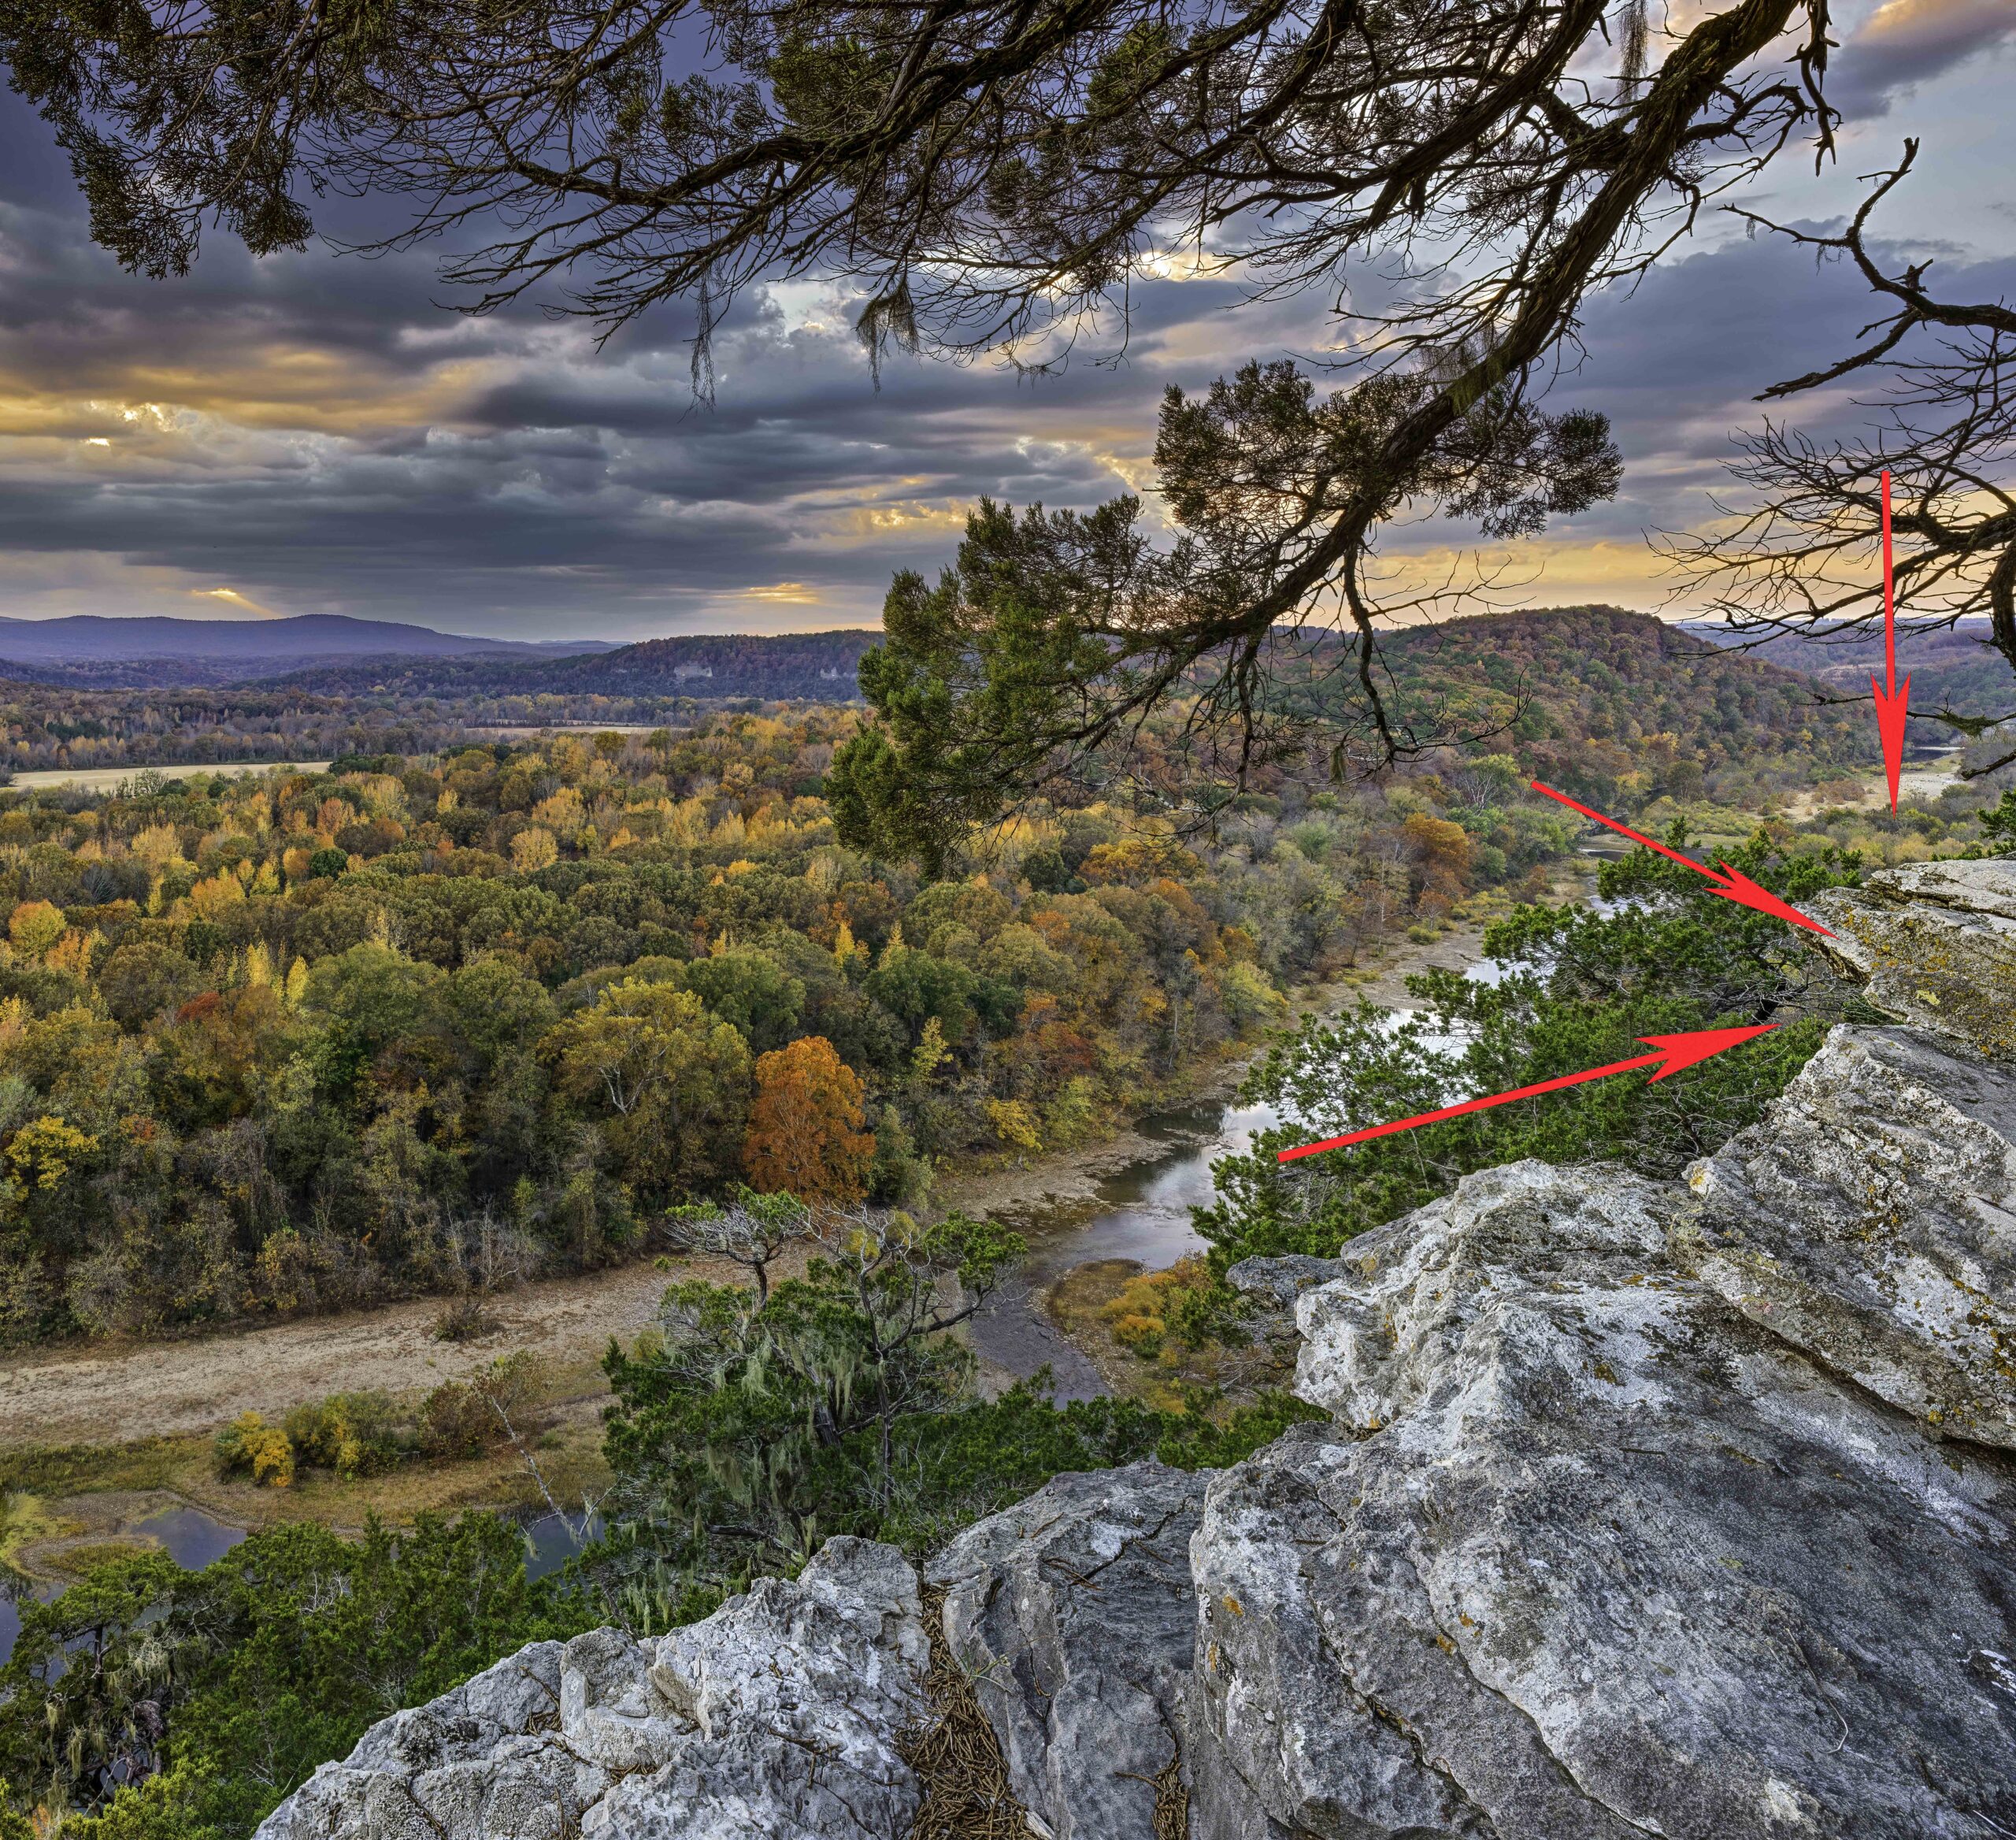
- Helicon Focus errors on image
-
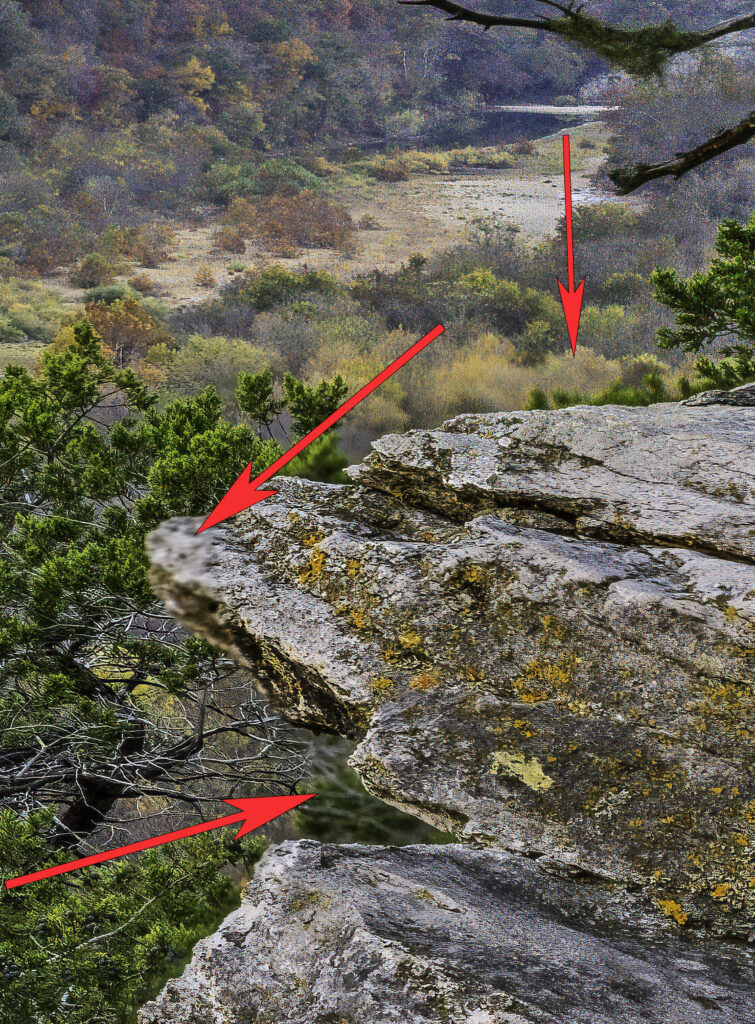
- Errors from First run of Helicon
The image on the right has arrows showing the errors. They are not obvious at first, especially if you are only looking at this image in a screen view, or a jpg. However it’s a 100MP image and when you zoom into it, these errors now start to be more obvious.
With Helicon, you load in your images, and then select one of three “rendering” method. I usually use option B, set to the Helicon defaults. NOTE, you can change these defaults, but make sure you remember the true defaults that the program started with. Once you change them they stay where you set them, even if close and reload the program. This can be problematic for a later set of images as most times the program defaults are what you need.
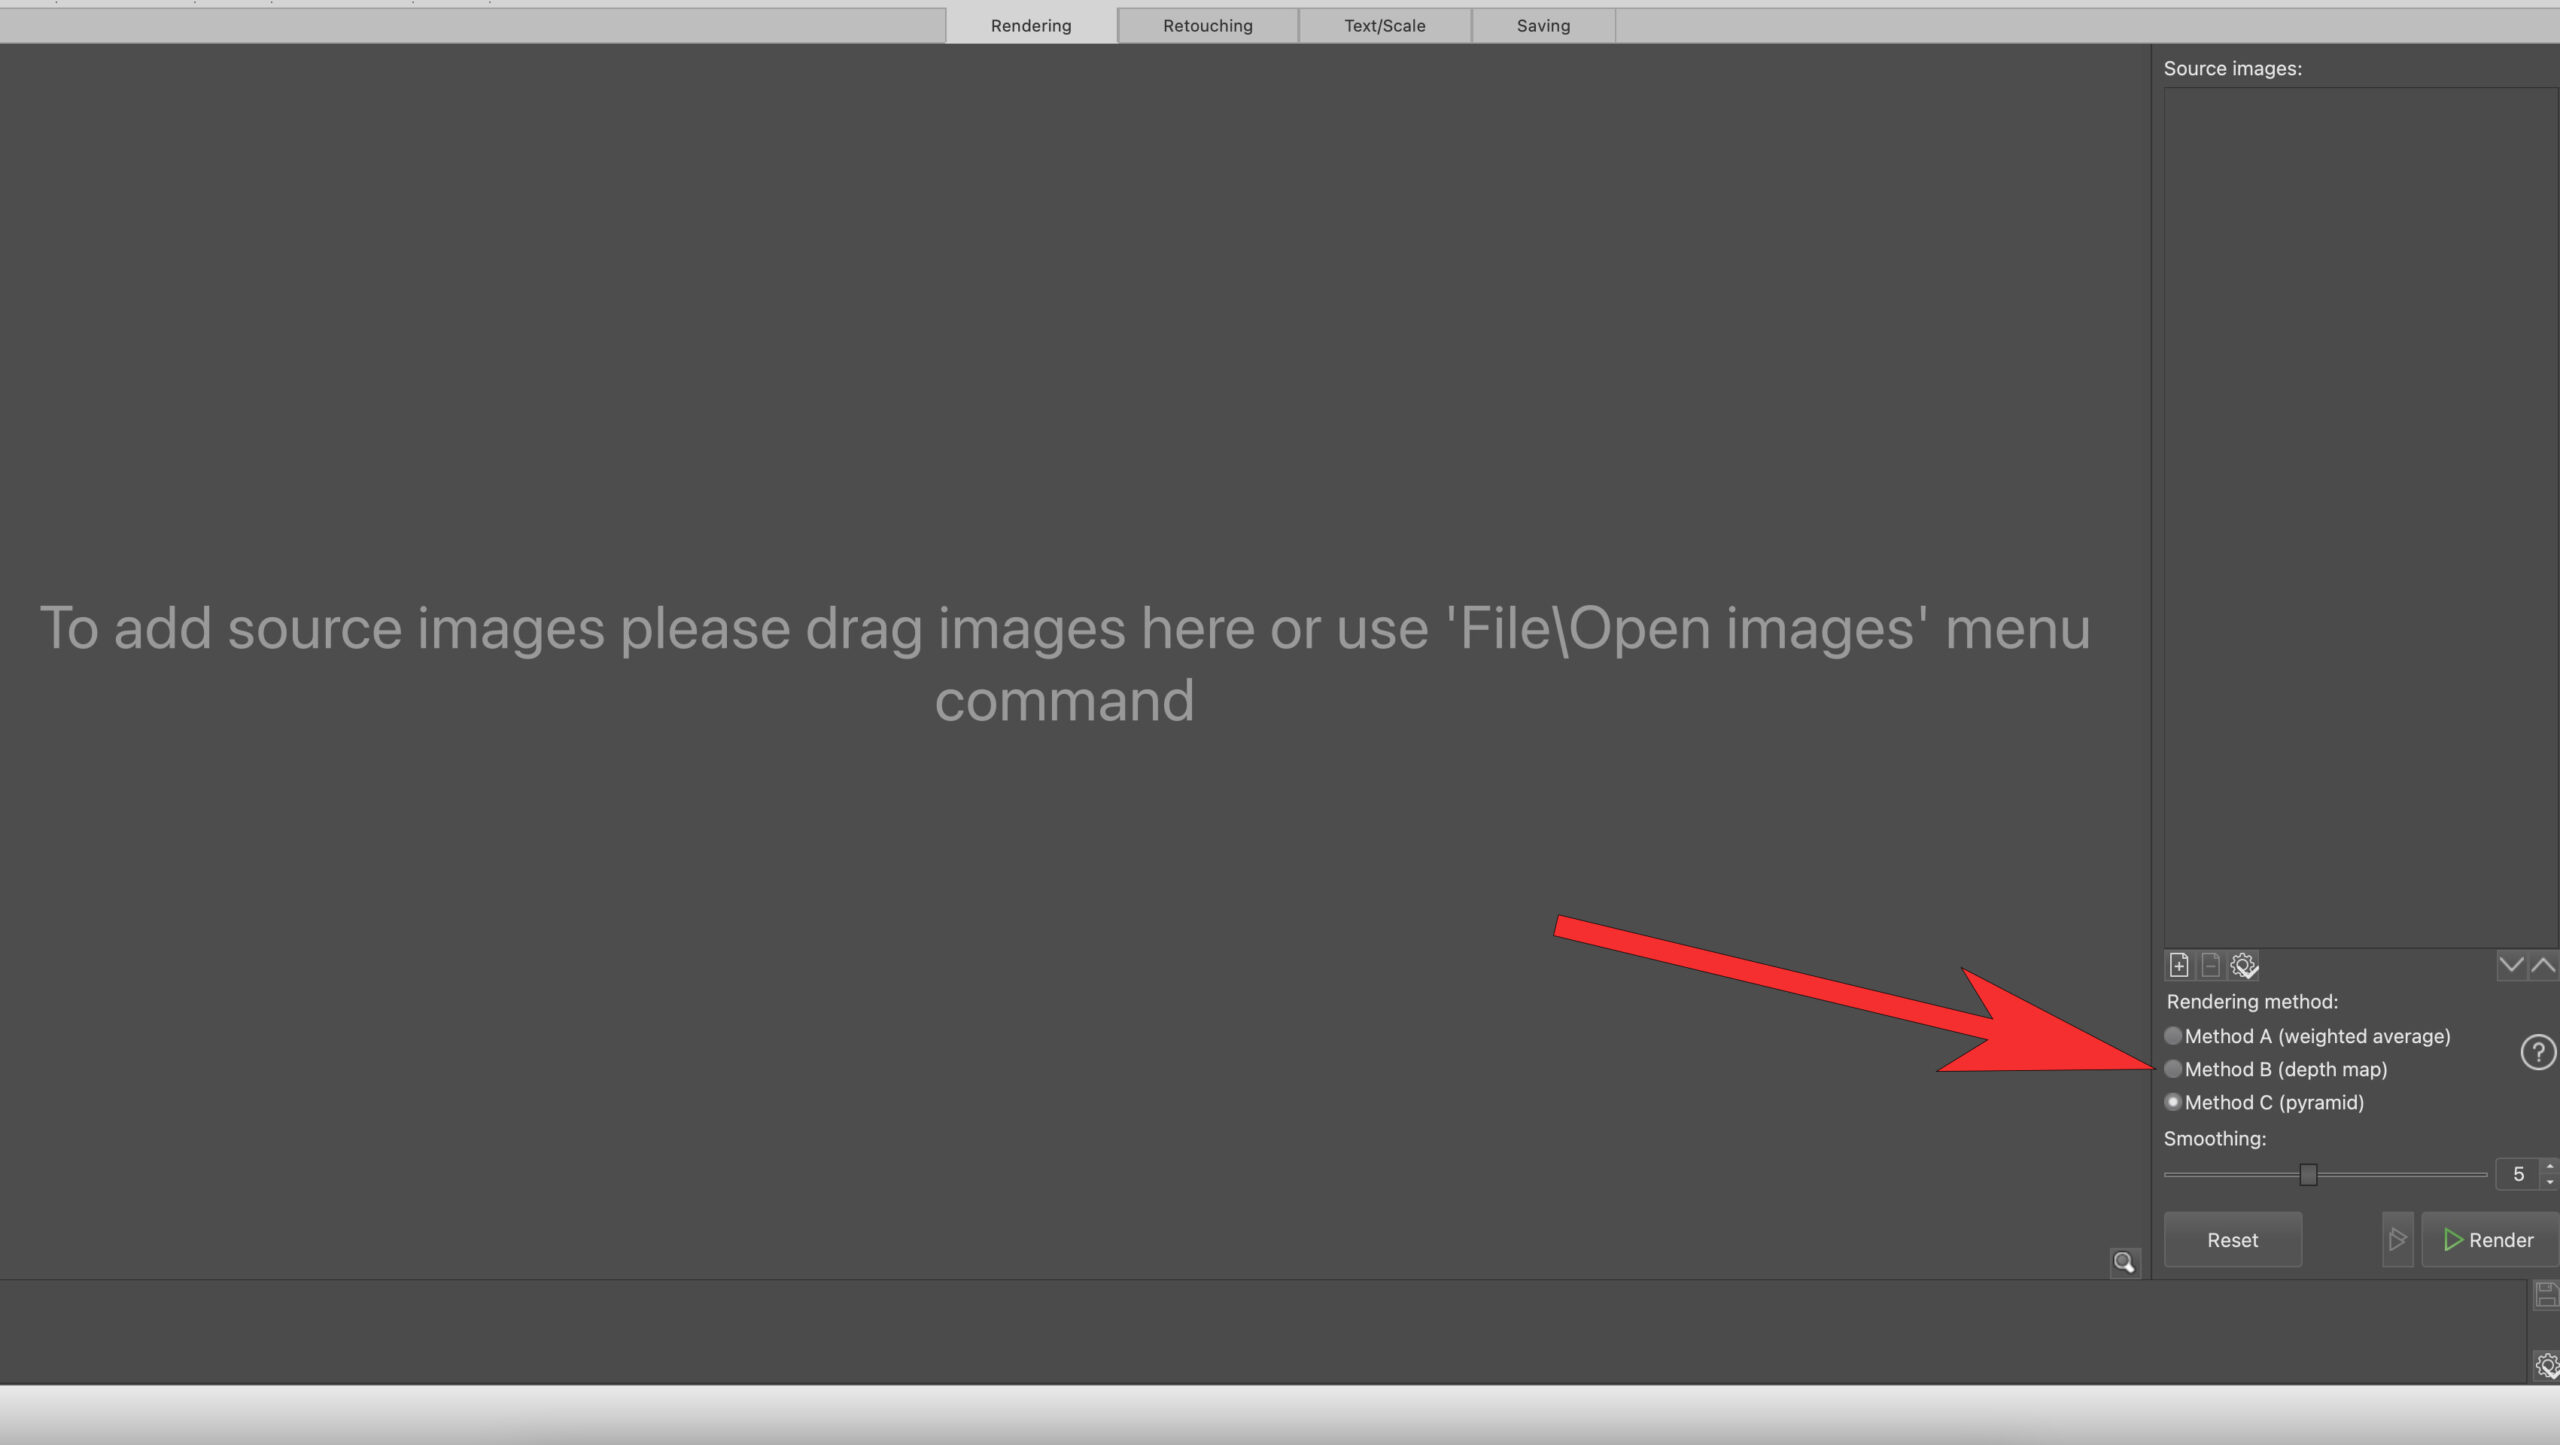
Screenshot of Helicon Focus Main screen
This is a quick screenshot of the main Helicon Focus page. Note the three different methods listed in the lower right corner.
My first thoughts were to just re-load the 7 images and try option B again. Upon doing this the same errors occurred, so I tried Option C and this time I was able to get a perfect separation between the rocks and the area in the distance.
Final view showing fixes
When using Helicon, take make sure you take a few minutes to view the entire image checking to see if any issues with mixed blending occurred. This image was actually a blend of 14 images, 7 were taken for the sky and cedar tree and the remain 7 were taken with exposure set for the foreground and trees in the distance. I was not able to get a single exposure that gave me good shadow recovery and keep the highlights in the sky from blowing out. So I ran 2 sets of 7 images through Helicon and then merged the two. Since I already blended the images with the errors, it was a simple fix to just rework the 2nd set of 7 images with option C and layer the fixed image on top then blend in the correction.
The point of all of this is that if you are only working for TicToc or Instagram use, odds are you would not even notice these errors, but then why would you be using a 100MP camera. My reasoning for 100MP is that I want have the ability to make large prints, and errors such as these would definitely show up in a print larger than 12 x 18.
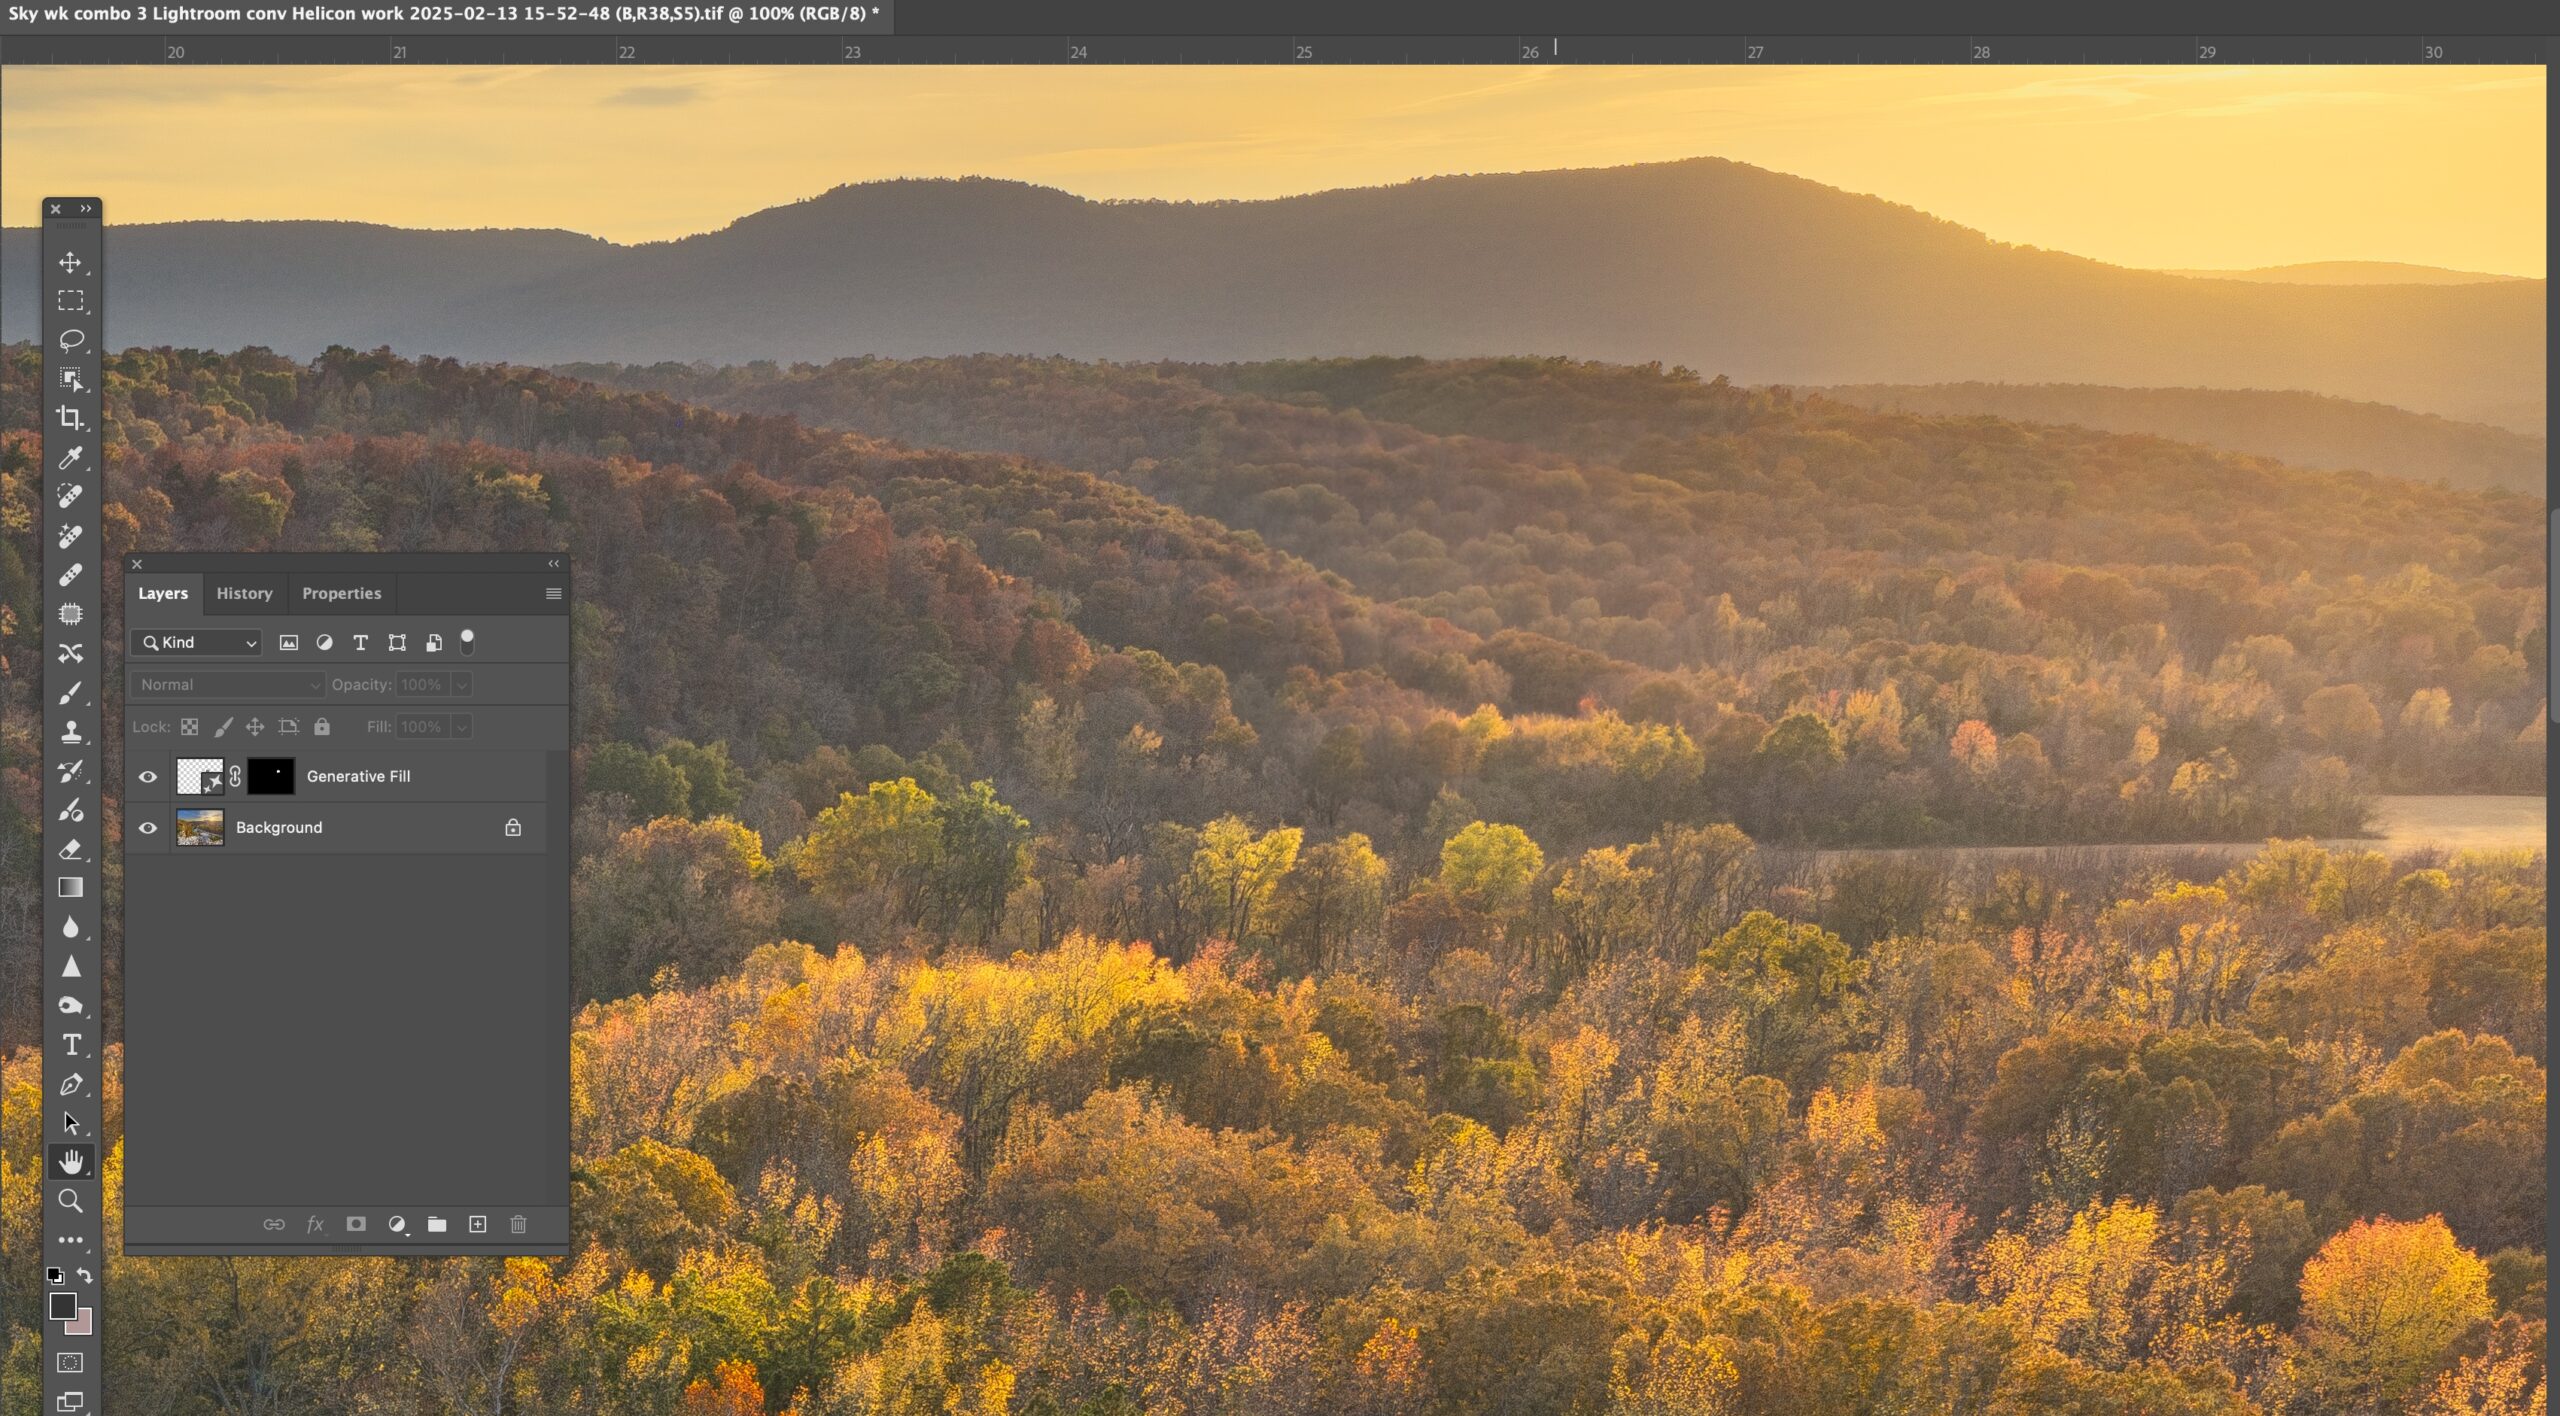
02/16/25 Using Adobe Generative Fill to remove lens flare–Example an X2D image with 20-35 lens
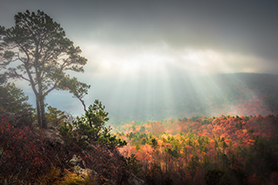
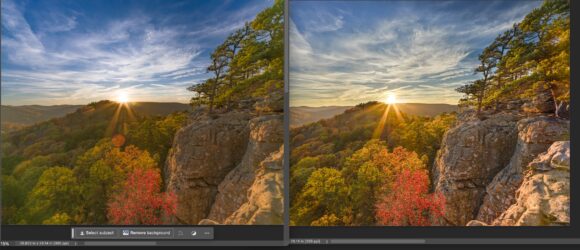
Sunset from Peter Cave Bluff–Buffalo River in Arkansas
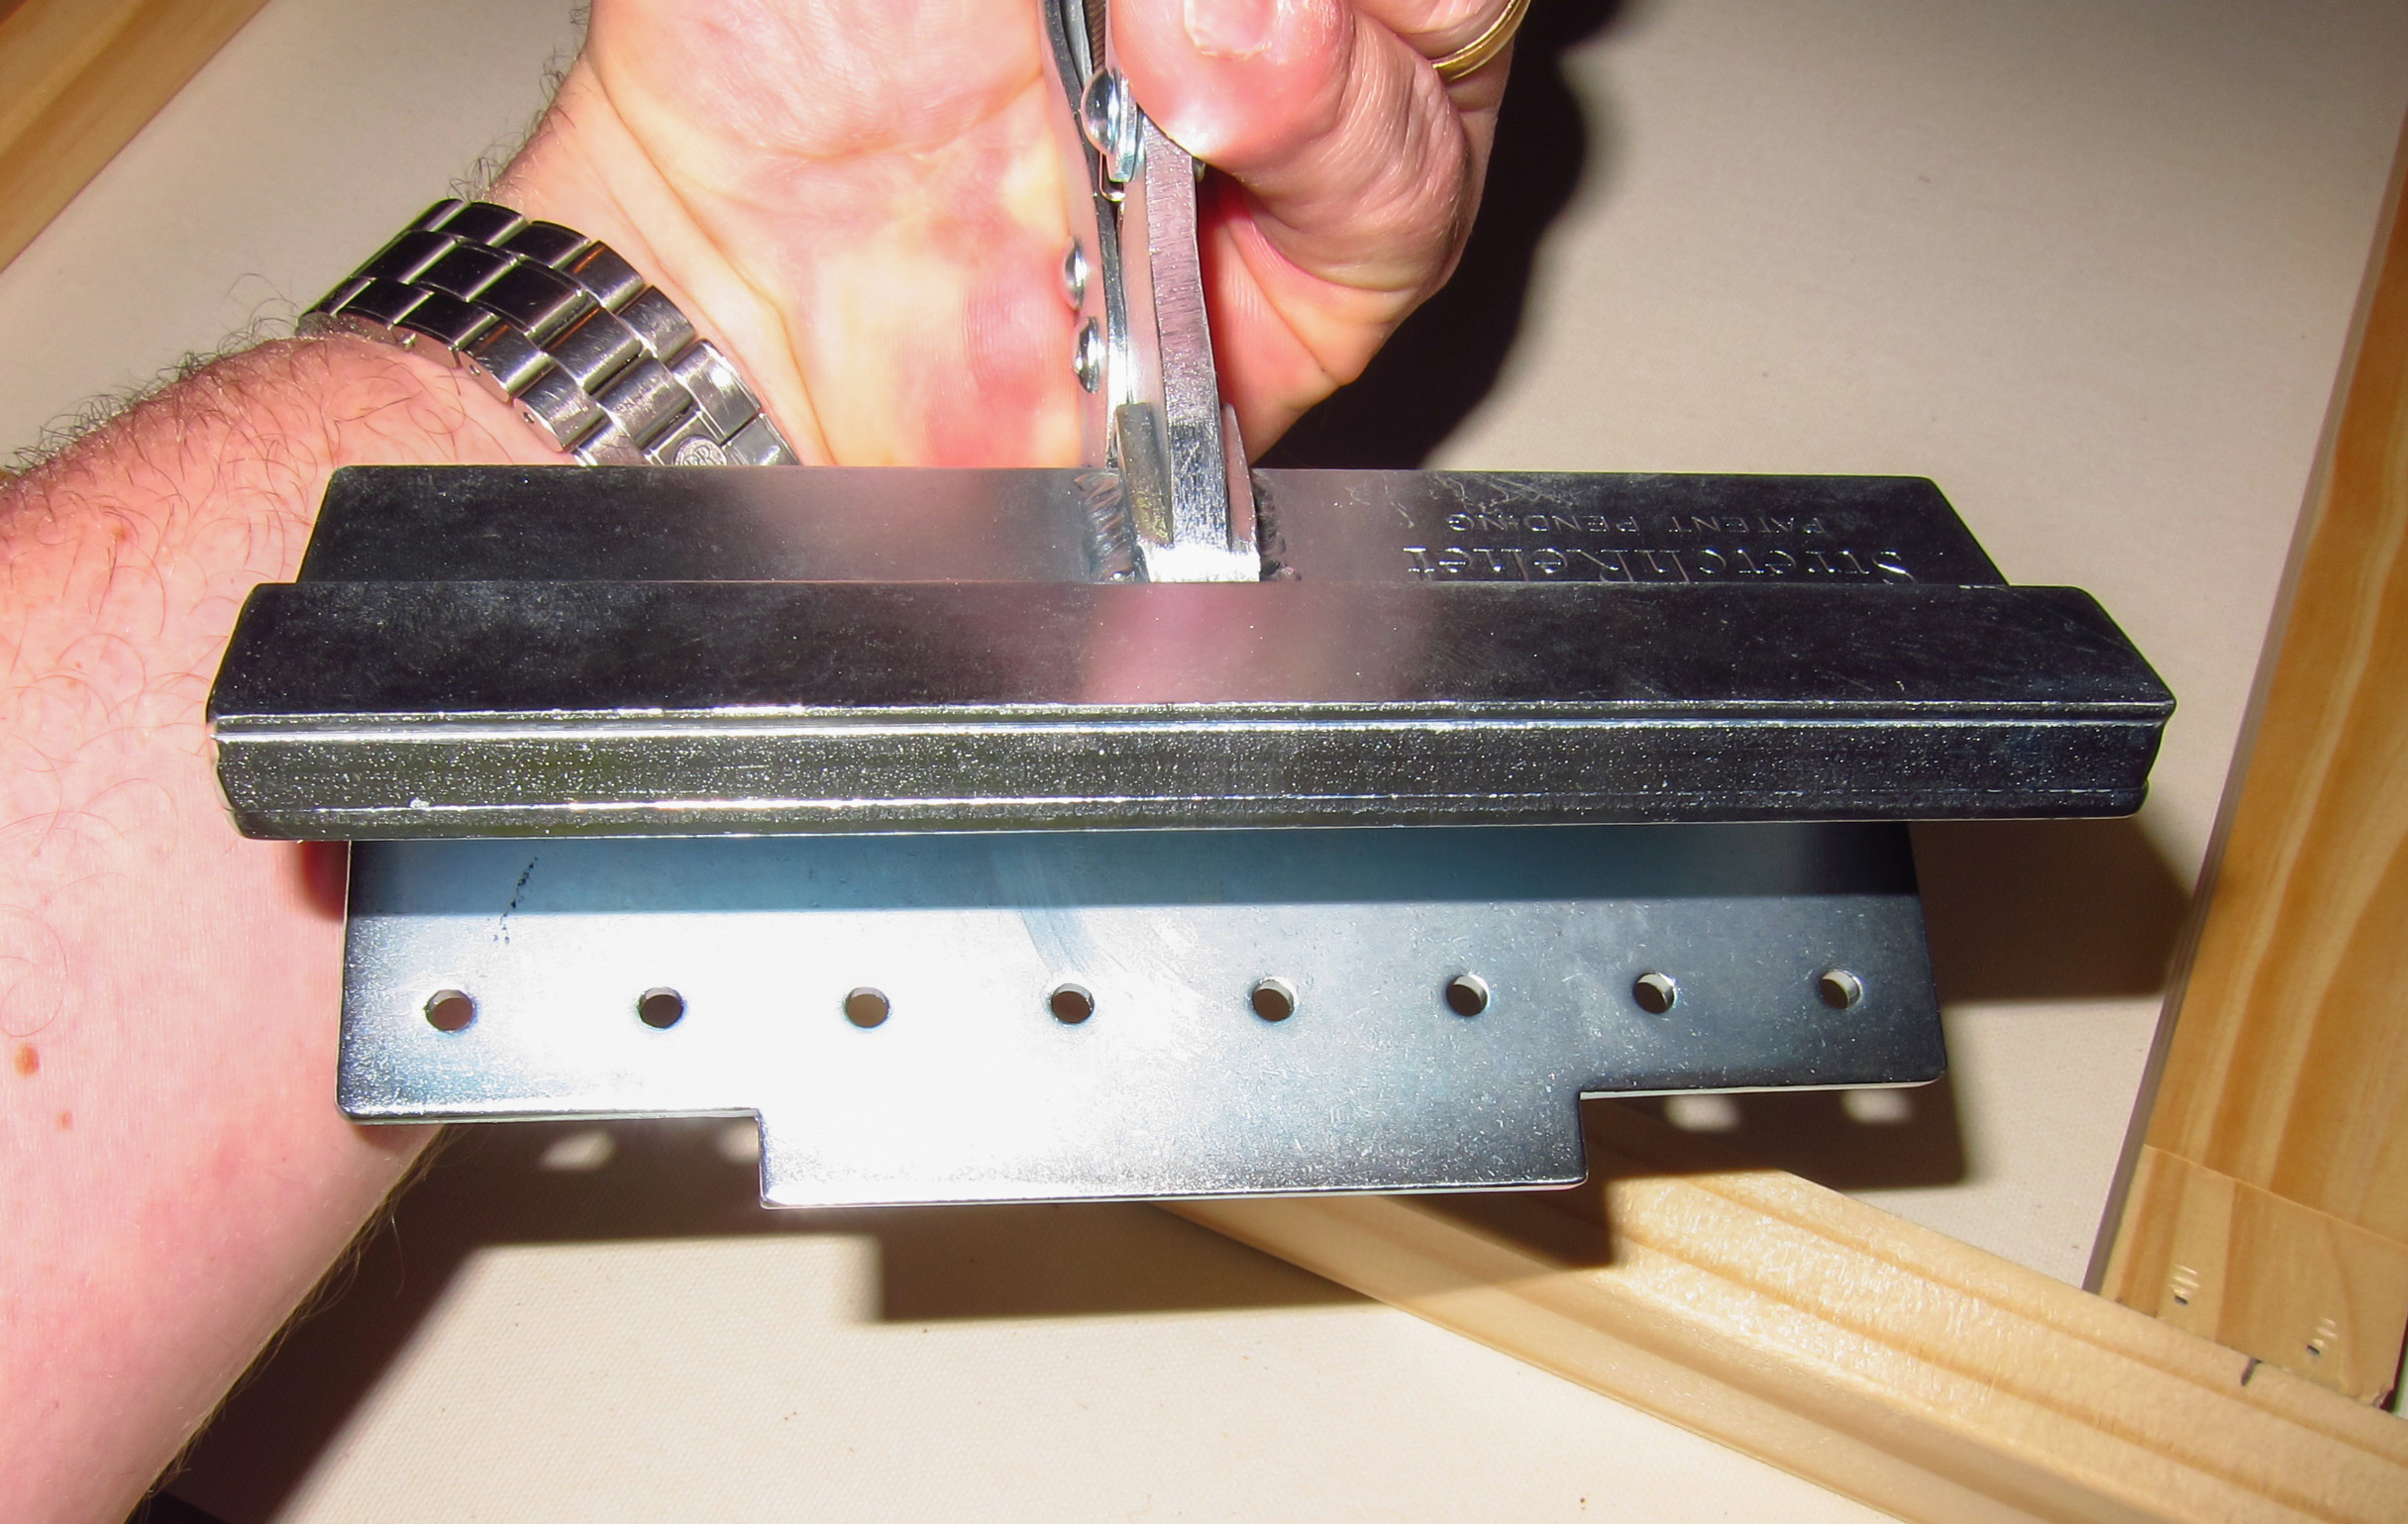
If you like to shoot sunrise or sunset images one of the issues that always has to be considered is lens flare. The effect is destructive as it tends to totally change the color of the subject, remove or change saturation levels, and totally alter the overall color of the image. Depending on the lens the flare tends to be in the corners or off of a diagonal from the sun. There are times where this type of flare can add to the overall image, but most times I find it distracting and destructive. In the past, the only way I knew to remove it was either cloning over the flare with a part of the image that is free of flare or attempting to use software tools like “Content Aware” in Photoshop. I never found content aware to be very effective for this and ended up usually either cropping the photo or using cloning. You can always try to hold your finger over the sun when shooting but this is tedious, and at time hard to due. I used to carry a flare buster to this as I could attach it to the flash bracket on my camera but many times I forgot it and knew I was going to have to work on the flare in post.
It’s also hard at times to see the flare when you are looking through the EVF or viewfinder of your camera, especially if you are using exposure brackets. In the image at the top of this article, you can see the sun was muted through some soft clouds, but there was still a flare issue. The camera I was using was the Hasselblad X2D and the 20-35 lens. I have found that the 20-35 is very flare prone anytime you are working with the sun in the image. The flare is especially large and damaging at times. In the crop below, you can see the amount of flare that occurred.

Discoloration due to flare on Hasselblad 20-35 lens
The flare in this case was rather large, and had the typical rainbow color spectrum on the outside edge. You can clearly see that the colors of the trees have been totally changed by the flare and overall the area has a more yellow look.

Selection area to remove flare with Generative Fill
In this screenshot, you can see that I used the lasso in Photoshop to select an area which slightly exceeds the amount of the image that is effected by flare. Once you have made a selection, click on “generative fill” and Photoshop will give you three solutions. There is an option to name this fill selection, I never do that. Once you have run the fill process you can then click through the three options to find the one that works best for you. Once you make that decision, simply flatten your layers and you are done. If you don’t feel any of the fills that Photoshop created work, then cancel and start again. Sometimes it can take a few runs to get the best possible solution. However I have always found that Photoshop can get something that works much better than content aware, or cloning.
After Generative Fill has been applied to area on image
Now it’s possible to see the same area after generative fill has been applied. No more flare, or discoloration. A perfect blend.
Written for Photos of Arkansas by Paul Caldwell
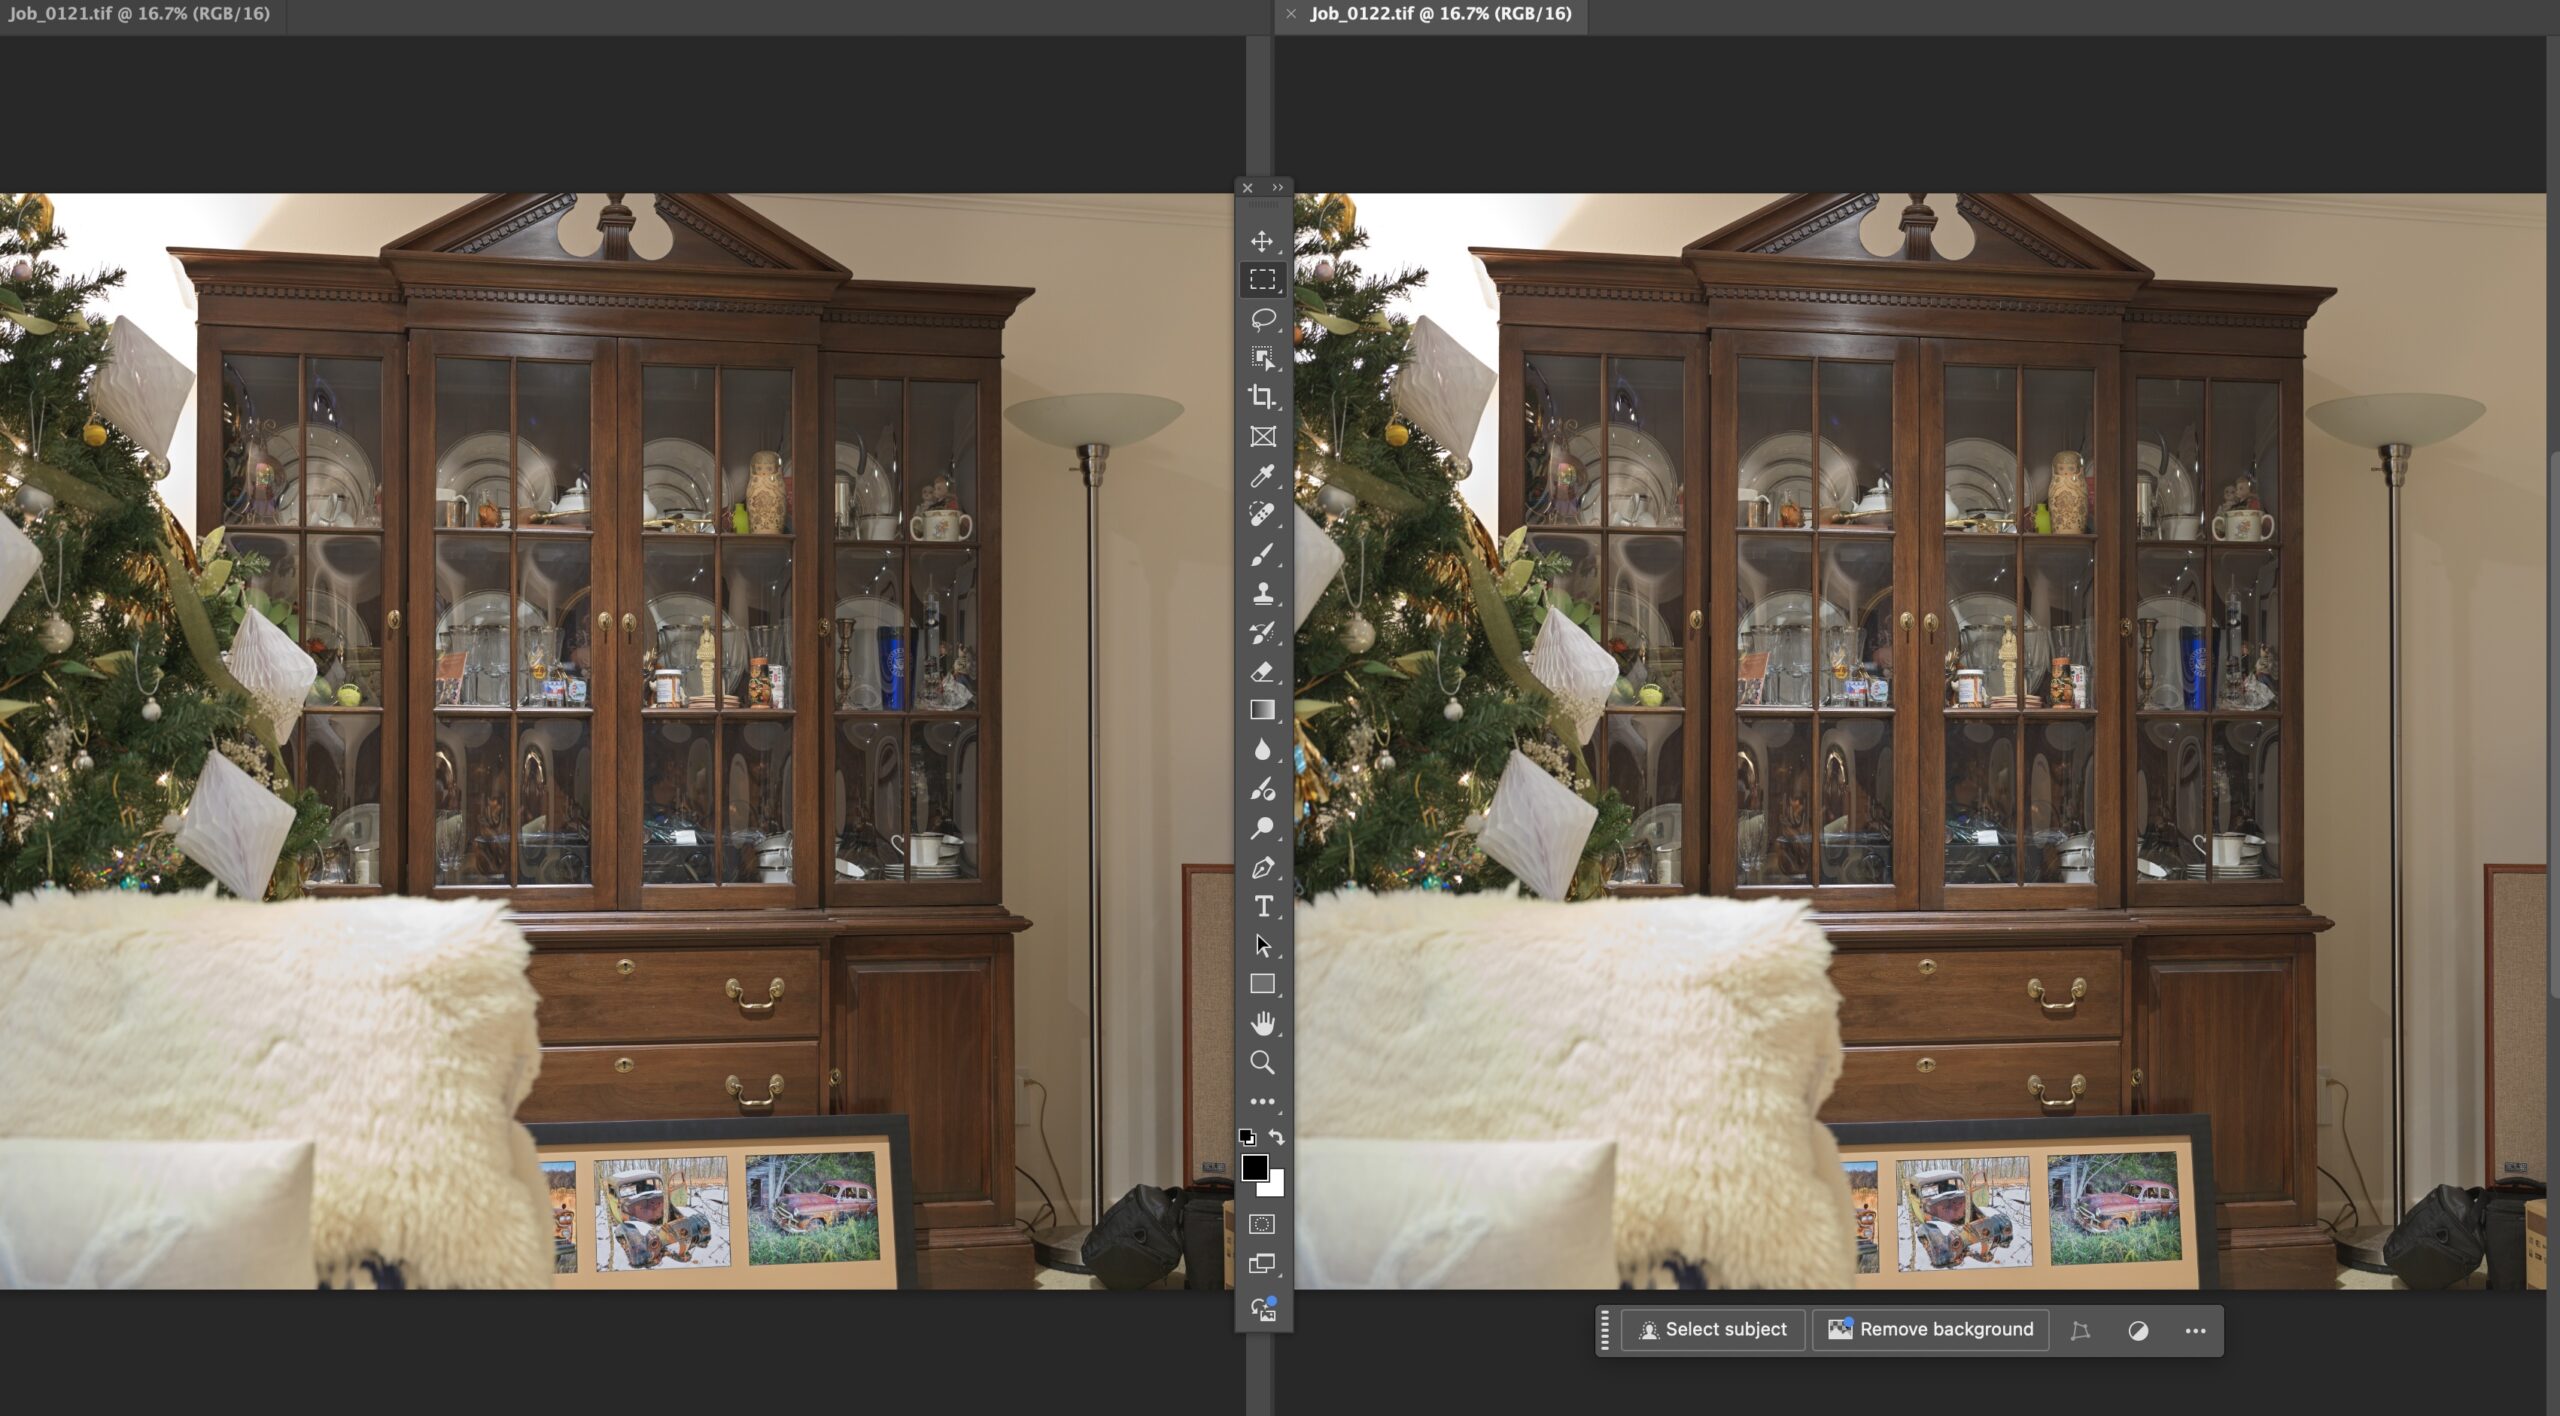
02/15/25 A side by Side Comparison of Hasselblad X2D Multishot (4) and Single
About 4 months ago, Hasselblad announced a limited multi shot capability for the X2D. It should be noted here, many people felt that the 3.8.4 version of Phocus “enabled multishot”. This is not true as previous versions of Phocus supported multi shot on the older Hasselblad digital backs. There was a firmware update to the X2D that allowed it to communicate with the multi shot option in Phocus. They did not really make a formal announcement, instead they allowed some of the testers to post some videos on Youtube. Some of the information was also incorrect in that they pre-announced that both a (4) shot and (6) shot mode would be available. The 4 shot mode kept the resolution at 100MP, but increased the details and created less noise than a single shot. The 6 shot mode was shown on the videos and created a 400MP output. NOTE, the 400MP has never been released as it requires a new version of Phocus. However the 4 shot is available but I have not really found too much written about it, so if you would like to see some side by side comparisons, read on. The images shown above were taken at ISO 1600, and F6.3 with the X2D and XCD 35-75 lens. The camera was mounted on a tripod and tethered to a M1 MacBook Pro running Phocus 3.8.4
Full screen examples for testing
Before you read through the samples, I am going to summarize my findings:
- The 4 shot Multi shot process does give considerably better resolution. This is especially true where finer details are involved.
- The 4 shot Multi Shot process seems to give better noise responses to certain parts of an image, however it would be nice to be able to use Hasselblad HNNR on the files. This is not possible since the only output is a .fff.
- Phocus Desktop seems to quickly process the 4 shot images on a M1 MacBookPro and the tethering connection is excellent.
- You are forced to use Phocus Desktop to complete the work on the images, since you cannot output to a 3FR only .fff or tif.
- Lightroom and or ACR cannot open the 4 shot multi shot .fff in fact no other software I have found can.
- There is no way to get Phocus Mobile 2 software to tether and thus 4 shot multi shot is not available on a mobile platform, thus you are tied to a laptop or a desktop both of which are heavy, bulky and have fixed keyboards.
- The workflow of 4 shot multi shot is tedious. Tether, capture, work on image all in Phocus, export as a tif to your laptop, then do more work on the image with Photoshop or similar software. The .fff images are left in your Phocus Capture folder and must be removed later to save space and you are generating a full sized tiff when you export the image. Duplication of images.
- I attempted to use the PC version of Phocus 3.7.5 which has multi shot support, on a 5 year old Surface Pro. The results were less than stellar as the capture time for the 4 shots was much longer than on the M1 MacBook Pro. This may have been due to the age of the Surface Pro, but using a newer windows laptop is no better than a MacBook as both have fixed keyboards and more bulk.
- This process cannot handle subject movement, be it from wind, cars or moving people. However I have found that with slight wind in landscape work, it’s still worth trying the 4 shot multi shot as it still outputs a 100MP image. You can often times combine from a single image of the same subject the areas that did alias due to movement.
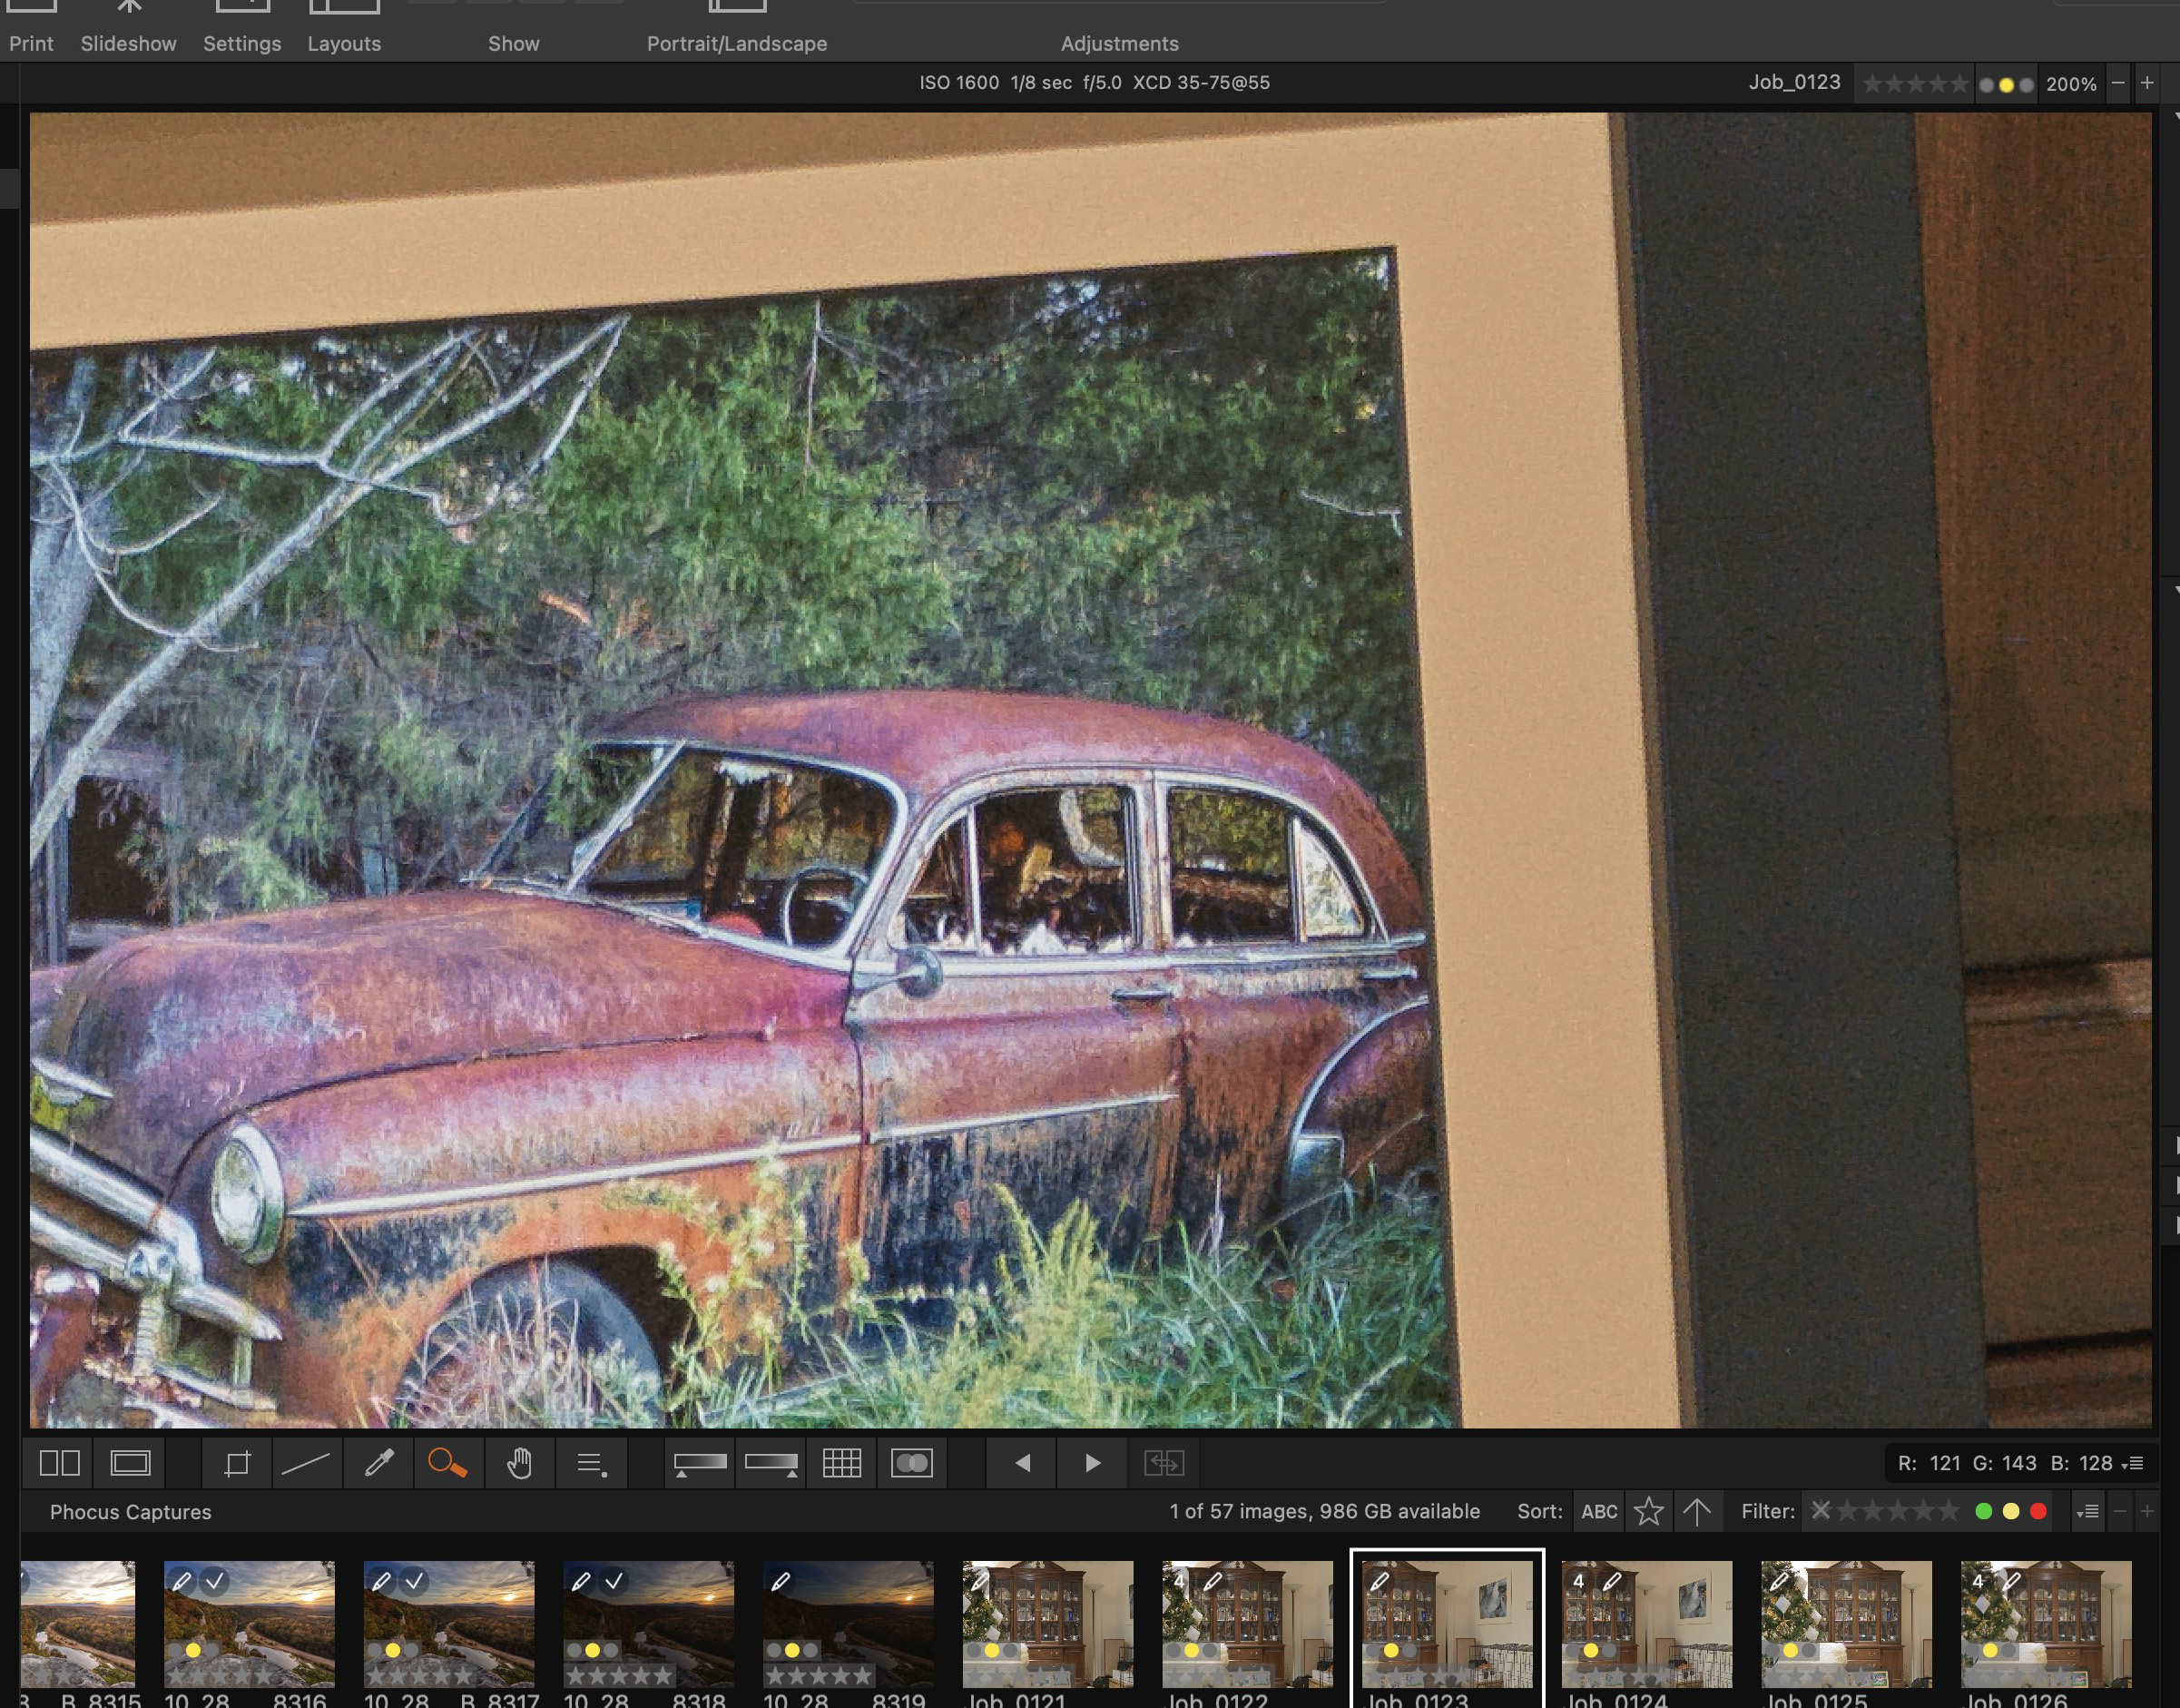
There are 8 different side by side comparisons, each taken from a unique area of the images. Since Phocus will not allow you to save a multi shot image as a 3FR, instead a .fff, I used Phocus to export both examples as a tiff. For this example I only used the default amount of sharpening in Phocus. No additional sharpening has been added. For all of these comparisons I viewed the images at 200%.
-
- X2D single shot
-

- X2D Multishot comparisons No1 old car
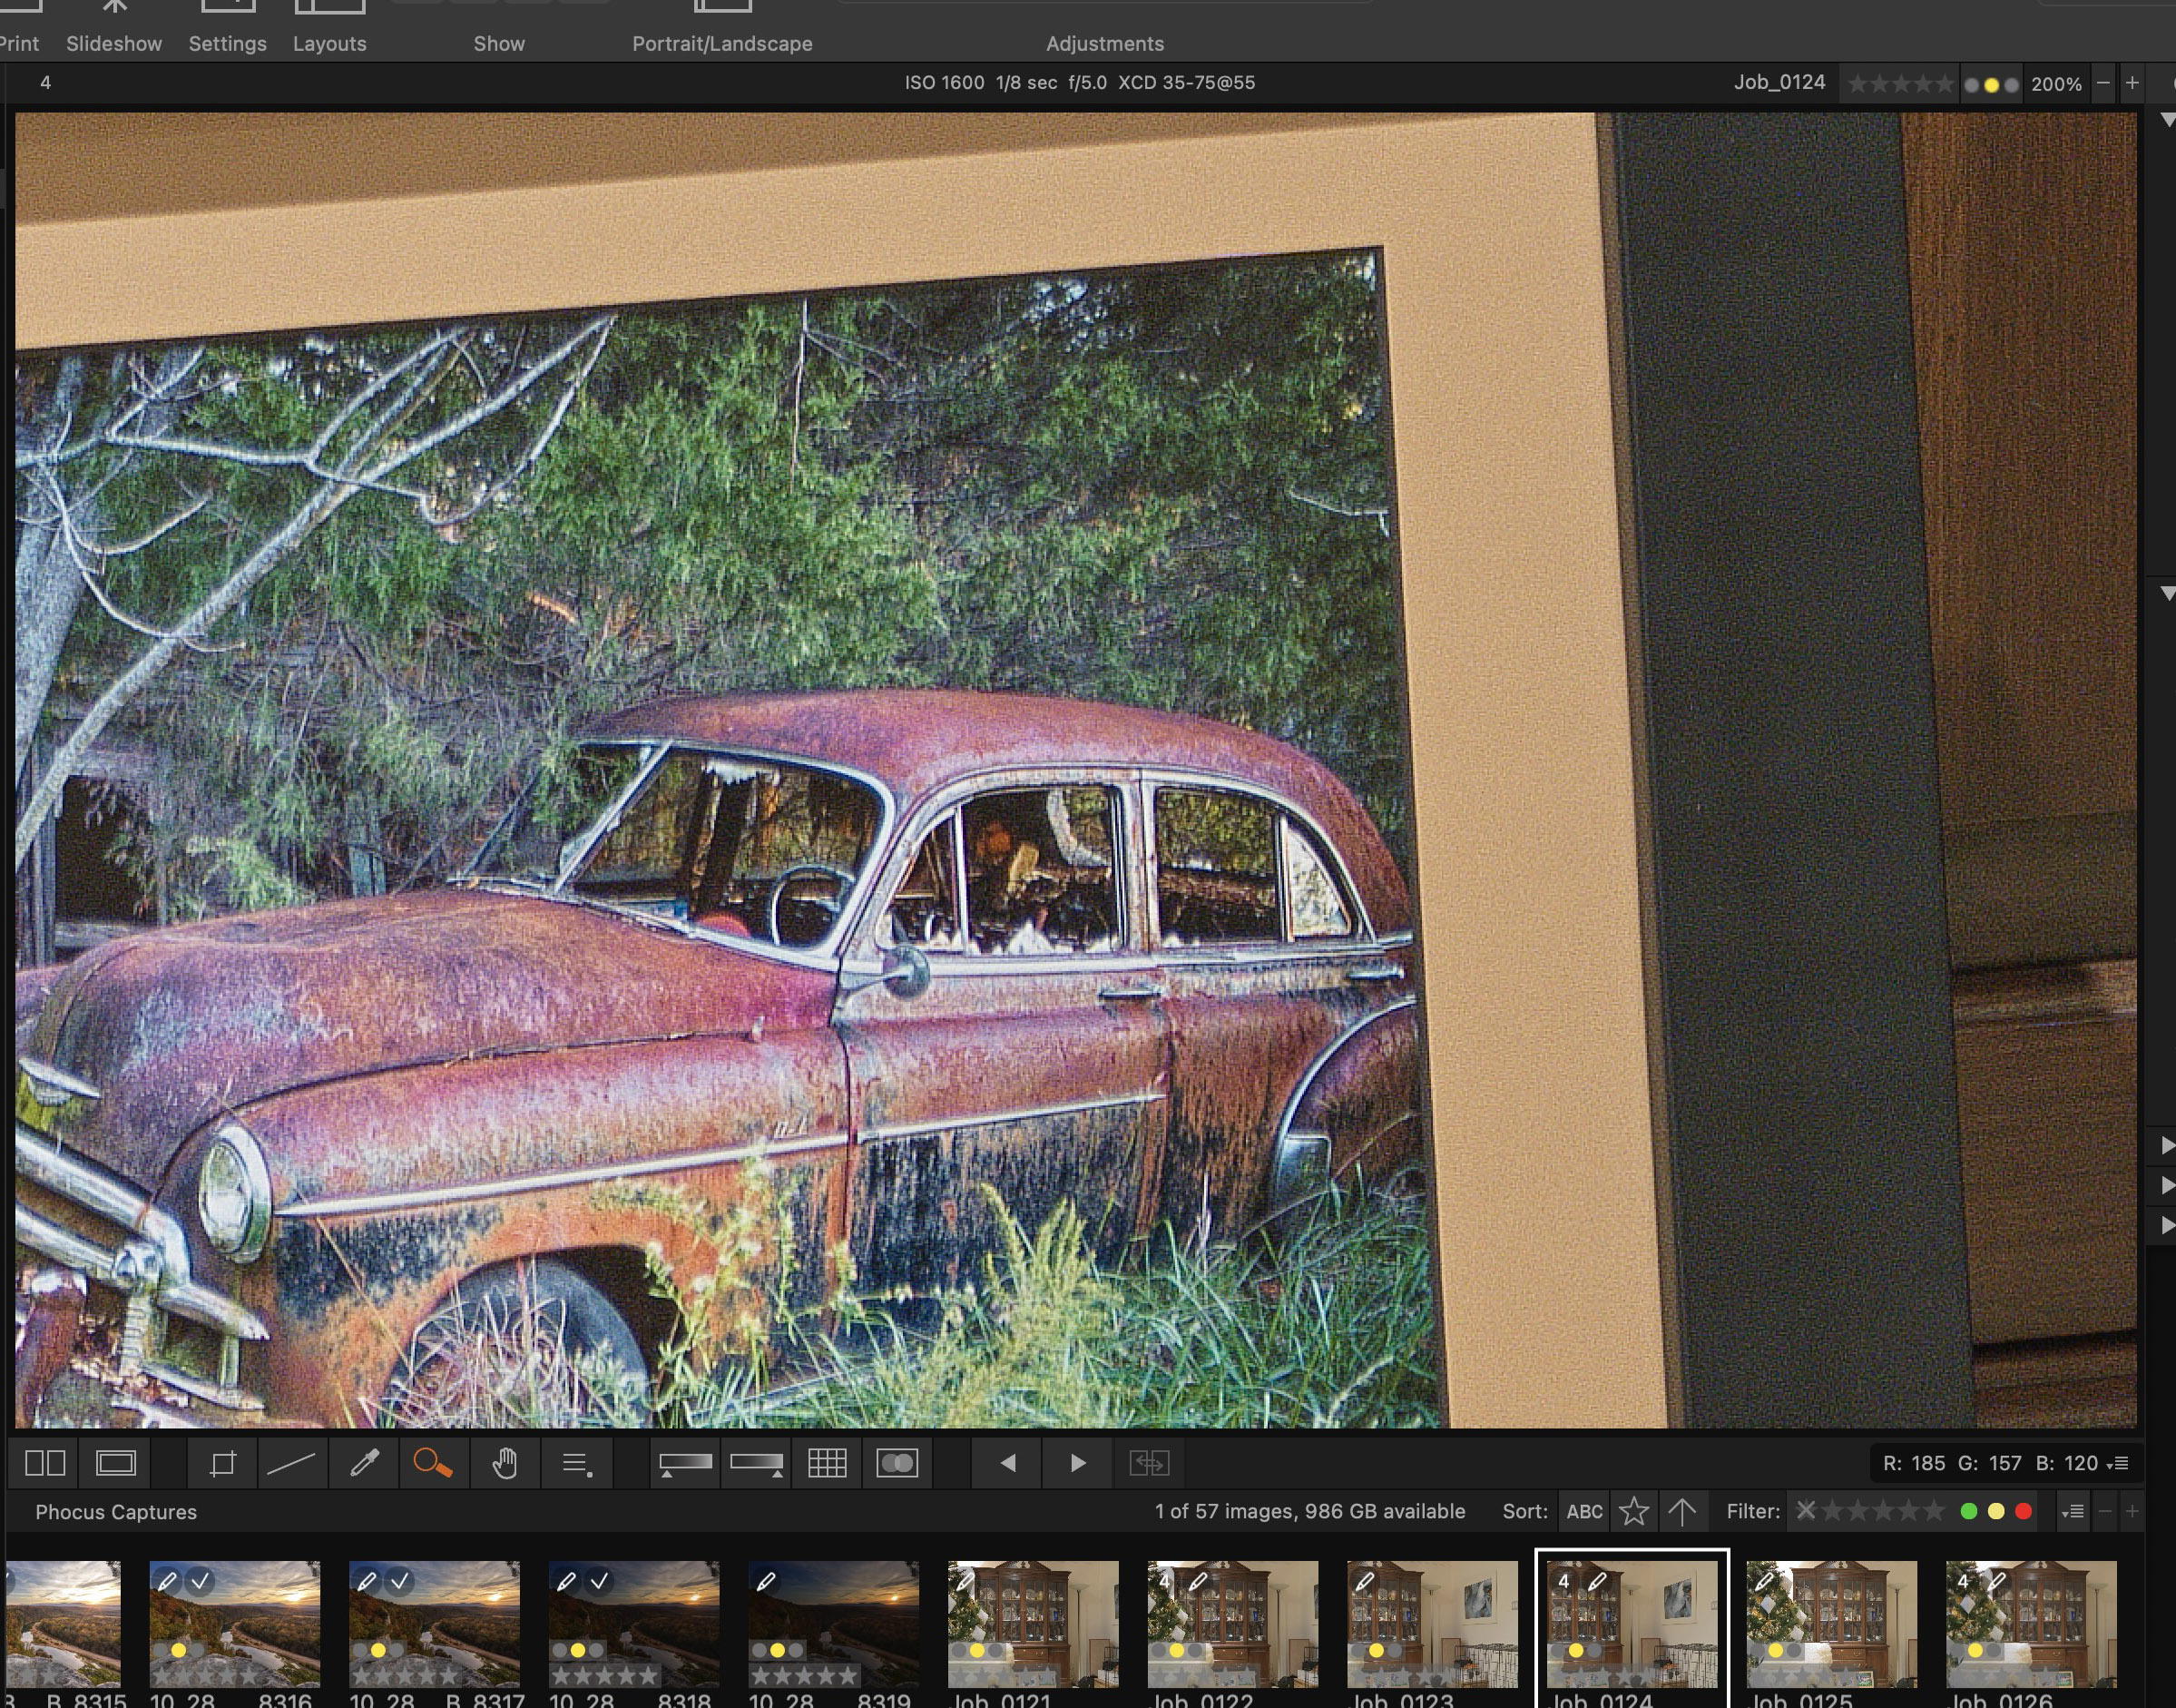
Click on either image in the gallery to open the two images into a Lightbox gallery. This will allow you to view the images in full size. The single shot version is on the left. These examples were taken from the lower right of the shot where I have a framed print of an old car. What you need to look at are the details on the car and the lesser amount of noise in the black frame. It’s very clear that you have more details in the car and in the brown of the cabinet behind the frame. The frame itself has a bit more noise as the multi shot attempted to pull more detail from a smooth black finish. This would be easy to fix with any noise reduction program.
-

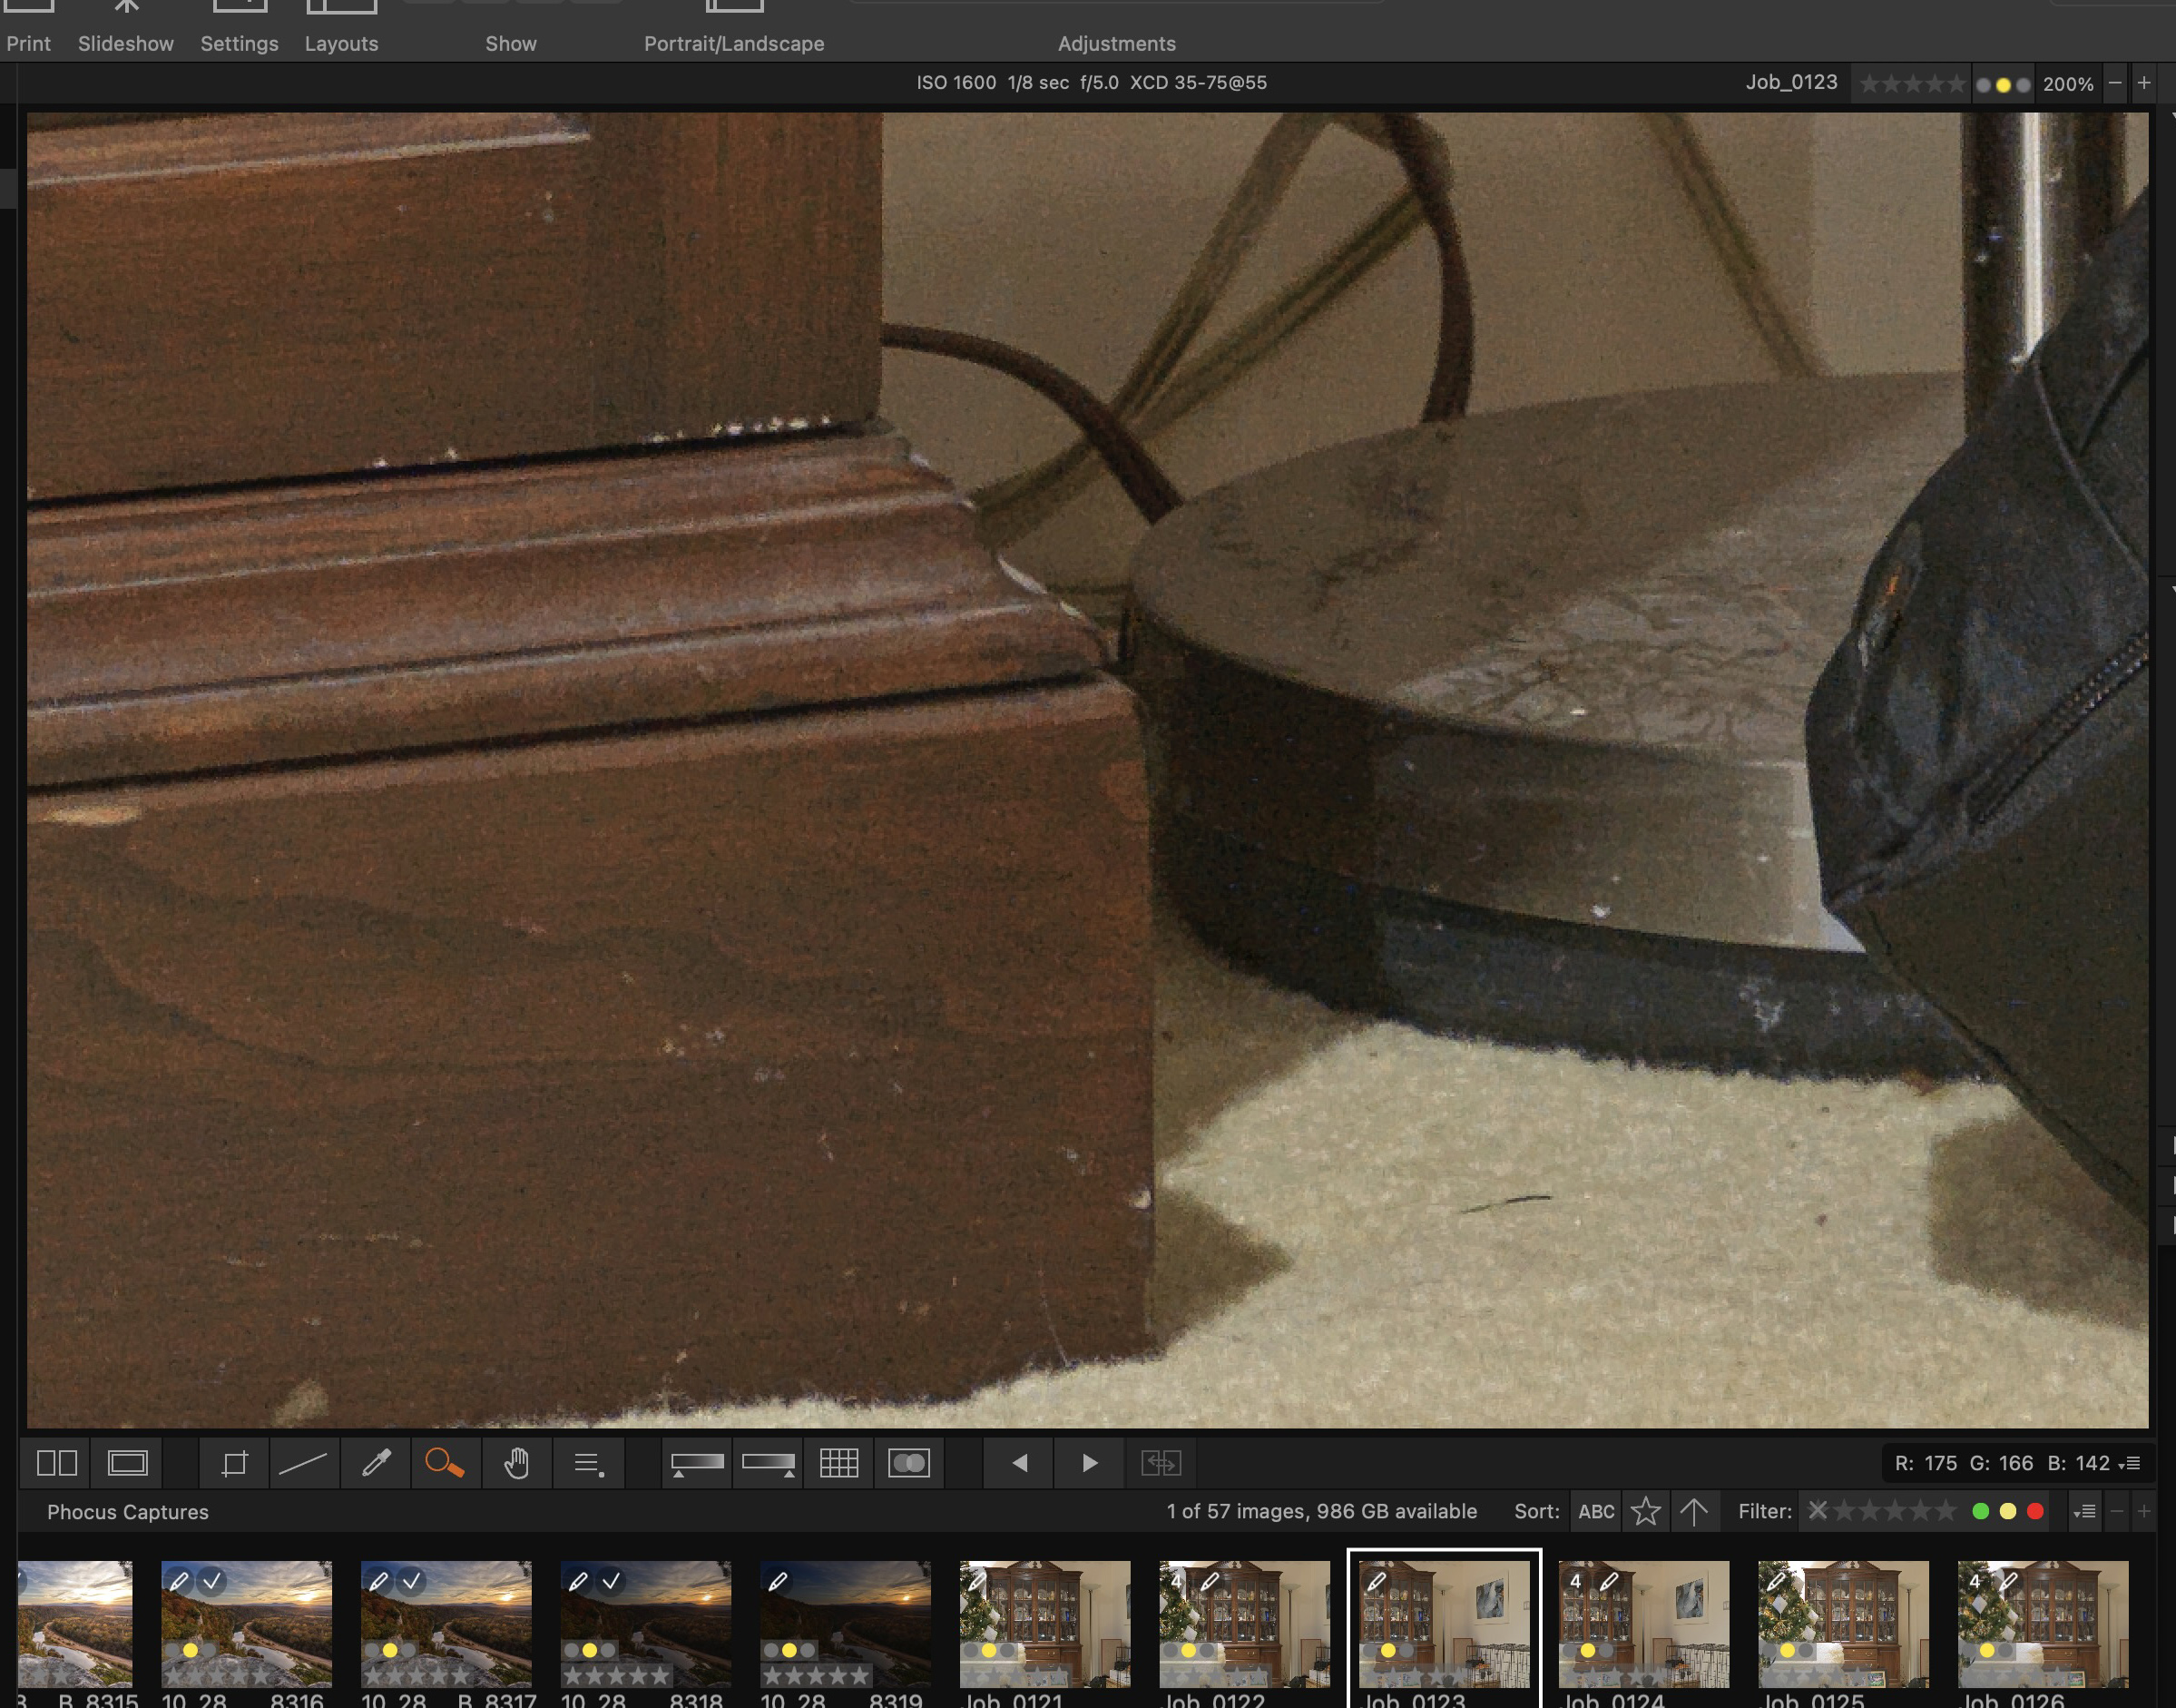
- X2D Single Shot
-

- X2D 4 Shot Multishot

This is an excellent example of what the 4 shot multi shot can deliver. The details in the wood are much improved. Also look at the black of the camera case on the right. The multi shot example is very clean of all noise. I do see a bit more noise in the background on the 4 shot image, again something that can be cleaned up later on, but I was surprised to see it. The details that came out of the black fabric of the camera bag were very impressive on the multi shot image.
-
- X2D Single shot

-

- X2D 4 shot multi shot
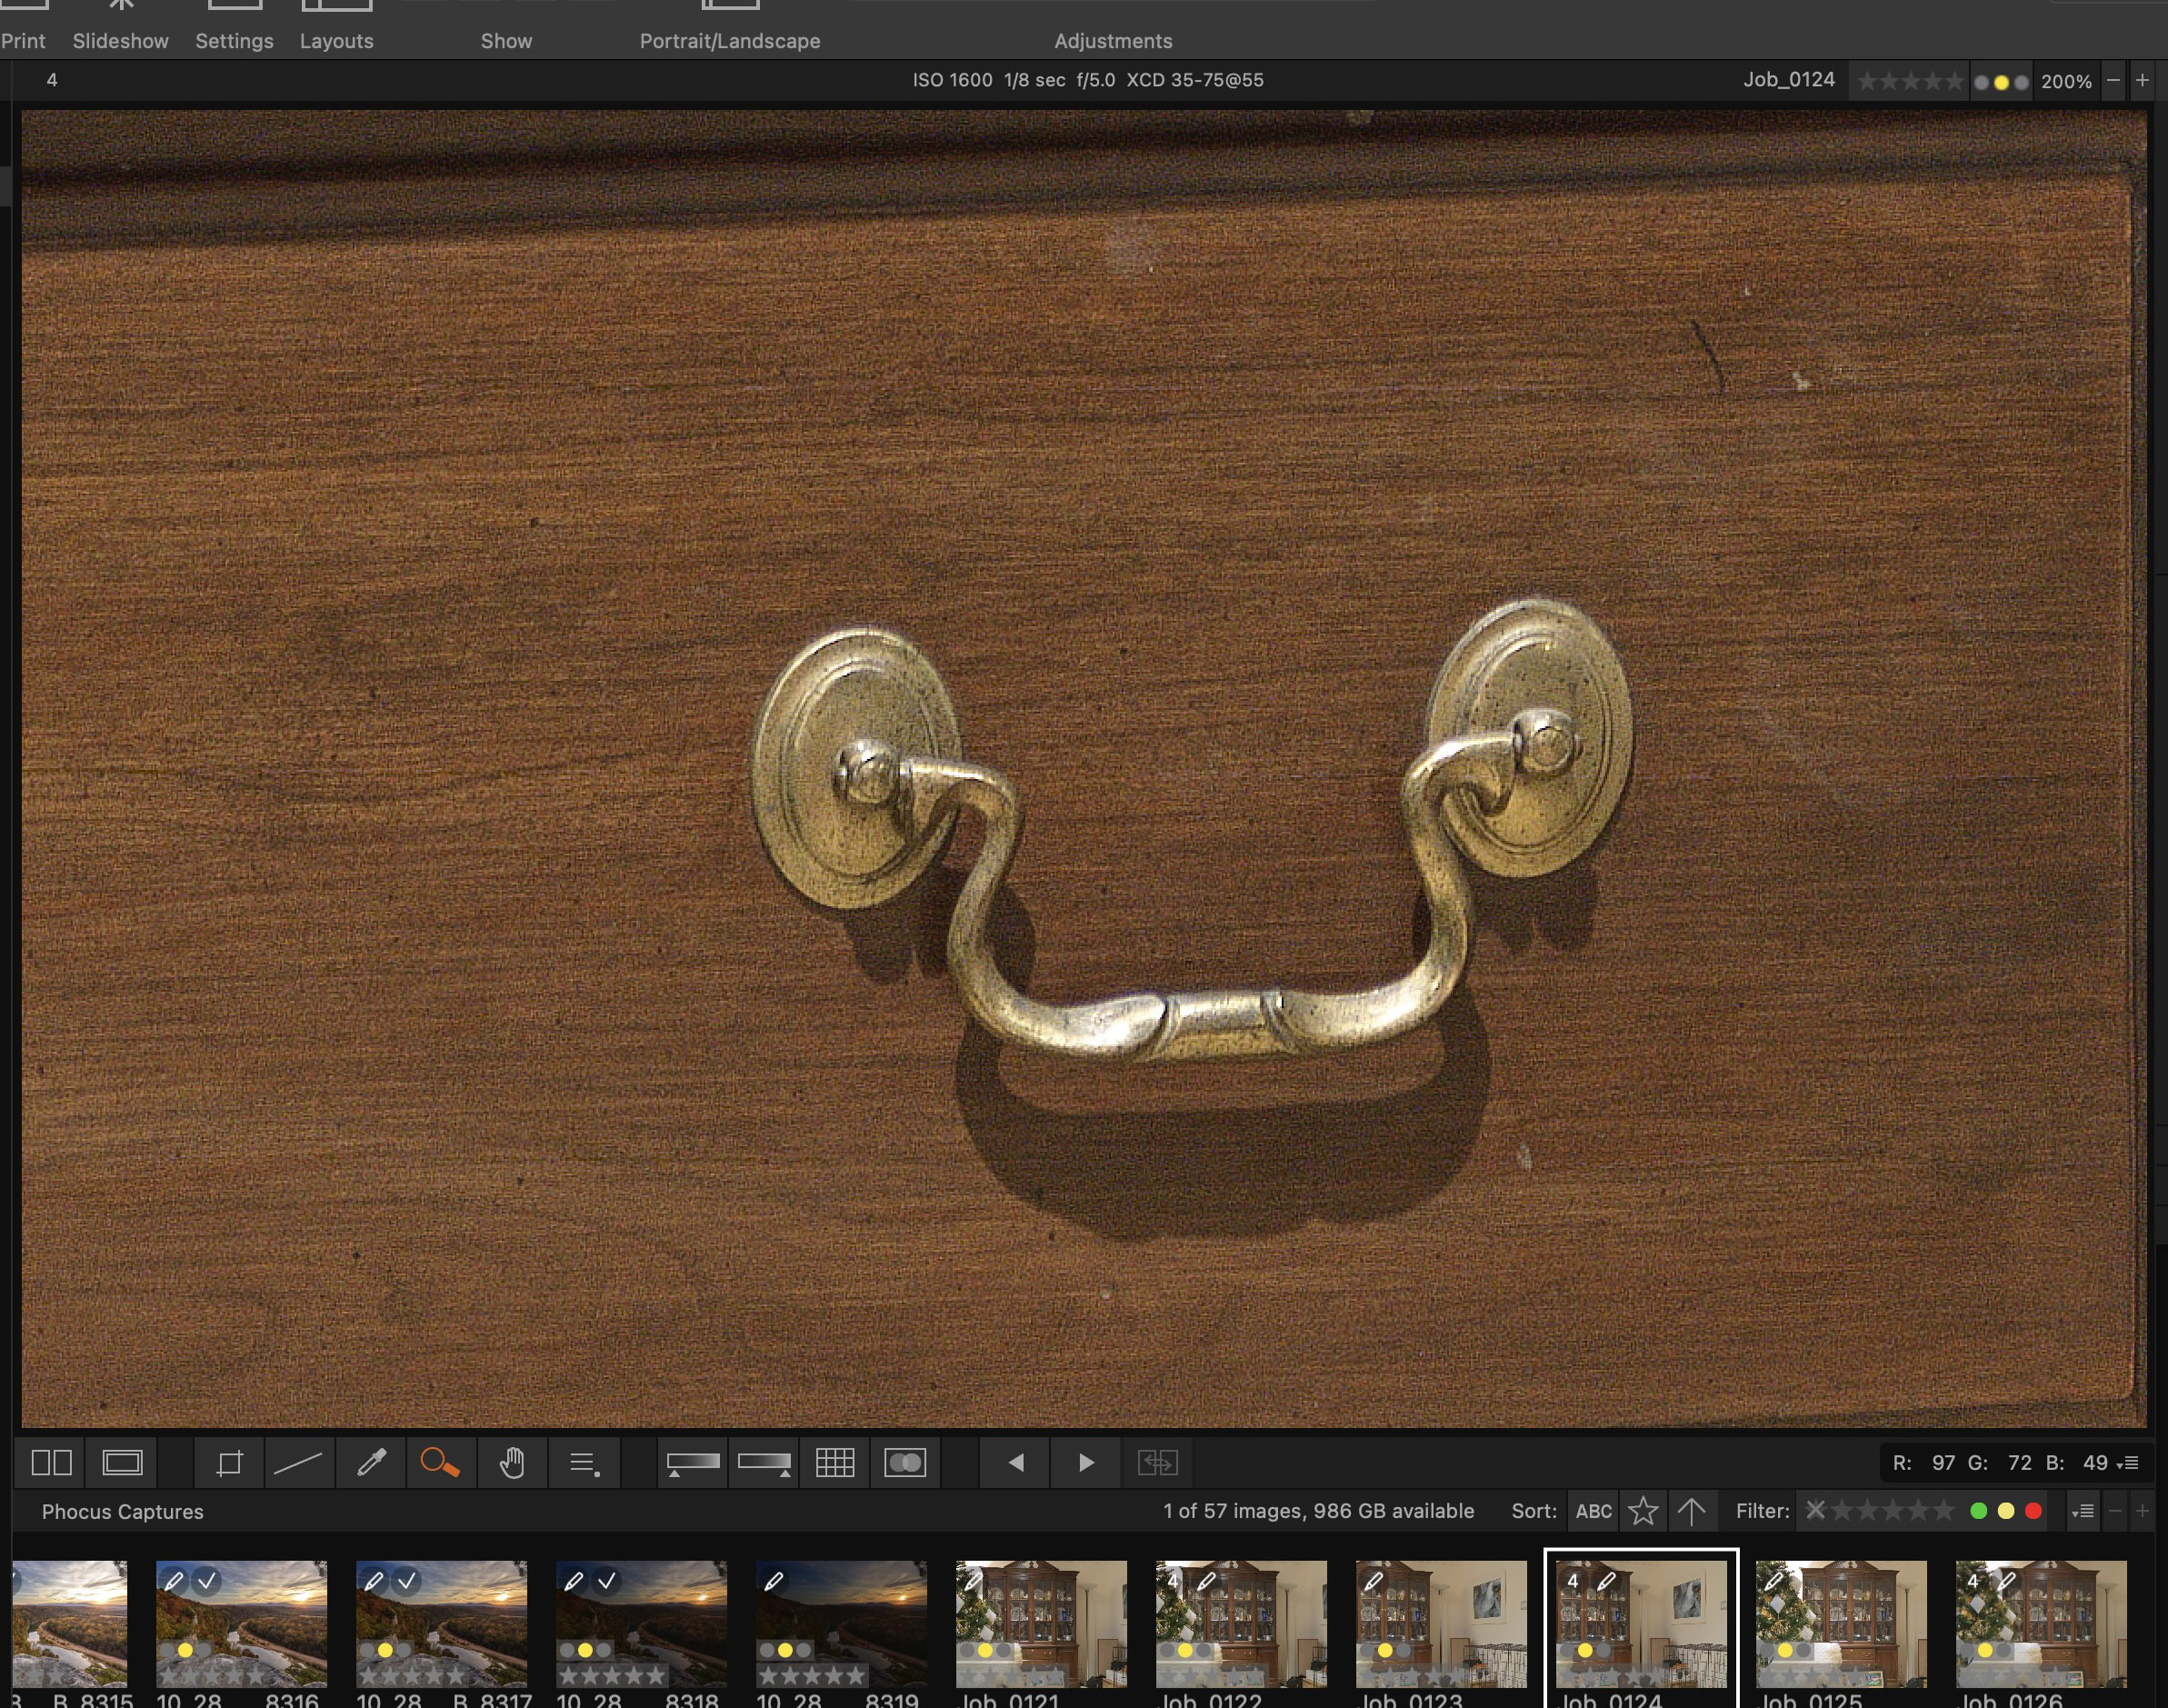
Simple side by side to show the amount of extra details that came from the multi shot both on the metal of the handle and wood grain. The gold metal handles and mounts take on an almost 3D look on the multi shot image. What stands out the most to me is how much better the wood grain is shown on the 4 shot multi shot images.
-

- Single shot
-

- 4 shot multi shot
These crops were taken from the upper left corner of the shot. You can clearly see that the wood grain is much better defined in the Multi shot image. The noise levels on the wood appear to be better on the Multi shot image also. The noise on the multi shot image looks more like grain and is more acceptable. Noise removal in subject matter like wood is tricky as you do not want to make the surface appear totally smooth. Wood always has grain and patterns.
-

- X2D Single Shot

-
- X2D Multi Shot
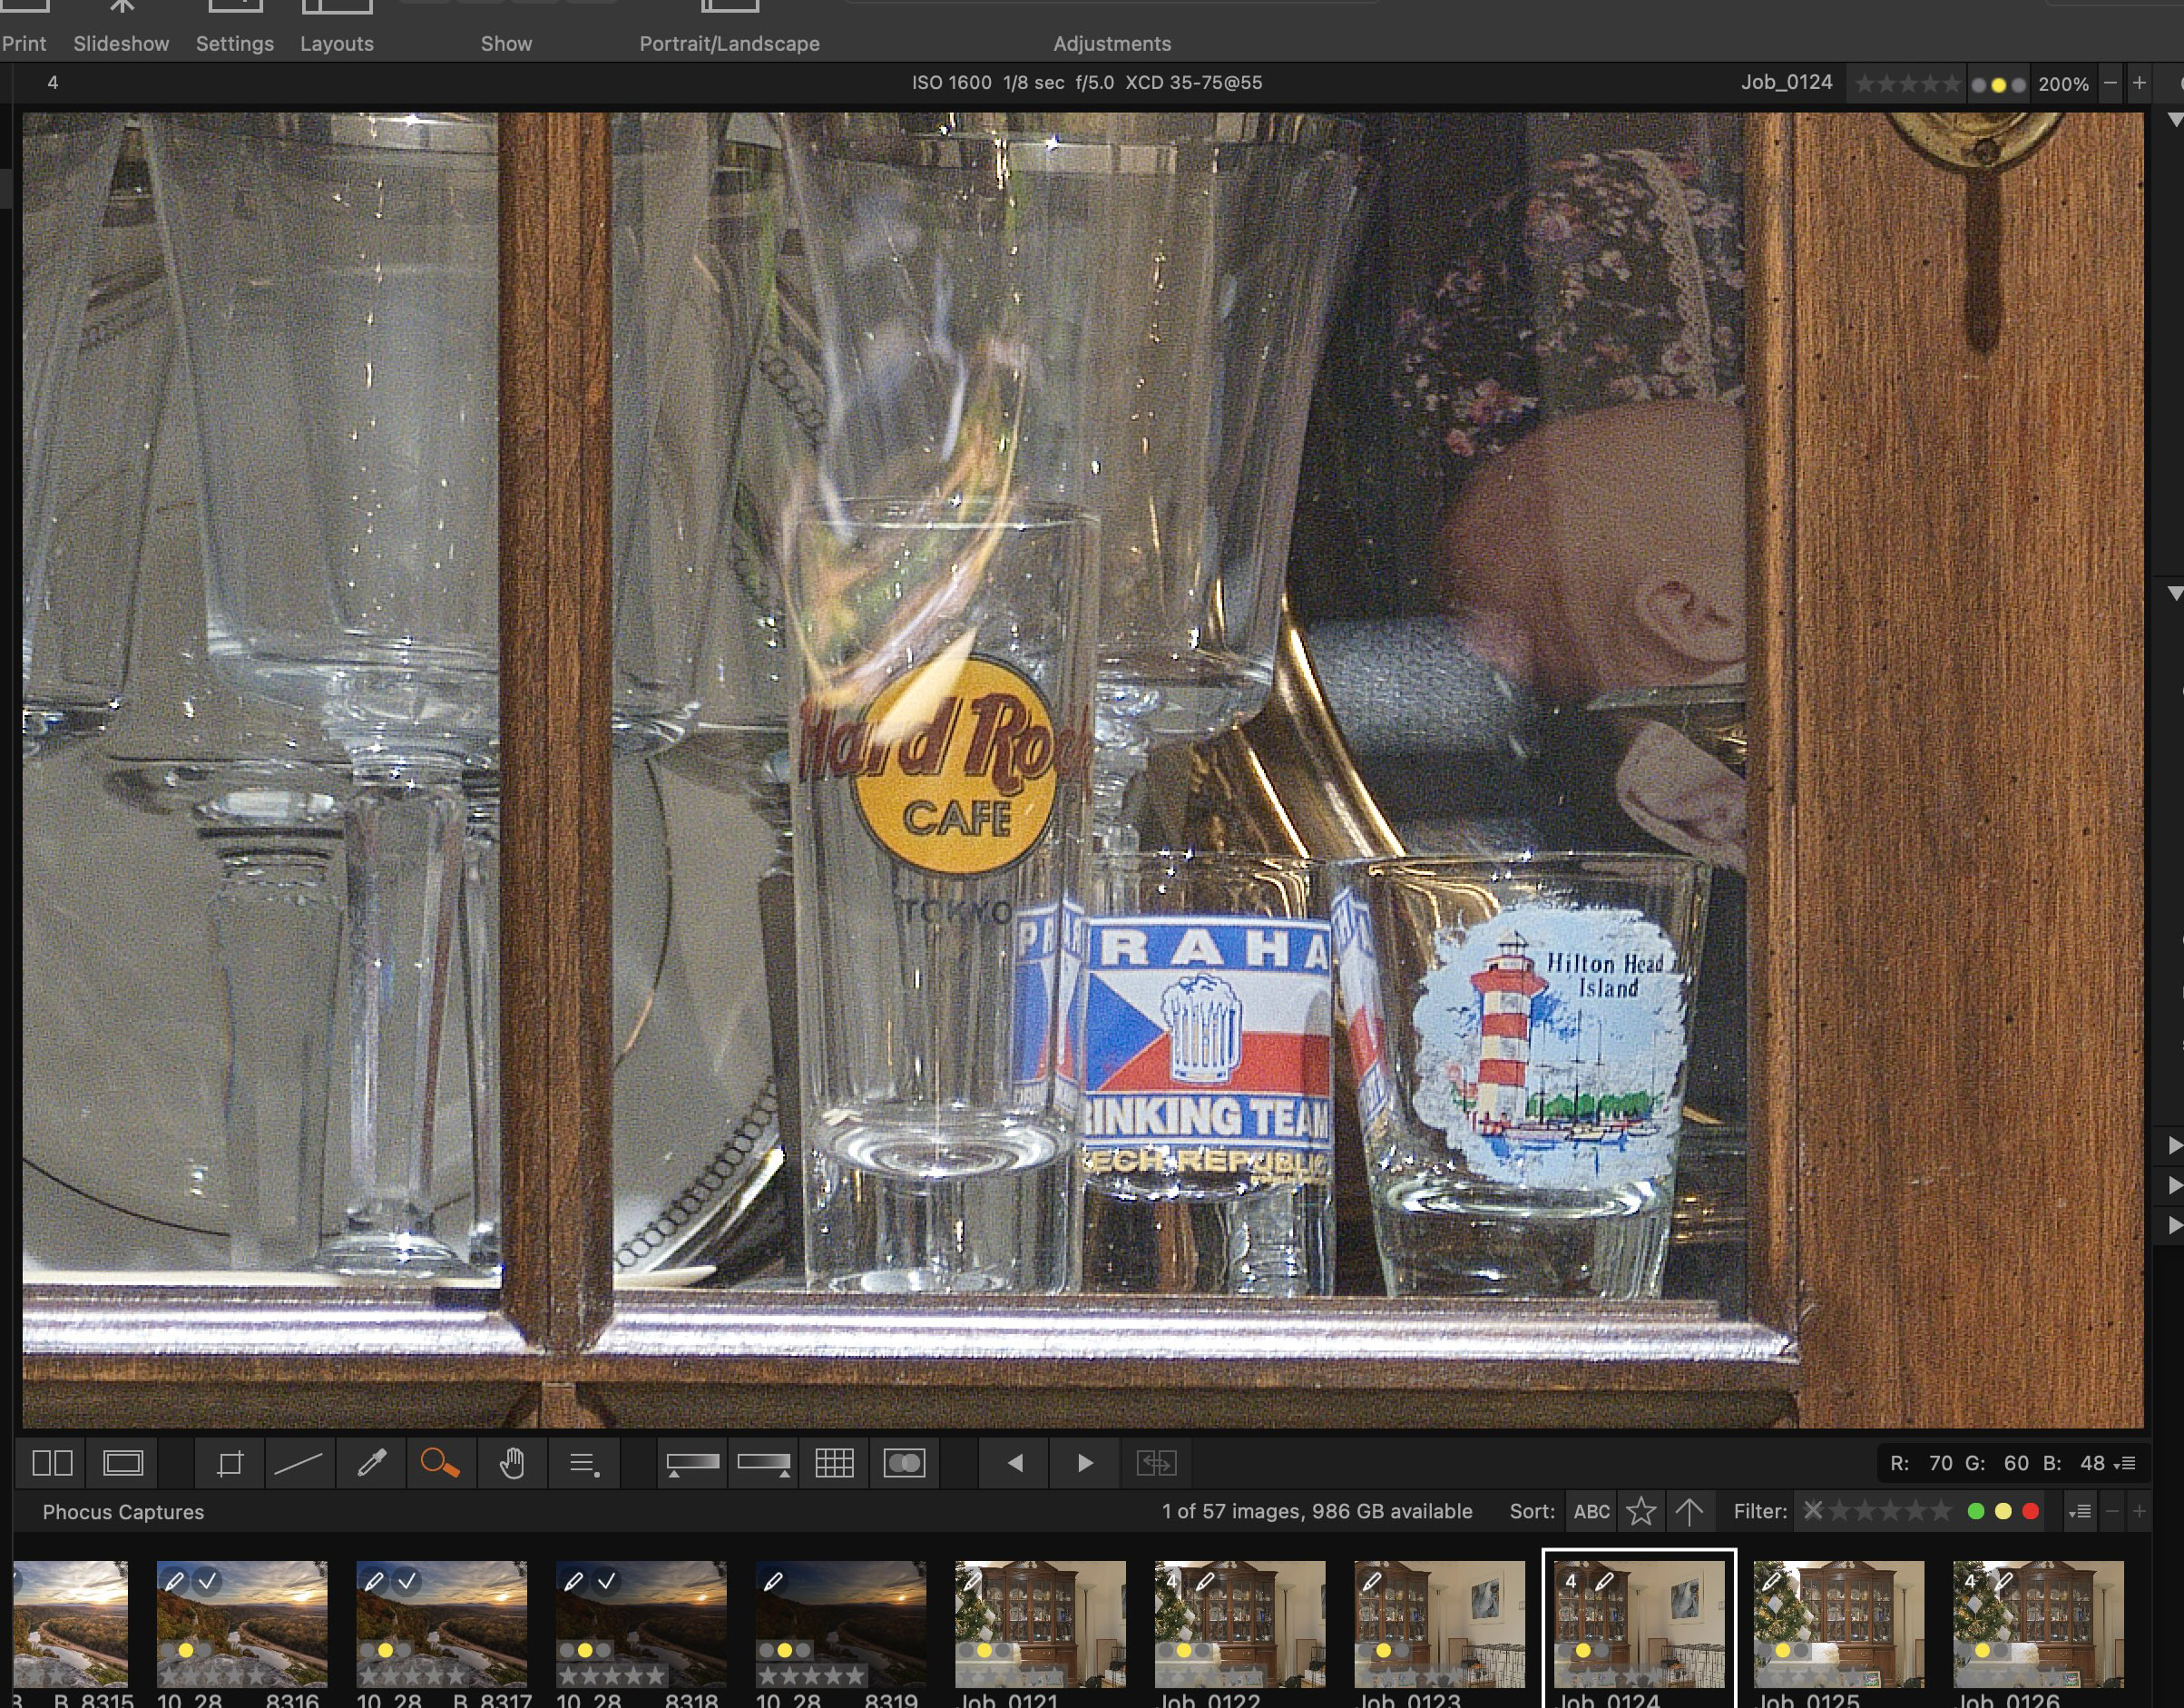
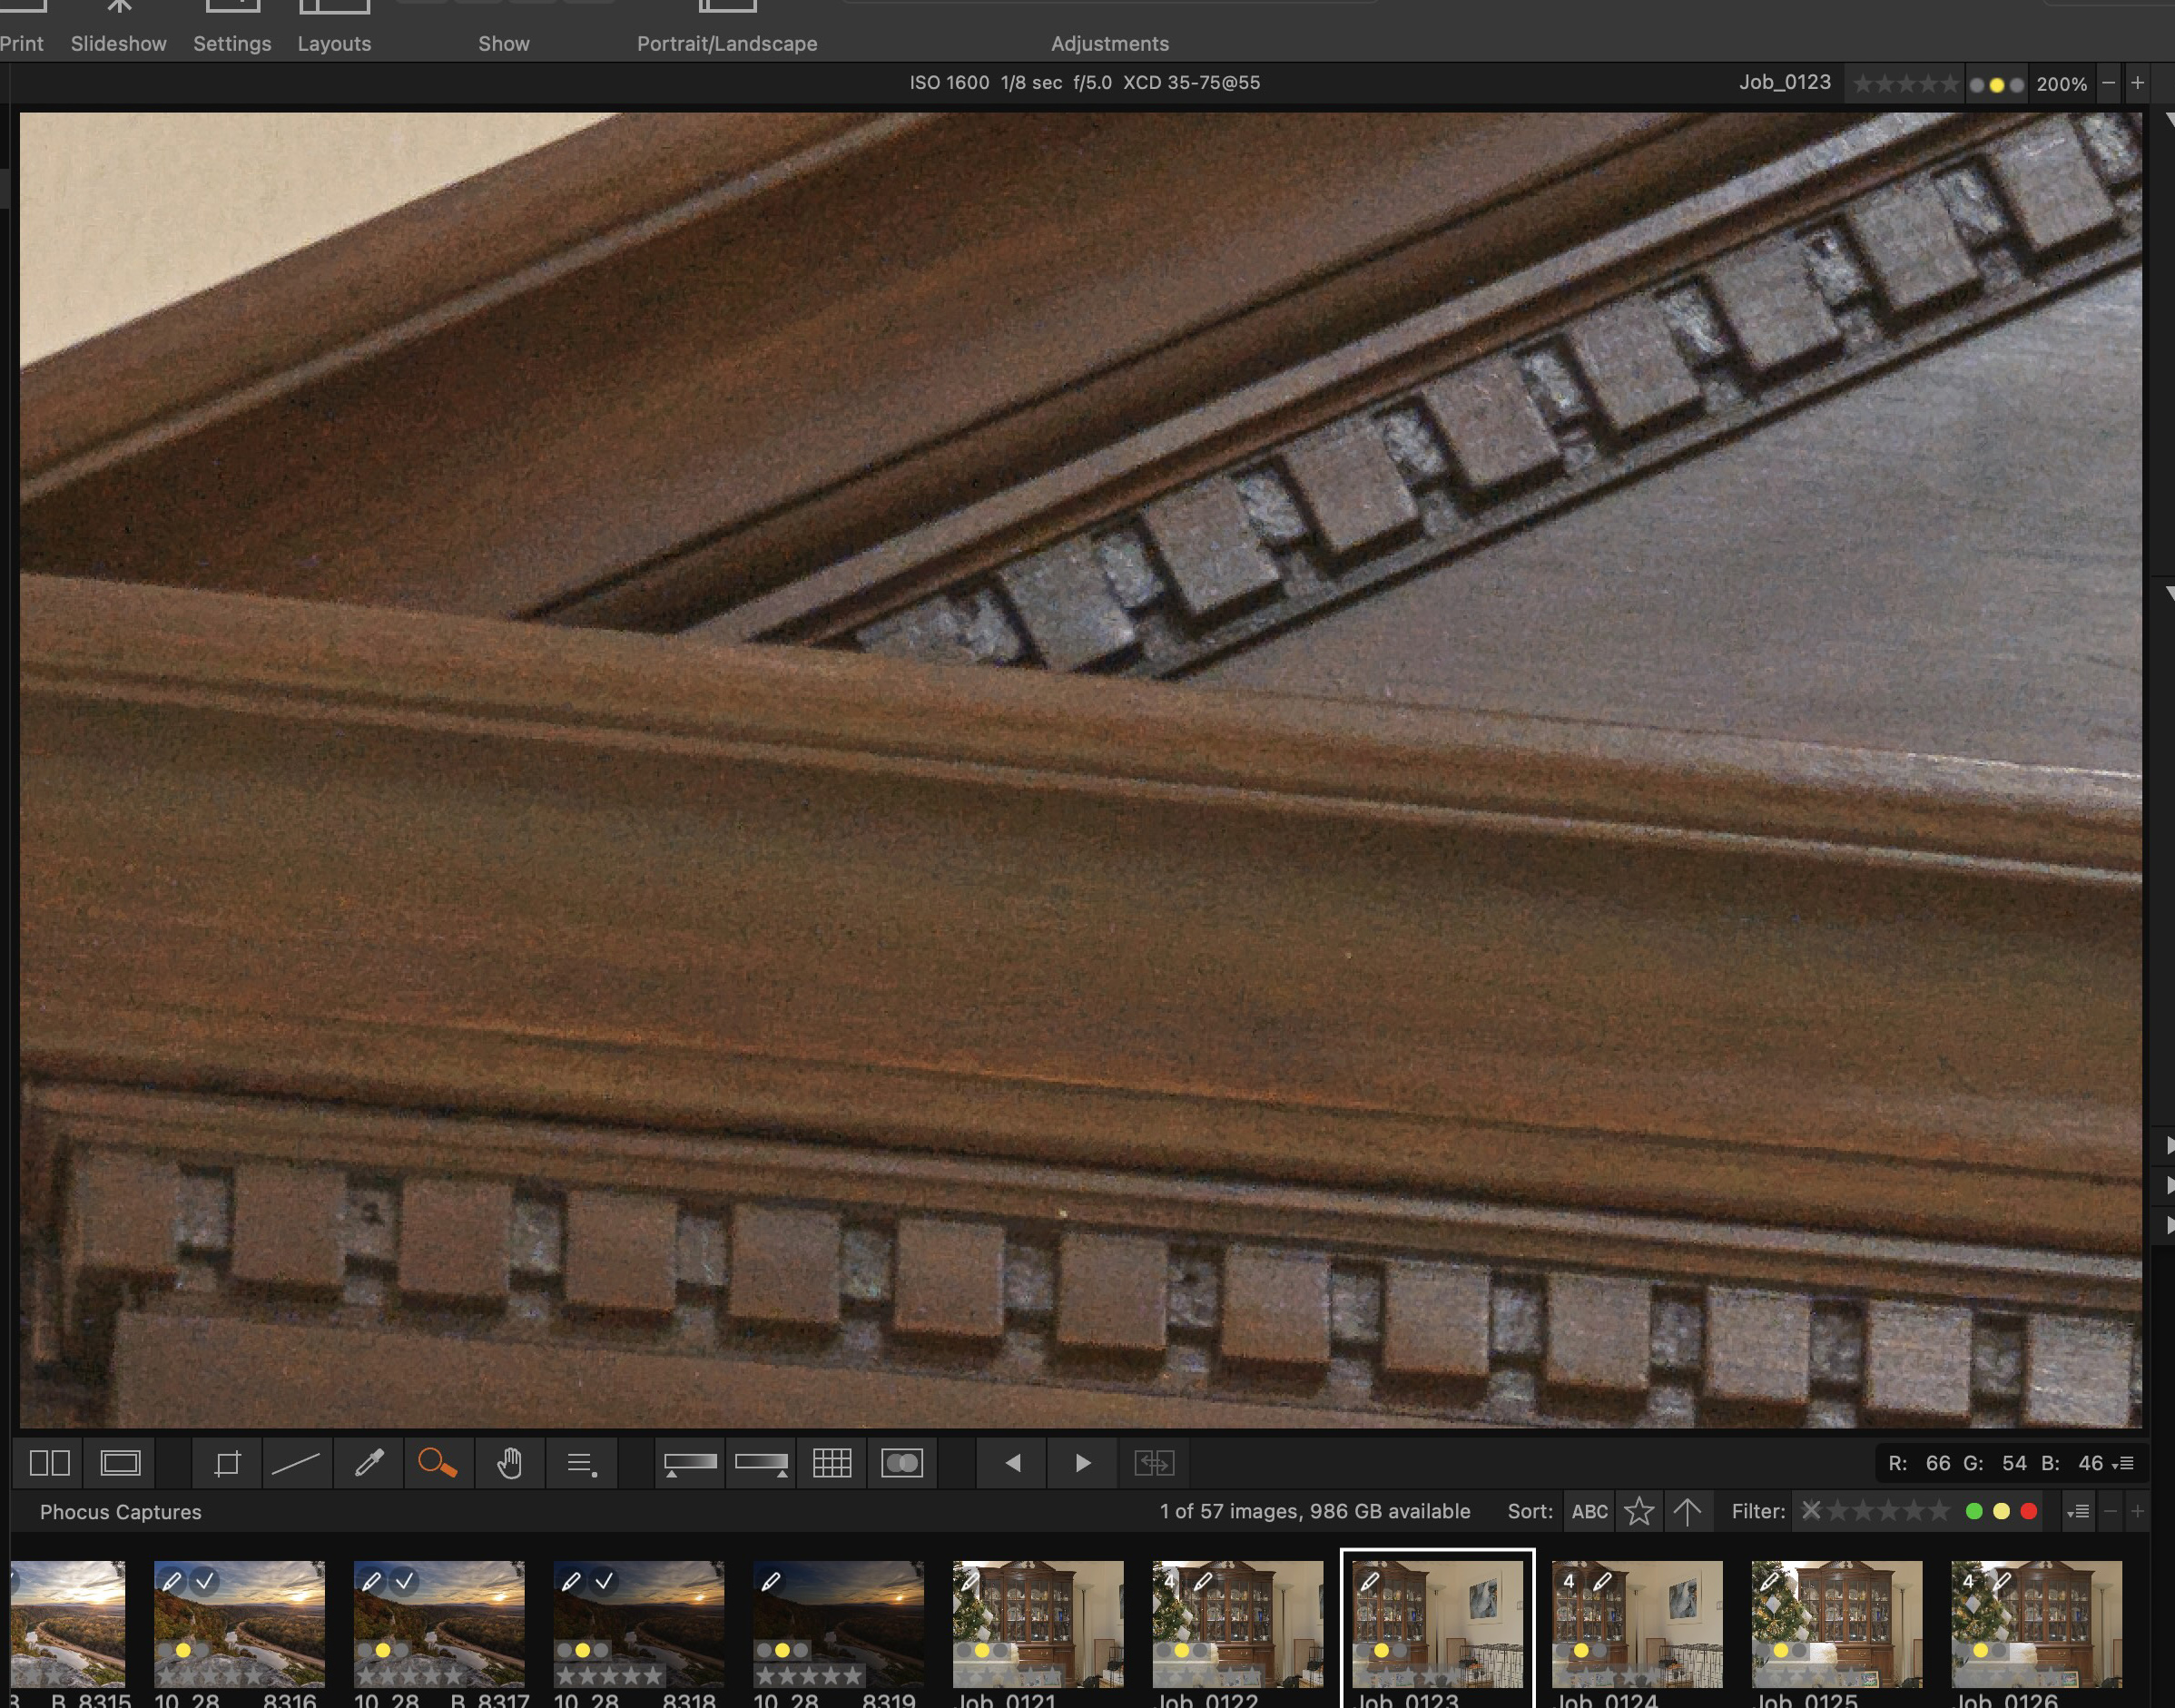
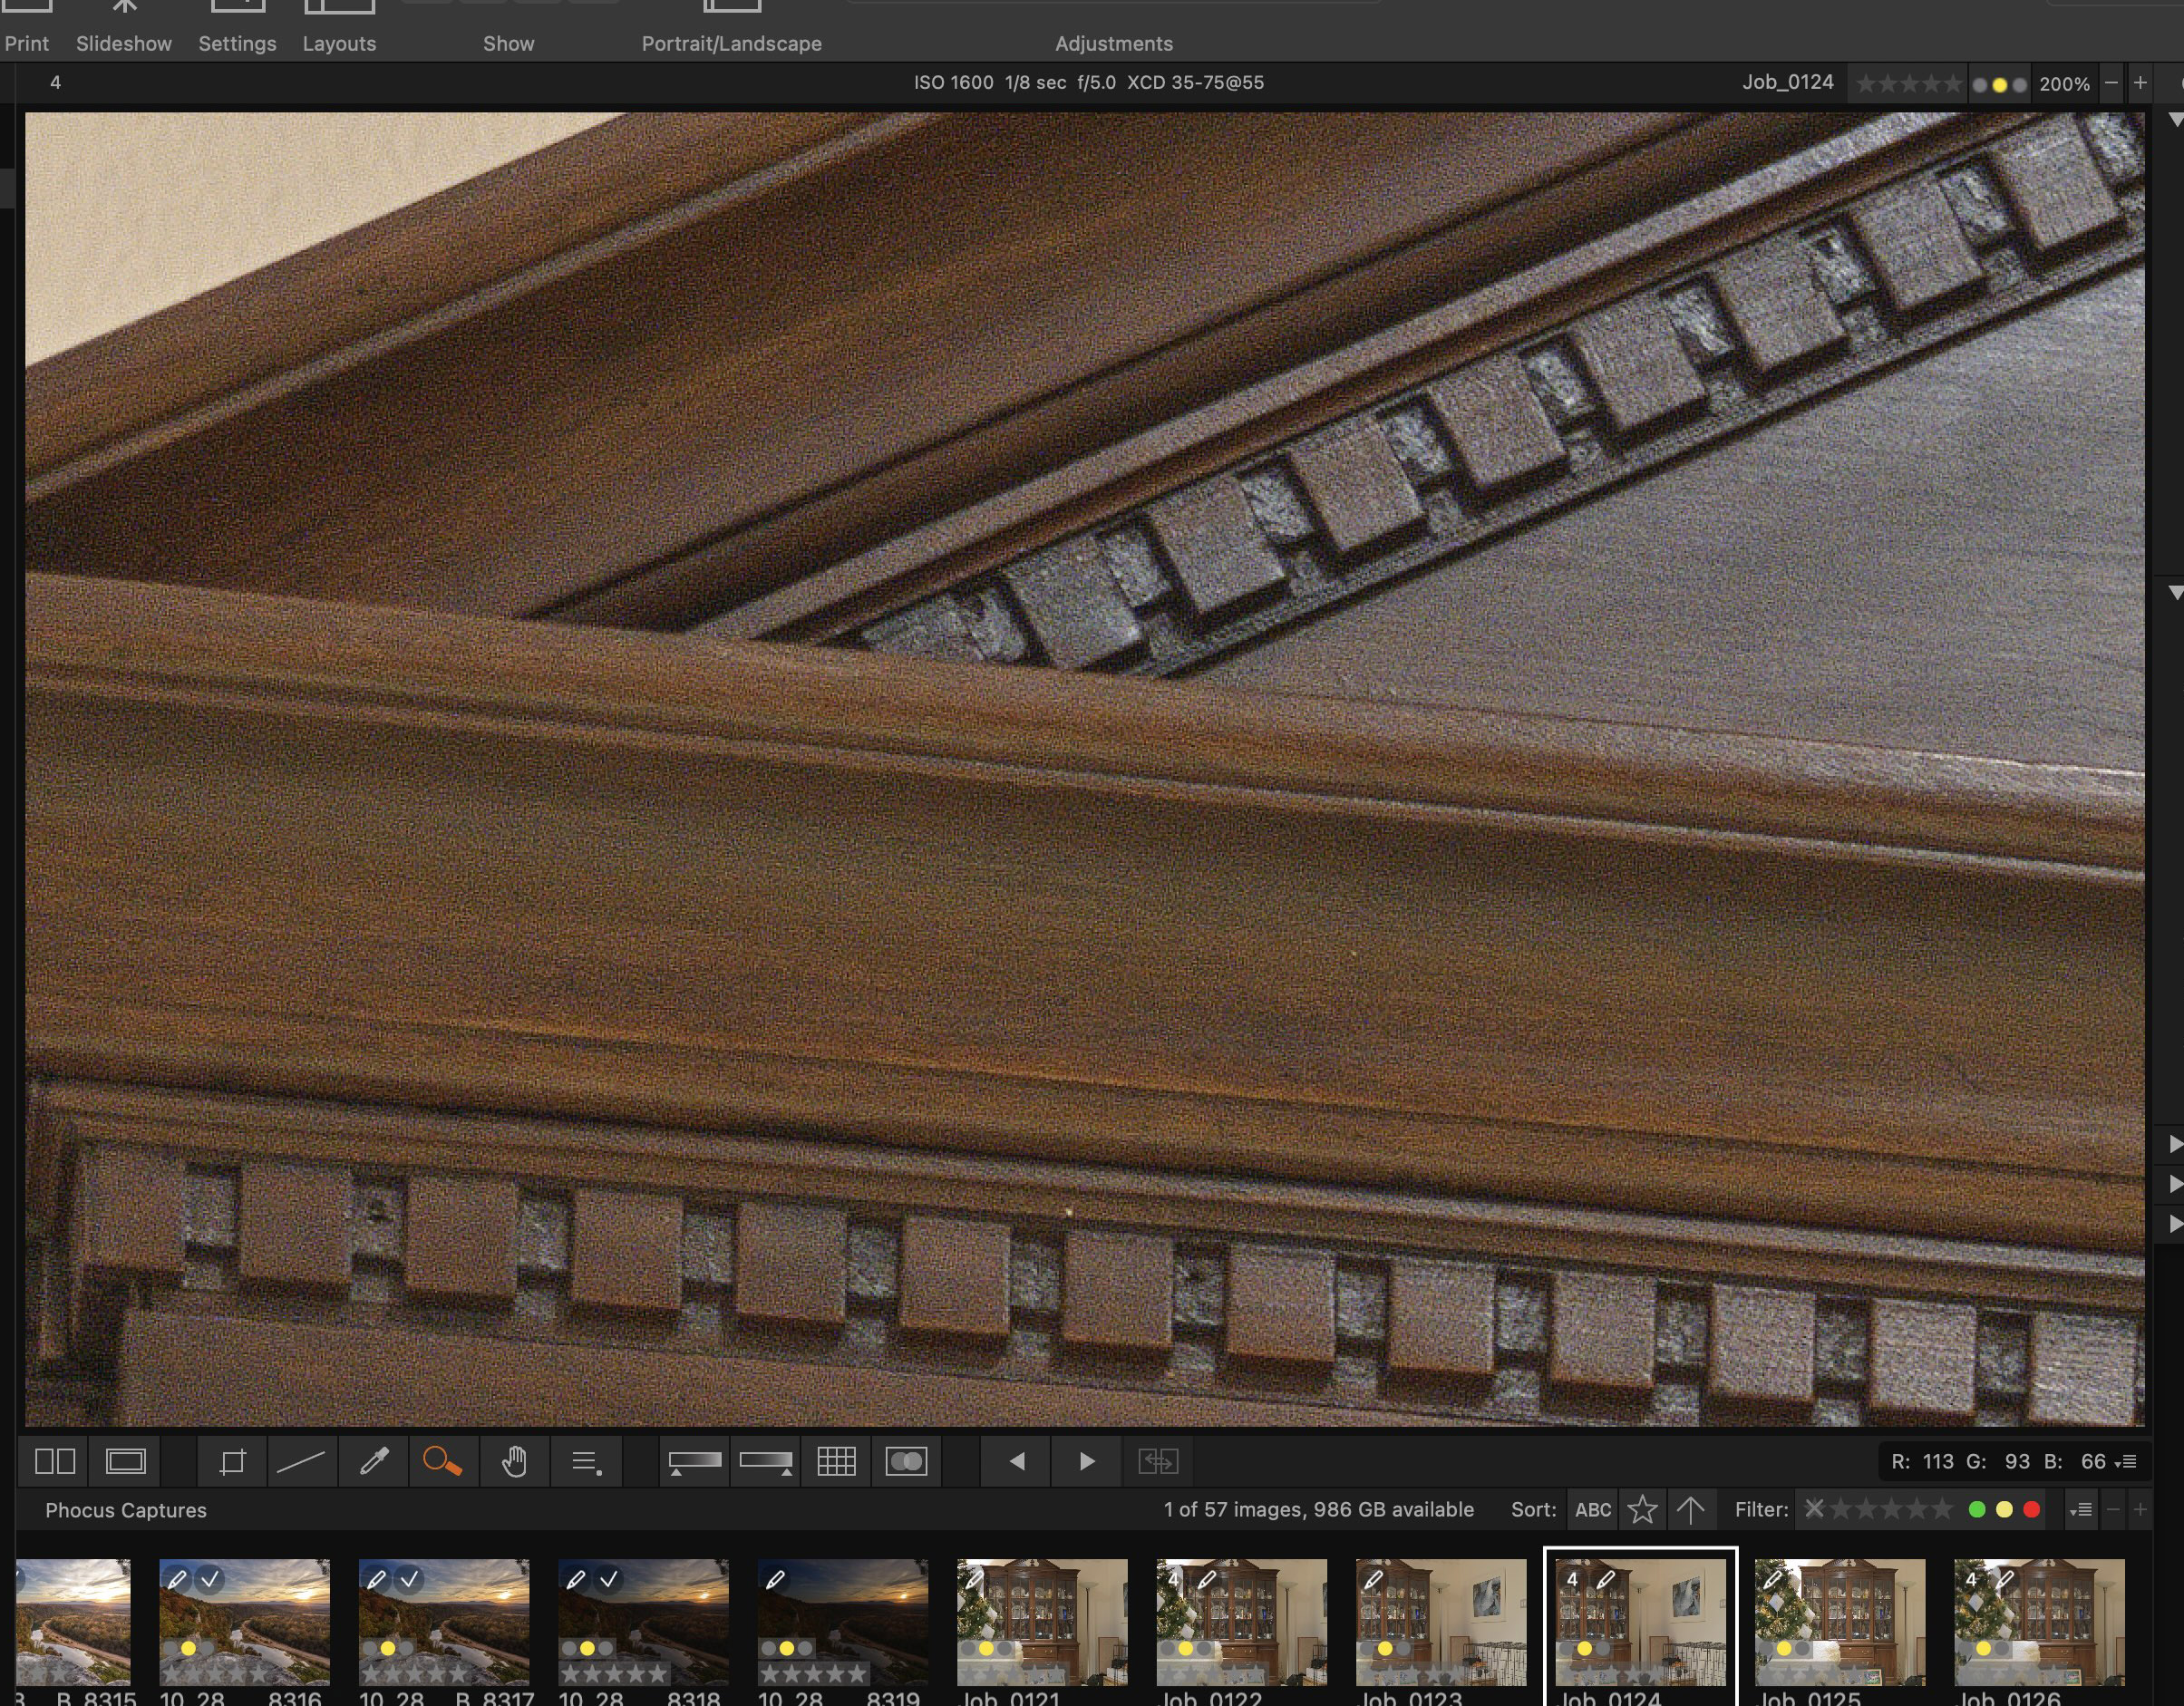
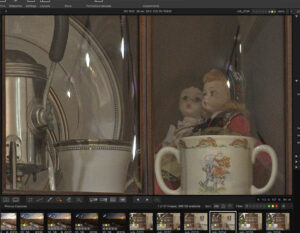
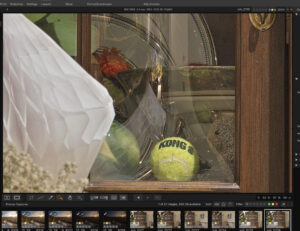
This part of the shot was taken through the glass of the cabinet. It’s interesting to look at all of the individual items and see how much better the definition is on each. On the glasses, look at the print as the edges of the individual letters is much better defined. Compare the large glasses in the back ground, the reflection sparkle has a sharper edge and appears brighter. You can also again see the difference in how the wood grain of the cabinet looks.
-
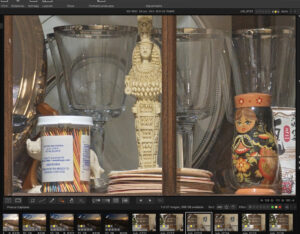
- X2D Single Shot

-

- X2D Multi Shot

This is another set of crops from the cabinet with the subject matter behind glass. Parts of the image to consider are the fine print on the toothpick bottle, the small statue in the background and the face on the wooden Russian tchotchke. Clarity and definition on all of these are superior on the multi shot image.
-

- Screenshot
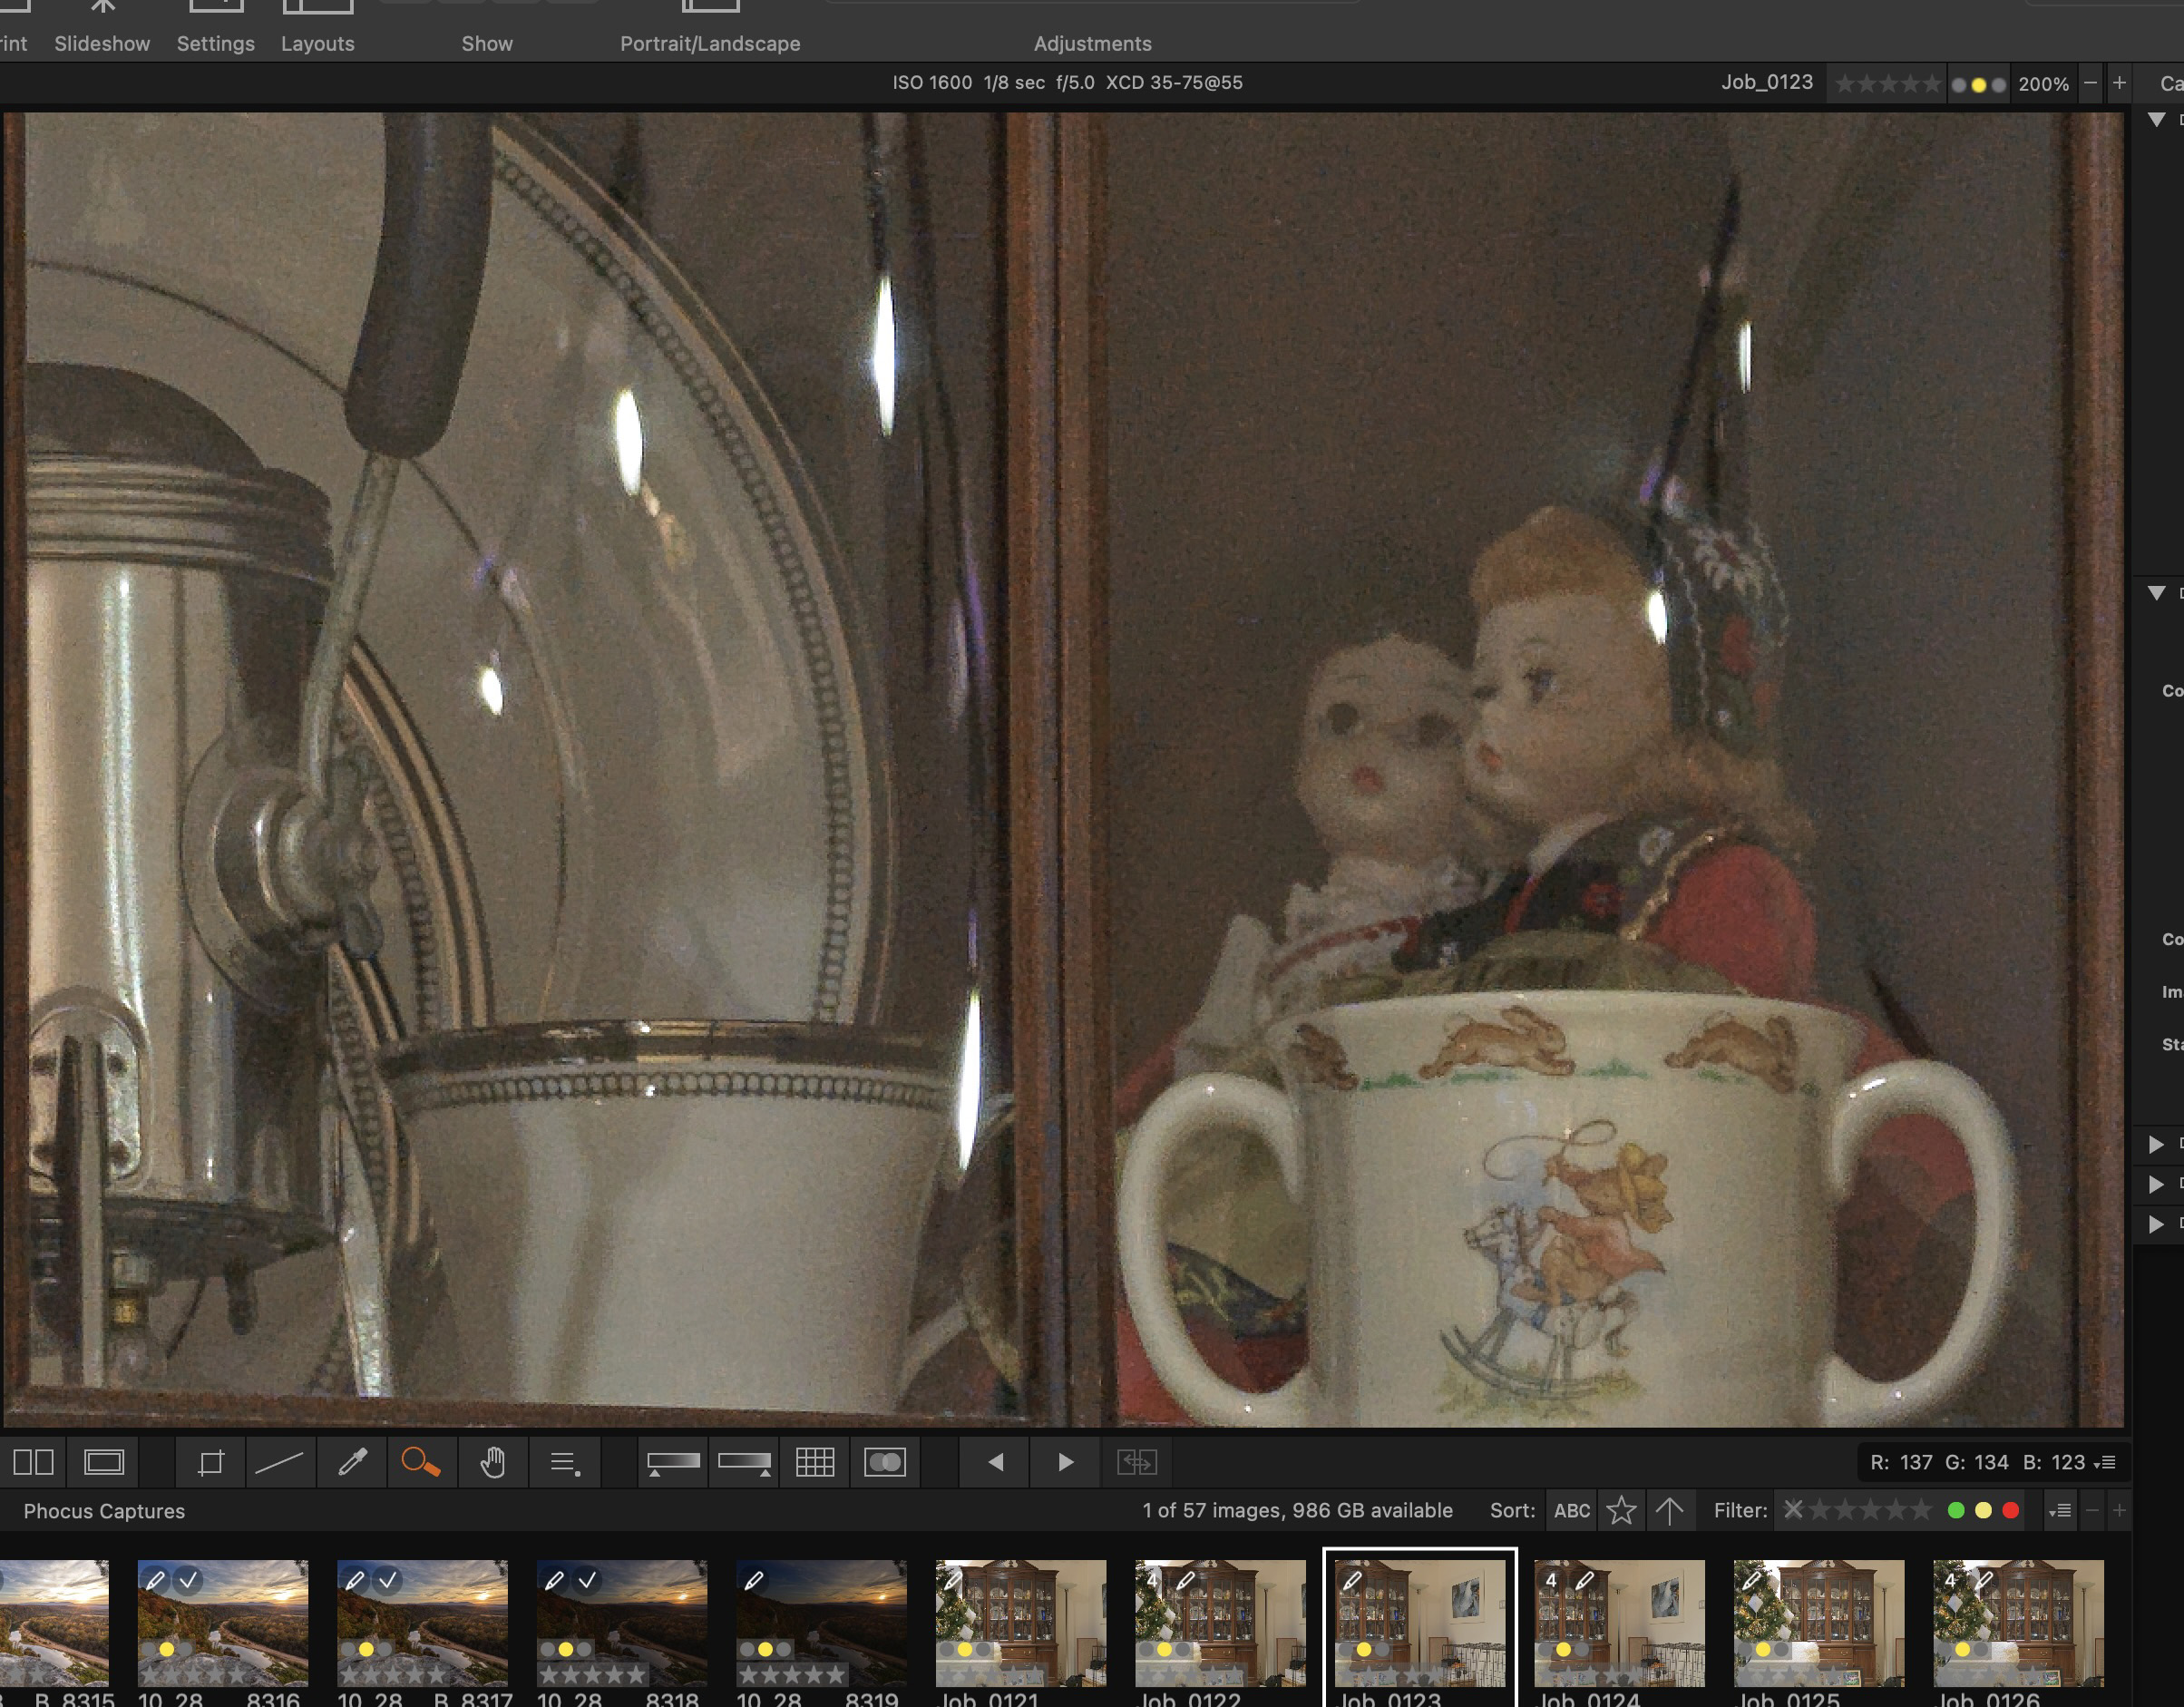
-
- Screenshot

I wanted to include these crops as they were from a darker part of the image. Remember these crops were taken at a 200% view. The lighting was the same. I feel that on the multi shot image besides the overall sharper look to the file, the image also seems to have a bit more life. It’s not as flat as the non multi shot image. Other things to look at are the fine details on the coffee cup around the lip, the faces of the dolls in the background. These images were taken at ISO 1600, on the X2D and I have not found the X2D to have the best higher ISO performance. There is clearly noise visible in both of the crops, but on the multi shot image the noise again takes on a more granular appearance, and it’s more acceptable to my eyes. Also look at the silver metal container on the left, especially the nut holding the handle on. Lastly, look at the face of the larger of the two dolls as a scratch on the face becomes much more visible on the multi shot image.
-

- X2D single Shot
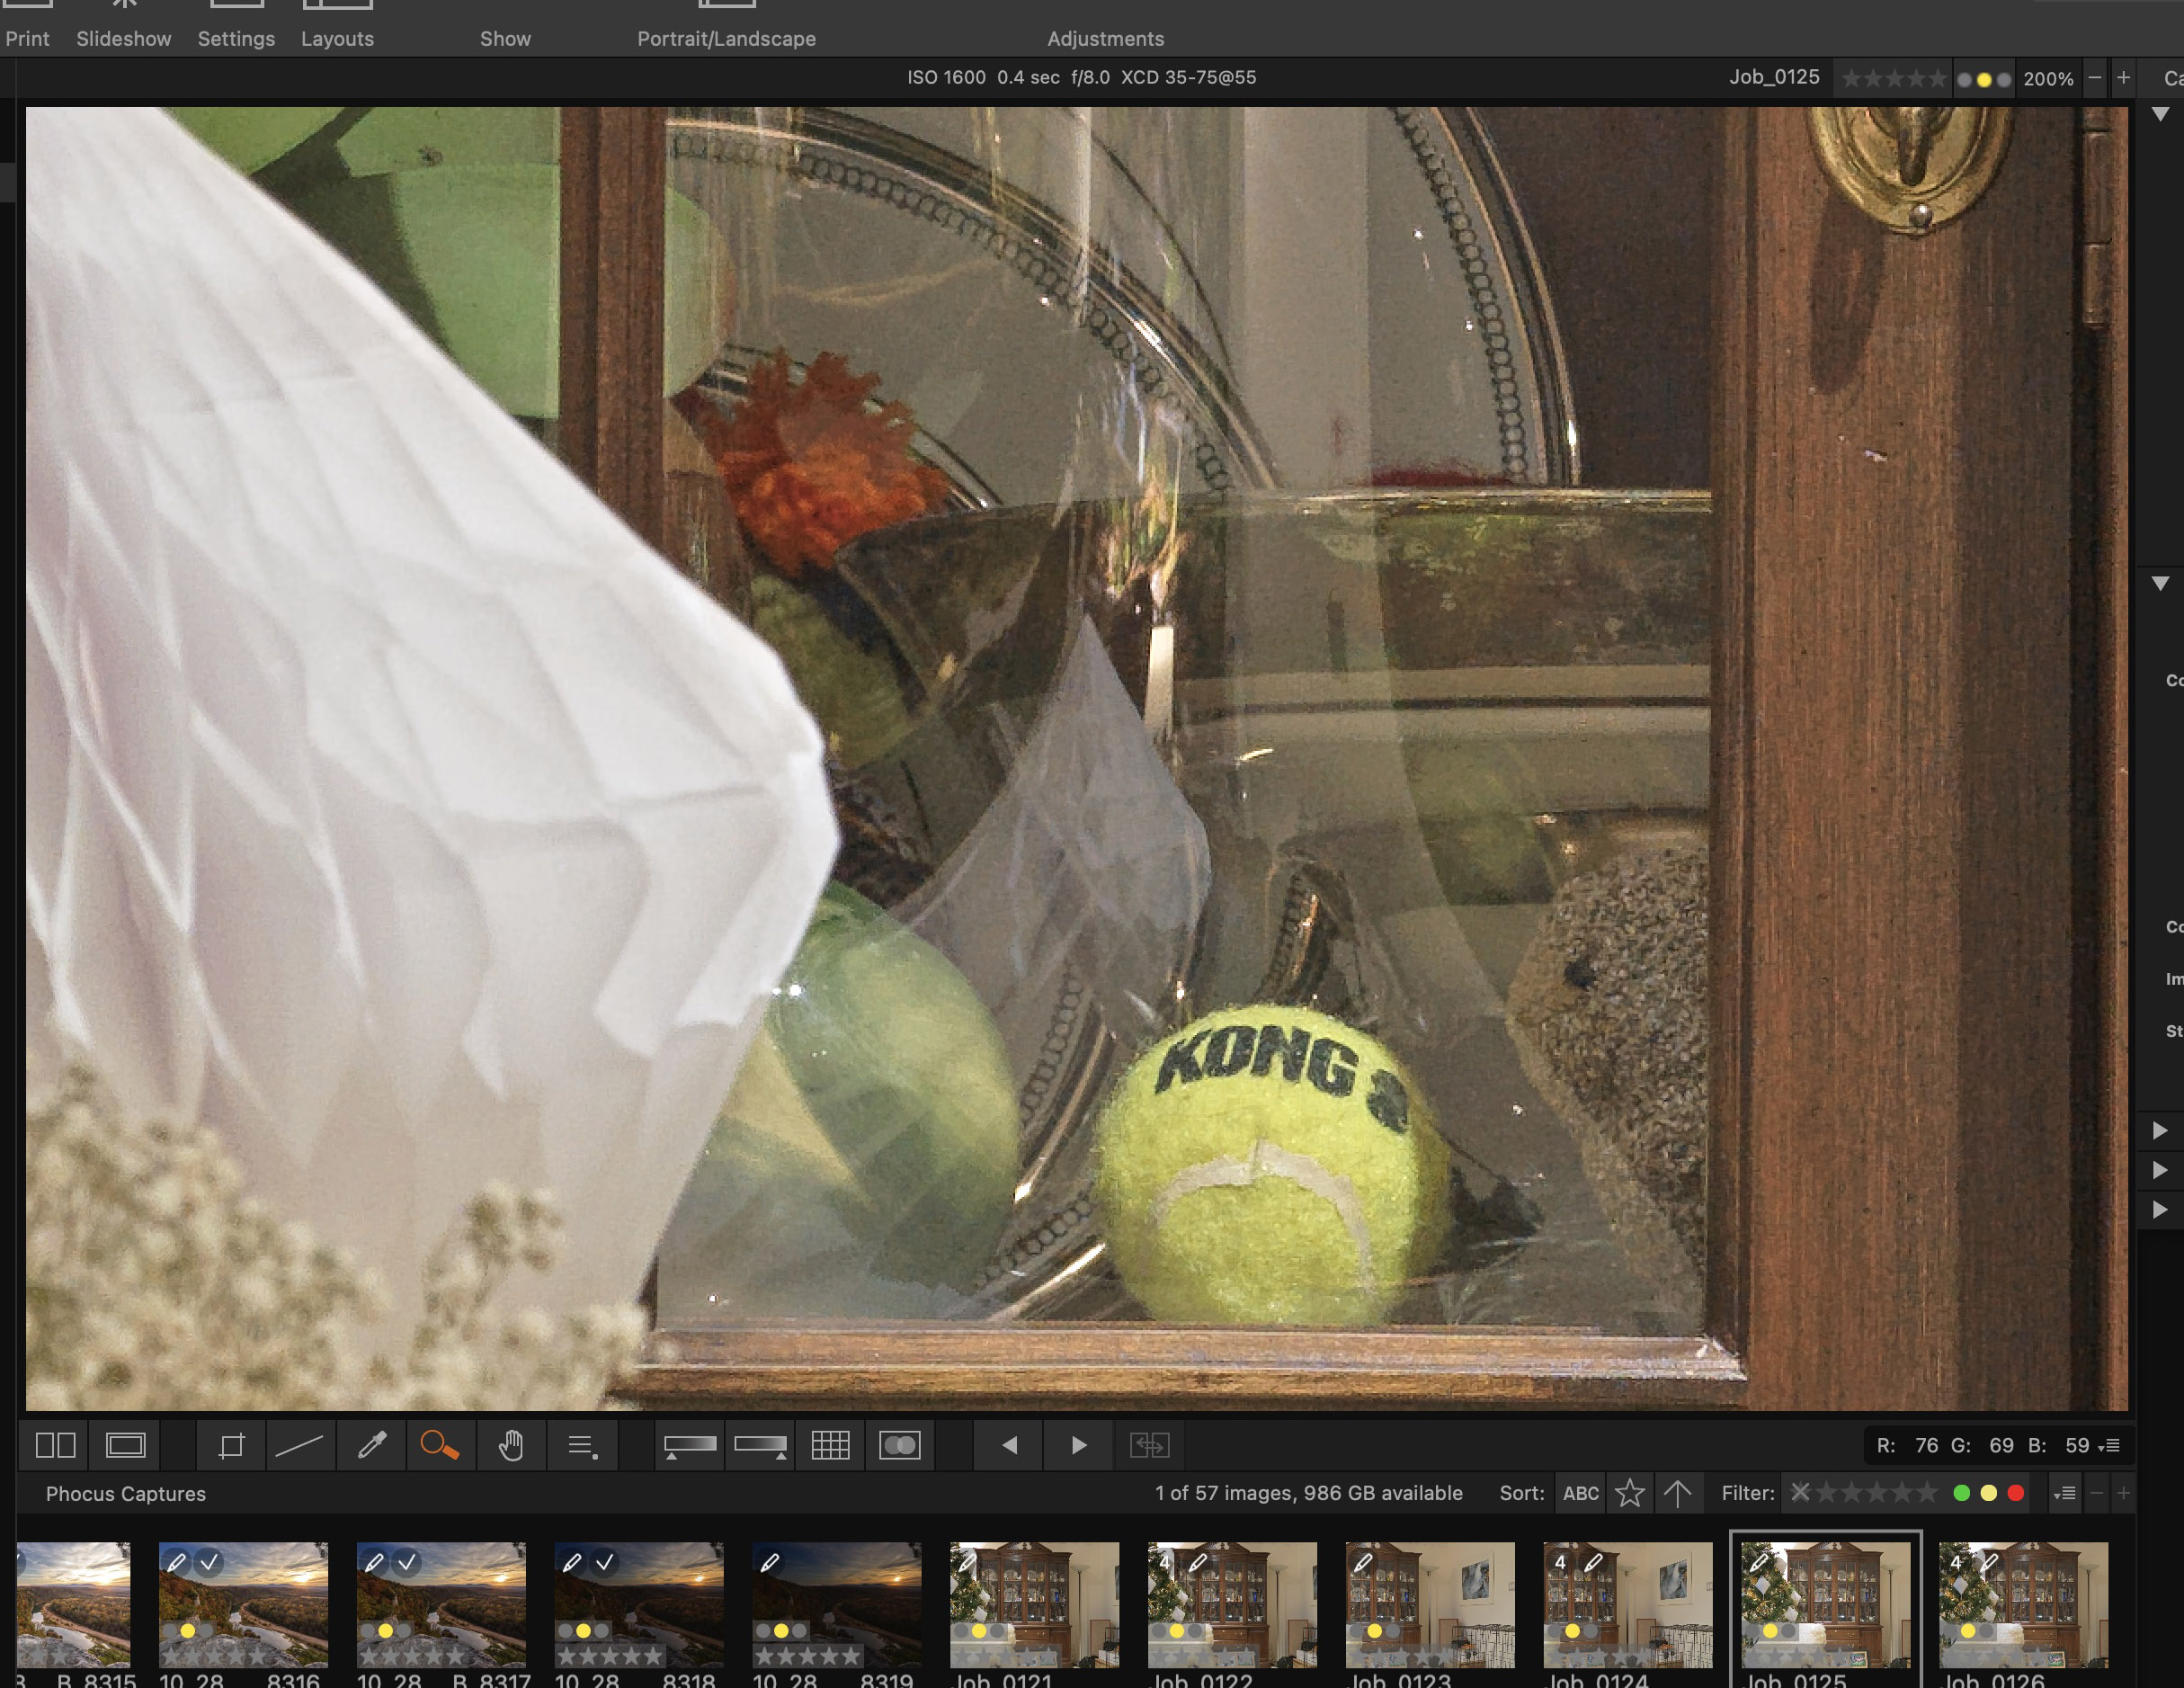
-
- X2D Multi Shot

The tennis ball says it all. Look at the color, and detail on it in the multi shot image. You can clearly see the individual fibers on the surface much better. Also the print on the ball has better definition. Other parts of the images to consider are the concrete bunny and the orange flower in the background. All have much better definition on the multi shot file.
Conclusions:
- The results from the X2D multi shot capture can be superior to a single shot taken of the same subject. The look and feel of the file is better, with superior definition.
- Noise levels can be similar at times, however the visible noise in the multi shot image takes on a more granular look, i.e. more natural in appearance.
- Finer details are much more visible in the multi shot image
- Sharpening the non multi shot file may bring some of the finer detail back, however I prefer to have them to start with and not need to rely on additional sharpening
- You must be tethered to Phocus desktop software, Phocus Mobile 2 does not currently support multi shot. This is a huge oversight by Hasselblad. Being forced to use a PC/or Laptop implies that they are only considering the use of multi shot in a studio. If conditions support it (no wind or moving subjects), there is no reason not to use multi shot in the field.
- I have yet to determine if multi shot cuts down on hot pixels, something I have seen quite a bit of with use of the X2D at higher ISO ranges.
- There is no way to save the output of a multi shot image as a 3FR, only .fff. Thus you cannot use the new noise reduction feature HNNR on multi shot images. Again a huge oversight by Hasselblad as based on my testing the multi shot images I captured would have benefited from HNNR at times.
- The multi shot workflow is tedious at best. You must be tethered and the image at first is imported to Phocus desktop at capture. It is now in your “Phocus Captures” folder on your computer. To use the image you must export it to your computer. In my case it’s exported to my documents folder as a Tiff. The problem with this is just that. It’s now a tiff, not a .fff and thus many if not all of the features of a raw file are gone. It’s just not compressed.
- IF YOU WISH TO WORK ON THE MULTI SHOT IMAGE AS A RAW FILE, you must work on it while it’s still a .fff in Phocus desktop. Phocus desktop is way out of date in comparison to any other raw conversion software such as Lightroom or Capture One.
- Lightroom CANNOT open a .fff from a multi shot capture. A .fff is really still a raw file, just a compressed version. Being forced to only work on the files as tiff is a huge disappointment.
Written by Paul Caldwell for Photos of Arkansas, 02/15/25
02/09/25 Color comparison of Hasselblad X2D No2–Phocus and Lightroom Snipes Bluff Buffalo River
- At February 10, 2025
- By paul
- In Articles/Reviews
- 1
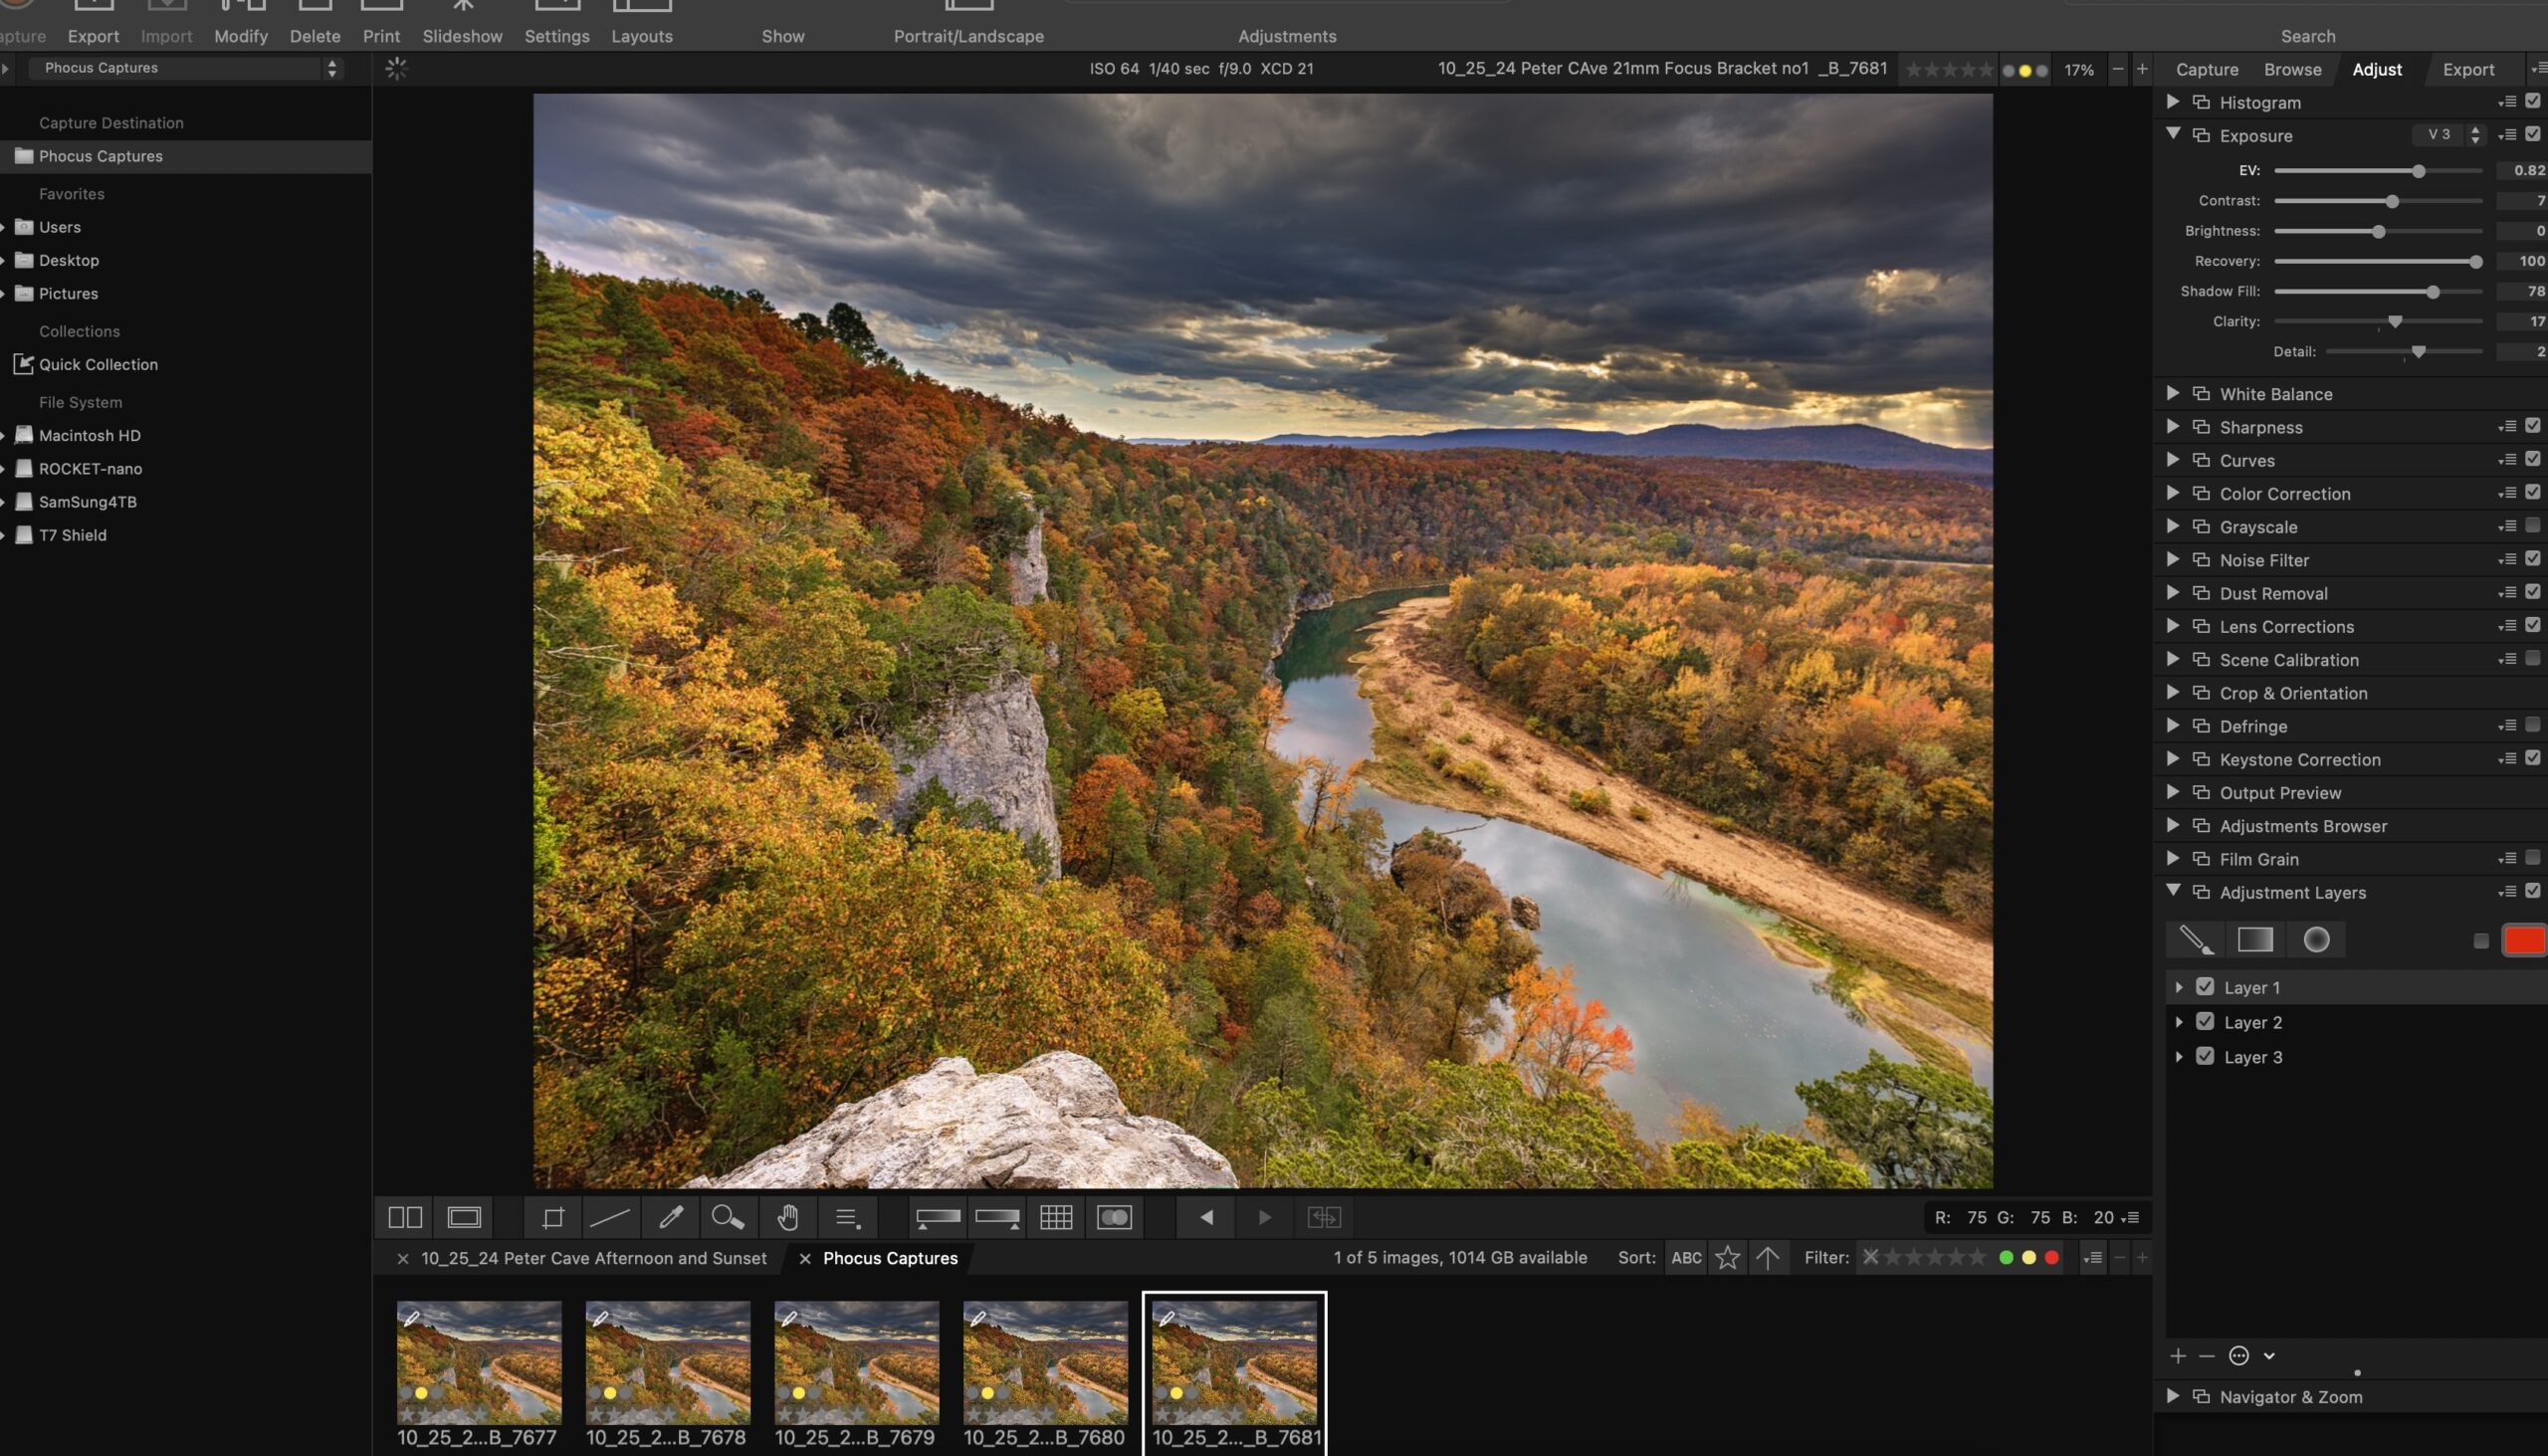
Fall colors are an excellent way to compare the color output from Phocus and Lightroom on X2D raw files. For this test, I imported the same raw file into Phocus and Lightroom and tried to keep the base work the same. I use the “camera standard” profile in Lightroom and Phocus Natural Color.
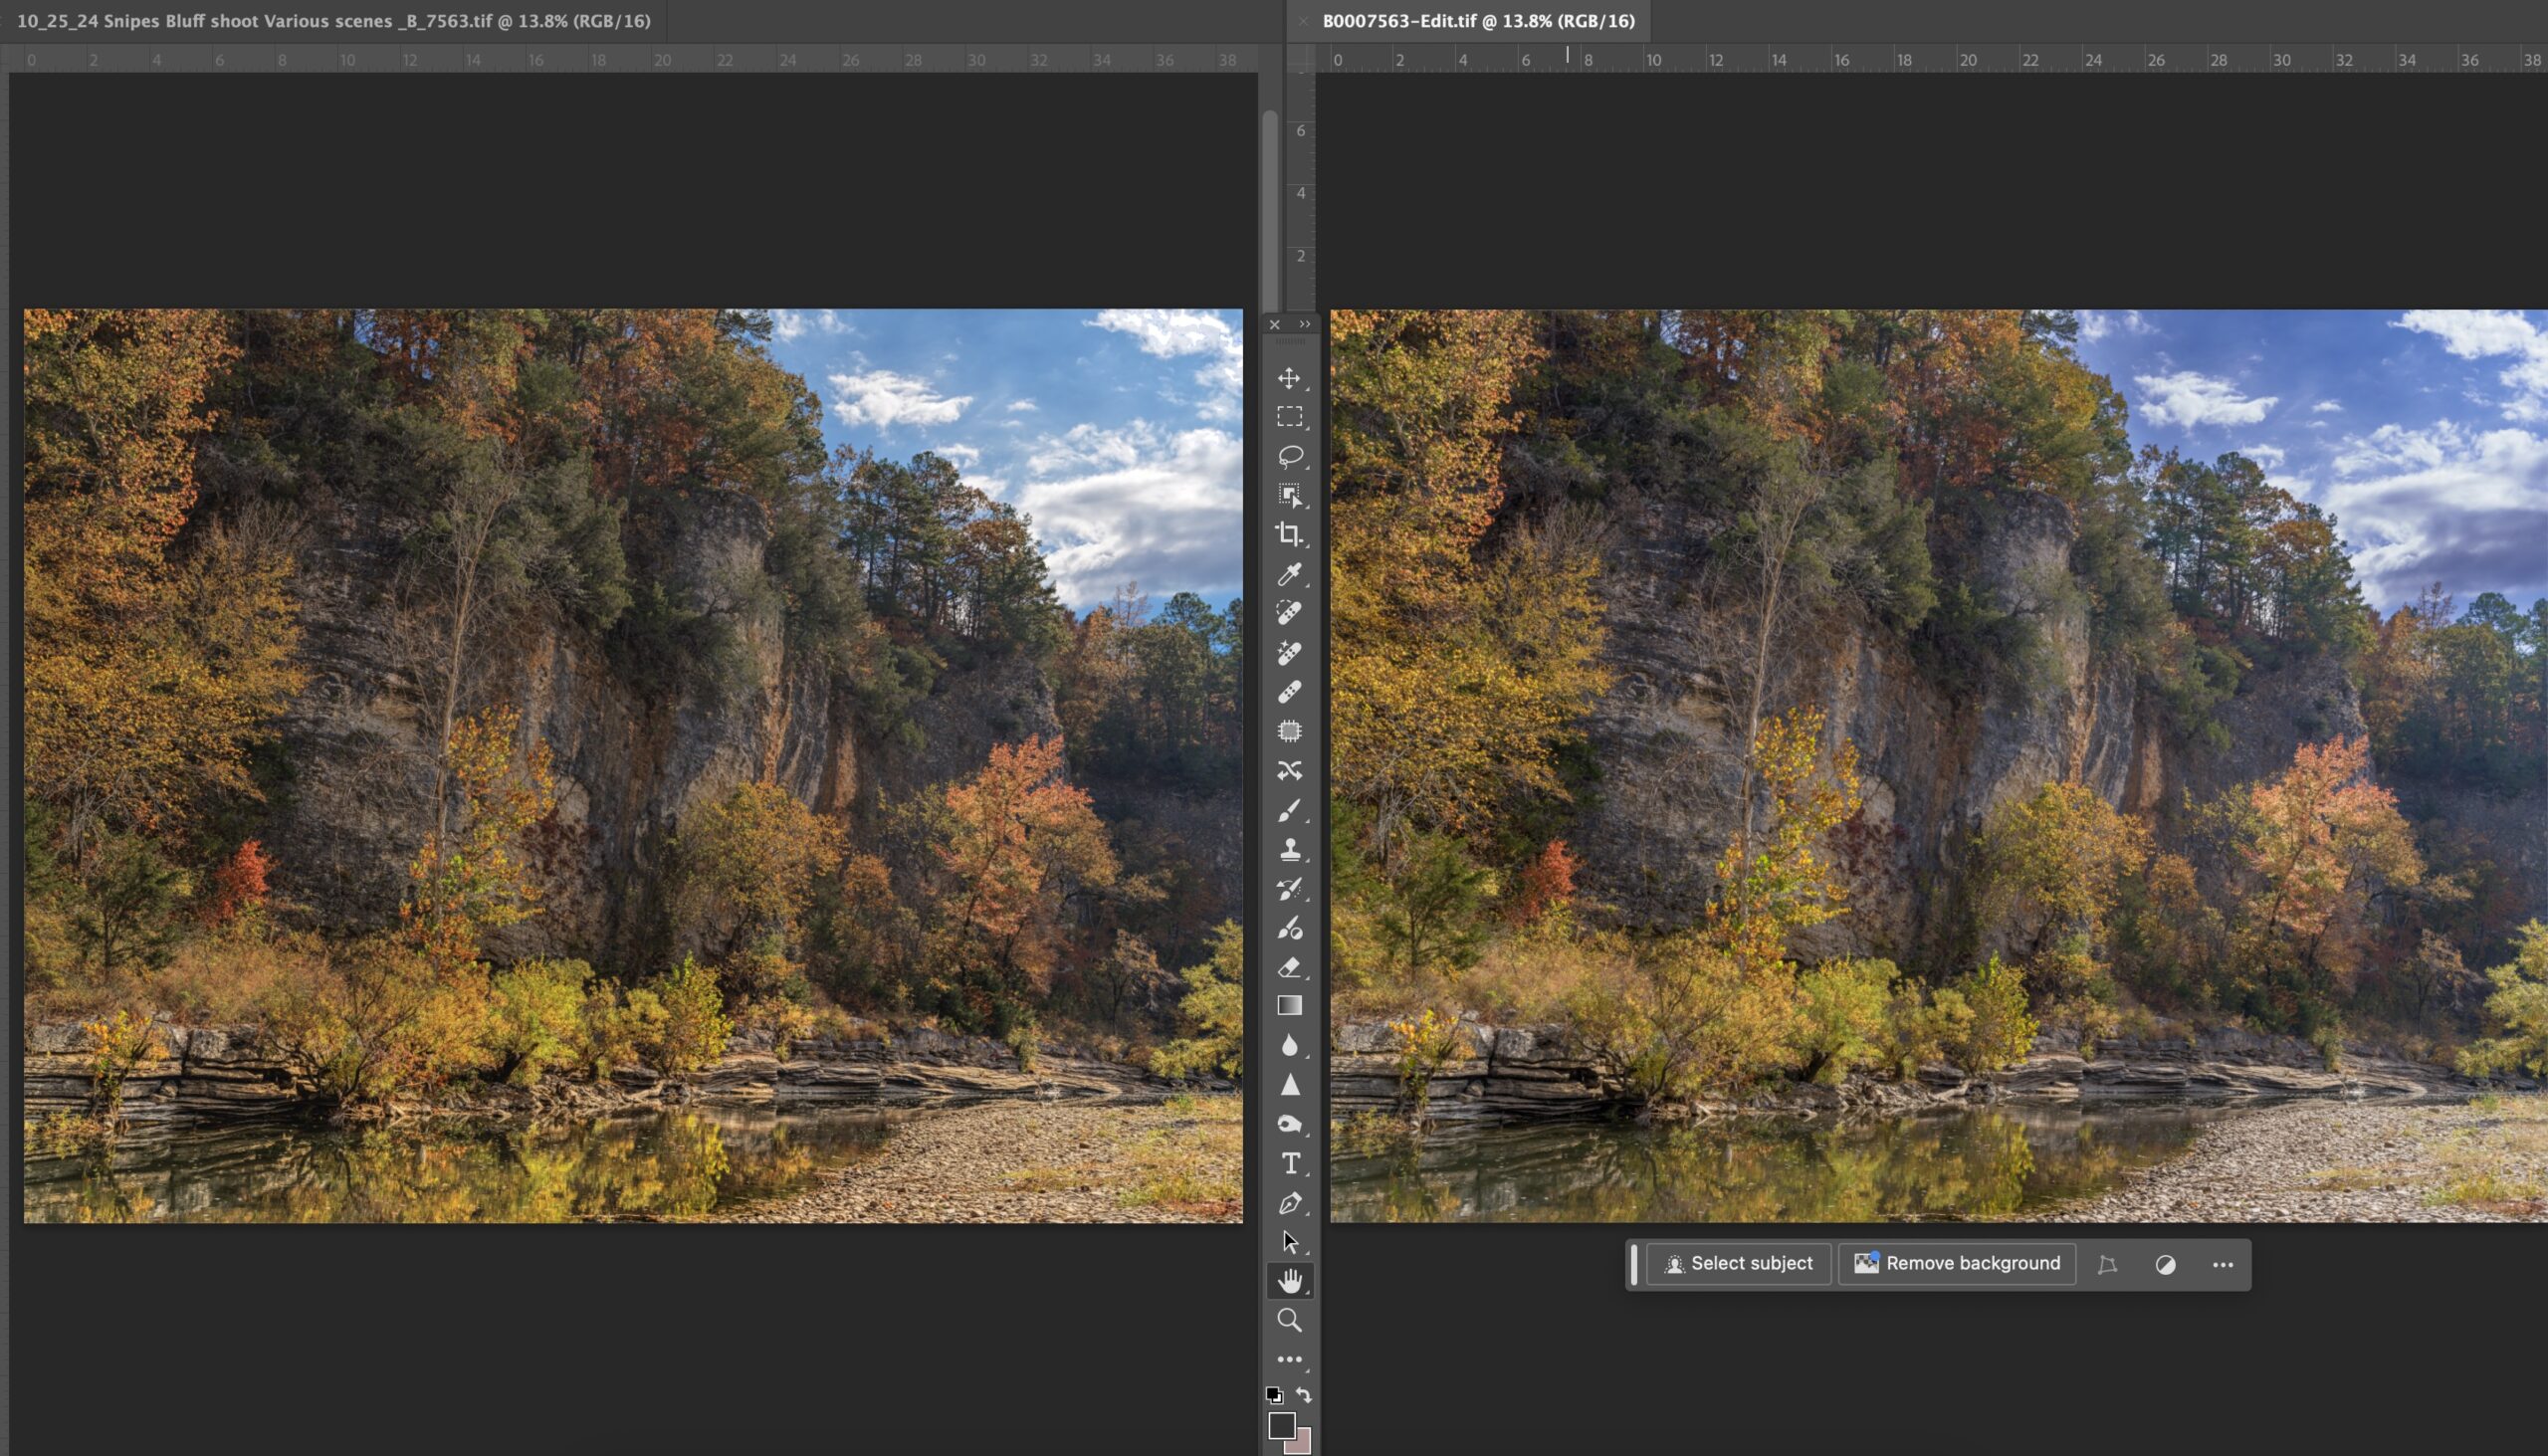
Comparison of Snipes Bluff Buffalo River Phocus and Lightroom
These side by side examples were screen printed from a Mac Pro M1 machine and I used Photoshop 2024 as the workbench. The Phocus output is on the left in all the examples. Shown below are screenshots showing how the raw files loaded into Phocus and Lightroom respectively without any adjustments.
-
- Screenshot
-
- Raw comparisons from Phocus and Lightroom
Click on either of the images to see them in larger view with a Lightbox.
As you can see the image was underexposed and I did this intentionally to help hold the details in the sky. I have found that the X2D is very sensitive to overexposure on highlights. Once these are blown, there is no way to recover them, whereas if you underexposure the rest of the image, you generally have plenty of room left to push up the shadows. This is true especially if you are at base ISO of 64.
Let’s look at a view closeup comparisons after working up output from Phocus and Lightroom. In this case, no additional work was done yet in Photoshop 2024 for fine tuning. All the shadow push and highlight recovery for both files was down within Phocus and or Lightroom. Additional sharpening was added to both images, again within Phocus and Lightroom. Some color work was also done. Mainly on the colors of the fall leaves using the color pickers within both Phocus and Lightroom.
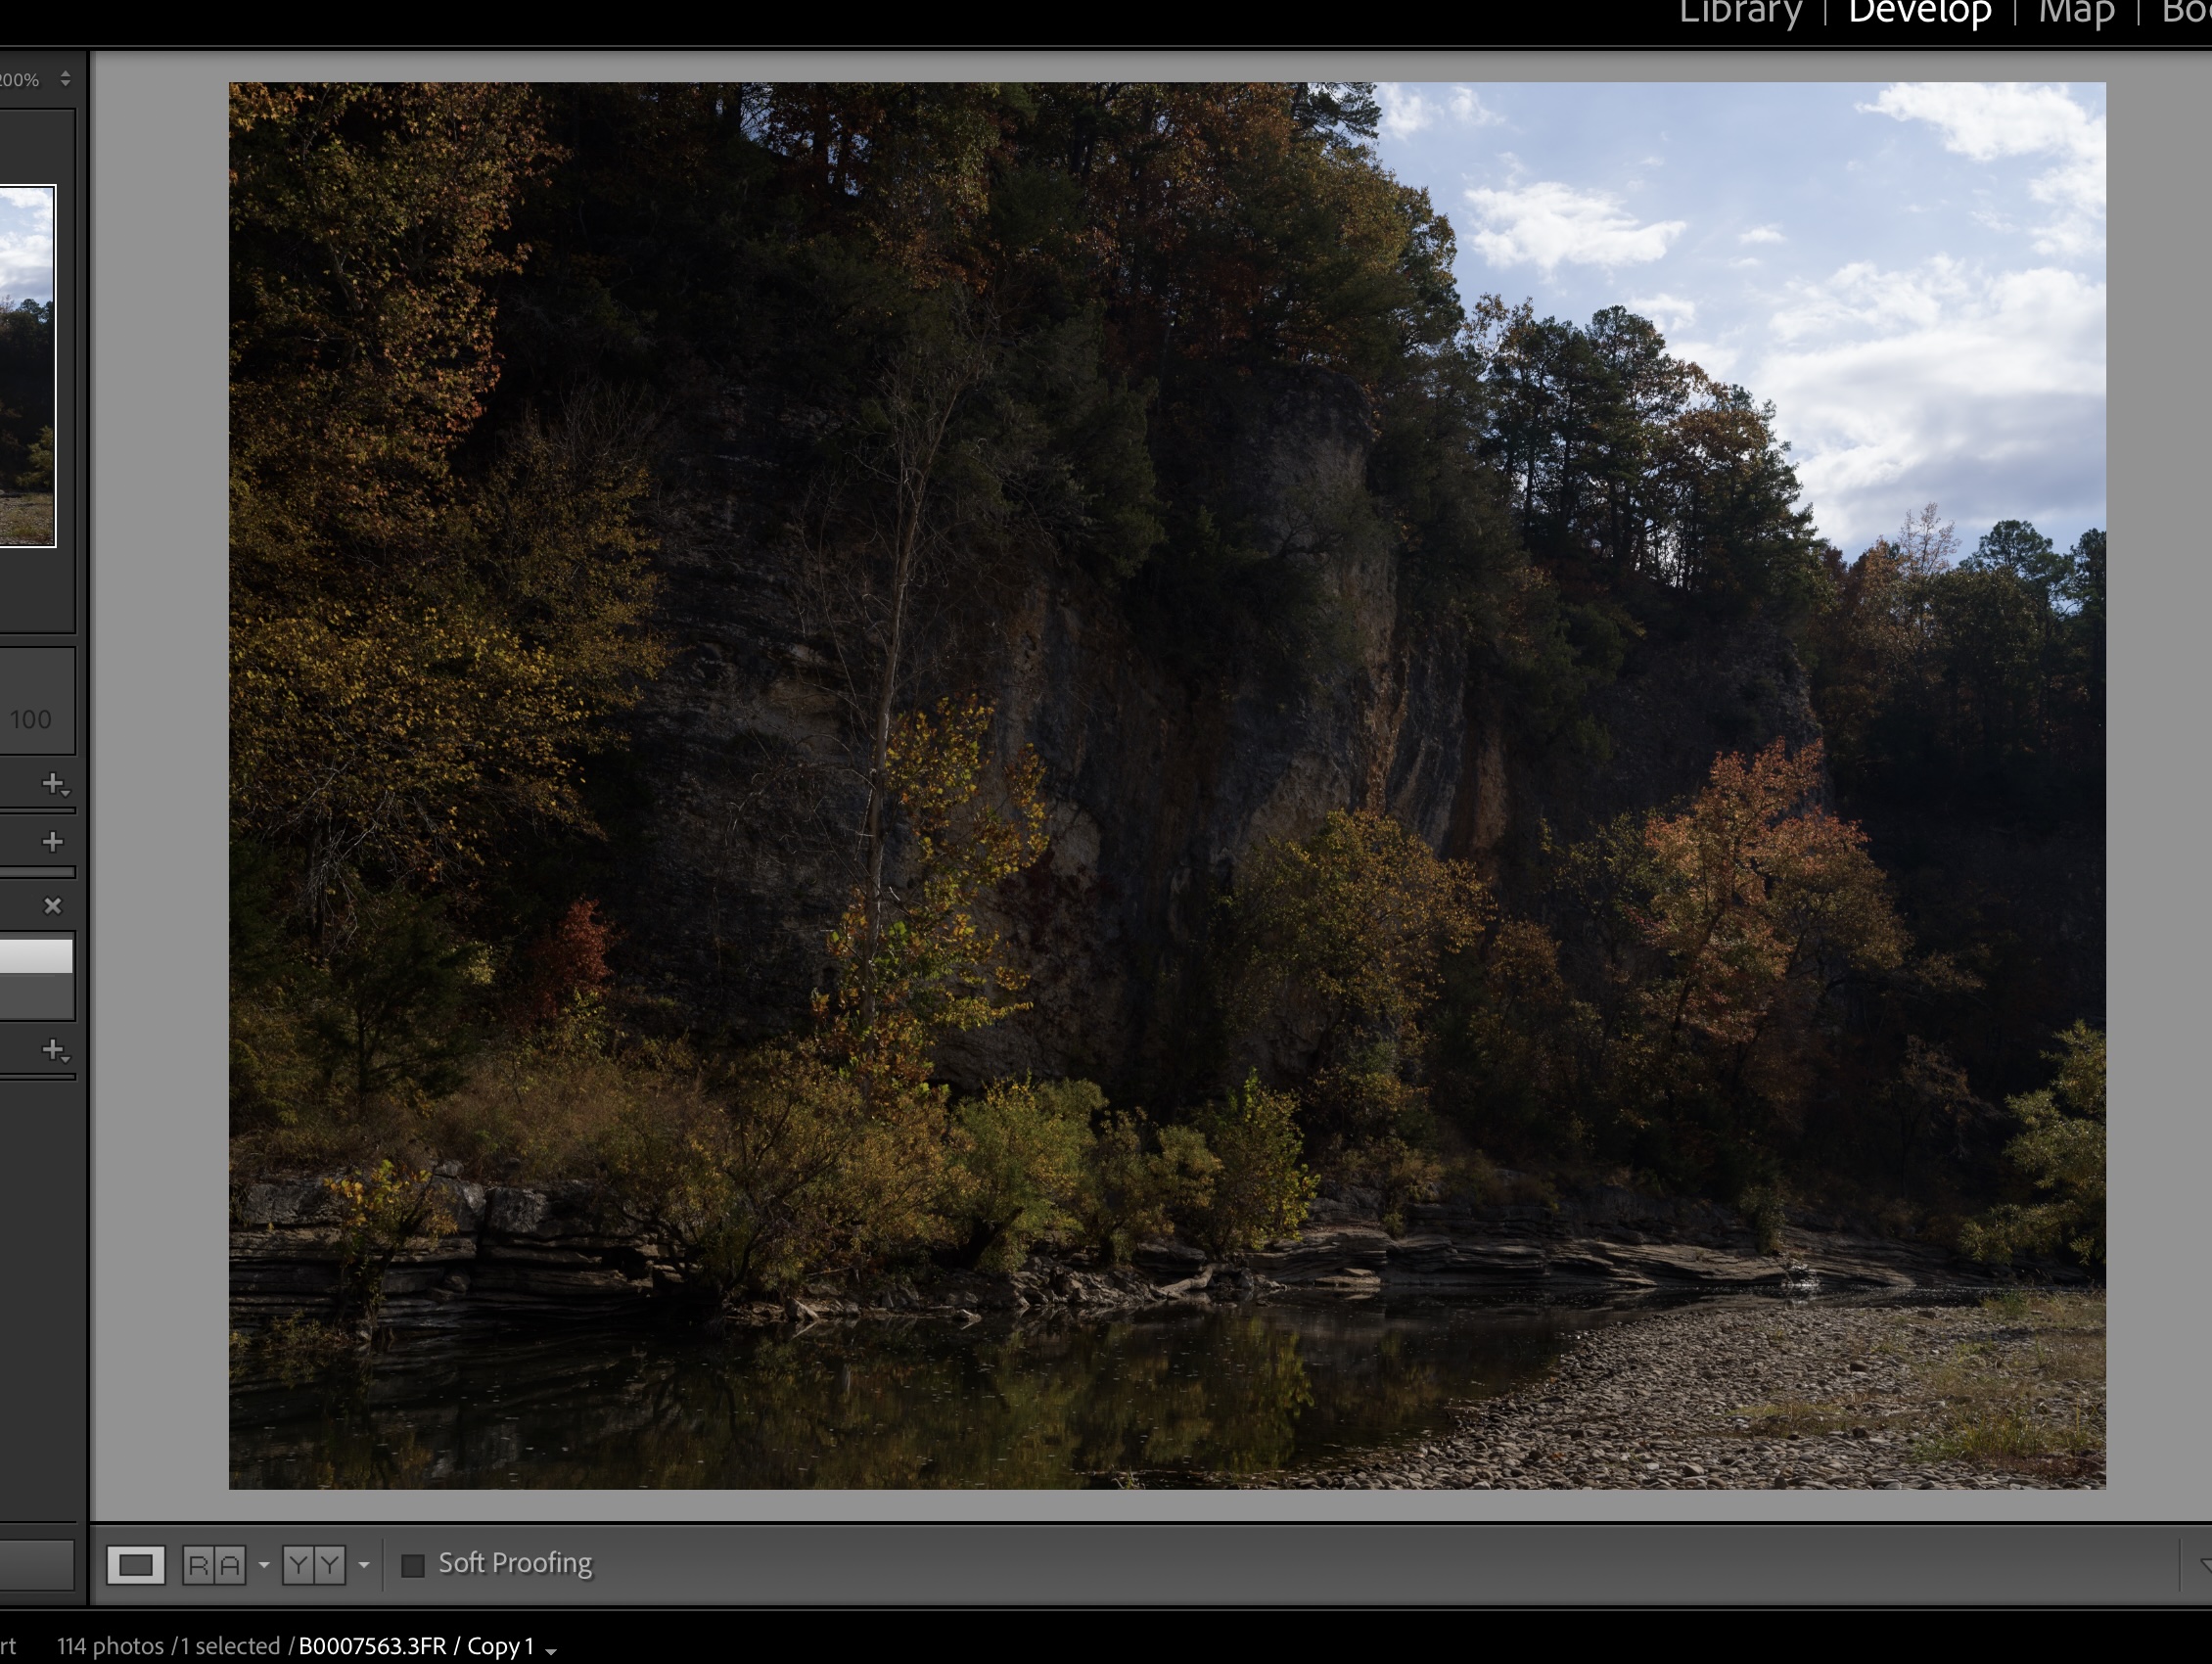
Upper left Corner comparisons for color of leaves
Albeit the two images are close, click on the image and view it in more detail. I believe you will see that the orange color of the sweet gum tree is more pronounced from the Phocus conversion. There is also what I feel is better overall versatility in the color shown in the Phocus example.
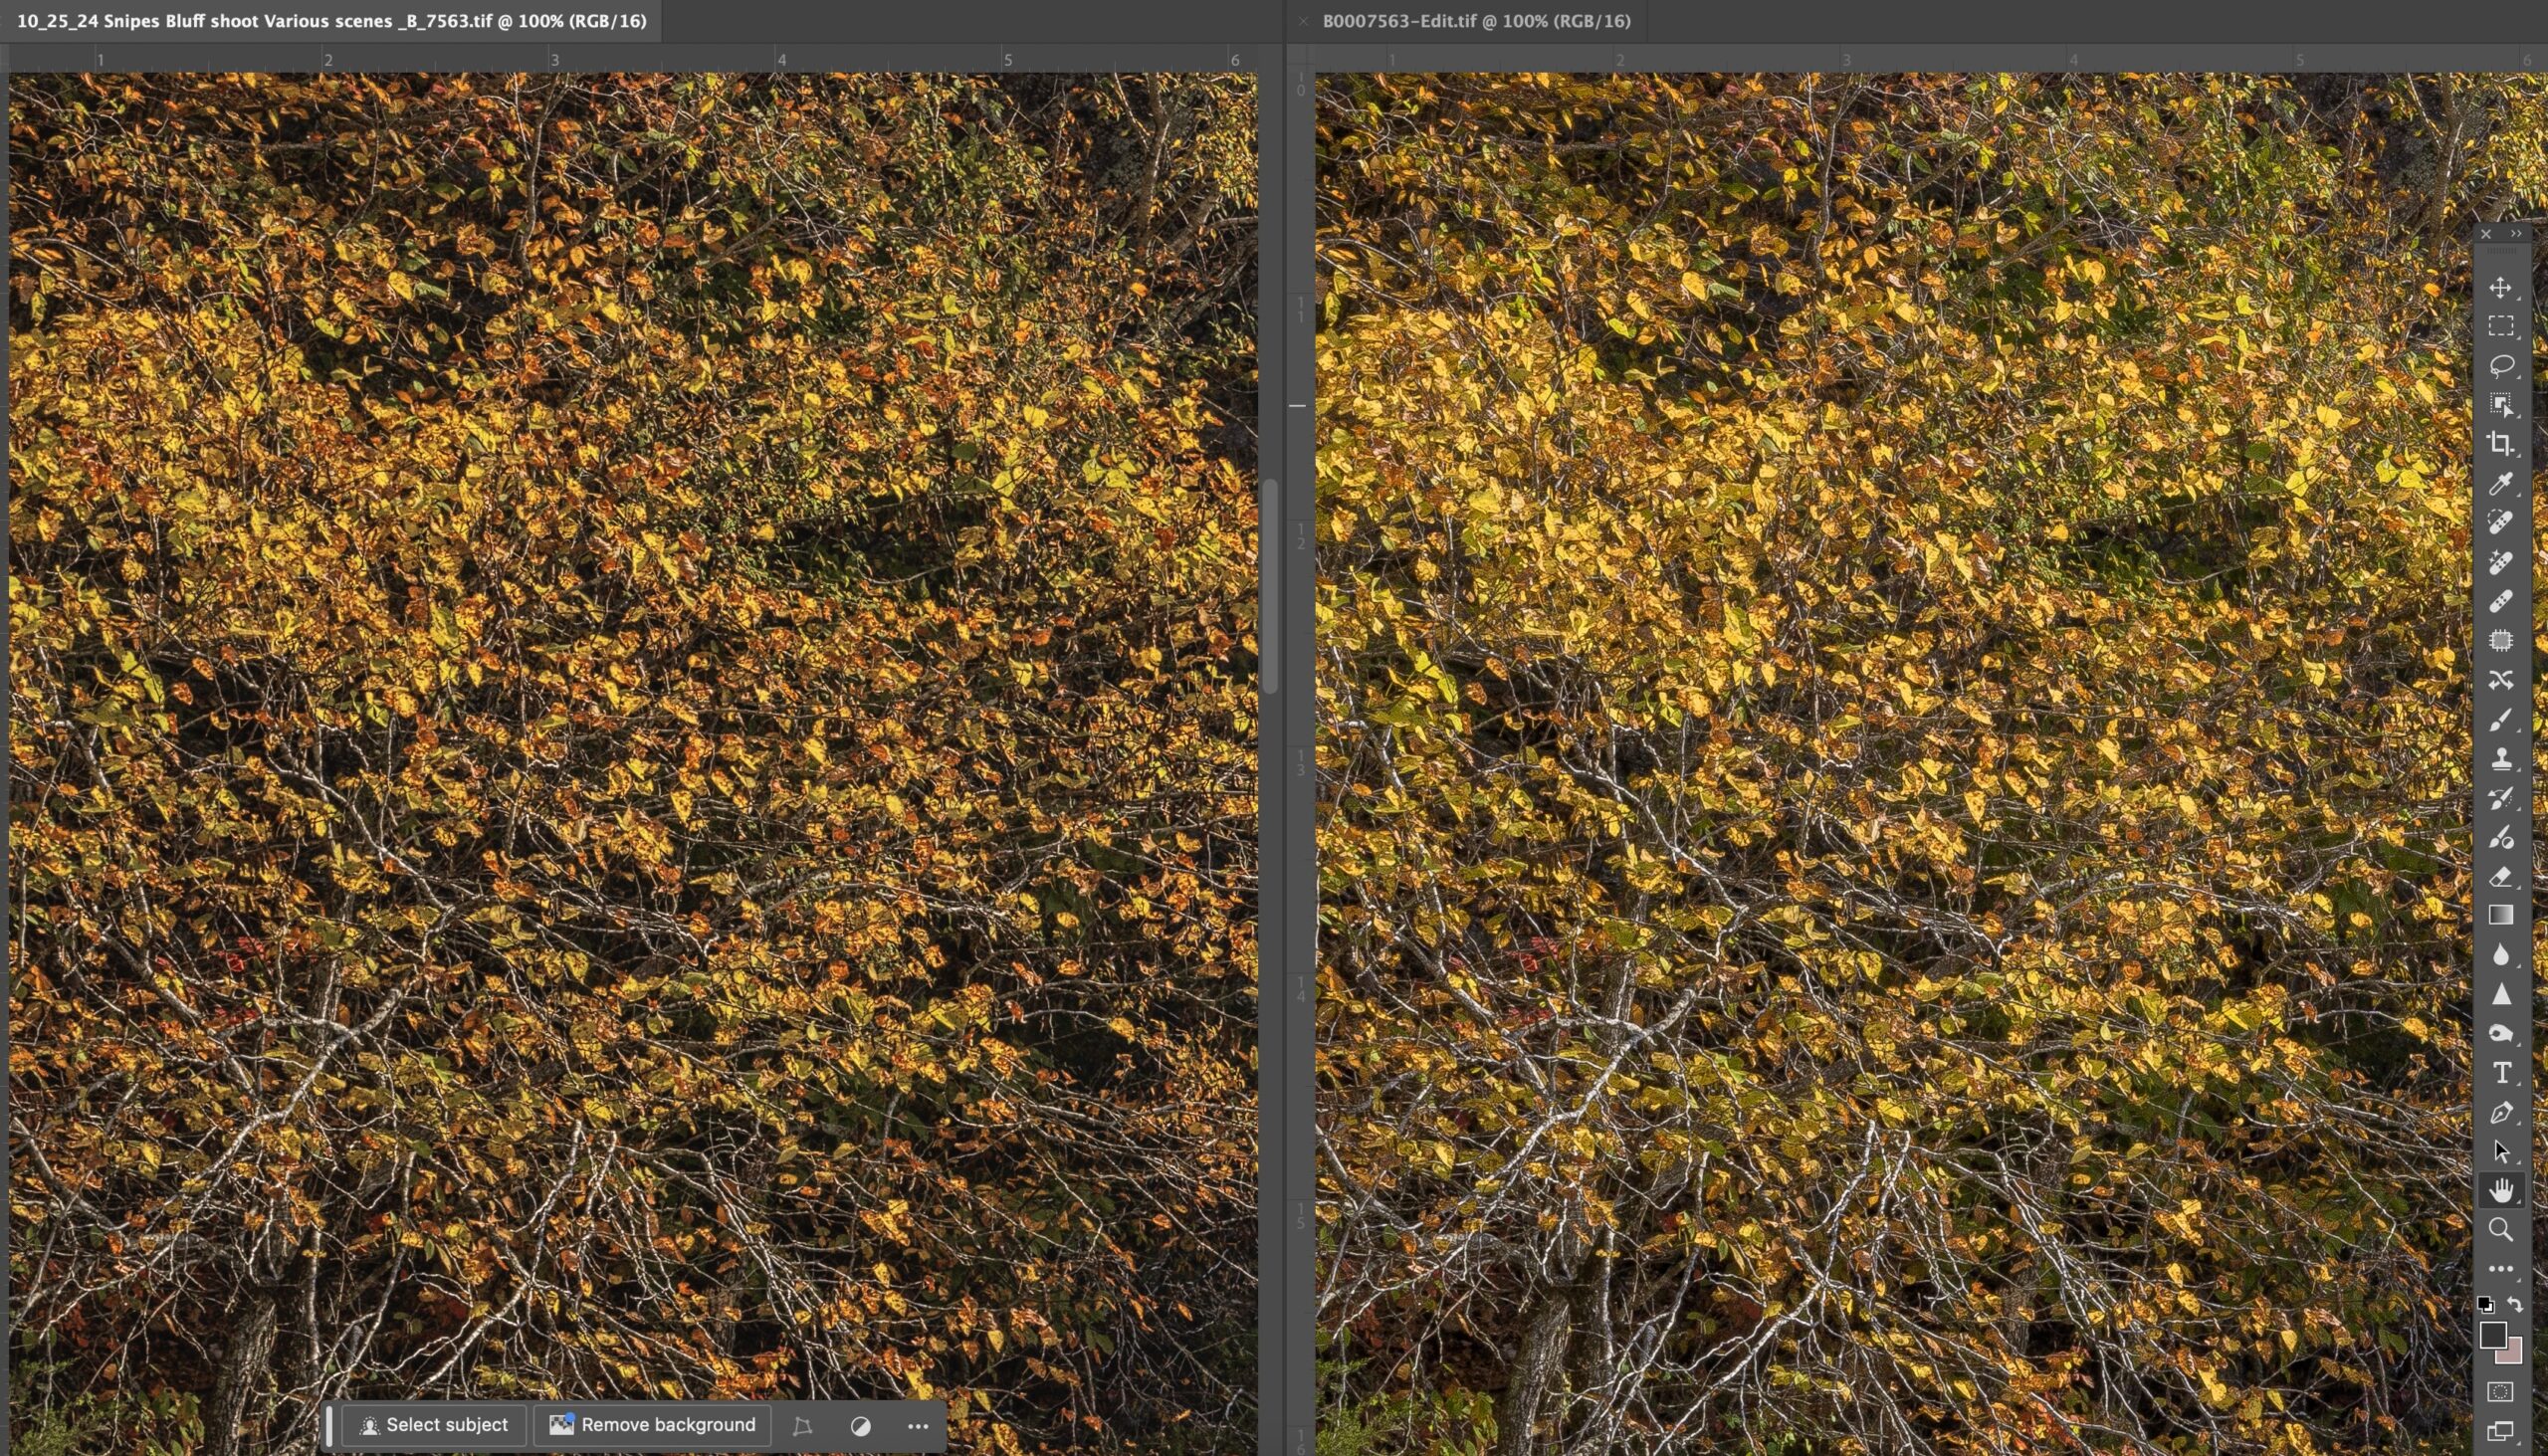
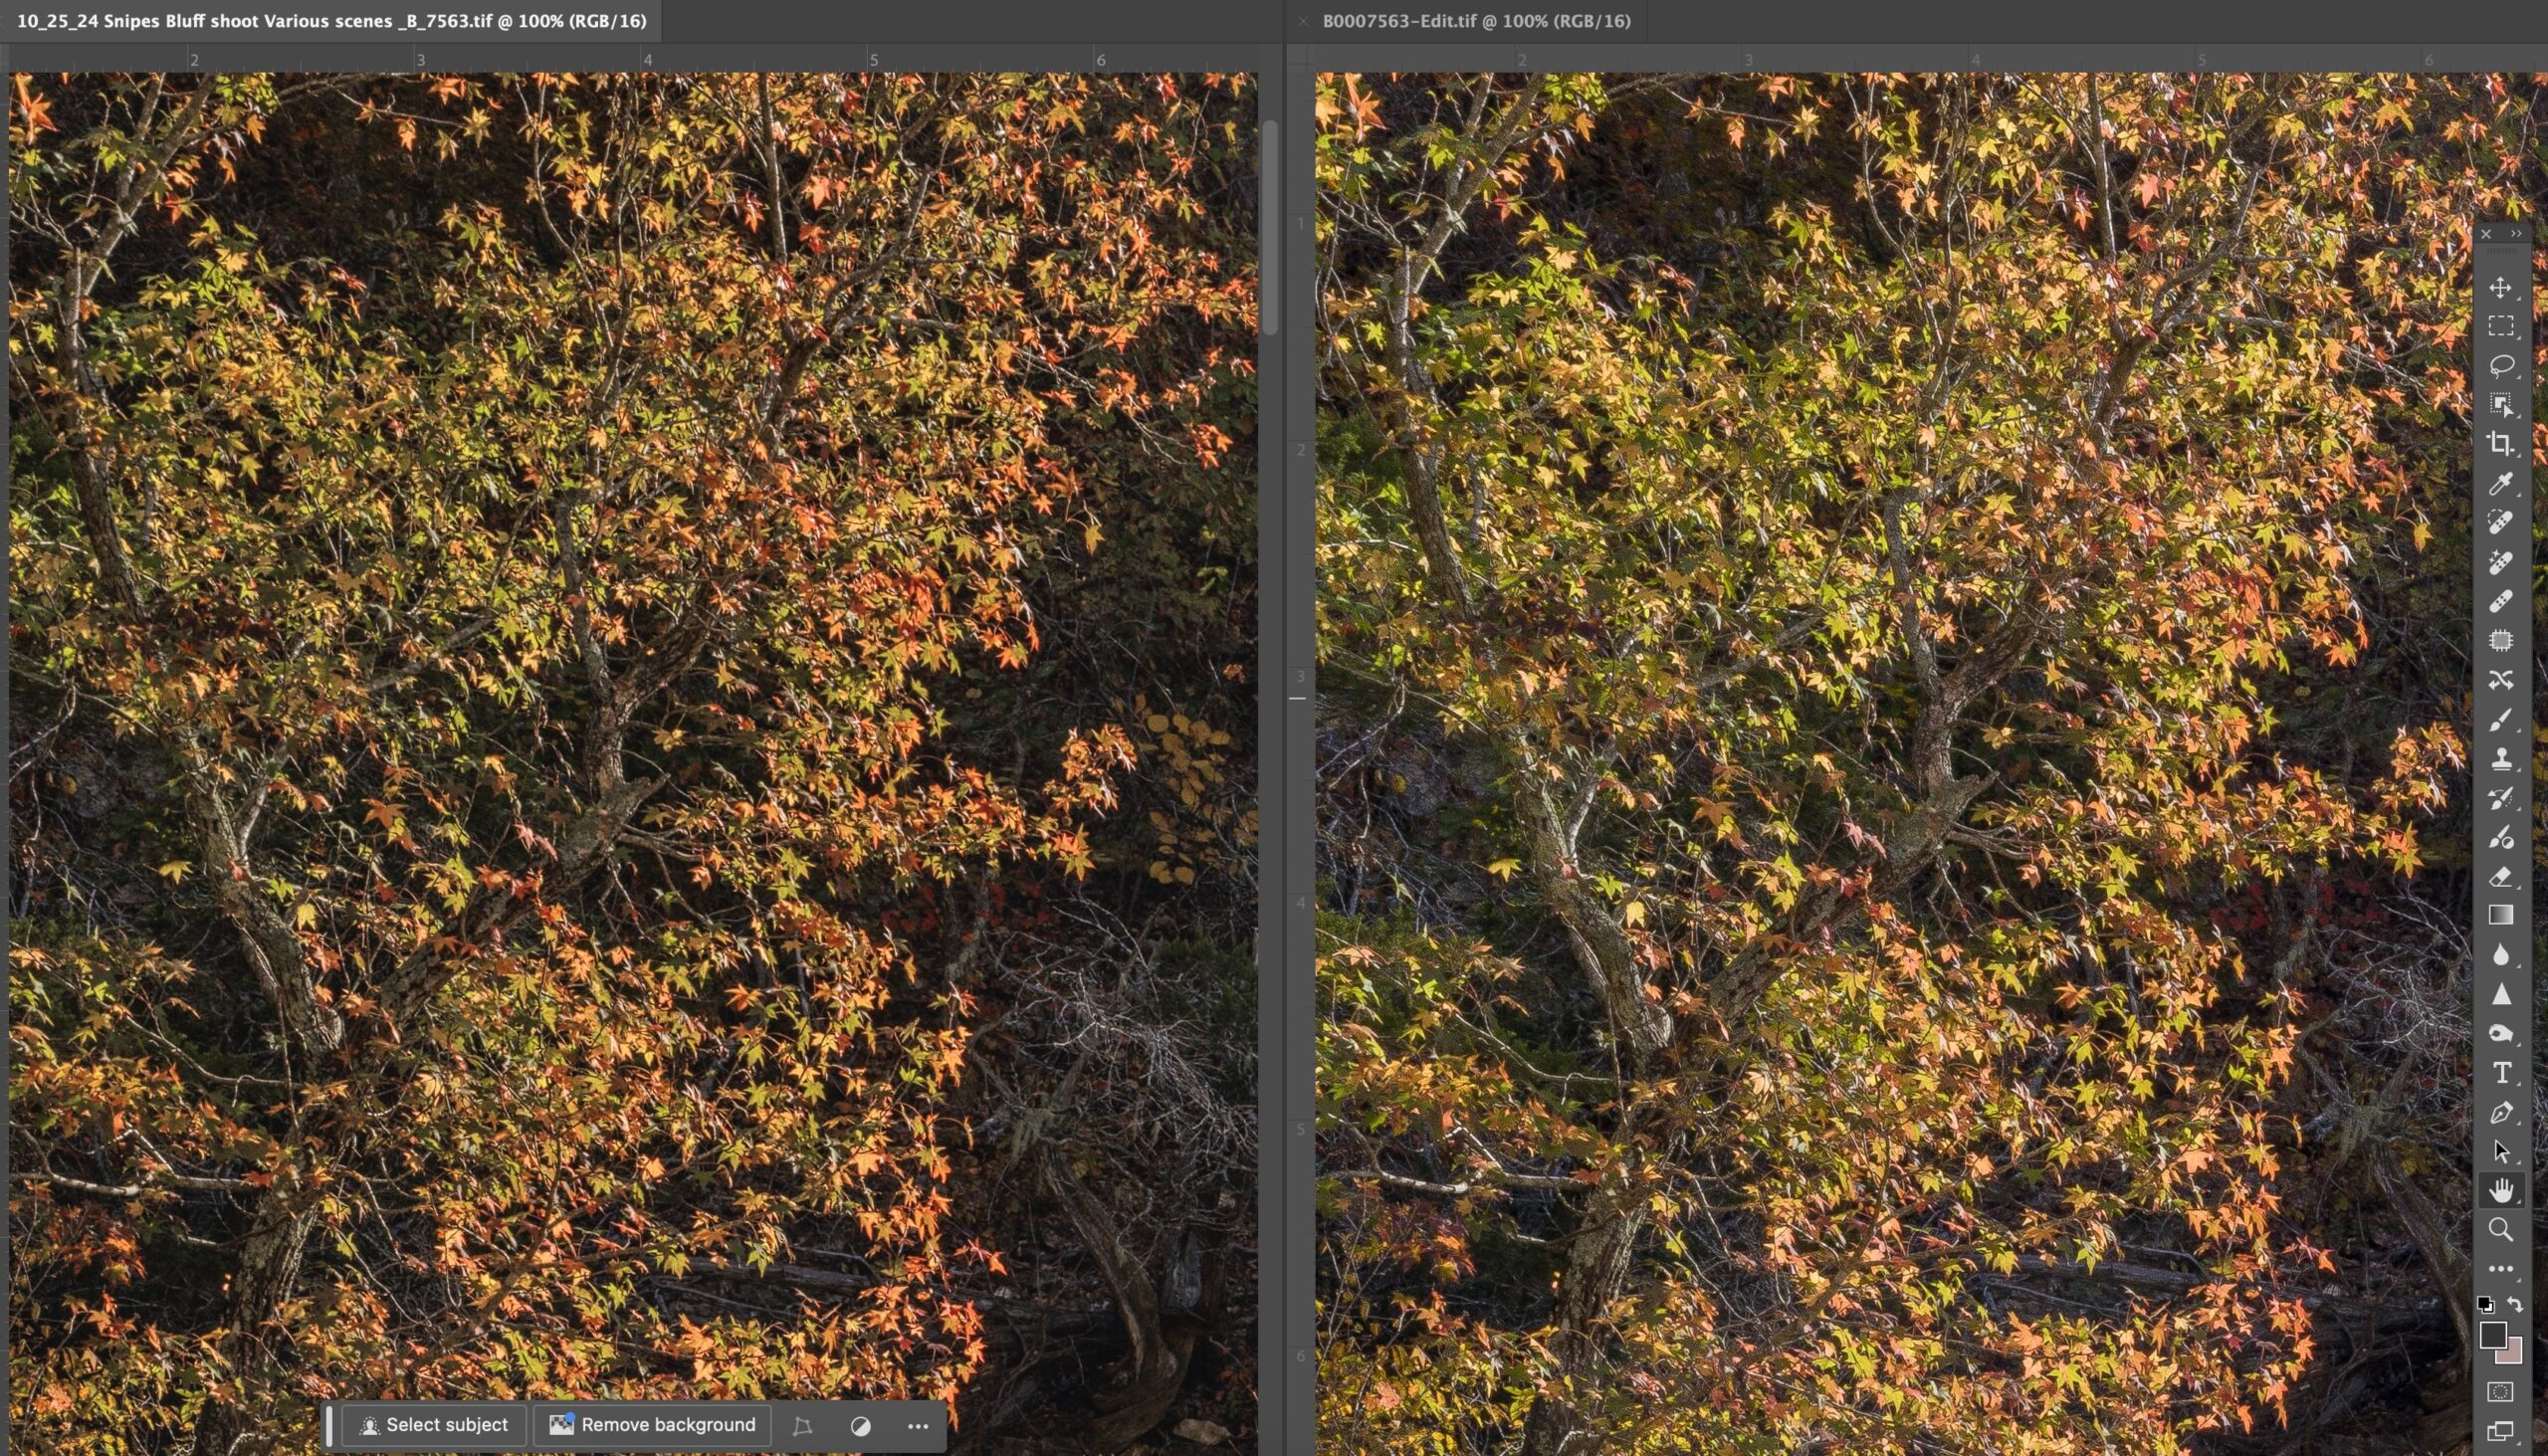
Color comparison of Phocus and Lightroom Middle left of image
Both images have nice color, however I still prefer the Phocus example. There are more variety of yellow and orange in the sweet gum leaves. Also the color is slightly less saturated on the Phocus example. It’s very easy to blow out a fall color when working with leaves. When you look at the images closely the Phocus image seems to have better definition in the edges of the leaves, where there is demarcation from orange to yellow.
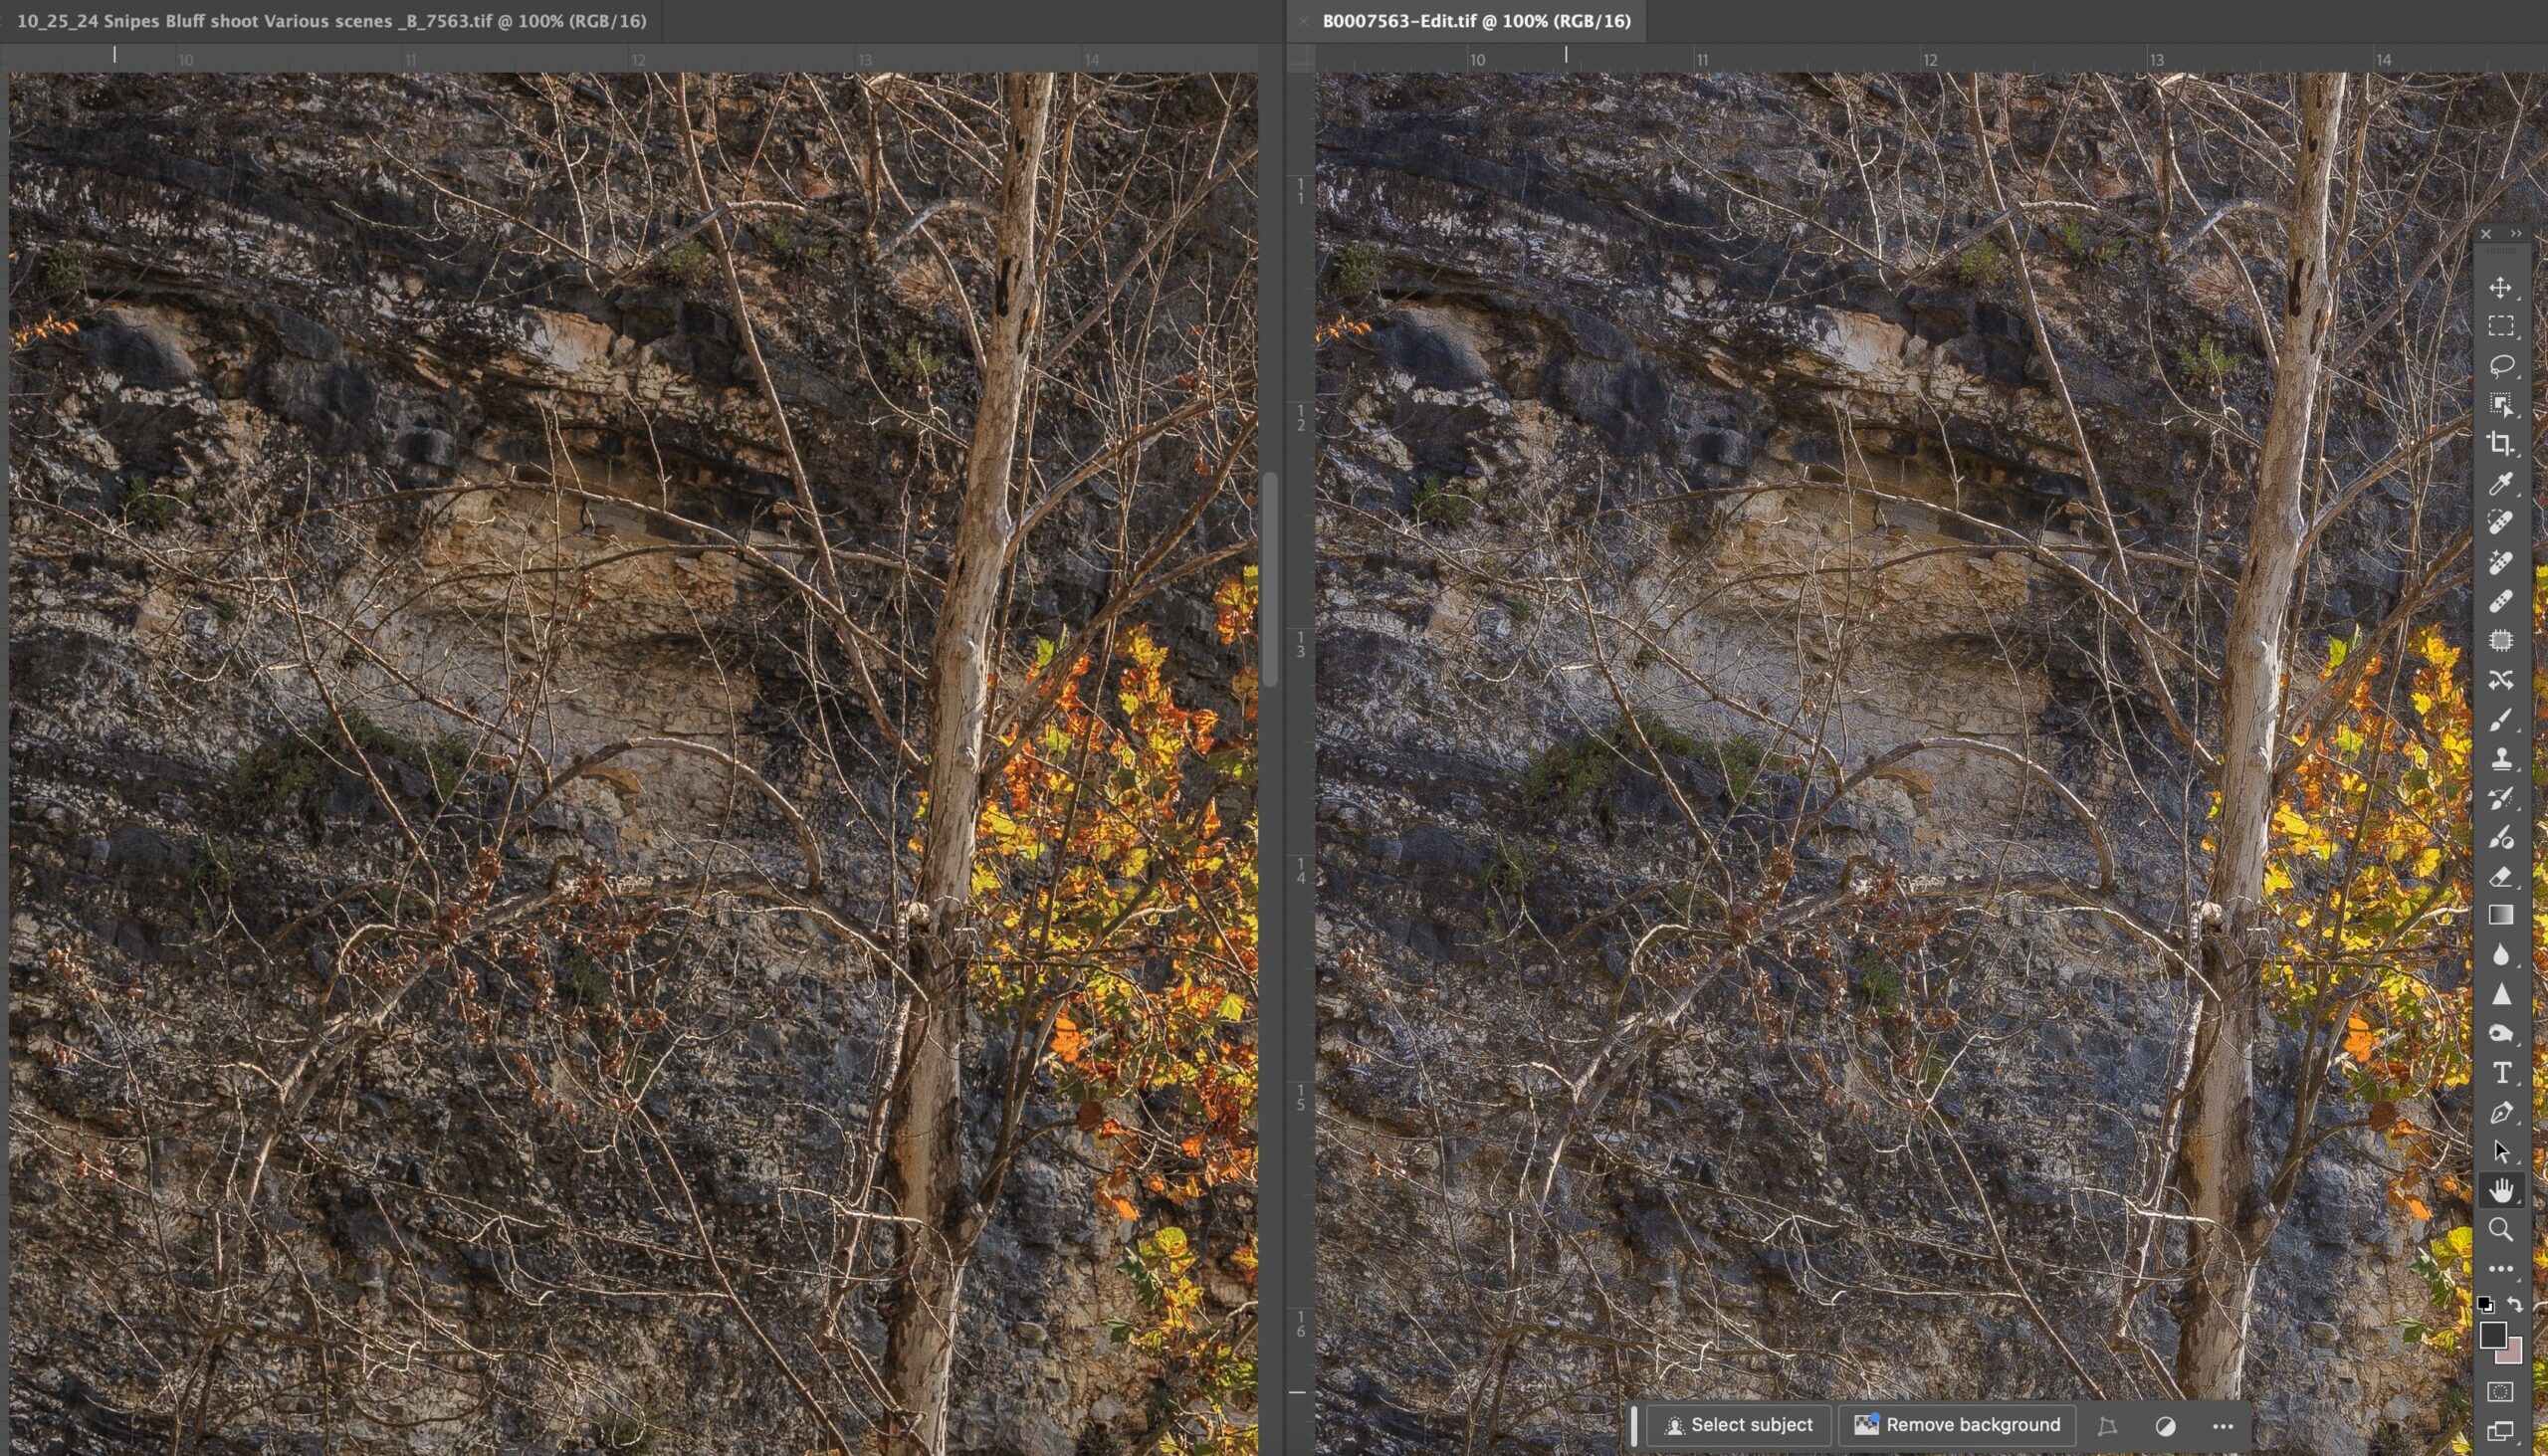
Shadow comparisons between Phocus and Lightroom
These two crops are very close with the Phocus example being slightly warmer. However once you zoom into the two, I believe you can see more demarkation in the various colors of the rock in the background. The Lightroom example seems to show slightly better shadow recovery in the dark greens of the cedar trees up against the bluff. The bark of the sycamore tree in the foreground is better defined in the Phocus example.
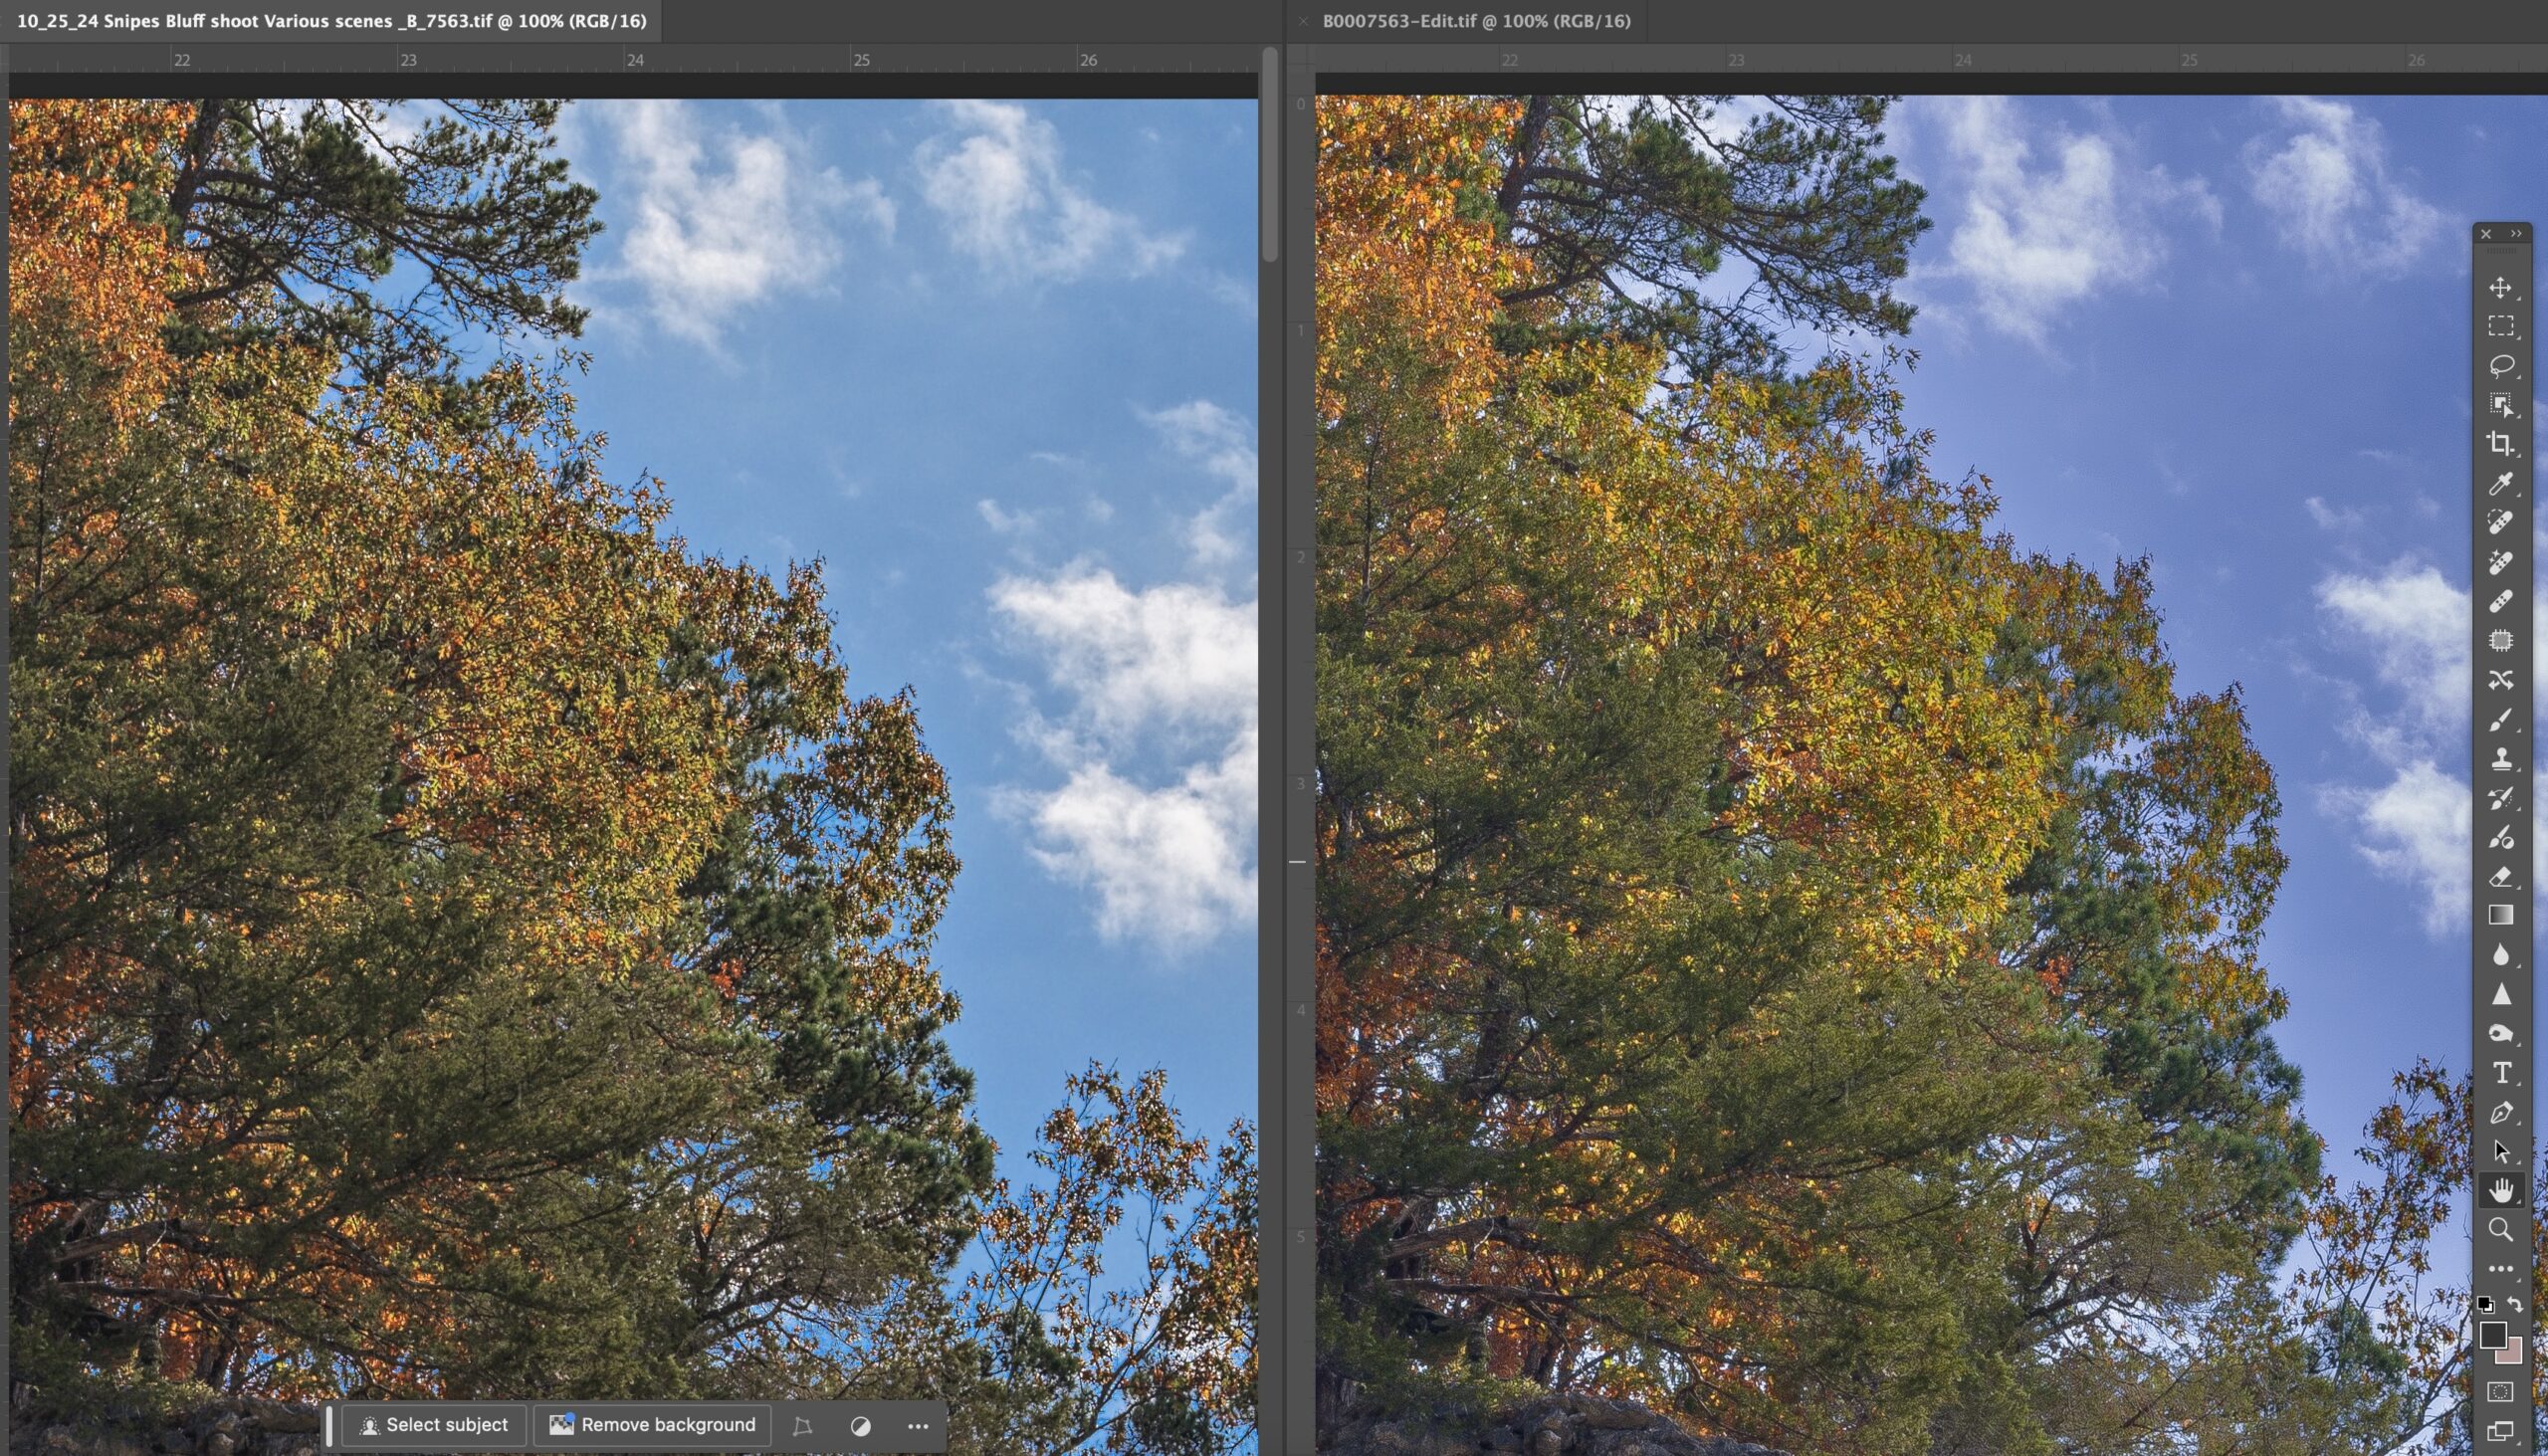
Sky comparisons between Phocus and Lightroom
The sky on this image was mixed with blue and white clouds. I noticed immediately that the Lightroom version has tended to a more red tint to the blue. Yes this can be tweaked later on, however look also at the details in the clouds themselves. They are more pronounced in the Phocus example, i.e. have more life to them. The cedar tree in the lower left has more shadow recovery in the Lightroom example. However the trees against the sky have better overall definition in the Phocus example. With Lightroom, I did use the “select sky” mask layer feature, where as in Phocus I was only able use a graduated ND filter to help along with the “recovery slider”.

Clouds, compared from Phocus and Lightroom
The Phocus example has a much more natural look to the clouds, more separation in the graduations of the white and grey. There are a few spots where I ended up with slightly blown whites from the Phocus example, which I would fix later on in Photoshop. Also notice the trees against the horizon, clearly the Phocus example has a much better look to it. The trees towards the left edge have better shadow recovery in the Lightroom example. The most important aspect to me is the color of the clouds and this can be very hard to tweak later on. Getting a pure nature white. The darker parts of the clouds are grey whereas the darker parts of the Lightroom clouds are taking on the red tint and moving possible towards magenta.
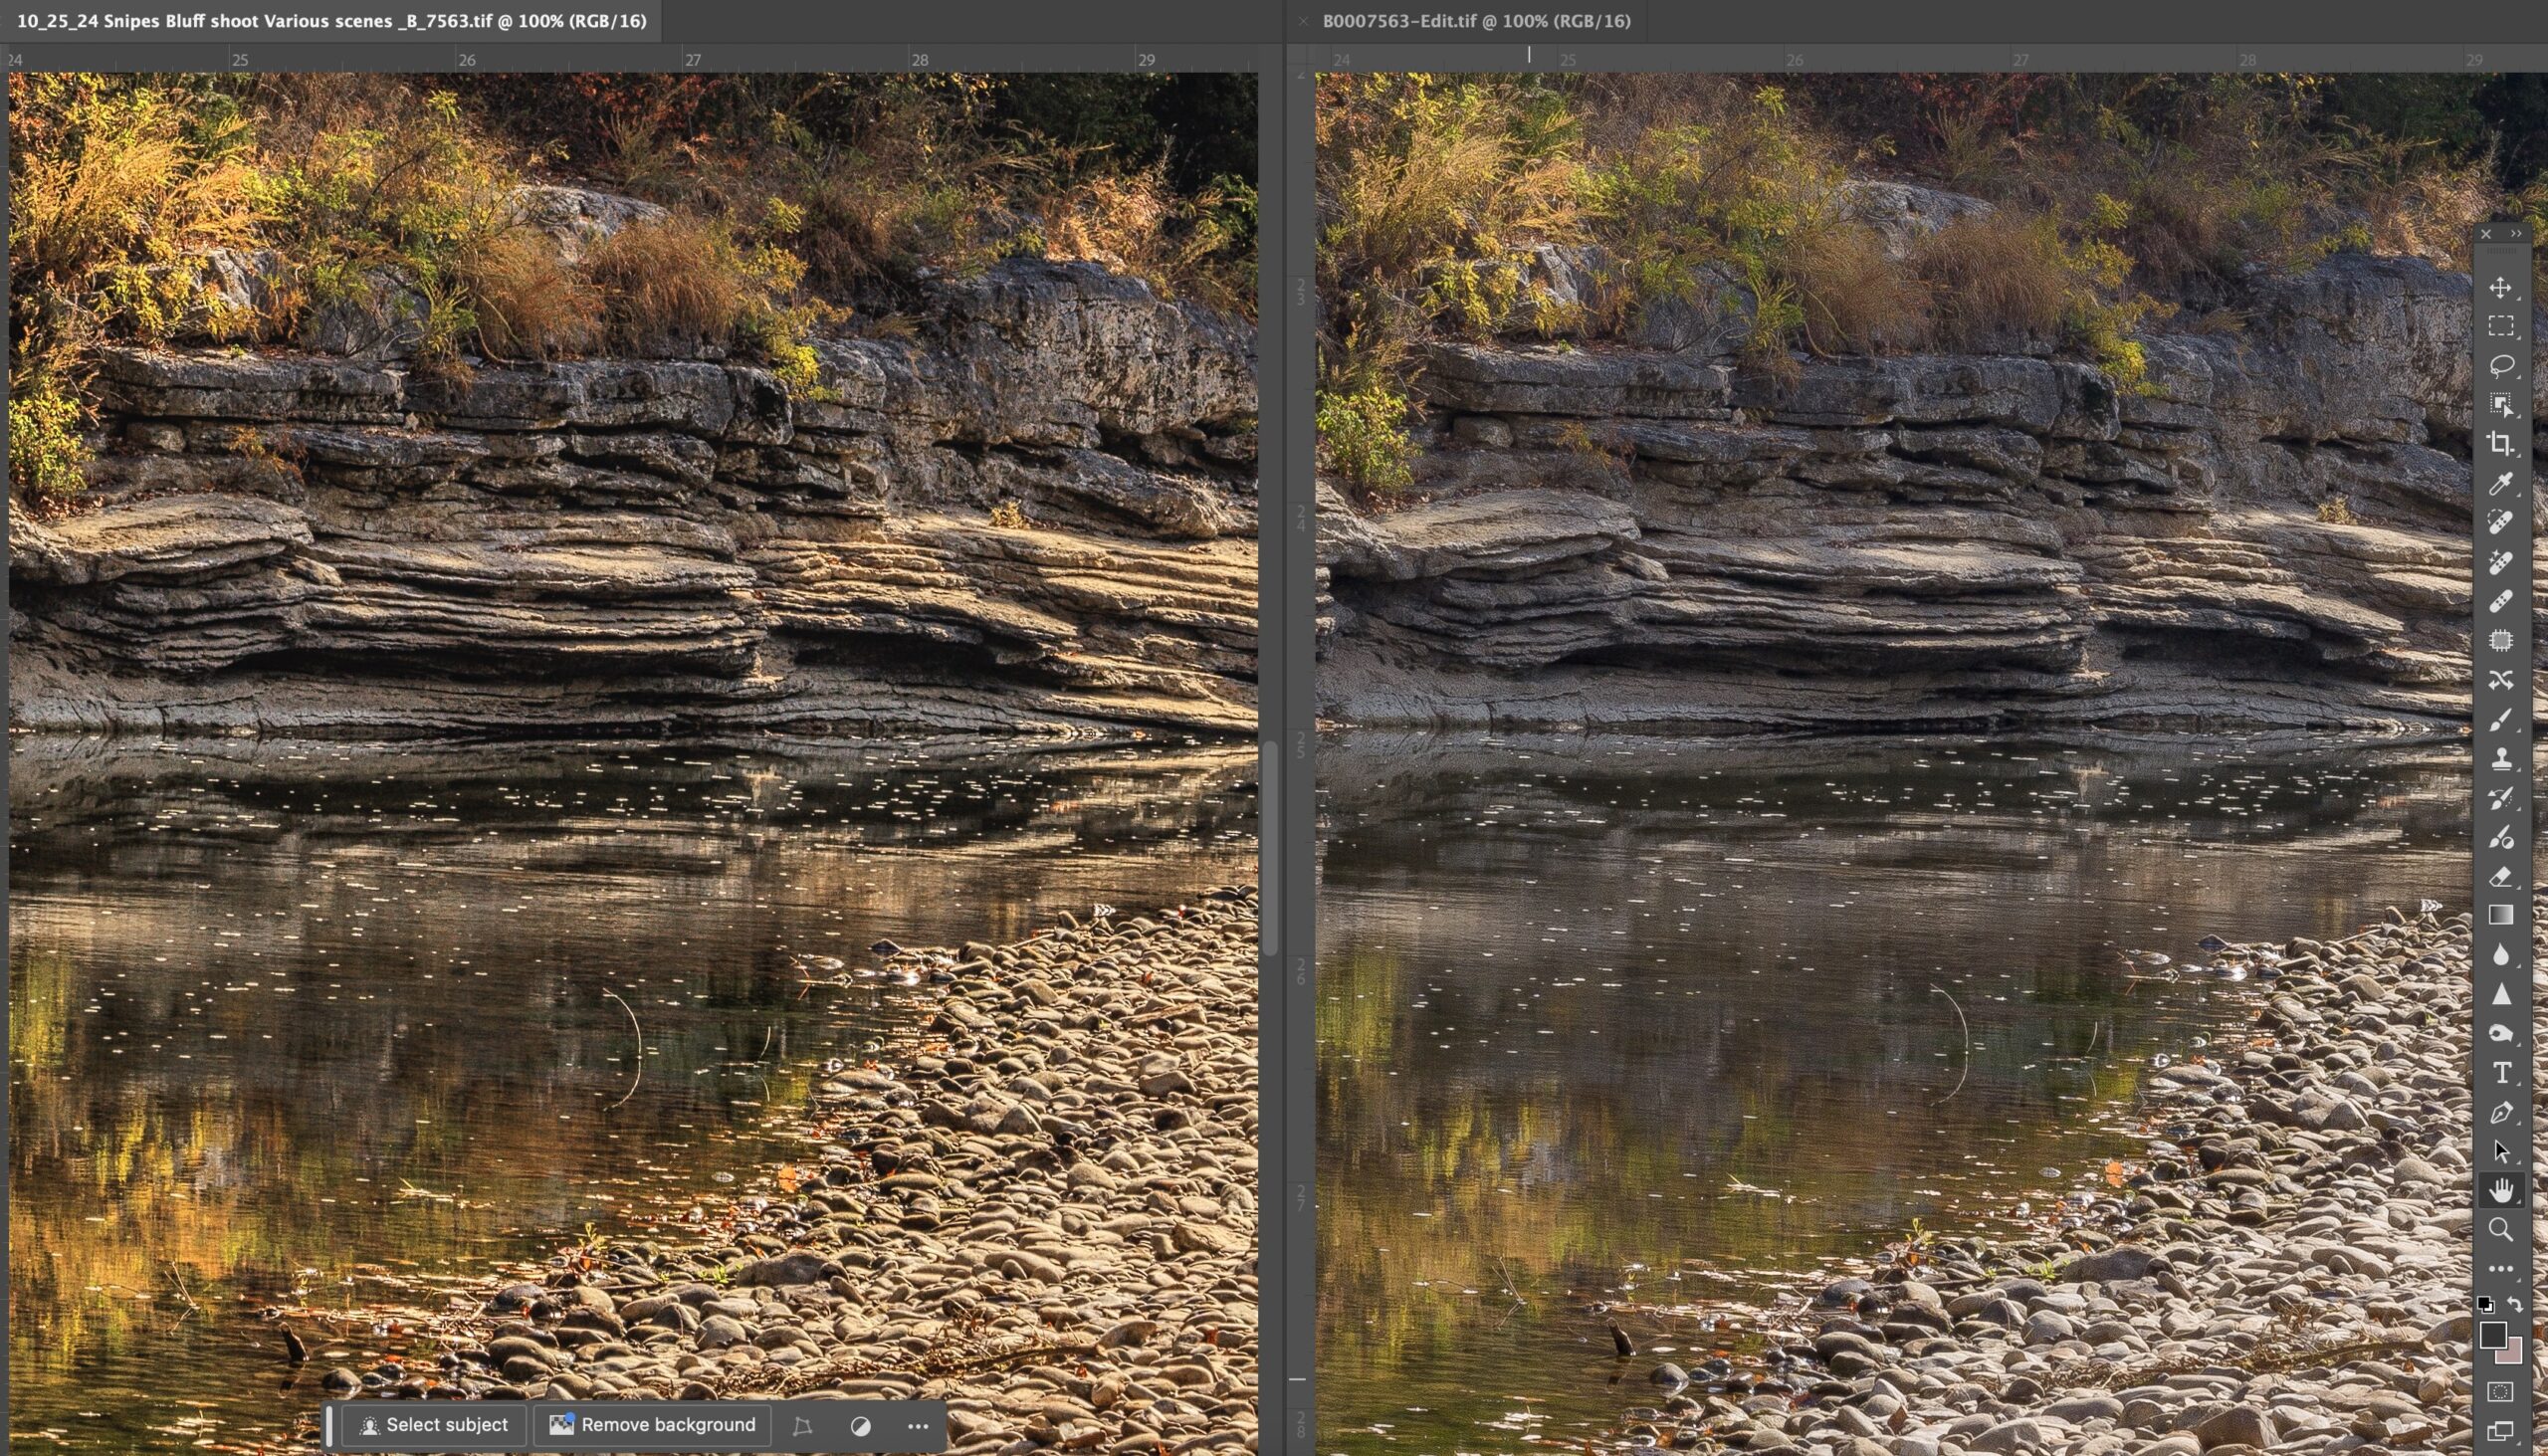
Rocks and shadows, comparisons from Phocus and Lightroom
In this case, the Lightroom conversion I feel did a better job on the rocks, lower right corner. The rest of the image seems better from Phocus. Especially the finer detail along the edges of the rock ledges. Look in the center for the brown plant growing on the top ledge. Also the reflections on the water are much more pronounced from Phocus and the details of the river bottom.
Obviously from looking at all of the images, you can see slight differences between the conversions. I feel that I am giving the Lightroom files more than enough work to get as close to the Phocus output as possible. NOTE, Phocus has by far the WORSE workflow of any raw conversion software I have used in the past 20 years. The program is slow, tedious, and has limited tools, like masking. The available mask drawing tool i.e. brush is terrible and there is no ability to “select sky” which is a huge advantage in Lightroom. However I feel that if you purchased the X2D for the HNCS (Hasselblad Native Color Solution), then you still need to do some comparison on your own to see if it’s worth delving into Phocus. I feel the advantages are there enough to continue with the software.
Written for Photosofarkansas by Paul Caldwell, Please ask before using any of this article in any other form of media.
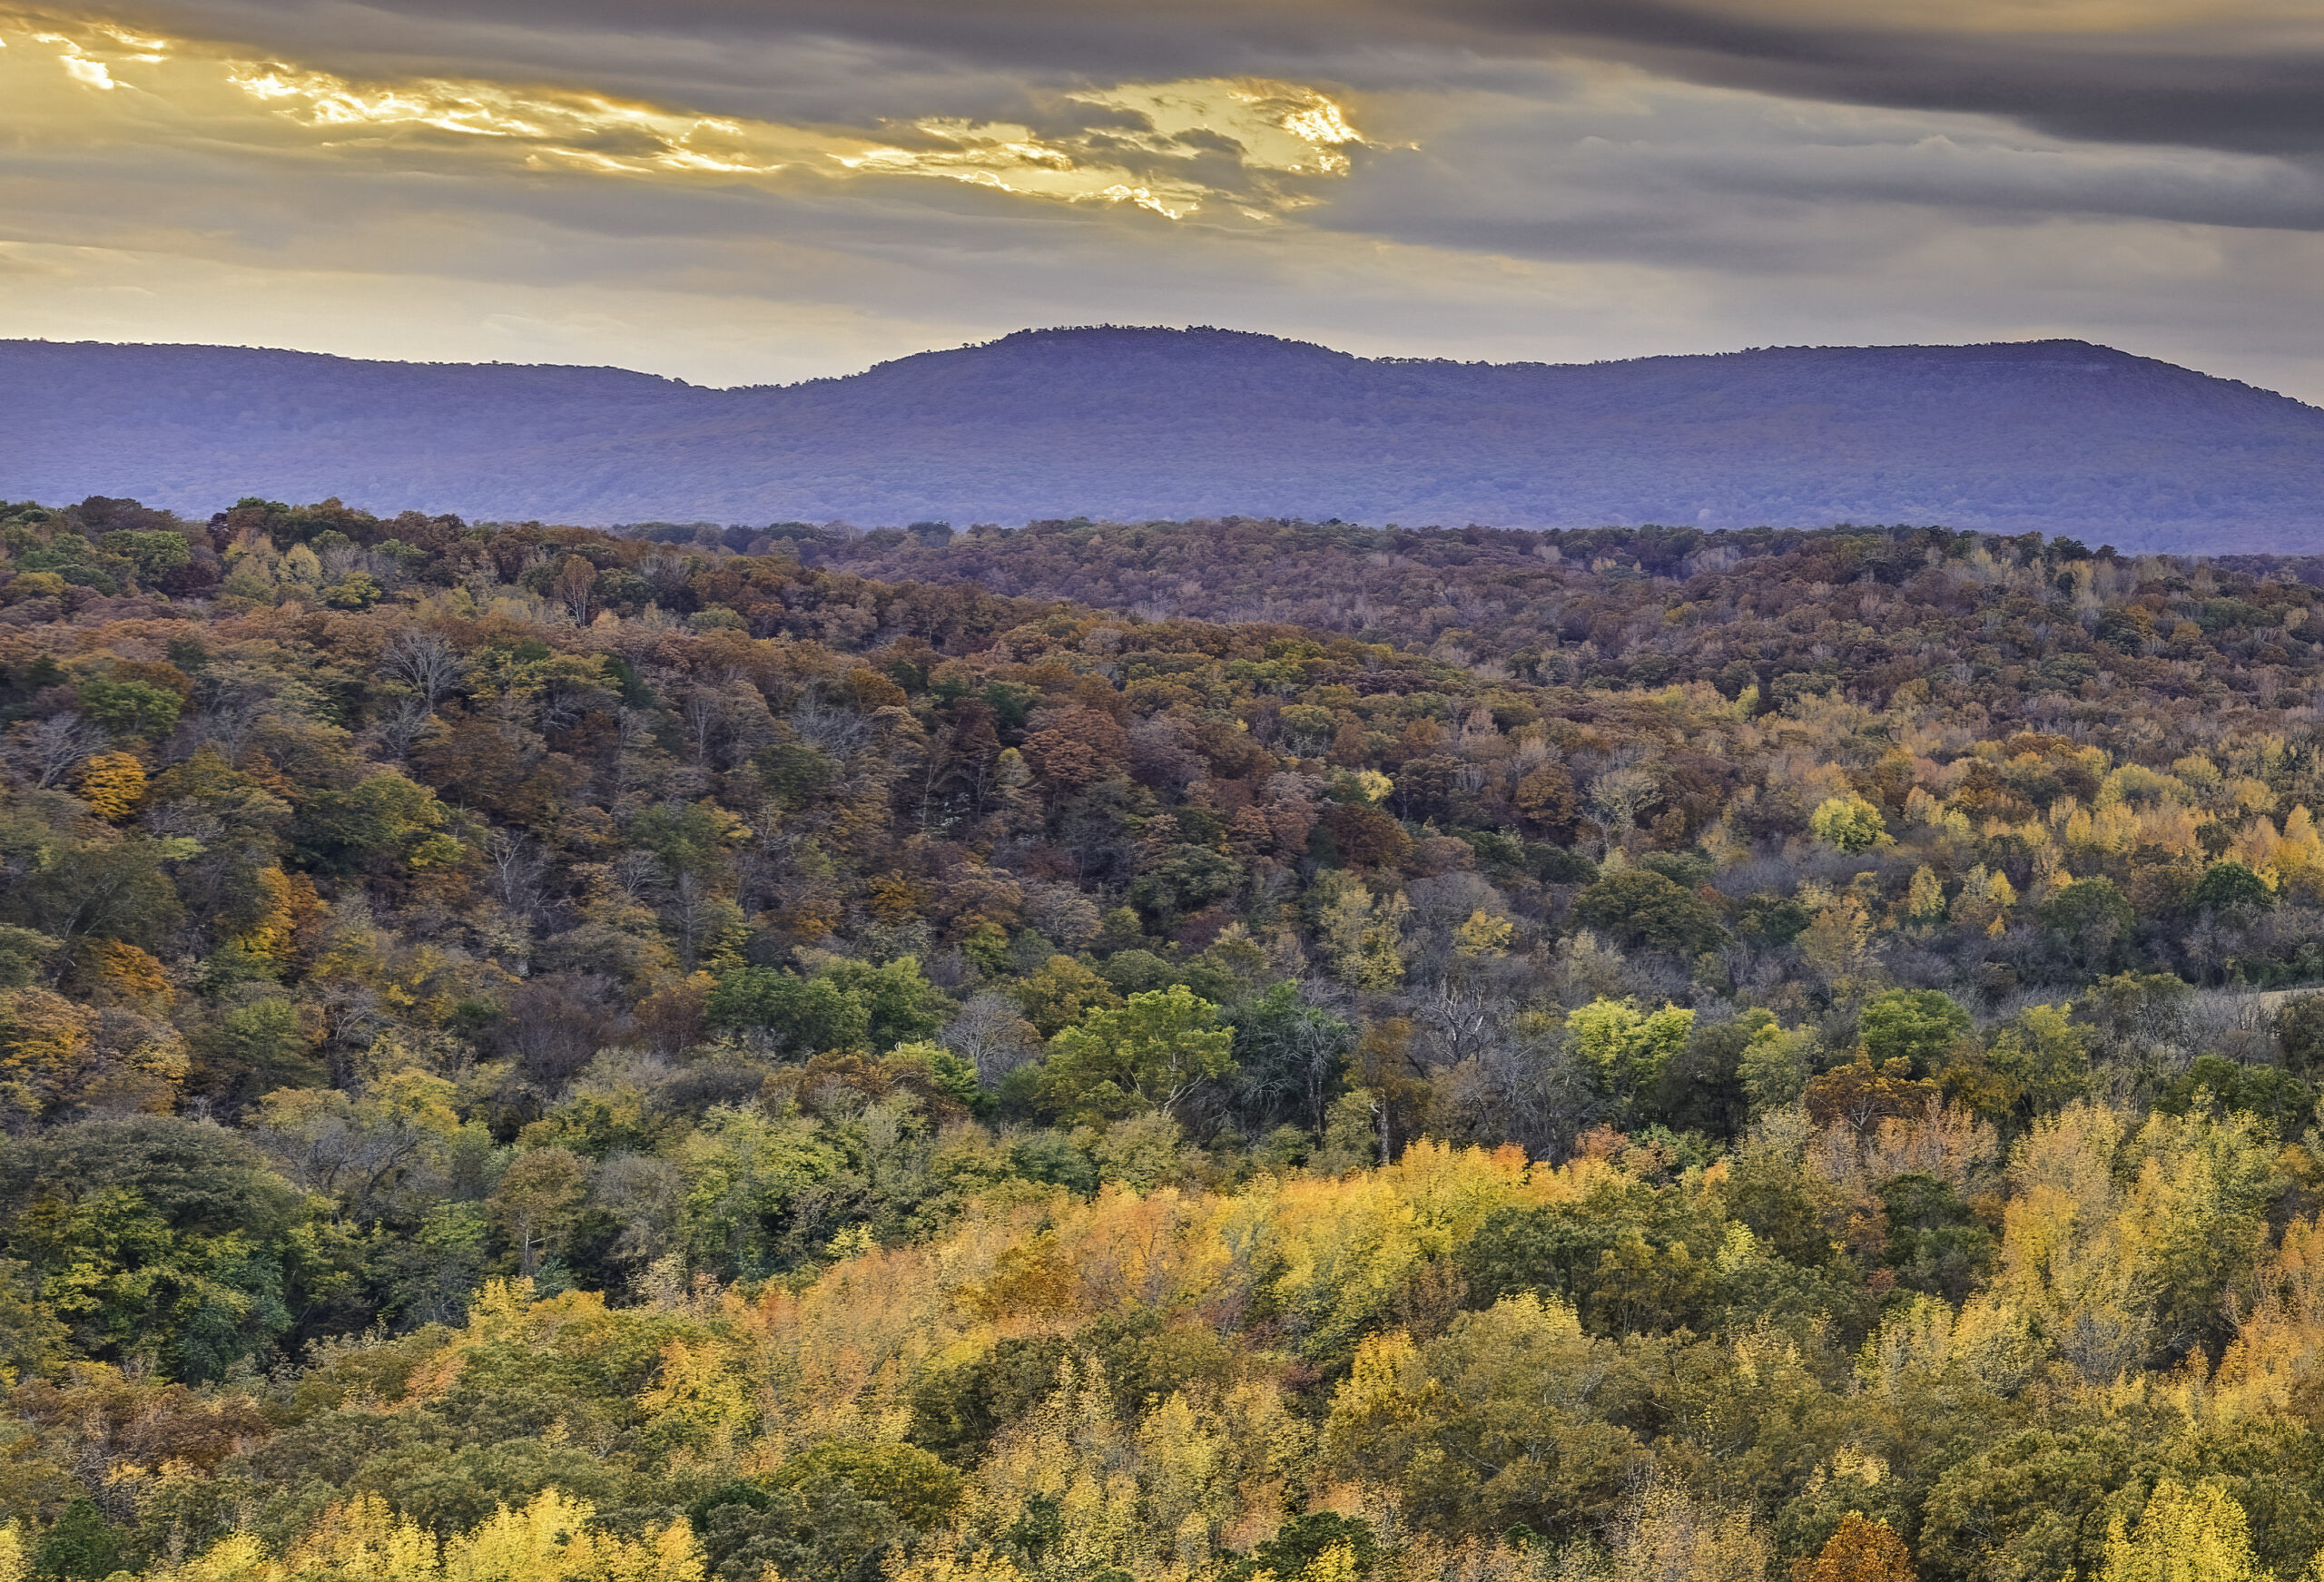
02/06/25 Featured Arkansas Photography–Fall Scene from Peter Cave Bluff

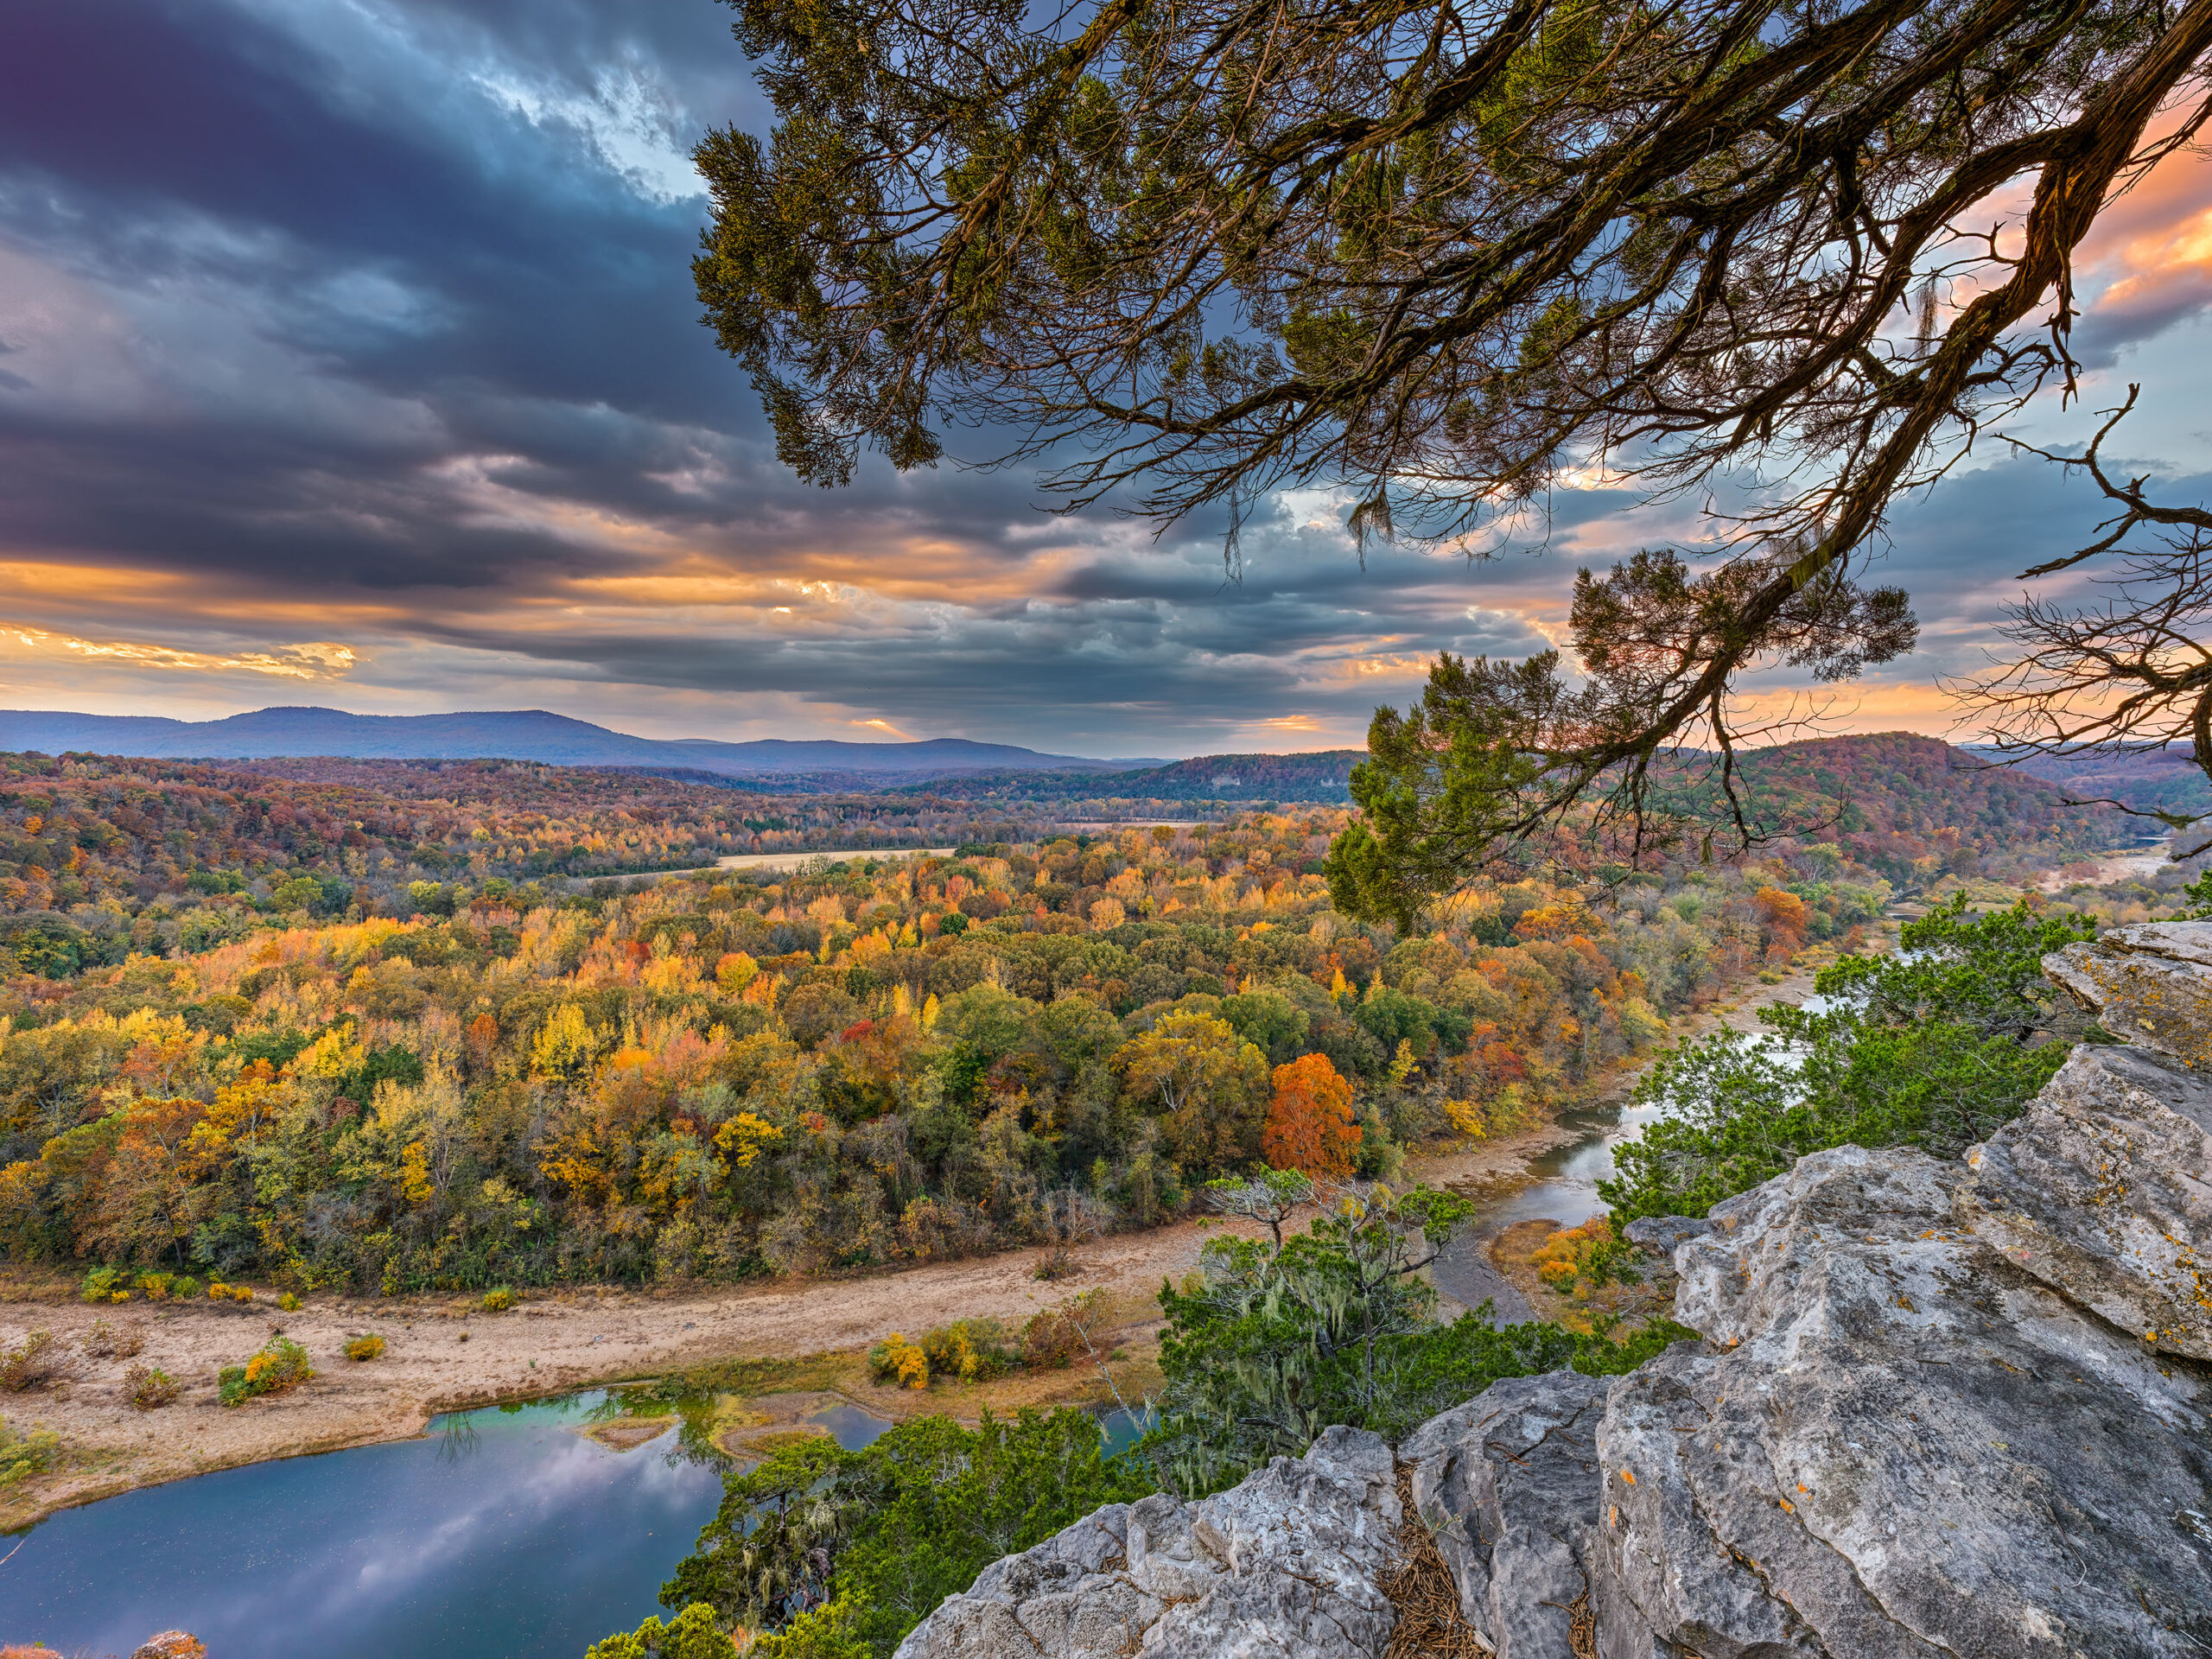
Focus Braacket 16 images from Peter Cave Bluff
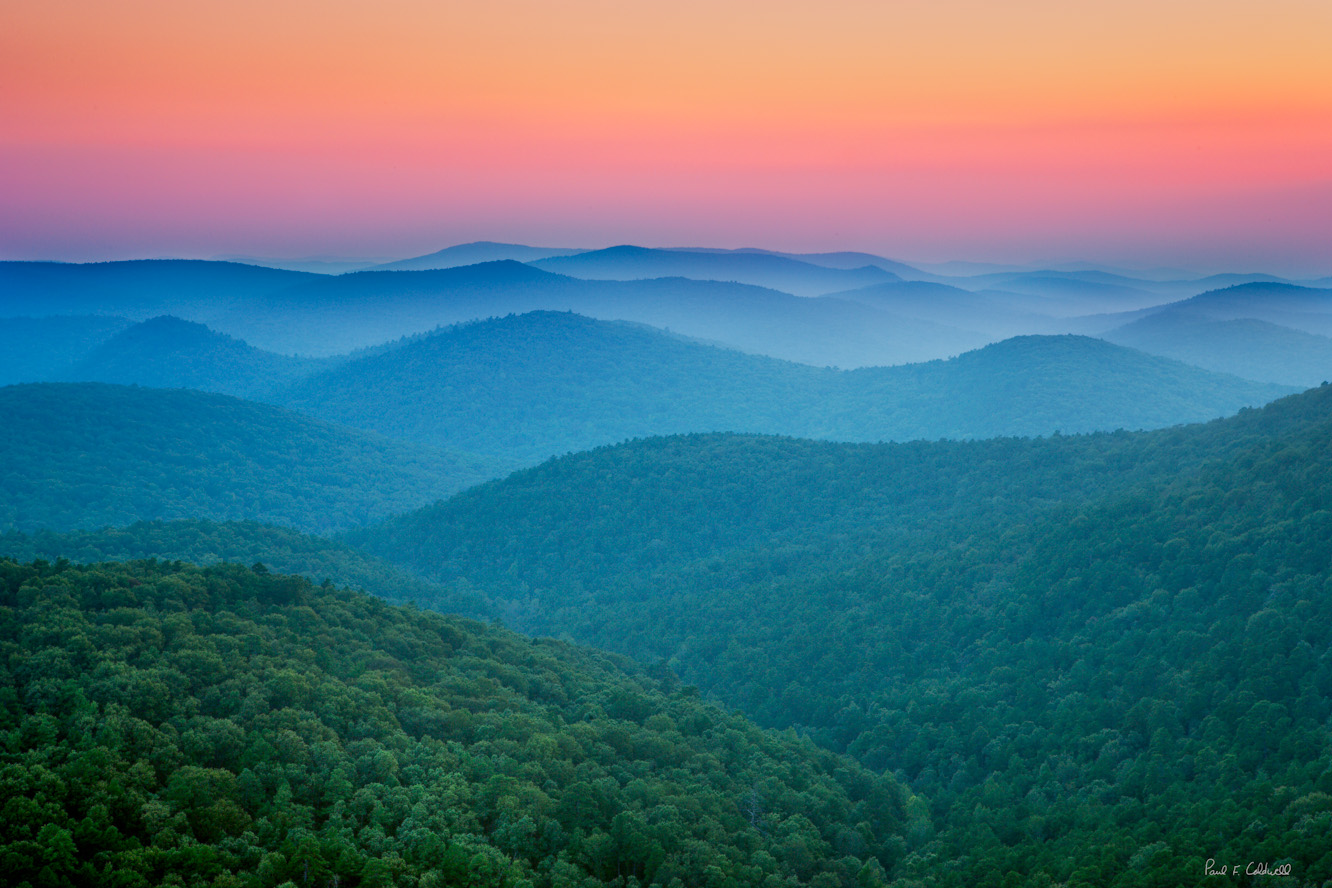
Fall color in Arkansas has been on the decline over the last 5 years. There have been many reasons listed, but whatever the cause, the colors in the state just are not as beautiful as they used to be 10 years ago. Peter Cave Bluff, is on the Buffalo National River, near the middle of the river. I love to photograph there since you have a grand vista of the countryside and can still feature the Buffalo River. There is a large single cedar tree that grows out of the bluff and I always try to make it a part of the photograph.
This image was taken with a Hasselblad X2D, and 21mm XCD lens. Even with the extra wide lens, I still needed to setup for a focus bracketing as I wanted to capture the rock of the bluff which was about 2 feet away from me. No medium format lens/camera combination I know can do this in a single frame even with apertures in the F16 range. Here also a tech camera would be a waste as if you added tilt to the shot to pull in the rocks in the foreground, you would quickly lose the top of the image to bluff since you have tilted the plane of focus. For many years I worked with a tech camera mainly for tilt and shift, but now with modern software and focus bracketing, I just don’t see the need for the tech camera system.
This particular shot was taken with 16 shots, two sets of 8 exposures at F 6.3. I had no wind that evening so I knew that movement would not interfere with the process. I had to take one set of shots at a higher exposure to hold the sky from blowing out in the areas where the sun was shinning through. The other set of 8 I used a slower exposure to help pull up the foreground. All the images were converted from raw files in Phocus. Then ran two sets of 8 image through Helicon Focus to create the focus bracketed sets, and then combined the two sets into one image.
Paul Caldwell, written on 02/06/25
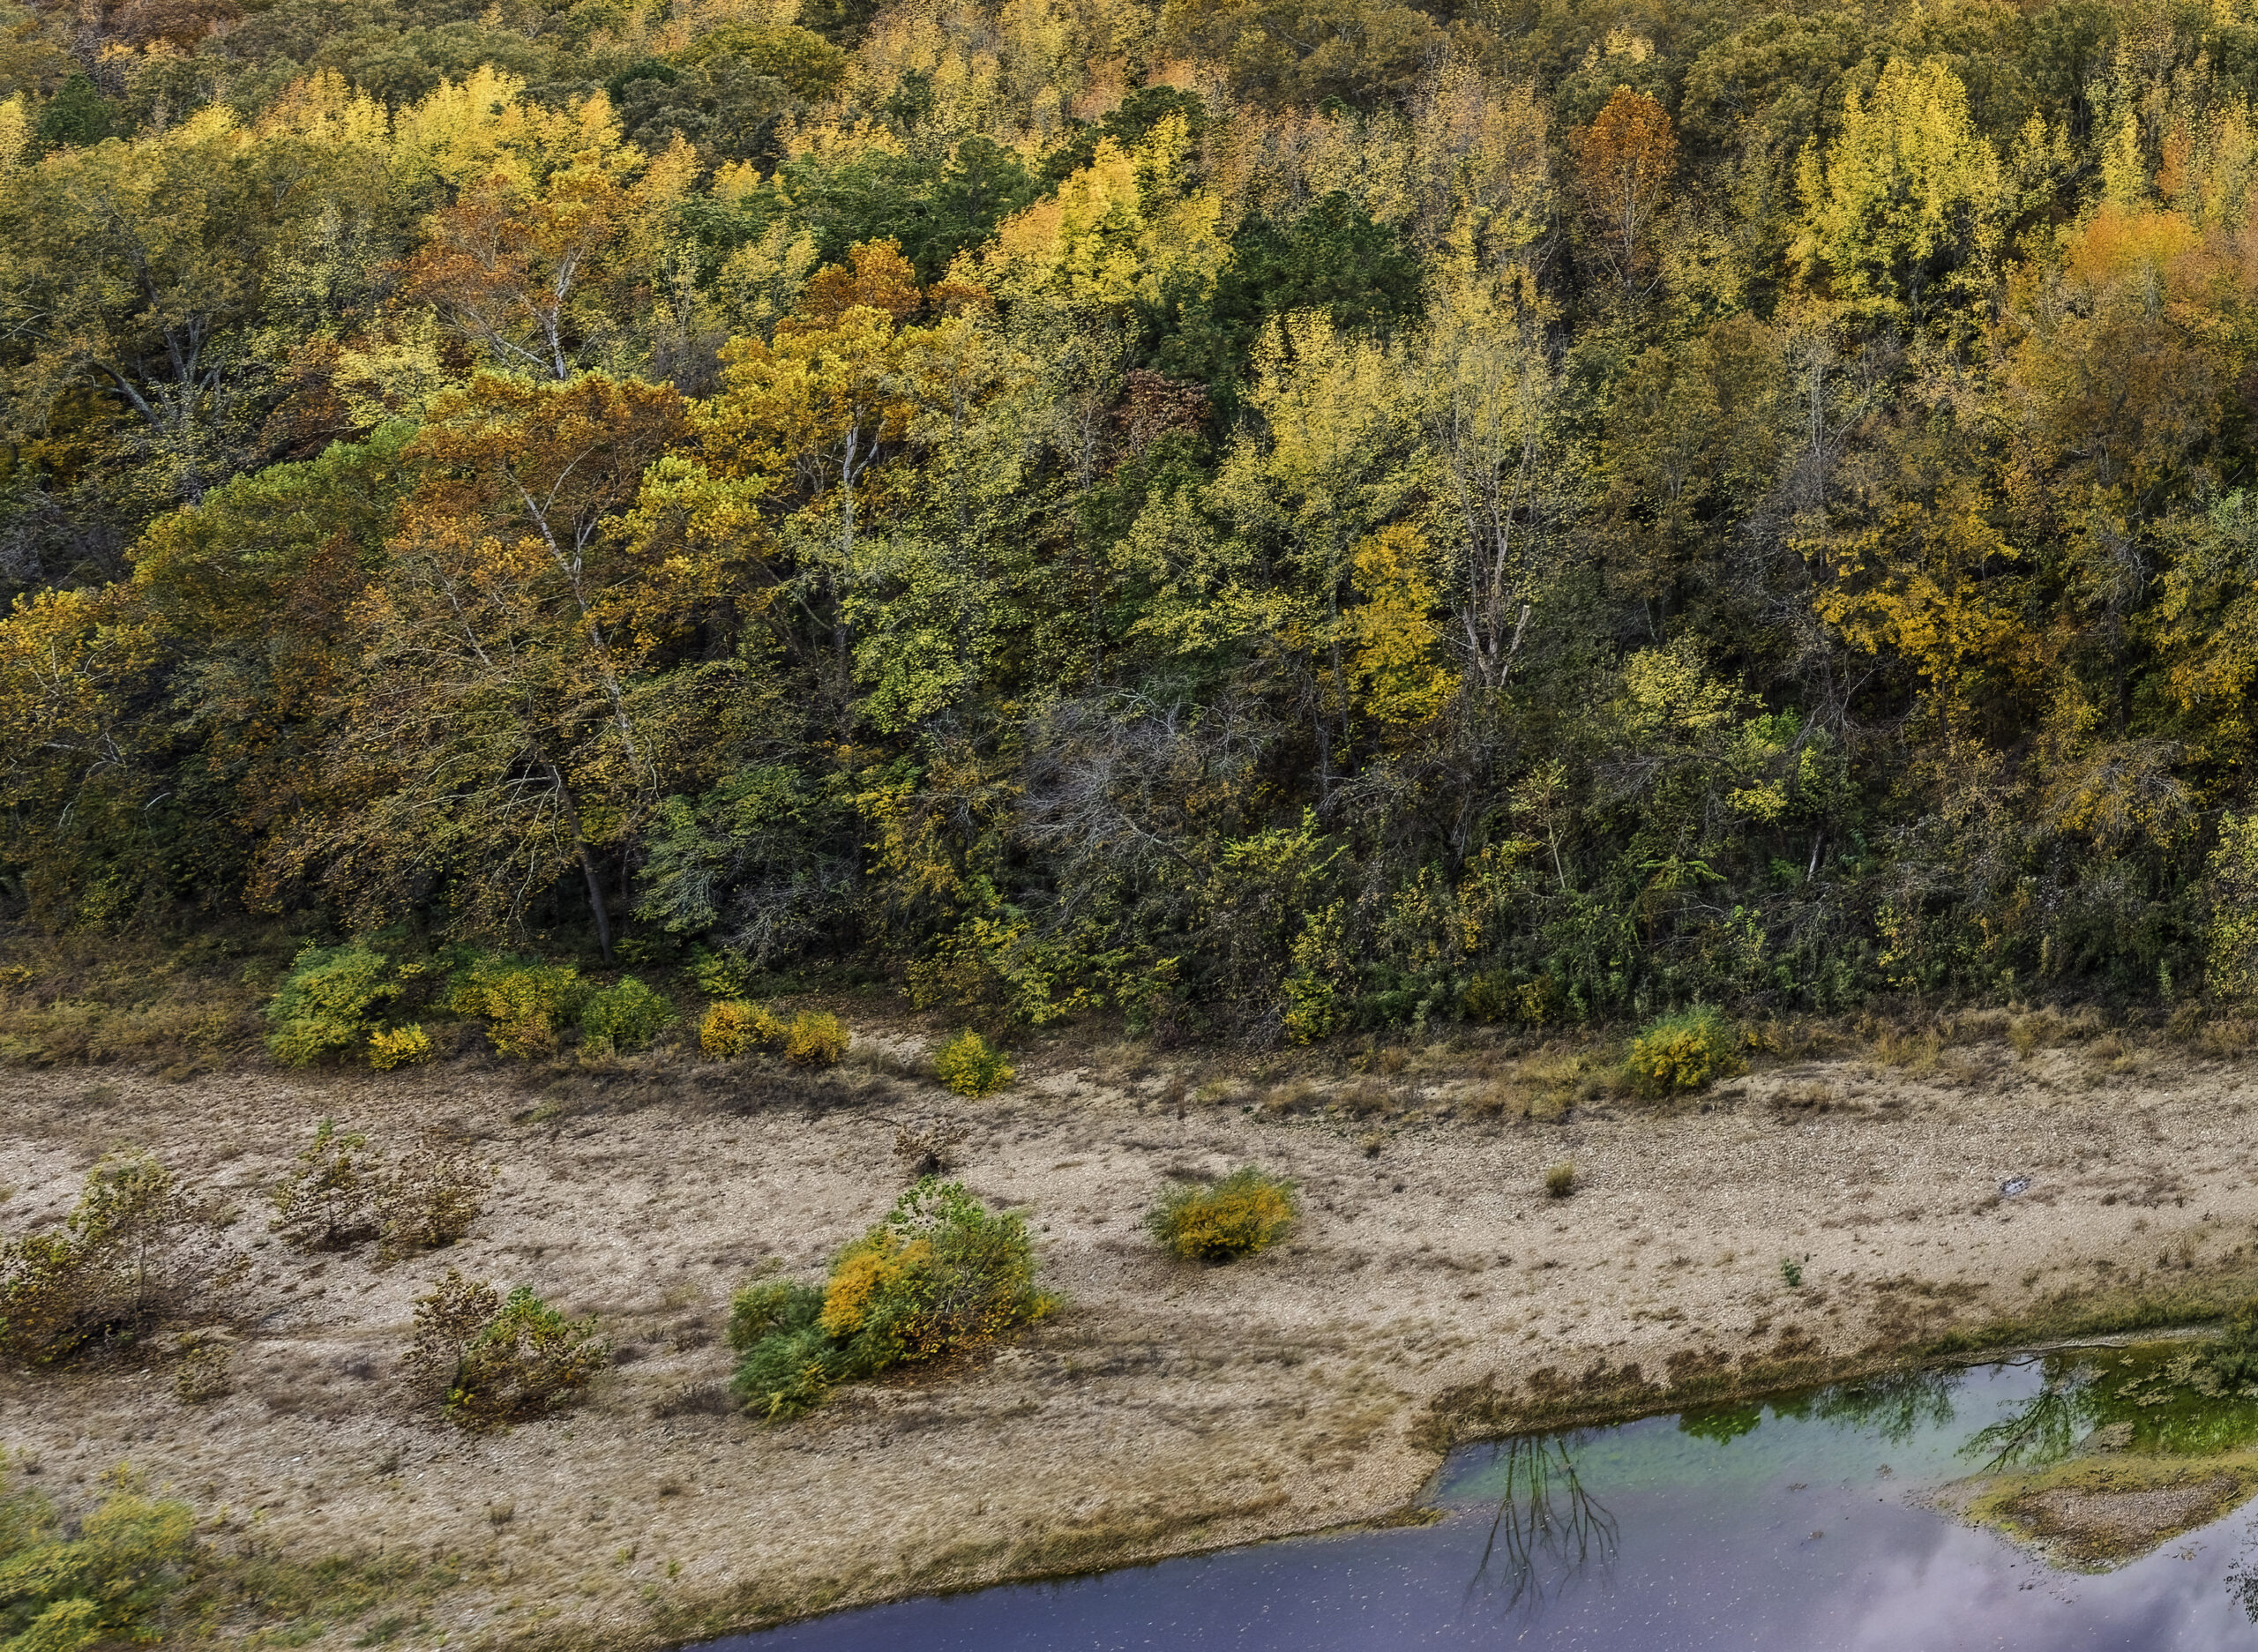
02/03/25 Focus Bracketing example, Hasselblad X2D and 21mm XCD Lens

Focus Bracket, 7 images total, Hasselblad X2D
When working with a Medium format camera system, you have to be very careful when composing your shot for many reasons, one of the most important one is the issue of shallow Depth of Field (DOF). If you are coming from 35mm or APS-C, you may be surprised the first time you view your images as many times you will have parts of a shot that are outside the range of focus for the particular lens you are using. This is true with all medium format lenses and can be an issue when composing your shot. There are two ways around this that I know of:
- Increase your aperture to F12 to F16. This will help bring in the closer details to a better focus, however you may start to see smearing in the corners and for sure you will see some diffraction. The smaller your aperture, (larger the number) the more diffraction will play. What diffraction will cause is softness in parts of the image, mainly the finer details. In the past my technique would be to focus on infinity and increase my aperture to F14 or F16. This will give you a good result most of the time, especially with all of the modern software tools for sharpening that are available.
- Use Focus bracketing. With Focus Bracketing, you allow the camera to focus on various ranges of the image from the greatest distance to the closest the chosen lens will resolve. For example in the image above I used F 6.3 and ended up with 7 total images. Each image will have a unique part of the scene in perfect focus.
Focus bracketing requires a lot of post production work. You now have to work up in this case 7 different images and they need to be pretty much the same. After that you will use a software tool like “Helicon Focus” which will take the images and combine them into one image with everything in focus. Trying to do this manually is next to impossible and requires a tremendous amount of work, whereas Helicon will do everything for you.
There are a few issues that might come into play when you are working with Focus Bracketing.
- The most important consideration is that there is little to no subject movement. So if you are attempting this on a windy day, with a lot of tree limbs, forget it. In the example above, I was blessed with a totally calm evening. There may have been slight movement in the cedar tree overhead, but it was not enough to create a problem. If you have too much movement, you will see aliasing, as the software can’t get the exact same parts of the various images to line up. The effect will be like a ghost image and makes the combination impossible. Also do not try Focus Bracketing where you have cars, trains, or people moving through the scene as they will cause the same problems.
- Exposures variances. In the example shown above, I knew that I could not expose for the sky and the foreground (especially the rocks in the lower right corner) in one series of images. So I ended up taking 14 total shots. I ran Helican on both series of 7 images, which resulted in 2 final images, that I then combined in Photoshop and the Camera Raw filter. Note: The name camera raw filter is misleading as it works very well on tif and jpg images.
- You must have your camera on a tripod. There is no way to hand hold the camera to take the bracketing series of images, you will have movement and the images will not align correctly.
With the X2D, you have three options when working with focus bracketing:
- Shoot from Infinity to nearest spot
- Shoot from nearest spot to infinity
- Use a symmetric option, where the camera should start in the middle and work up and down.
I use option 1, with the camera in AF mode (auto focus) I will move the focus point to where I know I am on the most distant part of the subject and start the series. You have to pick the number of frames you want, and for most landscape shots I have found that anywhere from 6 to 10 seems to work with the aperture at F6.3. However it’s always a good habit to check you shots to make sure the camera was accurate on the furthest and nearest frame. NOTE, if you are going to need several series due to the variance in exposure make sure you do not move the camera. Also you will need to be on a tripod.
Here are some close ups from parts of the file to show the details that were captured throughout.
LOWER RIGHT CORNER (Click on image to view it larger)
Even though I used a 21mm lens, I still needed to focus bracket to get the closest corner in good focus. This part of the subject was less than 3 feet away from my camera.
UPPER RIGHT CORNER SHOWING DETAILS OF CEDER TREE (Click on image for a larger view)
What really makes this shot complete for me is the 1000+ year old cedar tree that is growing out of the top of the bluff. It’s really impossible to shoot the scene without the tree being in the frame so it’s very important to have it in sharp focus.
UPPER LEFT OF IMAGE SHOWING TREES IN THE DISTANCE (Click on image for a larger view)
This was a fall shot, so I wanted to have all the different species of trees in sharp detail. The Hasselblad 21mm lens has an excellent ability to resolve these finer details, however if I had tried to capture all of the shot in one frame I would have lost some of the finer details to diffraction.
LOWER LEFT CORNER (Click on image for a larger view)
One test of any ultra wide is the ability to capture sharp details at the extreme edges of the frame. The Hasselblad 21mm does a very good job with this, however it does suffer from retrofocus distortion. This will cause details at the edges of the frame to elongate and or stretch out. The effect on this image is not enough that I am concerned with it. However if I were to make a print of this, I might crop into the image just a bit.
In conclusion, I hope this article has made you more interesting in working with Focus Bracketing. If you have a medium format system from either Fuji (GFX camera) or Hasselblad (X2D), you can work with this in camera to take all of the images. Once you understand the workflow it’s a pretty automated process. If you have a 35mm camera from Nikon, or Canon, I know that Nikon offers focus bracketing with their Z cameras, I assume that Canon also now has it. Sadly Leica still does not offer Focus bracketing and I feel it’s huge over sight by them. There is no need for image stabilization, all you need is auto focus and a piece of firmware to process out the images. Leica has missed this with both the Sl2 and now their latest Sl3 cameras. According to available information, the Leica SL3 does not have an in camera focus bracketing option; reviews and specifications indicate that the camera only offers exposure bracketing, meaning it cannot automatically capture a series of images with varying focus points within a single shooting sequence.
Notes from the author:
I have the Lecia Sl2 and would strongly recommend to Leica that they add Focus Bracketing to their SL cameras. I doubt it would be retroactive the SL2, but with the SL3 it could be added via firmware. The Sl3 is 6oMP and even with the best Leica lenses, you often times need to bracket your focus to get the best overall image. I have used the Hasselblad X2D and it has a very nice Focus bracketing option, however after each series, you have to go back to re-focus on infinity (if you are shooting from far to near). The Fuji GFX100 has a more complicated menu to setup Focus Bracketing, however once you have it set, you can reshoot at will, i.e. the camera remembers you are shooting from far to near and on each series will return to the set point to gave the camera. With Fuji you set both the far and near points. With Hasselblad pick the shooting method far to near or near to far, and use you AF point to hit first point, then the camera makes all the rest of the decisions, thus I feel you need to check it after the first run to make sure the camera got the near point correctly.
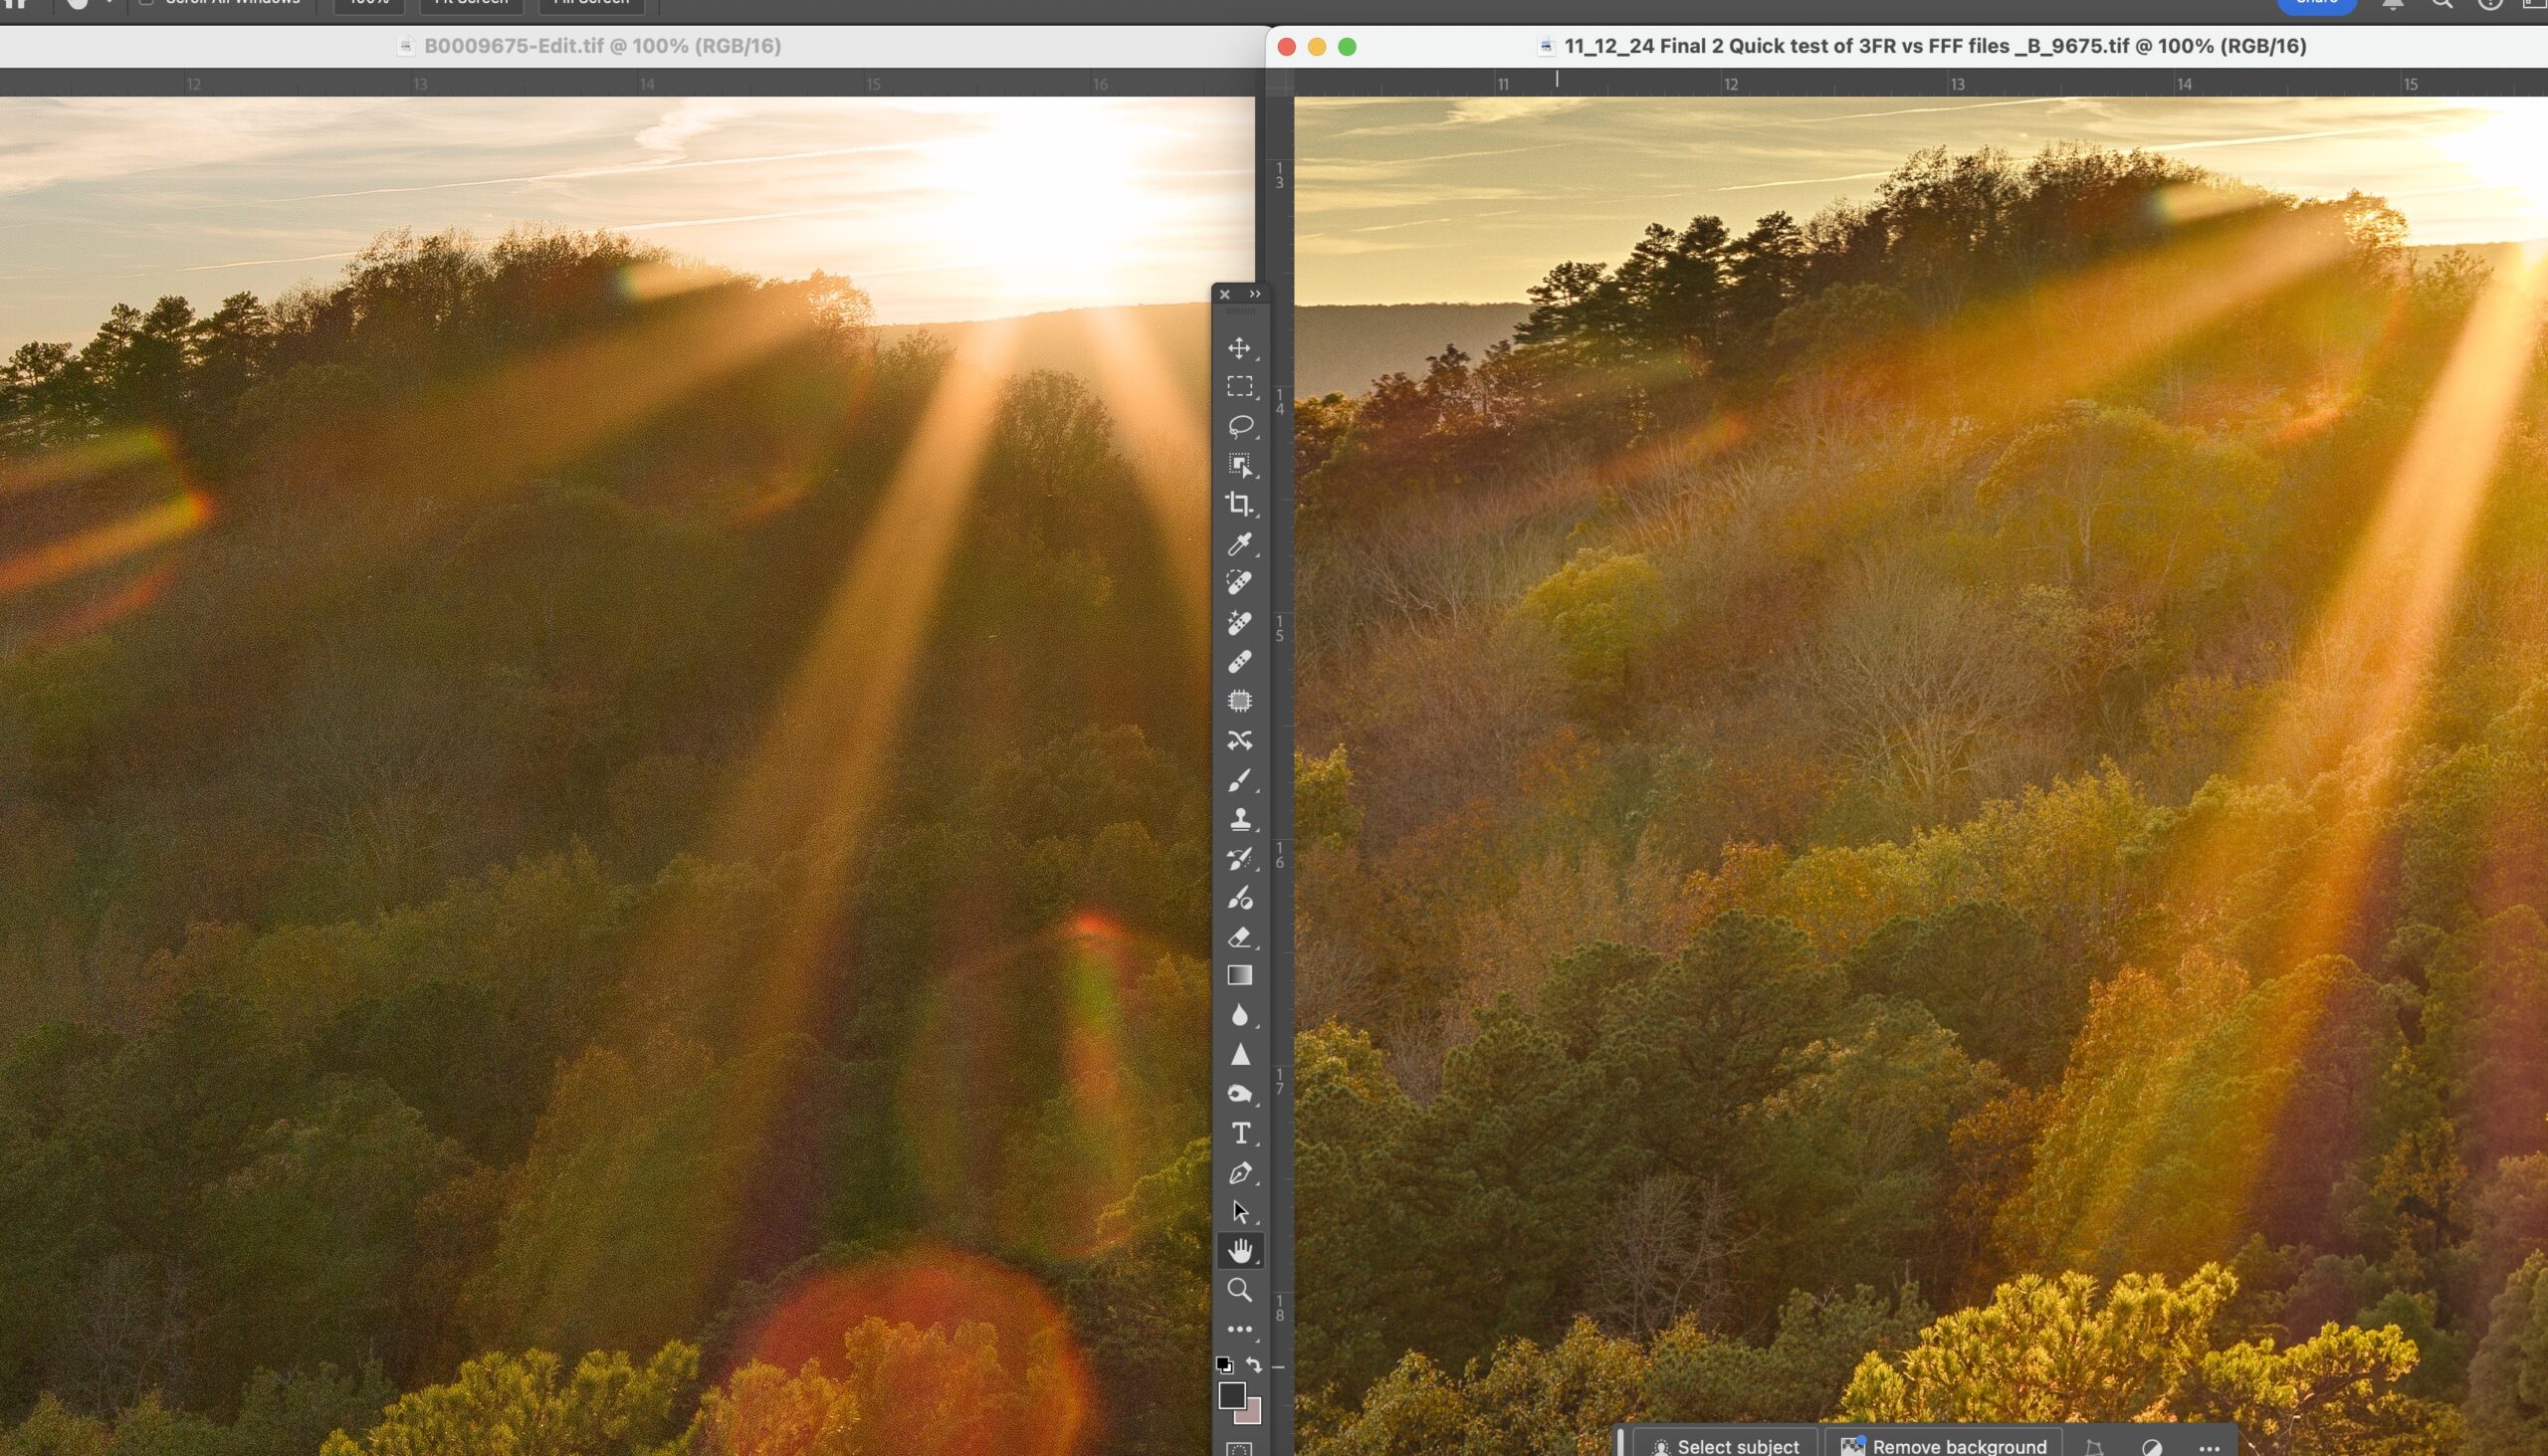
Hasselblad Phocus Color Comparison, Example Number 1
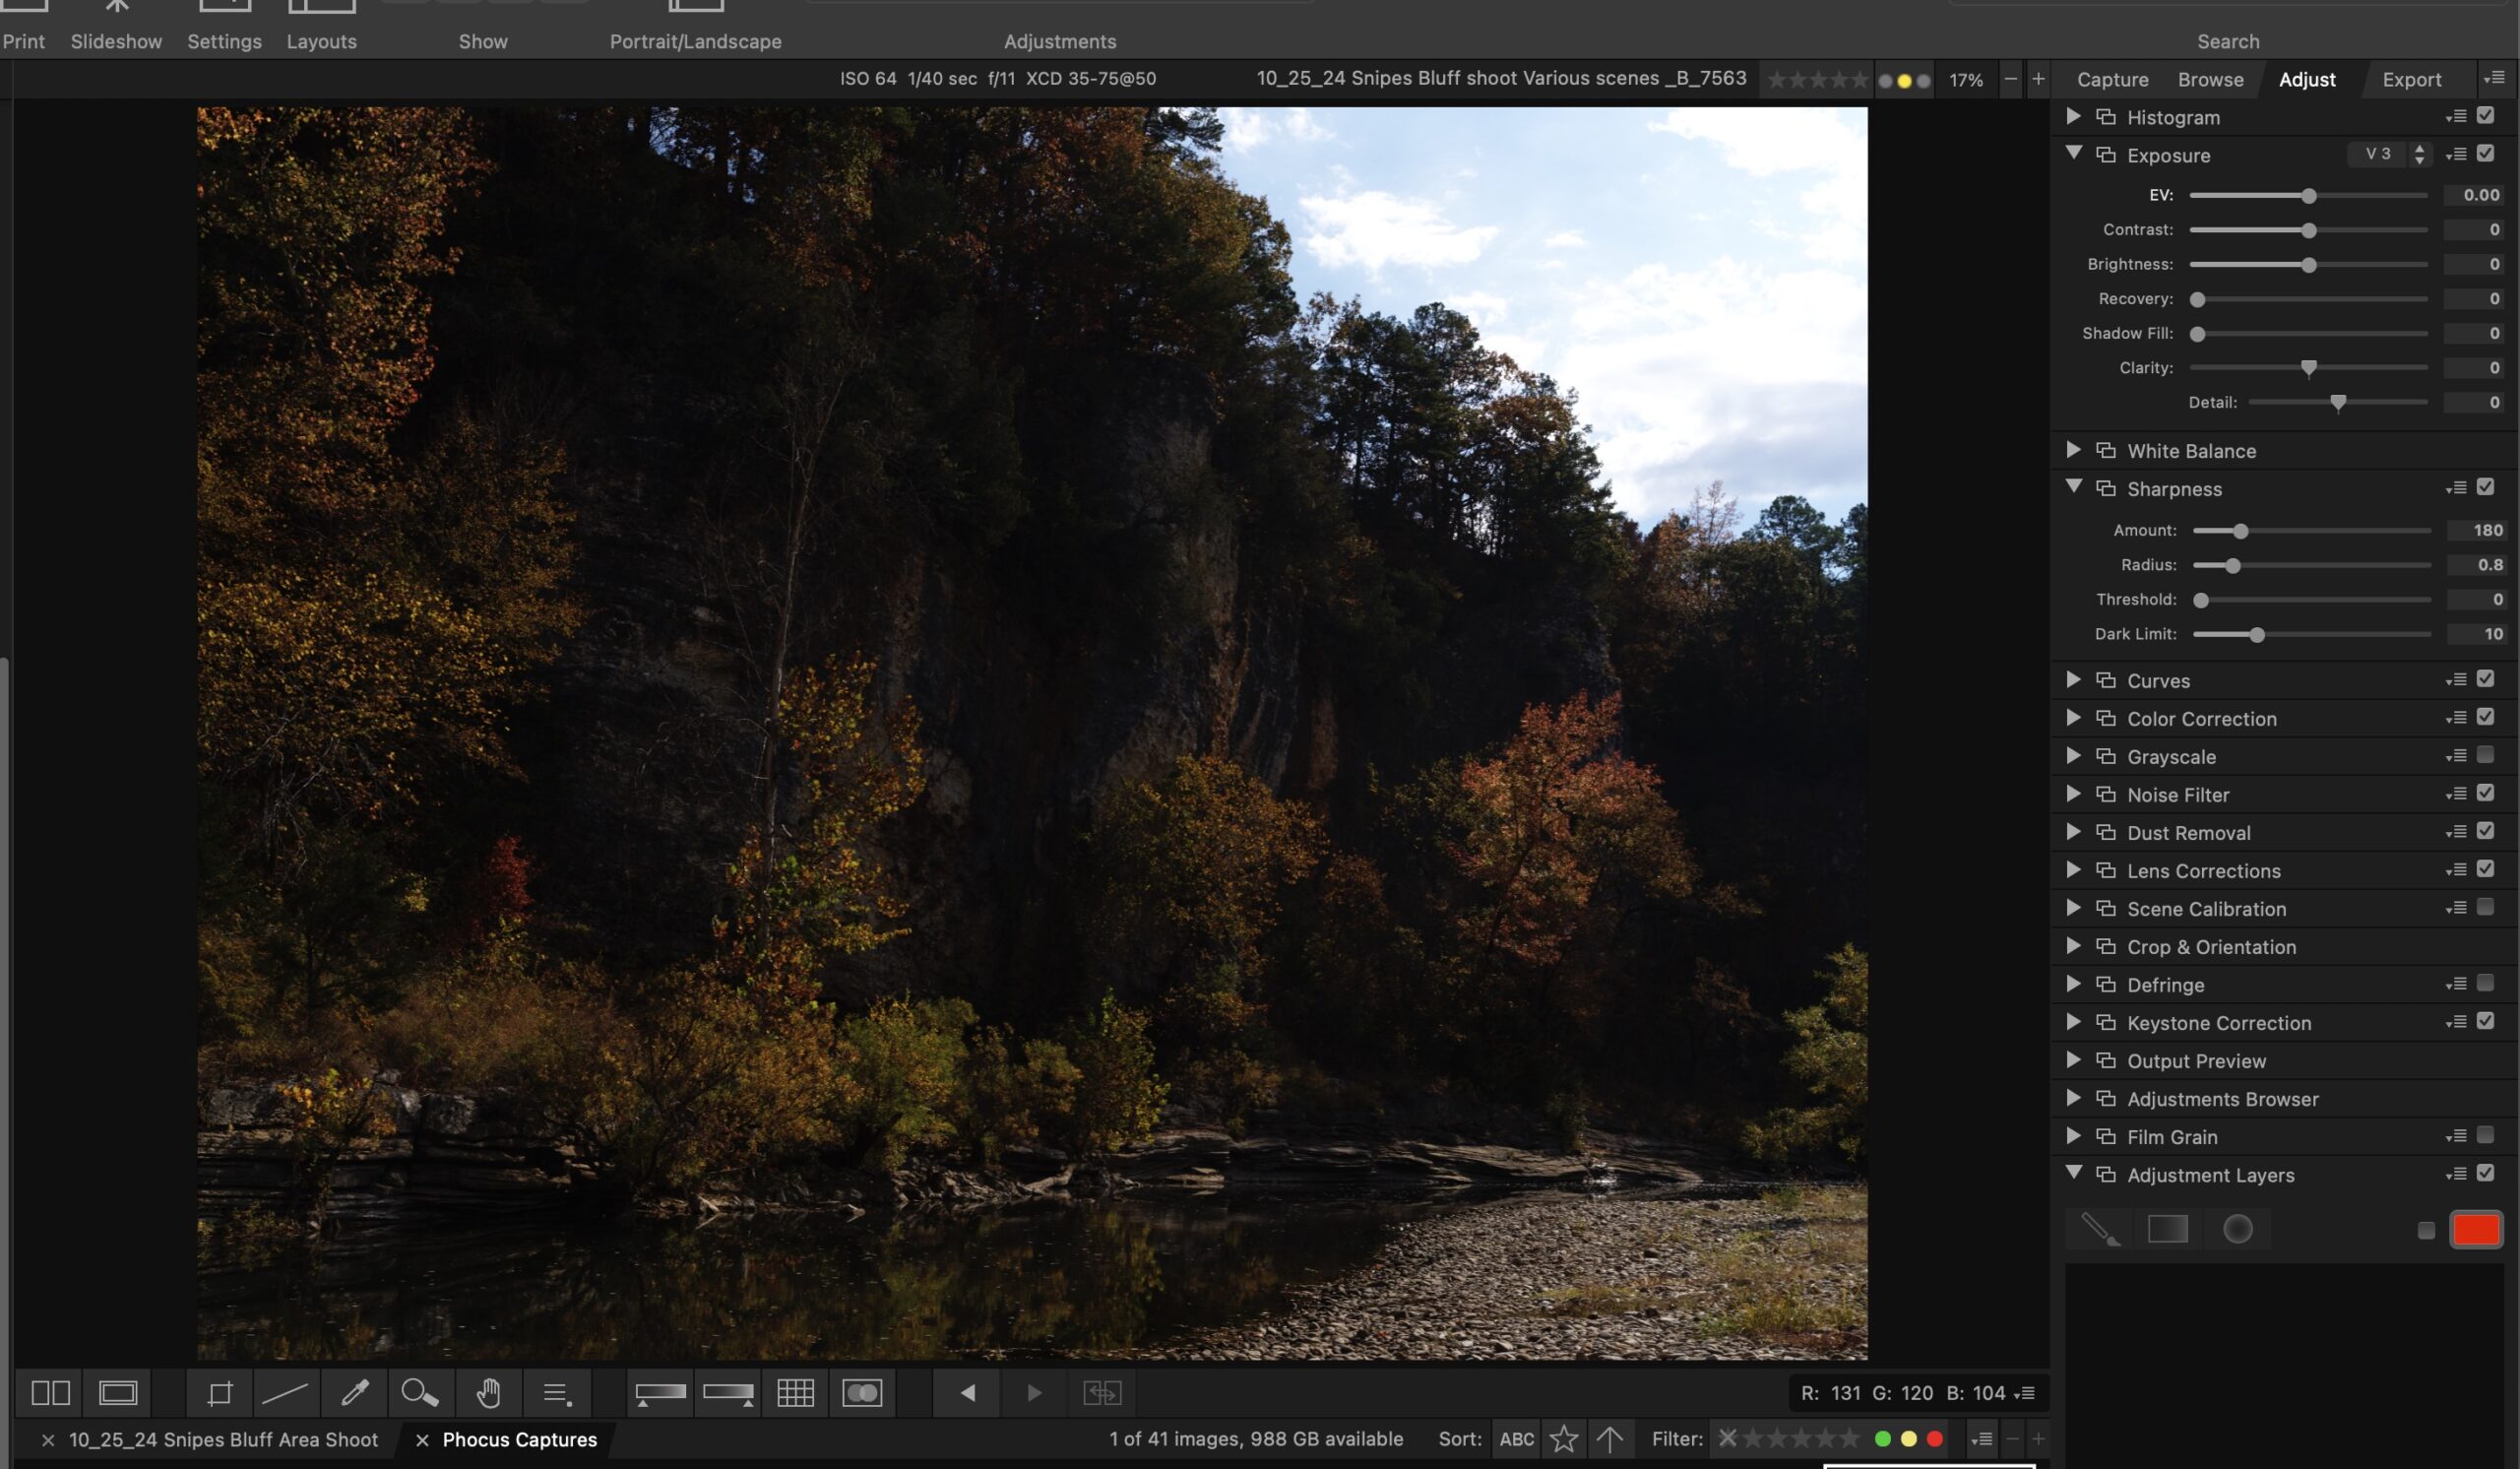
A Screenshot of Phocus Desktop for Mac Ver. 3.8.4
Hasselblad’s color or HNCS (Hasselblad Natural Color Solution), is one of the most highly touted features of the X series of cameras. From the X1D, all the way to the X2D. Before I purchased into the Hasselblad system, I had read about HNCS for years but had not given it much thought. I had used cameras from Phase One and Fuji and these seemed to give me a very nice response to color. I started working with the Hasselblad X2D in February of 2024. When I first started using the camera I immediately headed to Lightroom to work with the files. Lightroom has a modern interface, excellent toolset, and a catalog. After working with the X2D for several months, I became more interested in Hasselblad Phocus on the desktop just to see the colors and overall image response was going to be better. What I found was that in general Phocus does give a much more pleasing look to the images. However this look and feel comes at in extreme cost as Phocus Desktop (the latest version is 3.8.4) has to be the worst overall raw conversion software I have used and I have tried them all. I will write more on that later, but for the purpose of this article I want to show why it may be worth fighting the battle with Phocus as the color is truly amazing.
Hasselblad color compared to Lightroom on X2D raw
In the two images shown above, you can see the best I was able to get from Lightroom on the left and Phocus is on the right. To my eyes, the overall look of the image on the right is much more pleasing. There is much better shadow definition in both the areas on the left (trees) and the bluff on the right. The look of the sun on the black gum in the lower center is also much more effective. (note to make sure I did not get the images mixed up, I have left all of the flares in the Lightroom images). The lens used for this shot was the 20-35, which has an extremely bad response to direct sunlight generating terrible destructive flare. But more on that later.
Close up Phocus vs Lightroom Number 1 trees on left
In this close up you can clearly see that the Phocus image on the right side has much more definition in the shadows. The color response is also much better. I should note here, I am not slouch to the use of Lightroom. I do not consider myself in any way to be an expert, but I have always been able to use Lightroom to get what I feel is an excellent rendition of an image from a raw file independent of the camera.
Hasselblad comparison to Lightroom on reds
In this comparison look at the reds and how much better they are defined. Also the details on the bluff appear to be better. Note the shadow area behind the red tree and you can see there are better details. When you click on the image look at the details on the bluff. There is clearly more separation on the Phocus image.
Hasselblad Phocus HNCS comparison to Lightroom
I zoomed in on the bluff to show this in more detail. The bluff is covered with all forms of fungus and lichen mainly white and orange. The white areas have better defined edges and the orange stands out better from the color of the rocks. The Phocus image is on the right.
Hasselblad HNCS compared to Lightroom Camera Standard
In this side by side look at the Oak tree in the lower left and then the trees in shade behind it. Much better shadow recovery by Phocus and you can still see the light rays from the sun in the shady parts of the image. Also note the lone pine tree growing from the bluff and how it is more prominent in the Phocus example.
Hasselblad HNCS compared to Lightroom Camera Standard looking at greens
The Hasselblad 20-35 appears to have an huge flare issue when you are pointing it directly as the sun as I did to photograph this sunset. What I immediately noticed was how Lightroom (image on the left) lost a lot of the definition in the pine tree and pine needles. I realize much of this was due to the flare as it was very destructive. In masking this shot I used Lightroom’s Sky Select and it did a great job. Thus I was able to use sky select a second time, and invert it grab everything else. (THIS WOULD BE THE SINGLE GREATEST ADDITION TO PHOCUS LAYERS), in Phocus I was forced to manually draw a mask to get as much of the pine tree as I could. But even with the terrible toolset in Phocus layers, I feel that Phocus did a better job. To really see the differences please click on the image and look at it at 100%
Hasselblad HNCS compared to Lightroom Camera Standard
This image speaks for itself. The Lightroom image is on the left and no matter what I did and toolset/masking I used, I could not get the details to come out in the trees. You can clearly see that there are more visible details in the image that Phocus generated. I have removed the flare from the Phocus image using the “Generative Fill” option in Photoshop. The sky in the background above the mountain also seems to look better.
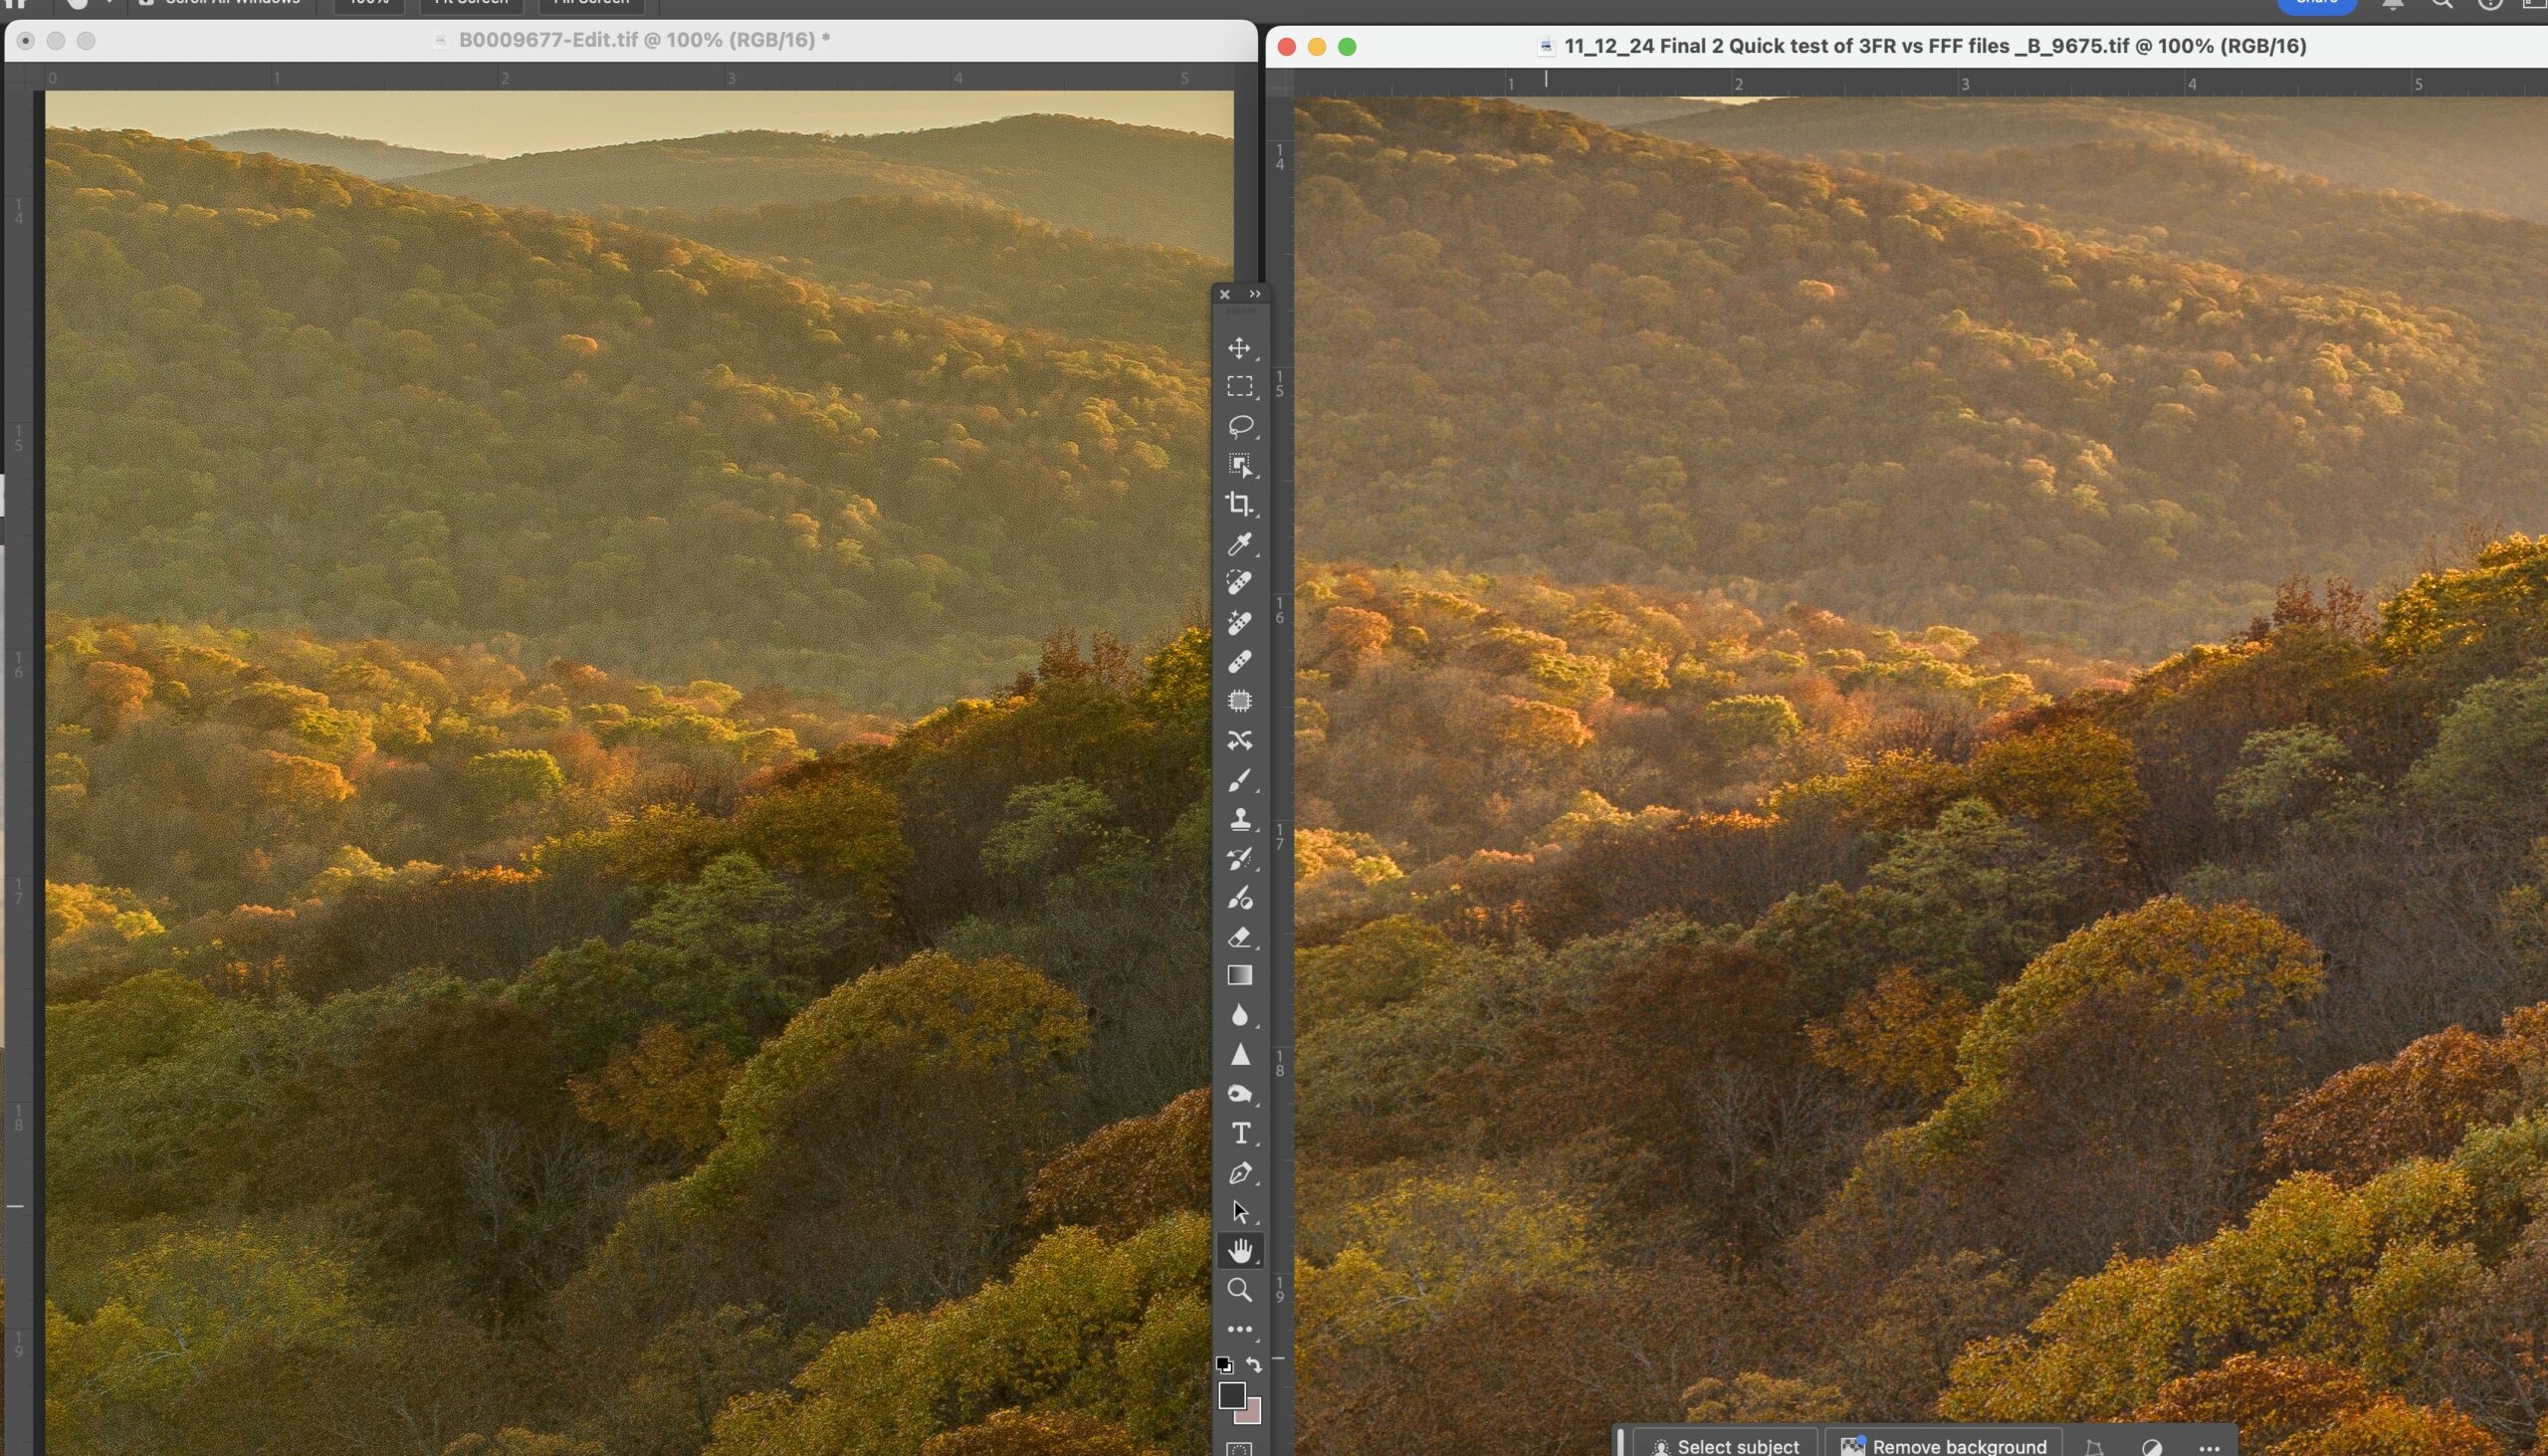
Hasselblad HNCS compared to Lightroom Camera Standard
A quick comparison to show how the details in the distance parts of the this shot came out. Shadow details appear to be better in the foreground. Also note the areas in the background. Along the bluff line you can see better details in the trees. The colors and details in the background tree line really stand out better in the Phocus images. The Phocus example is on the right.
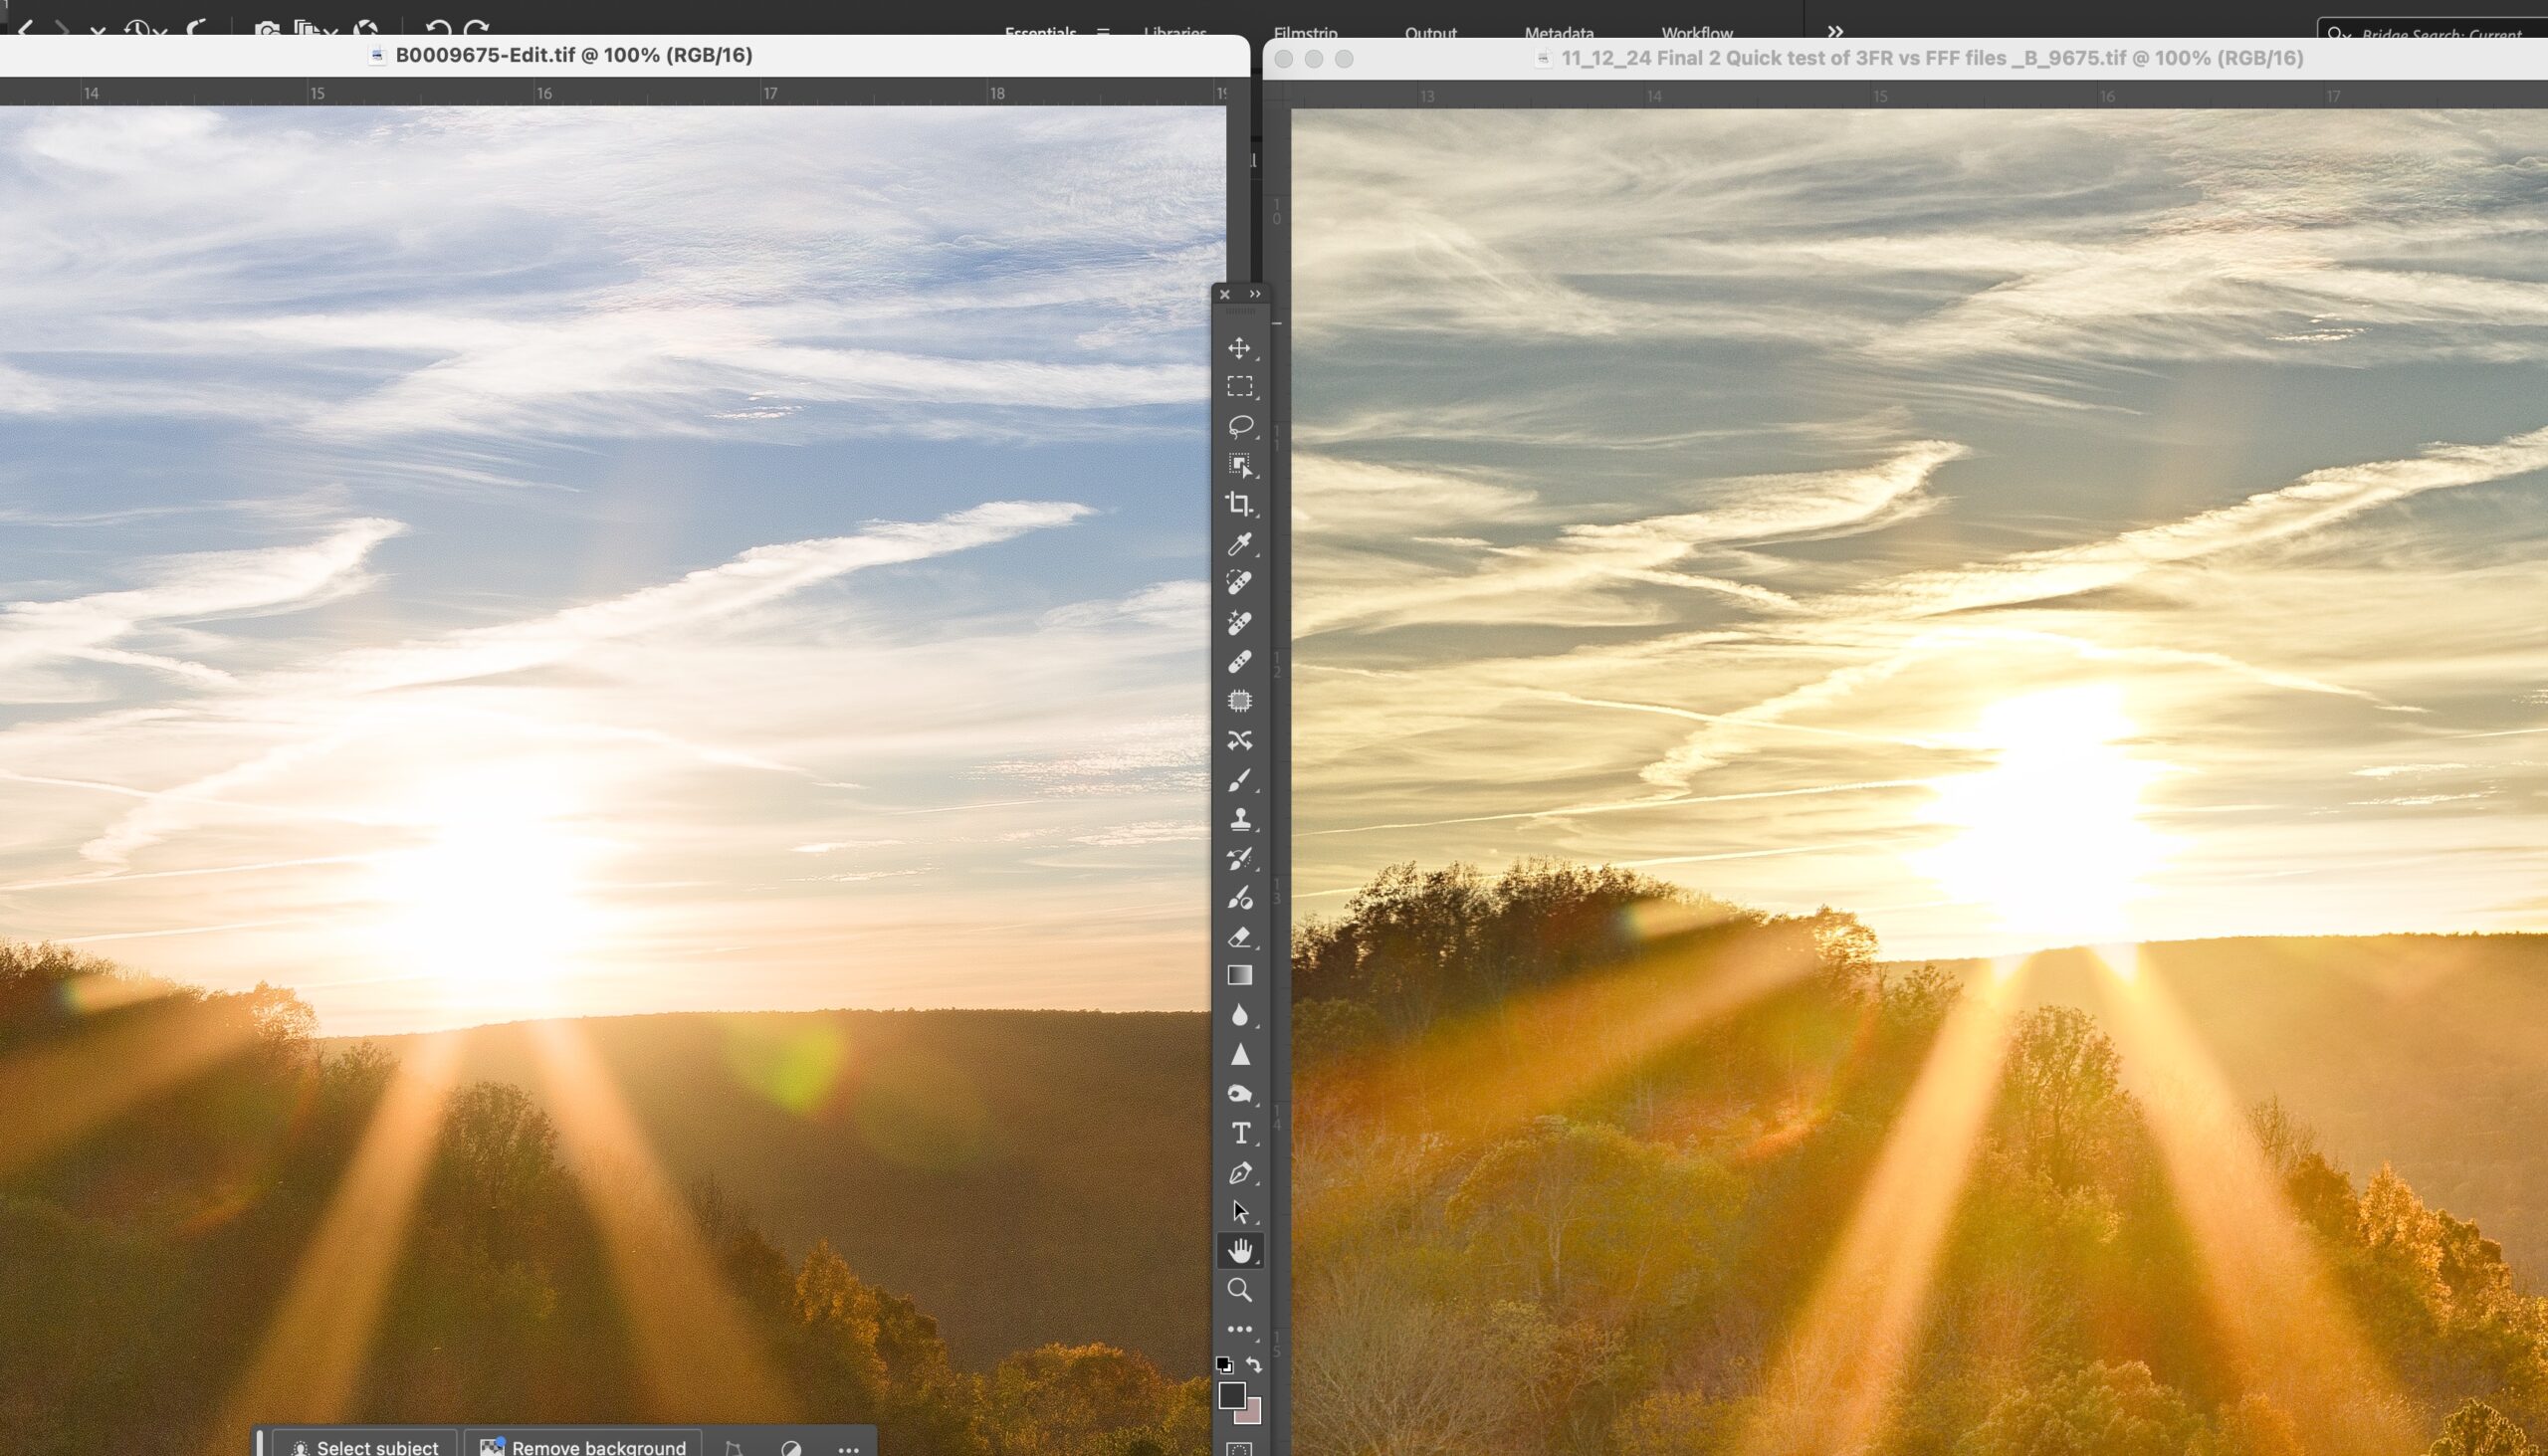
Hasselblad HNCS compared to Lightroom Camera Standard
This example brings to bear some interesting differences between Phocus and Lightroom. The Phocus example is on the left and you can see again that somehow Phocus is pulling out more details in trees even though there is a huge amount of flare. The sky has a much warmer look in the Phocus image in these areas around the sun. In the Lightroom image you can see there a bit of a red tint that moves up into the white of the clouds. I also prefer the sun rays in the Phocus image.
 From the Blog
- Errors with High Resolution Mode, Panasonic LUMIX S1RII July 4, 2025
- 05/08/25 Capture One, big announcement, at least for portrait photographers May 8, 2025
- 05/03/25 Trump’s Tariffs finally start to hit Photography Equipment. May 3, 2025
- Firmware 4.1.0 for X2D? April 21, 2025
- 04/18/25–Looks like Trump’s Tariffs are much ado about NOTHING in regard to photography equipment. April 18, 2025
- 04/09/25 Arkansas Sets new standard for Scientific Ignorance with new law for Ivermectin April 4, 2025