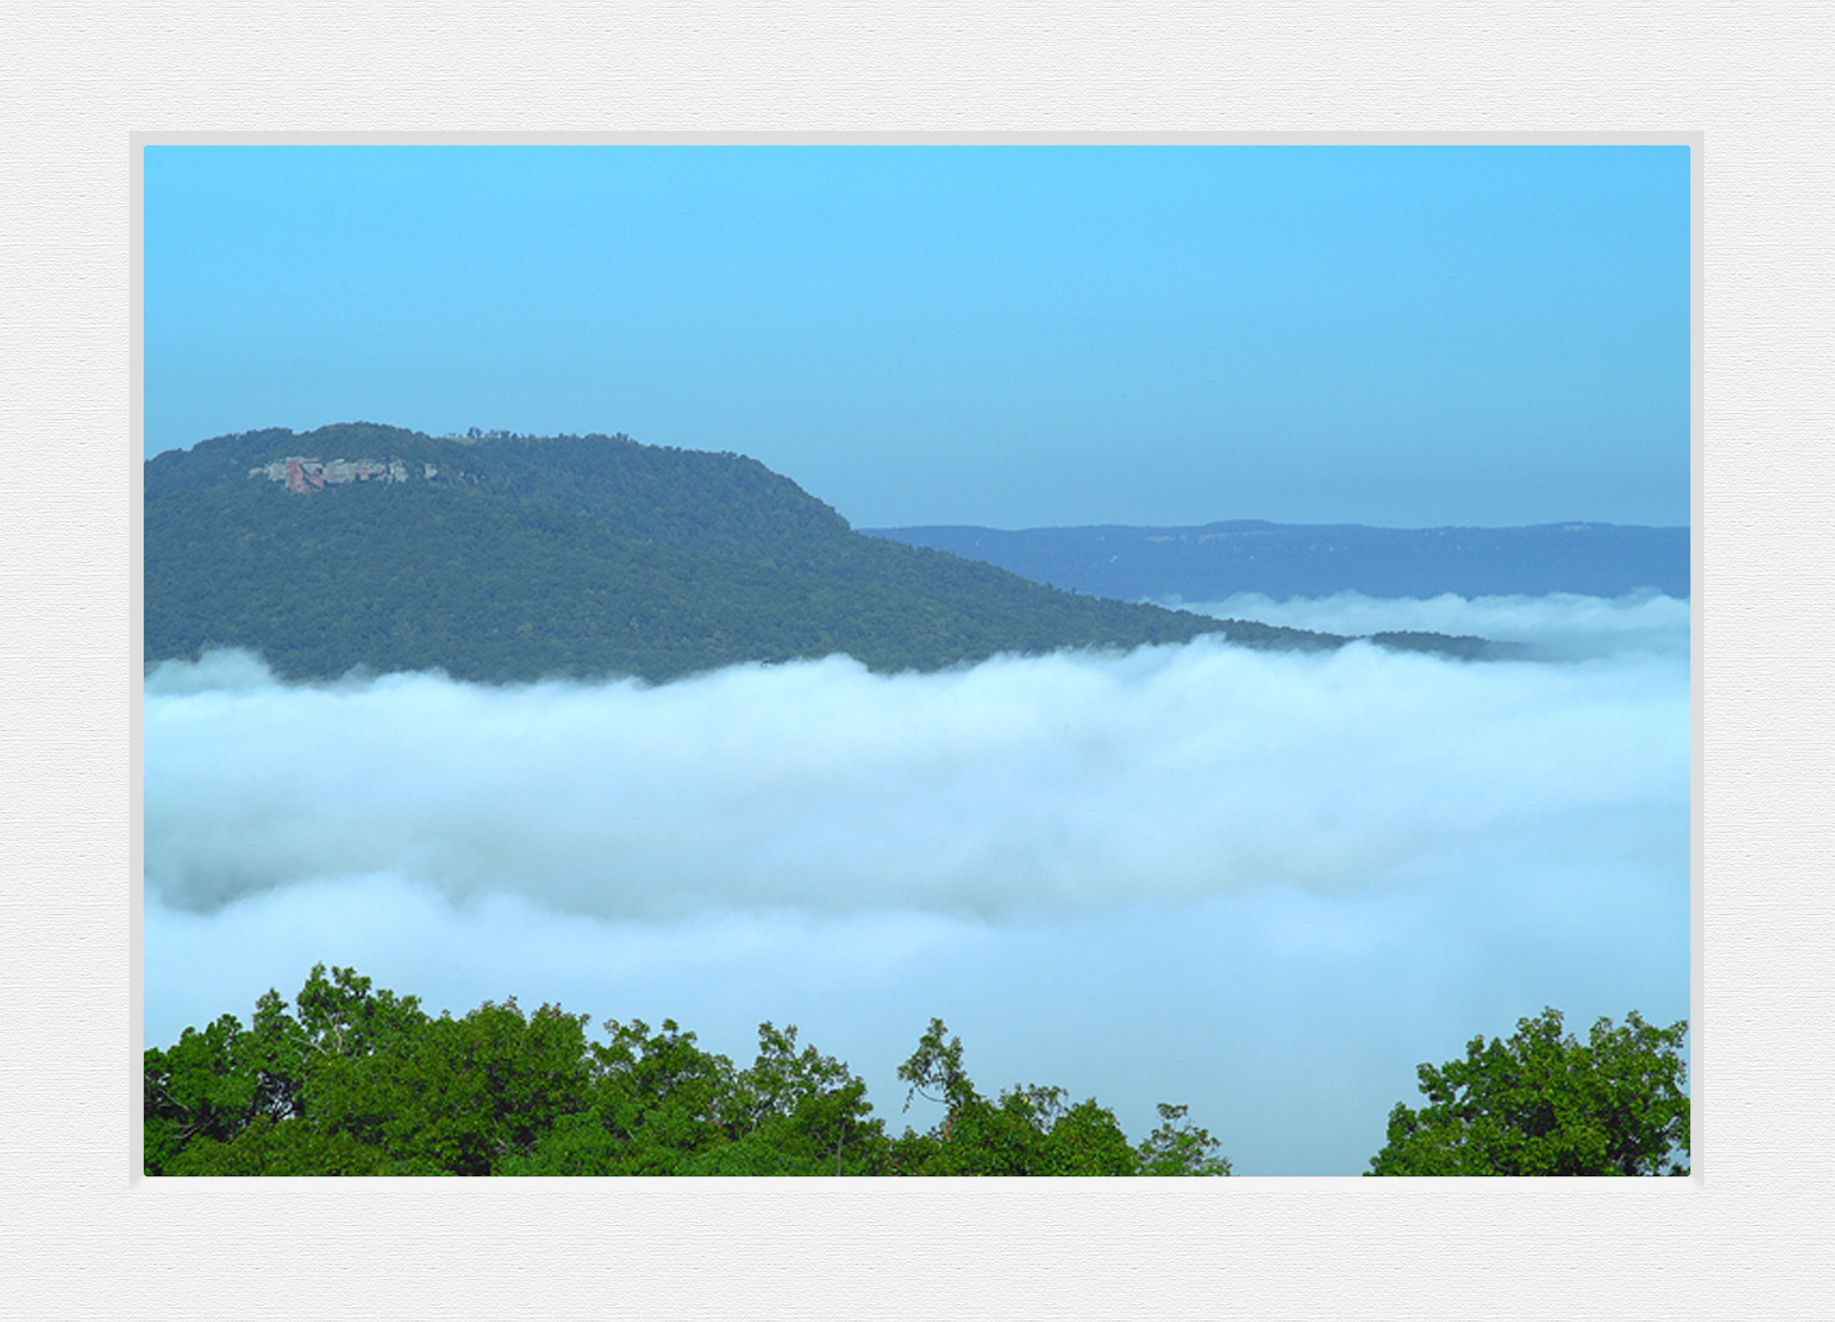
09/19/14 Phase One Photokina 2014–Summary of Announcements
As the big show starts to wind down, I though it would be good write about what Phase One considered to be significant announcements during the Photokina Photo Expo, current being held in Germany.

- Phase One Corporation

You can list out the major announcements here:
- The new IQ150
- Capture 1 version 8
- Enhanced trade in for P65+ backs (an additional 6K)
- Phase One & Alpa Strategic Alliance
- Major Change in the Value Add Warranty for IQ2 Digital Backs Value add only now, no classic 1 year.
What was not announced was a new medium format camera body, one to replace the aging Phase One DF+. Many photographers felt that Phase One would at least talk about the progress on this. The DF+ body is a good solid body, but at a list price of approximately 5K, it’s a bit overpriced for the feature set that it contains. From reading between the lines, I feel that the new camera body is something that will made by Sony and when it does come out, will be revolutionary. Many are looking for mirror-less, but I don’t see that, but possibly the first Medium Format body with an EVF would be something to talk about. But for now that’s all speculation. Lets look at what was announced.
1. The New IQ150
Not too much to talk about here, expect it appears that Phase One is a bit concerned about the Pentax 645z and Hasselblad 50c. Both of these solutions list for much less than the Phase One IQ250 (at around 34K US). The new IQ150 is the same chip, same case as the IQ250, but no WiFi. It appears to have all the other features like focus mask, built in level, high end LCD touch, etc. However looking on the Phase One site, it’s really hard to tell. The IQ150 ships with a 1 year warranty, that also appears to be non value add and the IQ150 lists for $29.990, lets say 30K. So all Phase One did, is take off WiFi, lower the price by 4 K, but if you purchase the IQ150 and add the 4K value add, (which is what the cost has been in the past), you are right back to the base price of the IWQ250. It’s also not clear if you can purchase a value add warranty for the IQ150. You would have to talk to your dealer on that. It will also be interesting to see how the new “lower” priced model has any effect of the Hasselblad 50c or Pentax 645z cameras, both of which are less expensive.
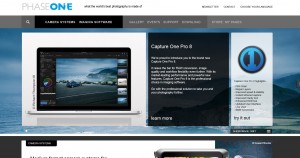
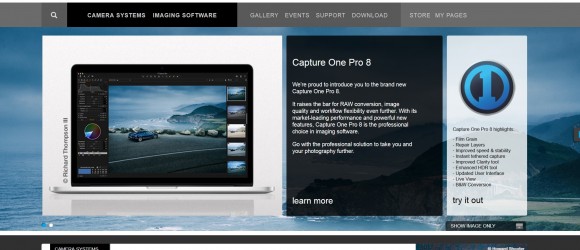
2. Capture One Vr 8.
Everything good here. Phase One has taken an already excellent software to a new level. They added a lot of new features and re-worked the processing engine. If you are a current user of Capture One Vr7, the upgrade is still 99.00. If you are new to Capture One, you can opt for a monthly subscription service or wait until Phase One sees the need to sell the base licenses for $150.00 as they recently did for Vr7. Hope if you recently purchased Vr7 you are able to get a grace period to move to vr8 as it’s a much better software. The advances that Phase One made to the Local Adjustment layers alone to me are worth the cost to upgrade. You can still download the software for a 60 day trial. I believe there is also a pro version if you want to just use the software with a Phase One Digital back, which in the past has been free. Capture One Digital Back, not Pro. Pro allows you work with other camera platforms like Nikon, Canon, and Sony.
3. Enhanced trade in for P65+ upgrades to IQ280
If you are looking for a upgrade, this is great deal. Currently it appears that the trade in is 21K for a used P65+, and now you can add an extra 6K to that, so 27K. That is a great offer if you are looking to upgrade. This would bring the cost of the IQ280 to about 25K or so. You would still have to add in the cost of the Value Add Warranty. Phase One is now claiming that the value add warranty is cheaper than before. so that is also a good thing. In the past I have been quoted between 4.5K and 4K for various Value Add Warranties from Phase One, back dependent.
4. Phase One and Alpa Strategic Alliance
From 50 thousand feet, Phase One has decided to partner with Alpa Camera. Alpa, based in Switzerland, is one of 3 major players in the technical camera (pancake) market. It’s safe to assume that soon there will be a Phase One branded tech camera made by Alpa on the market. Not sure yet what this means for the rest of the tech world, namely Cambo and Arca, but this move by Phase One may have them looking to partner with Hasselblad. It will be interesting to see how this plays out in the future. I do hope that any improvements to the LCC processing that Phase One develops with Alpa can be passed down to users of non Alpa tech cameras, like myself.
5. Major Change in the Value Add Warranty for IQ2 back.
From what I have been able to pick up from the dealer community in the US, if you purchase a IQ2 back, (250,260 260 achromatic, 280), the value add warranty is now included in the purchase price. THIS IS BIG DEAL, as before a value add warranty was always an additional purchase feature, in the range of 4 to 5K. The value add warranty includes the use of a loaner back while your back in for repair. The photographer is still responsible to pay for the shipping of their back to Phase One.
If you purchase a IQ140, 150, 160 or 180, the 1 year classic warranty is still included with the purchase price. I assume that you can purchase a 5 year value add if you prefer. However if you are looking at either an upgrade from an older back or purchase of a new IQ back, the purchase of the IQ2 should be a better alternative. Kudo’s to Phase One for changing this policy.
Arca FP (Focal Plane Shutter) Facts and costs overall a bit disappointing

Yesterday, I was very excited by Arca’s announcement of the new FP (Focal Plane Shutter). I knew that this device was in the works well over 10 months but had been asked to keep all mention of it off the web. Arca is a small company based in France, with basically no website, so getting information about current and future products can be very difficult. The FP was the one single item that Arca was working on that really had my excitement and interest. The main reason being:
- It was going to “fit” into the current r cameras rm3di or rm3dl in a modular fashion
- All existing lenses with R mounts would work
- Price point was going to be around $1,800.00 for the shutter and all electronics needed to run it.
- Focal plane shutter would allow shutter settings of 1/3, 1/2 and 1/10 of a stop.
With the actual announcement, unfortunately, a few of these previous statements did not come true.
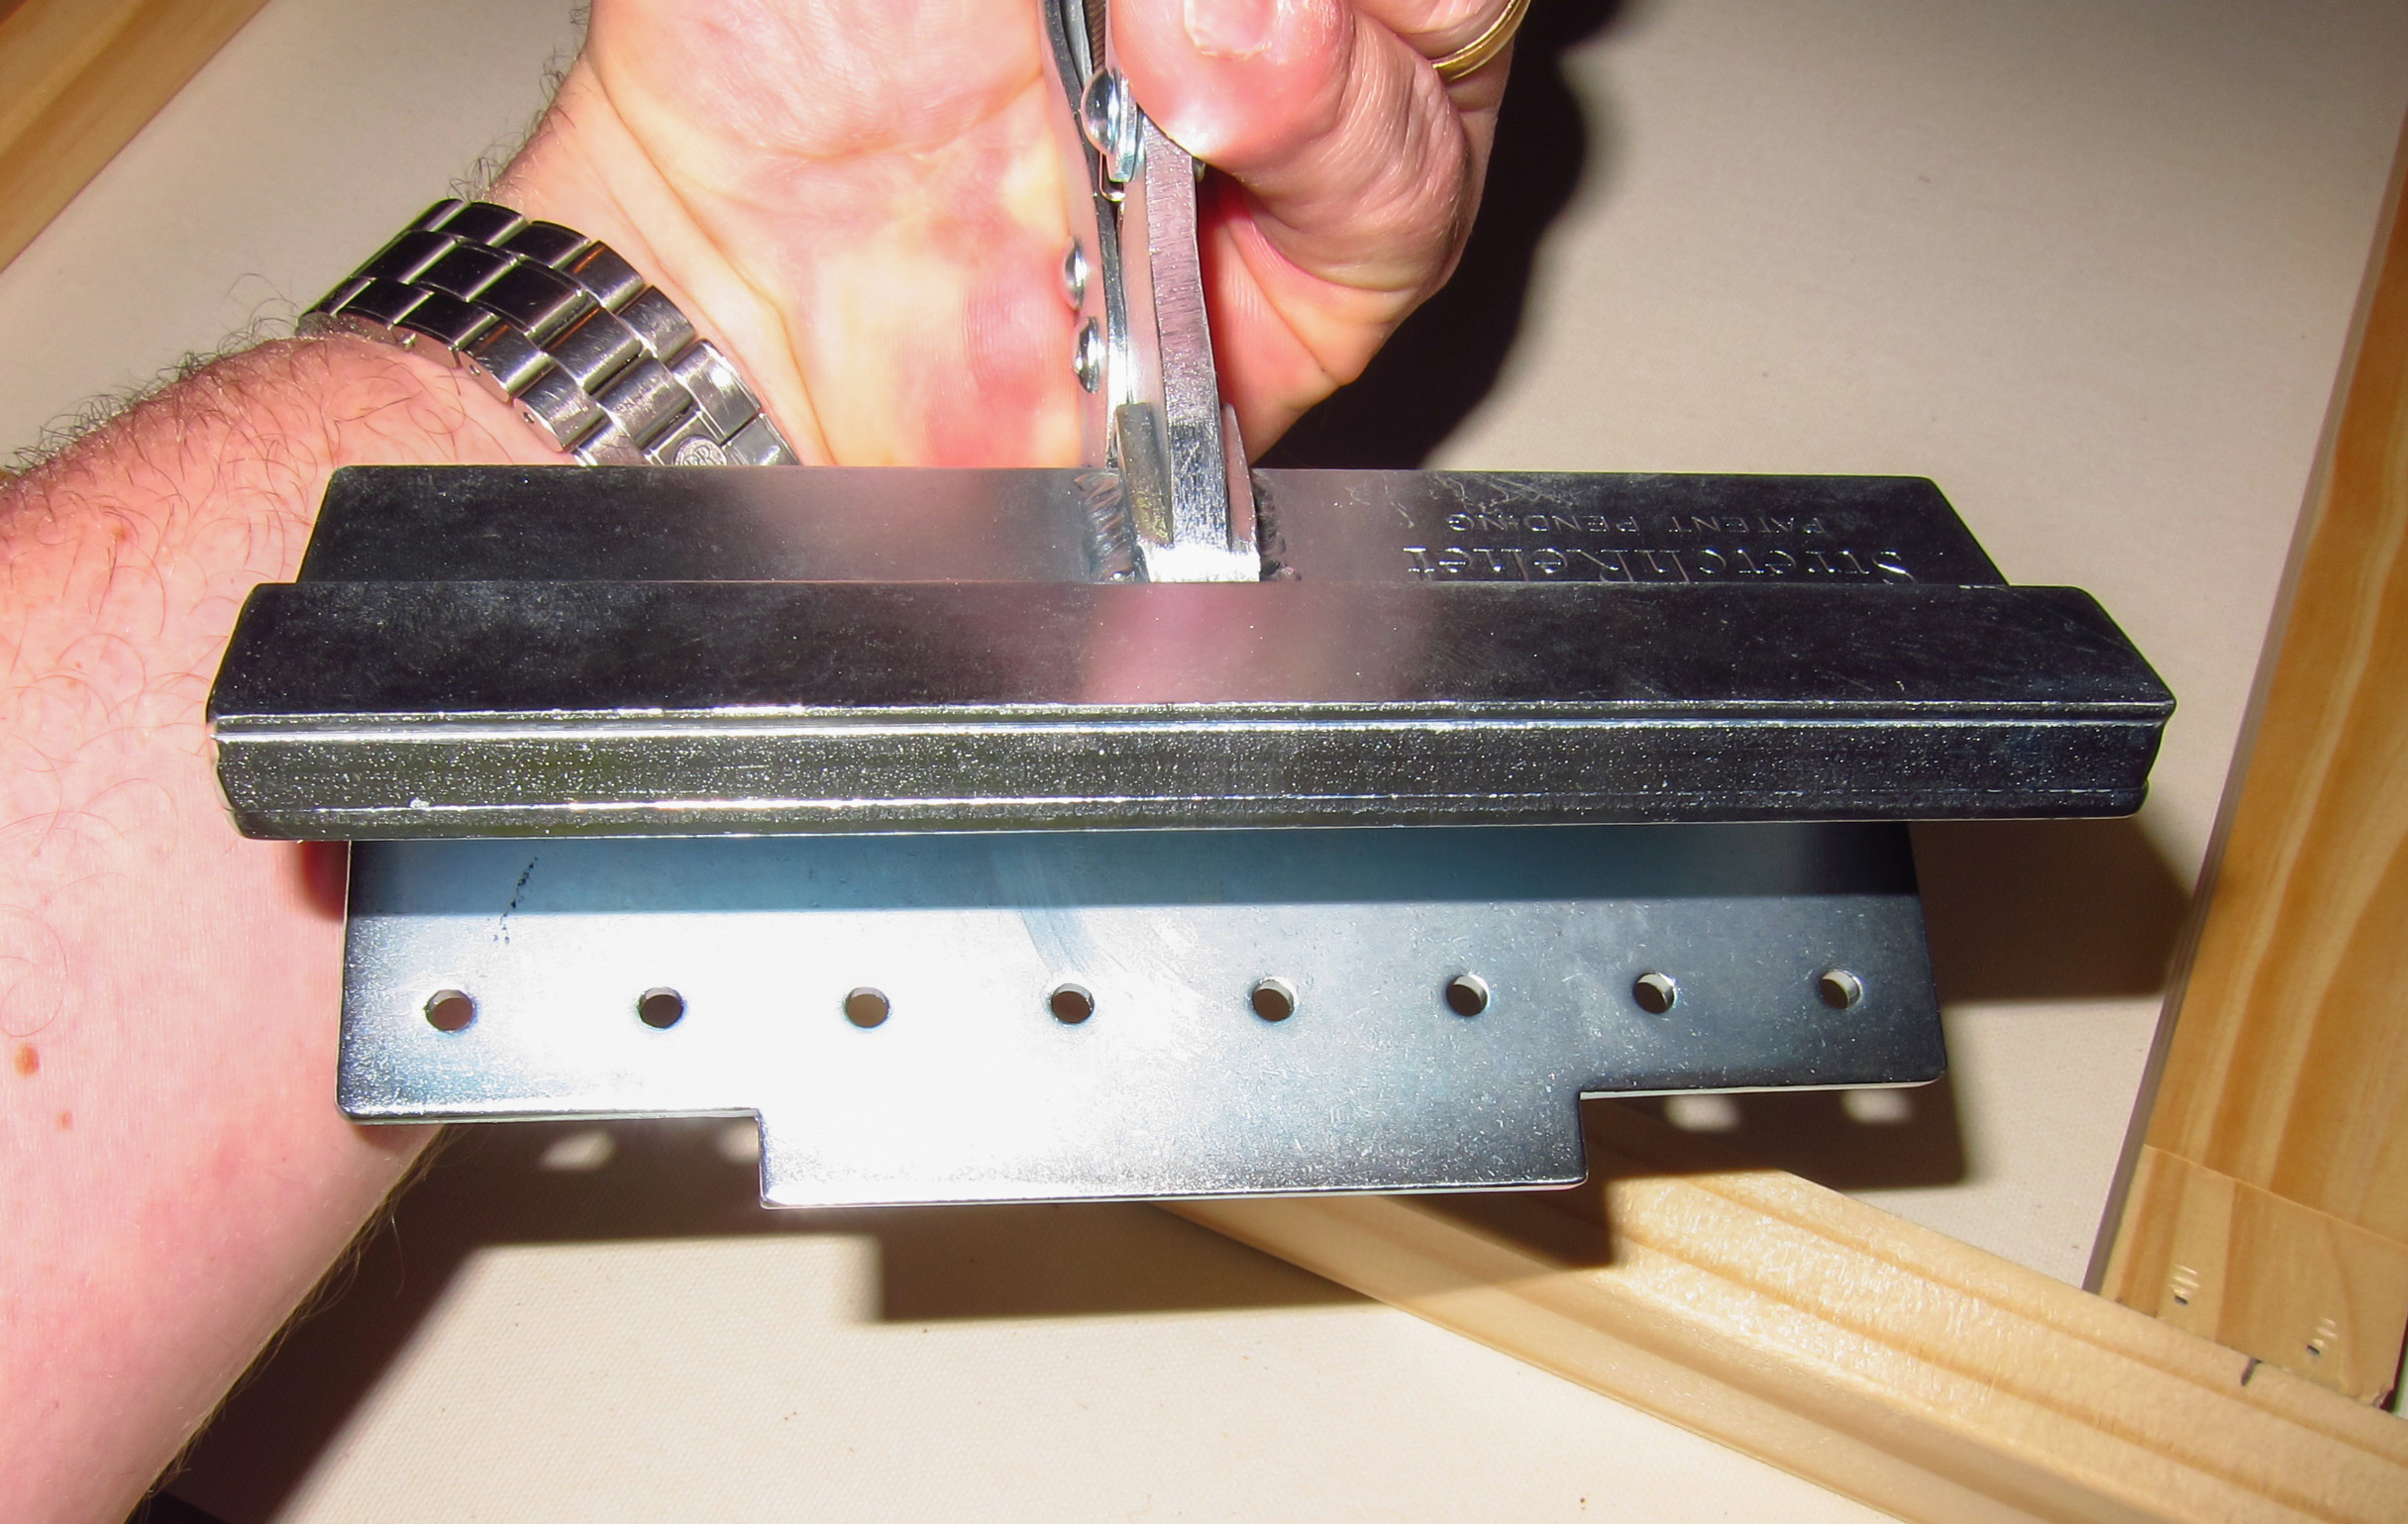
The FP is a real item, and it will be a modular attachment to the current R series cameras, see my previous post for more information. Here is a picture of the FP
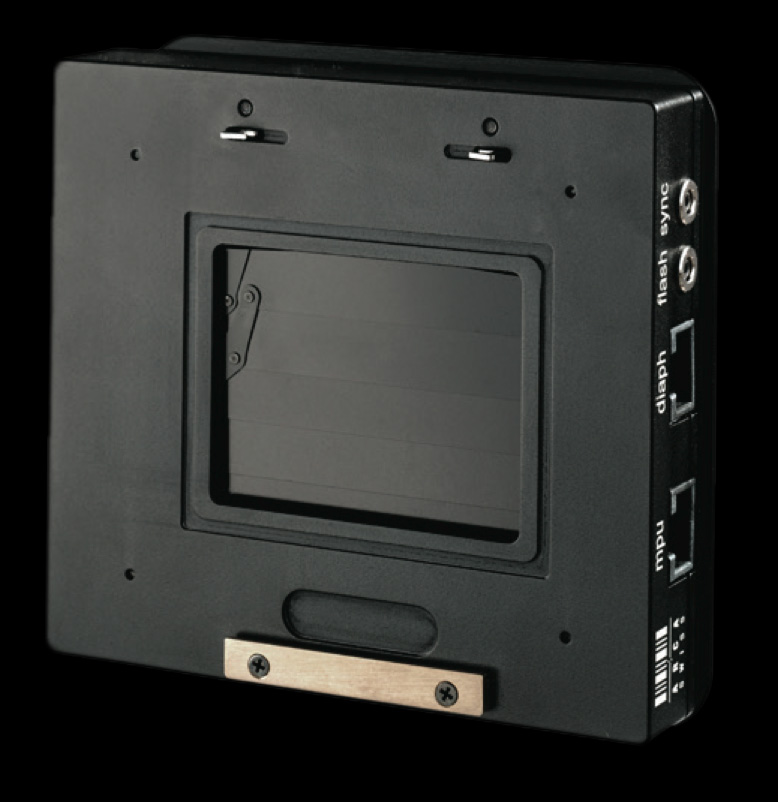
- New Arca Swiss Focal Plane Shutter for R series Cameras

Knowing the Arca does excellent design and that they make very good products in regards to quality, I have no doubt that this FPS will work as designed. However it also seems that there will a limit as to how wide a lens can be used with it. There are some pretty important issues to consider.
I. The lenses that can be used will need a new modified lens tube installed. The lens tube is the first ring of the R mount, and you can clearly see it in this photo.
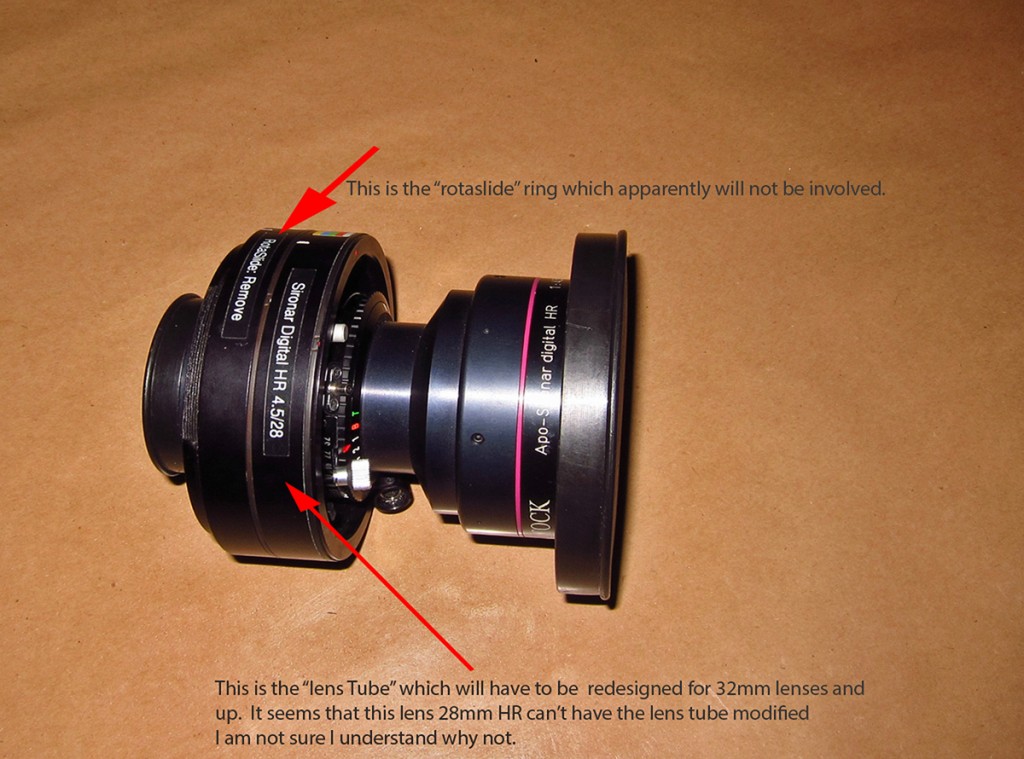
- Rodenstock 28mm HR in Arca R mount
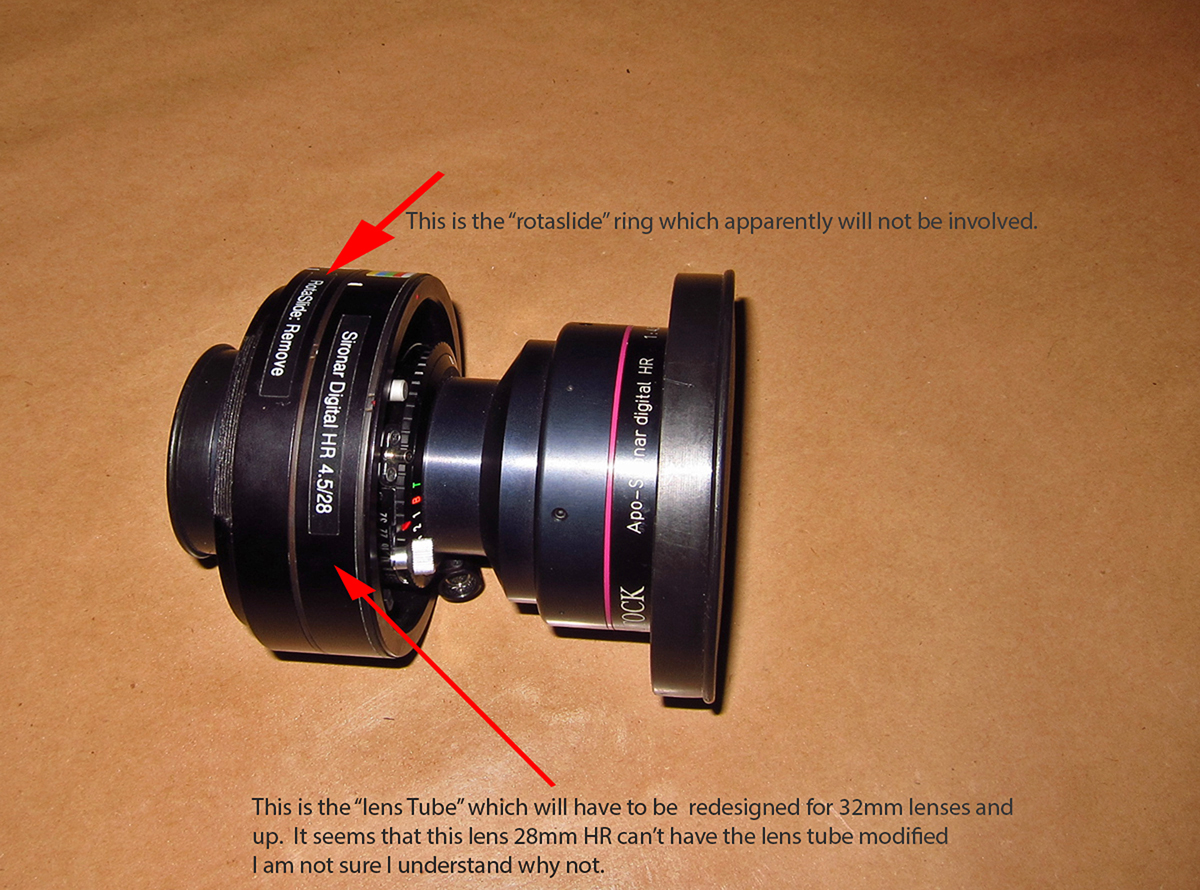
The first ring, closest to the lens, with the name Sironar Digital HR on it, is the lens tube that will have to be modified. Modified is not a good word as basically you will replace it with a new one. The lens will have to be measured, the measurements sent to Arca, and they will make a new ring. I guess in the future with Arca, if you were to purchase a new lens, they might ship both rings. OK, now lets add up the cost. The rings are $495.00 each. So if you are going to work with say 5 lenses, you will need to spend an additional $2,500.00 just to be able to use the new shutter. I find this the most unappealing part of the deal, as Arca should consider giving a credit for the current ring, however I guess it makes sense to keep the old ring, to revert back to if the FP has a failure. Plus you need to either drive your lens to an Arca representative or ship them and to ship and insure 10K of glass, I figure that will add about $250.00 to the cost.
II. The shutter is going to be controlled via a wifi attached controller.
The dEx controller. I have to assume that this is not “part” of the shutter so it’s safe to say add another $1,200.00 to the total cost. Plus it’s wifi controlled. This is a new technology to implement, so I hope it’s well thought out. If the wifi connection fails or disconnects in the field, it appears you will not be able to fire the shutter. This means you would have to removed the shutter from the R camera and the new modified lens tube, then reinstall the original lens tube.
Looks like the cost of the FP will also be a bit more than I had anticipated. Here is an estimated breakout of the cost for using the shutter with 5 lenses. This is based on pricing that was released late on the 18th of September 2014. Pricing is much higher than I expected. This easily approaches the cost of the Alpa FPS. So competitive advantage based on pricing appears to have possibly gone out the window. I was also hoping that the lens tube replacement would stay at $350.00, not $490.00. More information needs to be out on that soon.
- Cost of Shutter…………………………………………………………$2,940.00
- Cost of 5 lens tubes………………………………………………$2,500.00
- Cost of mpu for shutter……………………………………….$1,400.00
- Cost of wireless controller for shutter………….$1,200.00
- Total cost for FP shutter……………………………………..$8,040.00
One other thought, as it appears that the dEx controller will be making a wifi connection, but to what? I can’t see the controller depending on a digital back’s wifi (mainly because right now so few of them have it). So what is the wifi all about. Do you wifi to the controller with say a iPhone, to make the settings i.e. change shutter speed (that would be about all you could change on a shutter)? If so, again, I have to wonder about that, as it makes you very dependent on the battery life of your phone and the battery life of the dEx. To me it would be so much more efficient to have a hard connection to a device that can set the shutter. It would become serendipitous to carry both lens tubes on any trip so if the shutter fails or can’t make a connection, you could re-install the old lens tube, pull out the shutter and shoot with the copol shutter already in the lens. This would of course only apply to lenses that already had the copol shutter installed. I wonder if Arca will still sell new lenses with copols.
Even with the extra costs, I believe overall this is a good investment long term for a R camera user, and once a Phase One back comes out with Live View that is full frame and works with movements with minimal crosstalk effects (which create color saturation loss on shifts), the photographer in the field will have quite a system.
08/20/14 Featured Arkansas Photography–Bliss

Bliss on the bed
Taken with a Fuji X-T1, 14mm lens @ F4, iso 400. Not too much to say on this one, I wanted to test out the new 14mm lens I had picked up for my Fuji X-T1 and my dog scout was totally engrossed in the testing as you can tell. Dogs can make life seem waay too complicated.
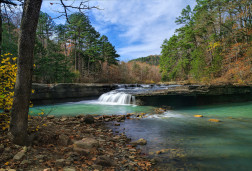
08/11/14 Featured Arkansas Photography–October day on Richland Creek

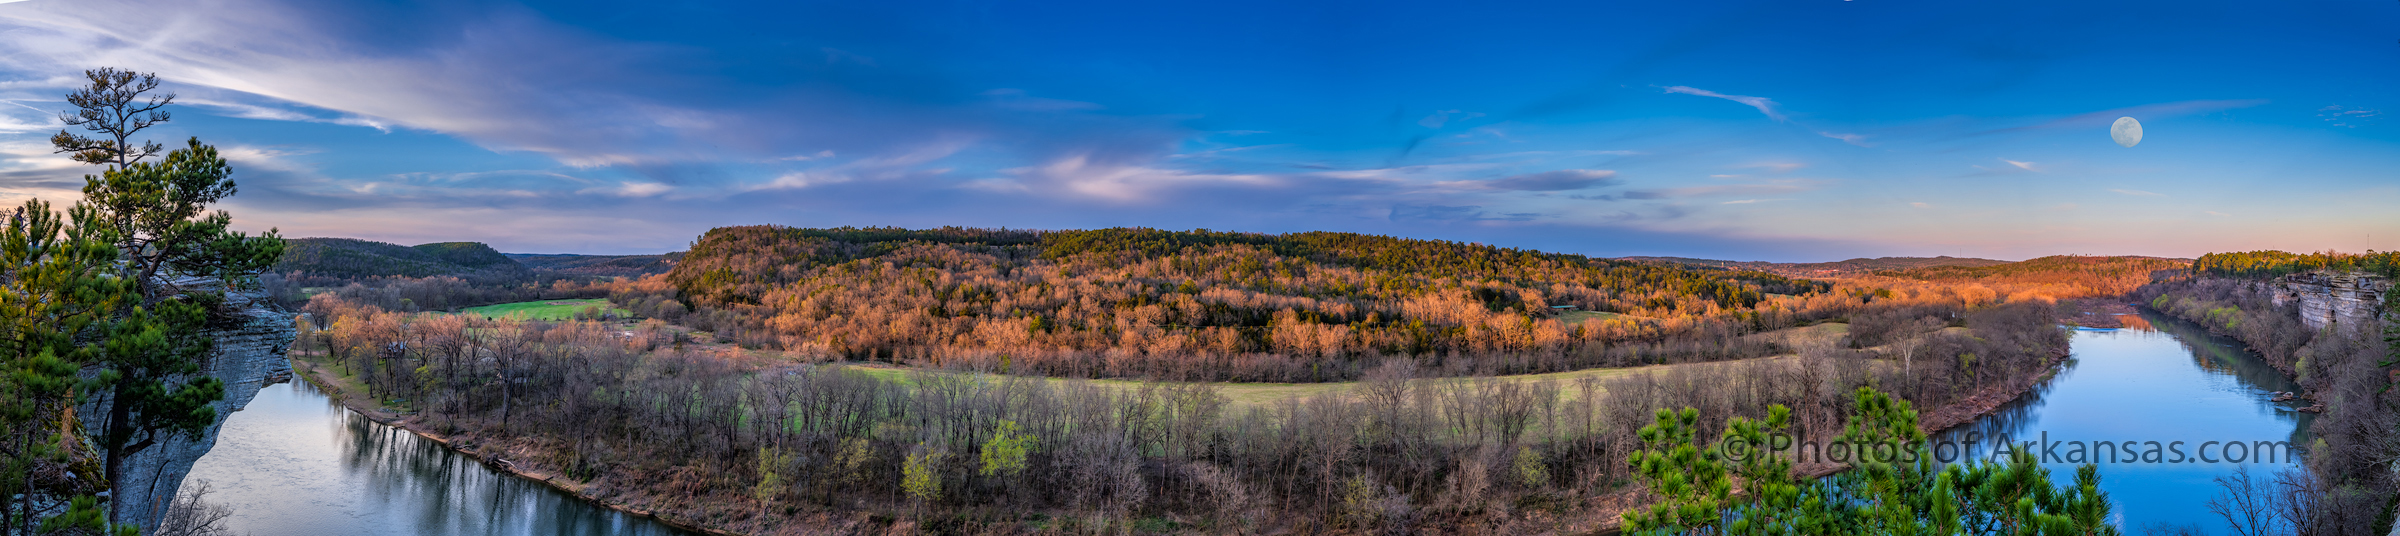
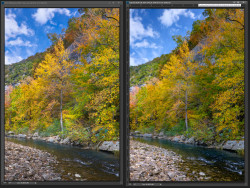
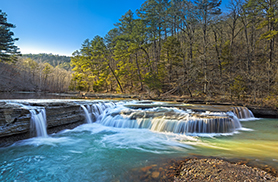
October morning on Richland Creek–click on photograph for a larger image
Taken with a Phase One IQ160, Arca rm3di and Schneider 35XL lens, F11 for 1 second, Image created by shifting the back for 3 separate images and then stitched together in post processing. Both a polarizer and neutral density filter were used. Richland Creek, which heads up in western Newton County, then runs eastward before running into the Buffalo River, is one of the most unique spots in Arkansas. The creek has hundreds of photogenic spots but the best photography will be from the forest service campground, upstream for the next 5 miles. Don’t just stop at Richland falls, which is a creek wide waterfall, but instead hike up stream for at least 2 more miles as some of the best spots are in this stretch. This photograph was taken in October of 2012, after a good rain had fallen a few days before. Richland is usually very low in the fall and when you can catch a clear day with good water it’s a rare but special day. The creek is lined with hardwoods, that produce some amazing displays of color, and most years, they don’t disappoint. Even if the water level is low, there should be some larger pools that will offer great reflections which won’t be there in the higher water times. On this day, I had the best color display I have seen in years on Richland, the only tree that had already dropped it’s leaves was the large sweet gum on the upper right of the the photo. In the fall, the water tends to be clear so you can see down to the bottom in even 4 to 5 feet of water.
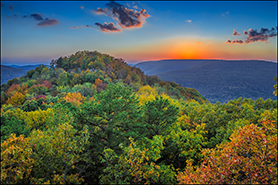
08/06/14 Featured Arkansas Photography–Autumn afternoon on Richland Creek

Richland Creek in Autumn above the campground
Taken with a Nikon D800e, Nikkor 24mm 1.4 lens at F 5.0, for a 5 second total exposure. The autumn in Arkansas can be one of the most beautiful times to be out photographing the state. The Ozark mountains are cut by thousands of small creeks and hundreds of larger ones like Richland. Richland however is by far one of the most scenic creeks in the state. It is the 3rd largest tributary of the Buffalo National River, after the Little Buffalo River, and it has 6 miles of sheer wonder to hike. The best times to hike this creek are the early spring and early fall. The color display along the creek can offer some of the most variety in the state as you can expect to see hickory, oak, maple, gum and dogwood with hundreds of lessor species of tree. If the creek has water in the fall, it just adds to the overall great effect. On this day in 2012, there had been a heavy rain about days before so I only caught the later half of the water, but it still had a lot to offer. This rapid is called Maytag is the last major drop on Richland before the campground. The large rock on the upper right of the photo is “maytag”. The color along the creek on this day was more green and yellow but there were a few dogwoods starting to show up. I love it when I can catch a small whirlpool eddy which is showing up on the lower left of this shot.
07/08/13 Power Management and WiFi issues on Surface Pro 3–A way to get a more consistent Wifi Connection
With their release of the new Surface Pro 3, Microsoft has definitely created a winner. This new form factor with a larger LCD, and thinner form factor will be turning a lot of heads. However there seems to be one glitch, WiFi drops. I have had my Surface Pro 3 now for about 2 weeks and during the first week, I was driven crazy with the WiFi, constantly dropping, reacquiring and dropping the connection. It happened enough that I was considering returning the unit, thinking that the WiFi on the system was defective. I also own the Surface Pro 2 and the WiFi on it has been rock solid from day 1. When I checked the WiFi driver for the Surface Pro 3 (S-Pro3) I noticed it was also the Marvell driver, so it’s safe to assume it’s pretty much the same WiFi that is on the Surface Pro 2 (S-Pro2). Net, I didn’t think it was a driver issue.
Microsoft did release a large driver/firmware update on 06/14/14, and my unit was running the 05/27/14 driver/firmware. I went ahead and upgraded that, but it did not really seem to make a difference. Then I learned about Hyper-V
One thing that is different about the S-Pro3 is how Microsoft implemented the Power Management. When you go to Power Management options you will no longer find the “power saver” and “high performance” options. Instead all you will find is the “balanced” option. You also don’t have as many options to fine tune the power management. With the current setup, Microsoft has tried to create a power plan for when the S-Pro3 is running on battery that gives maximum life to the batter, and in doing so, they created a plan that does not give a constant enough power supply to the WiFi, so it momentarily drops thus losing the connection. You can read more about this new power plan design here, Microsoft available power plans.
The key is getting your S-Pro3 to allow all three of the power plans, and do to that, you have to enable Hyper-V.

Power management screen for Surface Pro 3
In this screen shot, you can see I have now enabled all 3 of the power options, which are normally available for all laptop devices. With this done, you can now customize the power options for all 3 plans, especially how much power is given to the WiFi card.
To enable Hyper-V, first go to the main screen of the control panel and select “Programs and Features”, once you have done this you should have a screen that looks like this:

Programs and features Surface Pro 3 main screen
Notice up on the left corner there is a area titled: “Turn Windows features on or off”. Click on this, and you will get this screen:
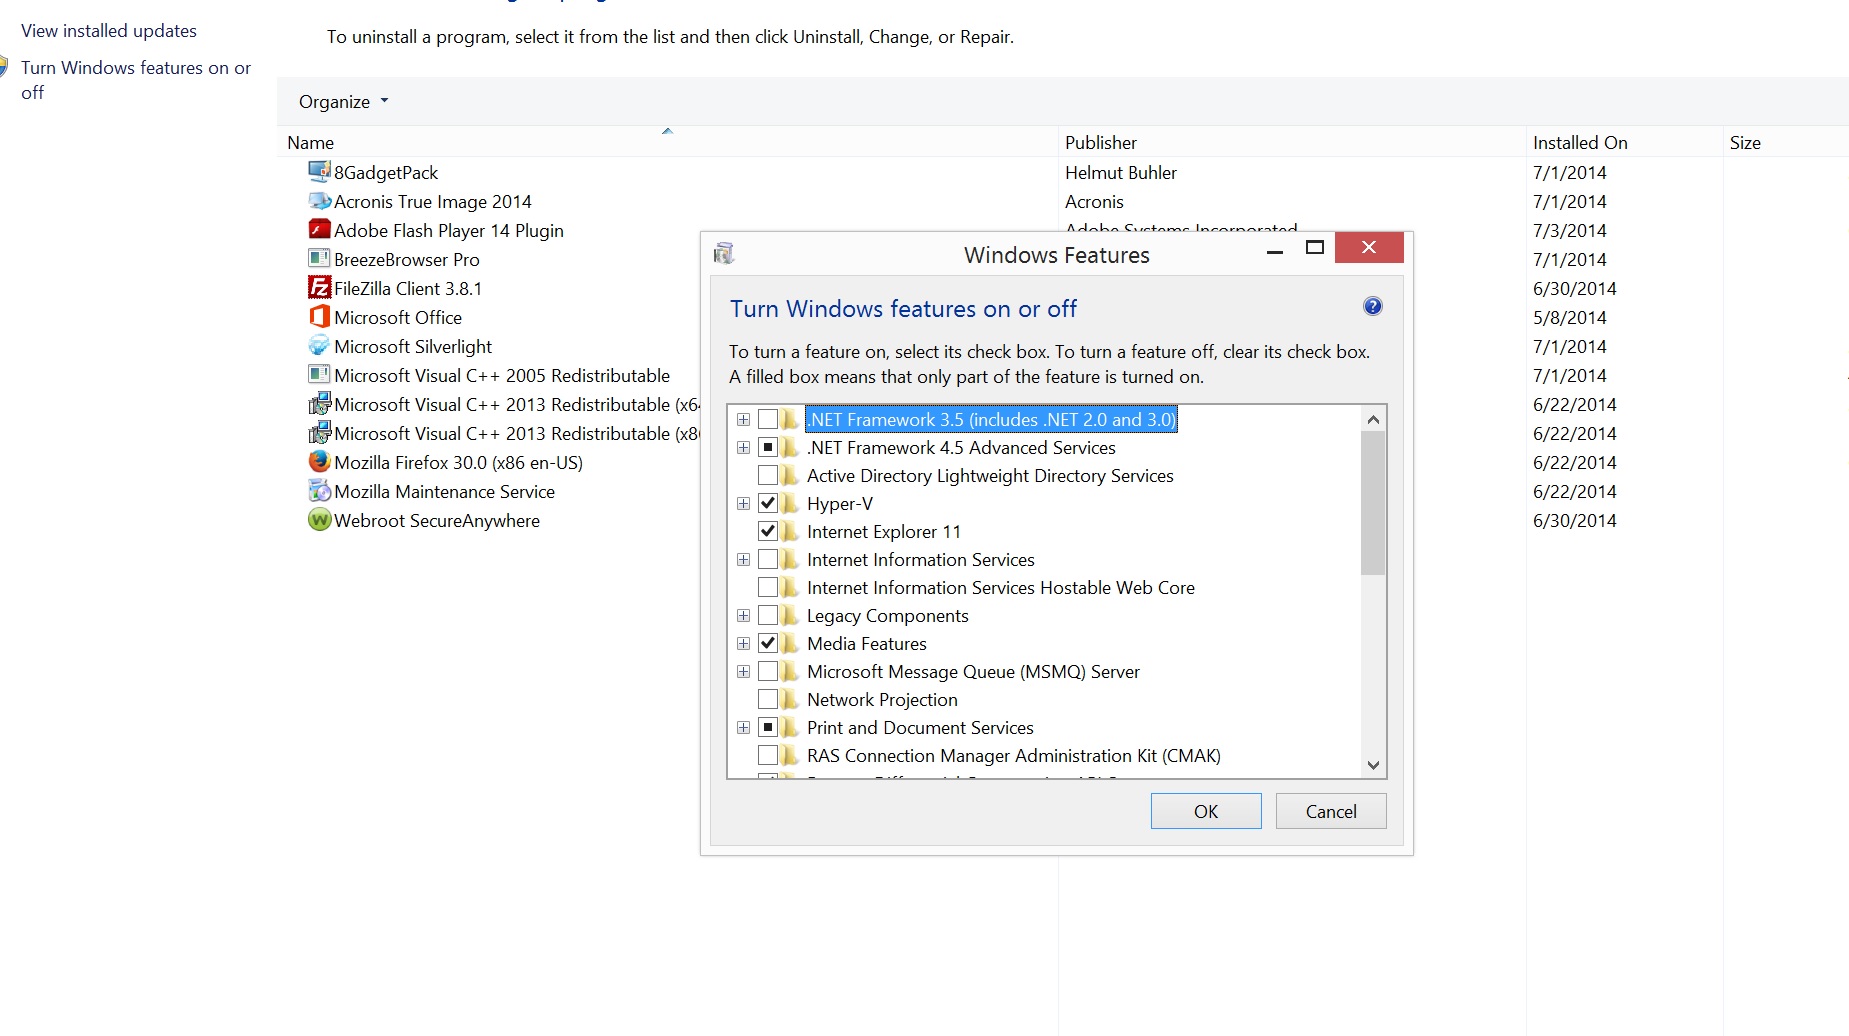
Enabling Hyper-V for Surface Pro 3
On your S-Pro3, Hyper-V should be “unchecked”. To enable it, place a check in the box. You will get a few screens showing that you have enabled Hyper-V, and the S-Pro3 will need to reboot once you enable Hyper-V. Once the S-Pro3 has rebooted, you can find two new entries on the main programs screen of Windows 8.1 as shown in the screen shot below.

Main Screen Window 8.1 showing Hyper-V enabled
Notice there is now an entry for “Hyper V Management Tools and underneath it two items are listed.
Now to fix the issue with the WiFi power, just go back to the main screen of Control Panel and select “Power Options”
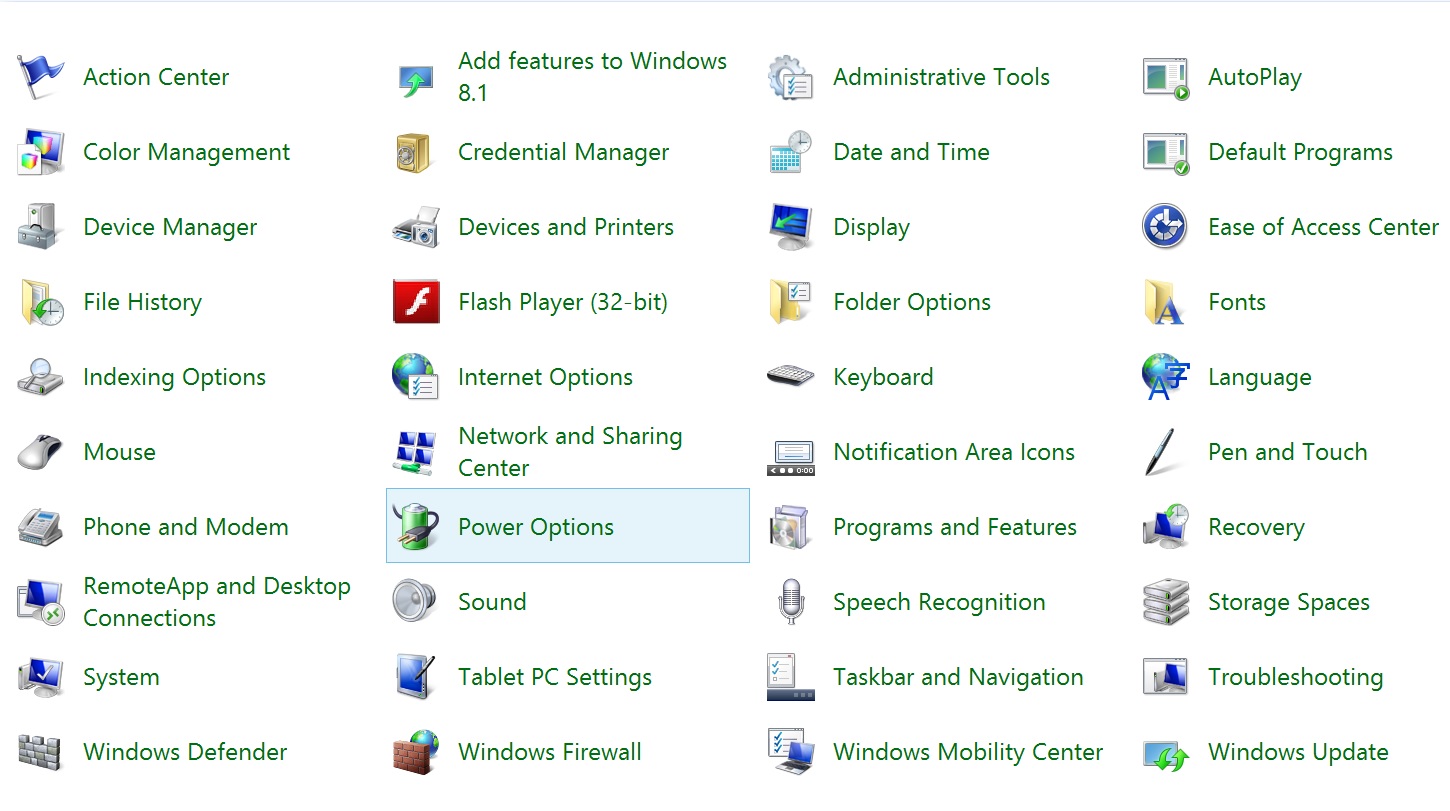
Power Options for Surface Pro 3
Once you select this, you now will see all three power options available, 1. Power saver, 2. Balanced, 3. High Performance.
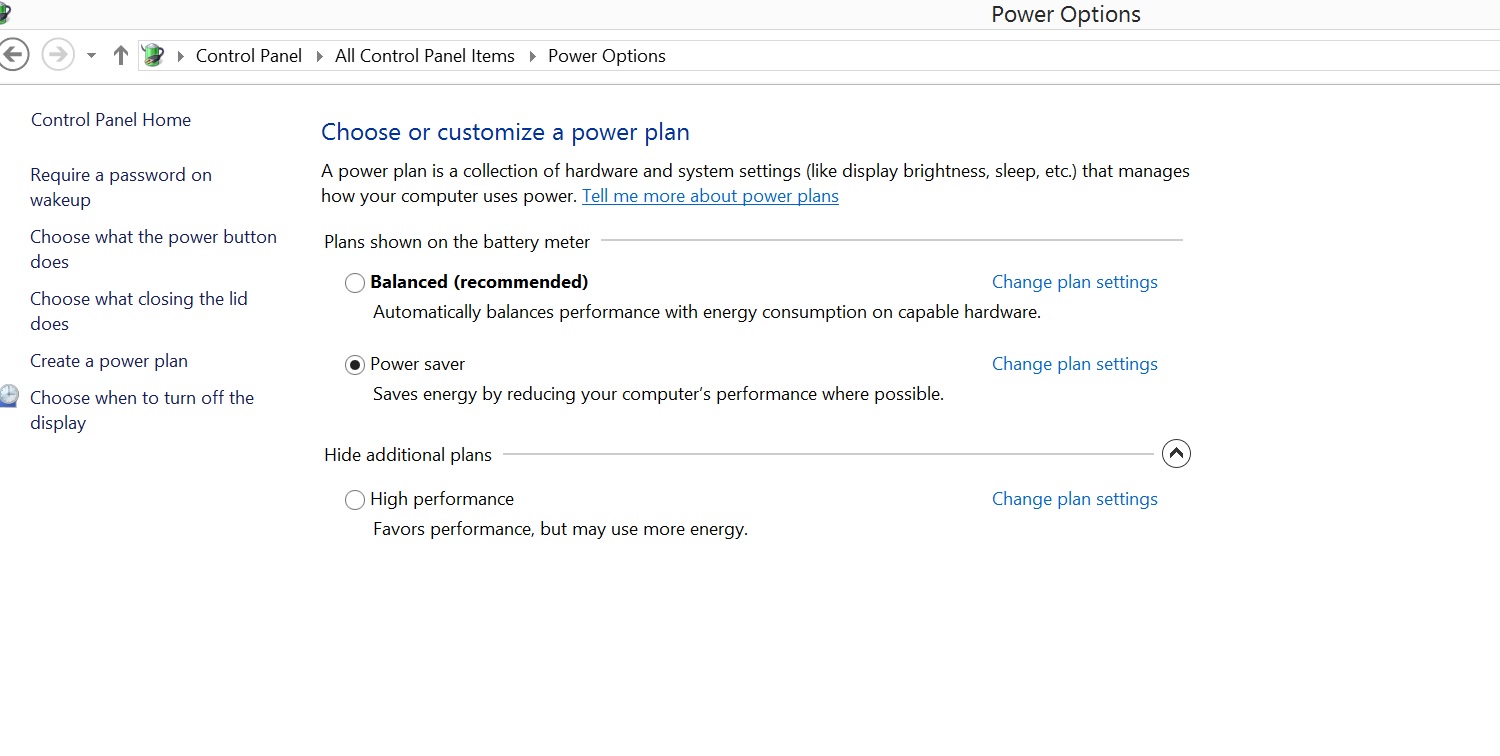
Power Option for Surface Pro3 main screen
Select any of the 3 options by clicking on “Change Plan Settings” to the right of the power option. This will allow you to bring up the screen where you can alter the plan’s settings which should look like this:
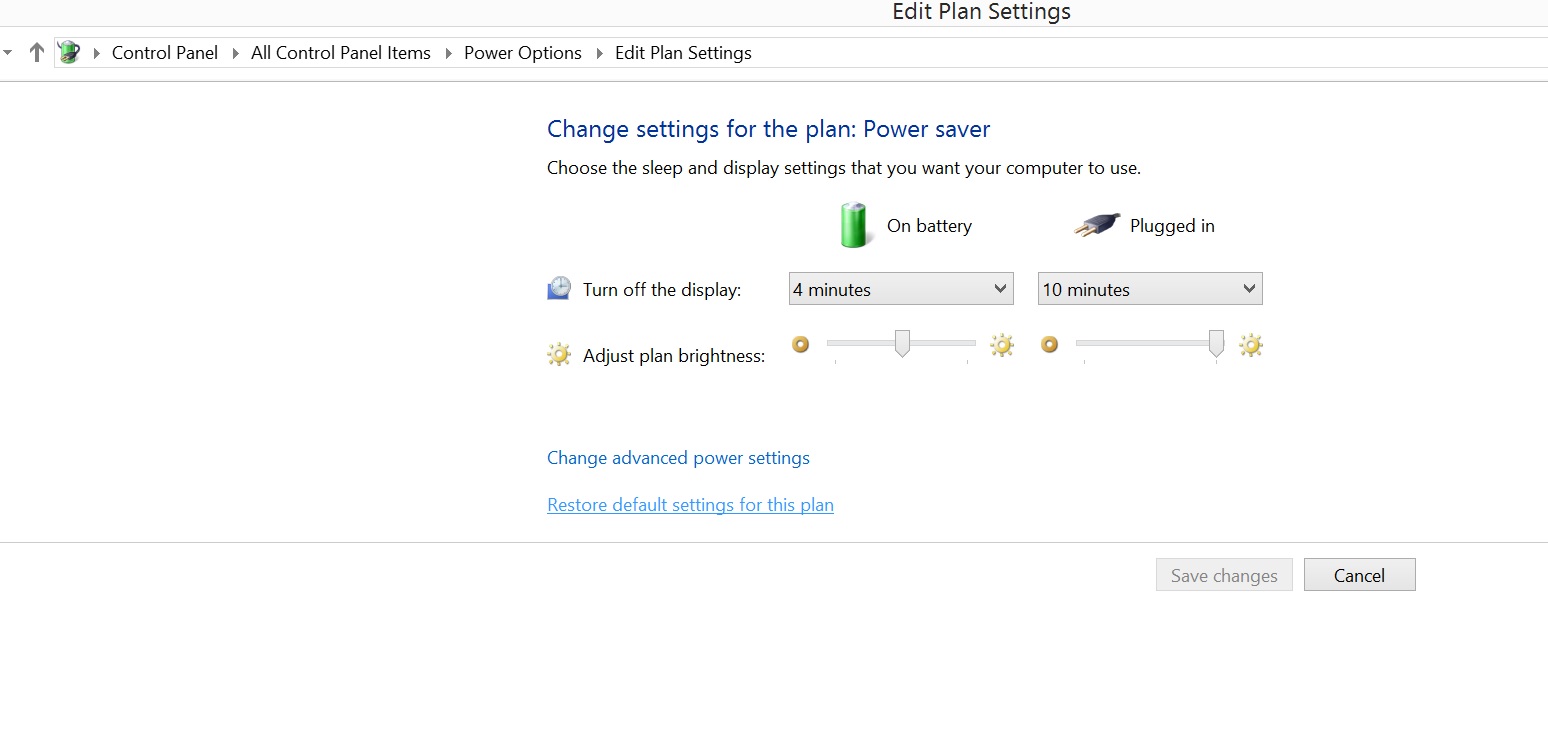
Detail on Suface Pro 3 Power options
Click on “change advanced power settings: and you will see this screen:
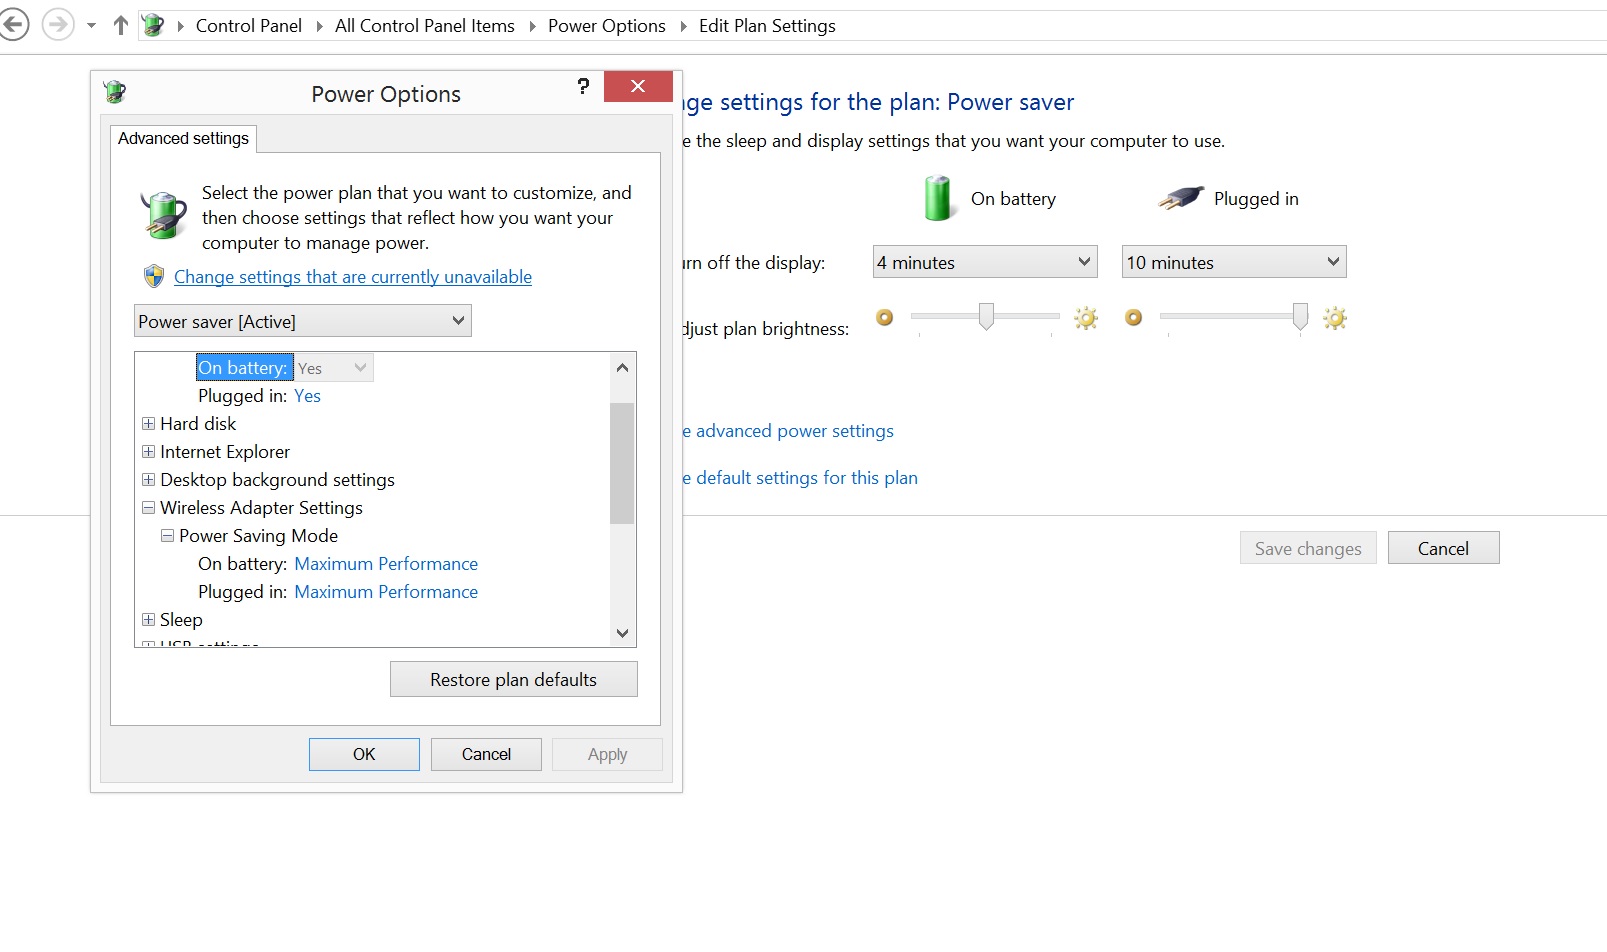
Details on Surface Pro 3 power options
Once you have the smaller screen open, line down until you find the “Wireless Adapter Settings” option, open it and here you now have various options for the amount of power that the WiFi adapter will get, I changed mine to “Maximum Performance”.
Once you do this, your WiFi will no longer drop the connection and the experience of the Surface Pro 3 will be much more enjoyable.
In Summary:
It’s quite clear Microsoft played some games here to attempt to reach the 9 hour battery life claims on the Surface Pro 3. It’s also clear to me that this laptop/tablet did not get tested fully and was rushed to the market, a sign of the times. I believe that Microsoft will attempt a software fix to existing Surface Pro 3 units but more than likely over time they will change out both hardware, firmware and software to tweak this issue. This is unfortunate for the early adopters like myself, since we will never be able to reach the maximum potential of the machine. I understand that hardware and software tweaks will happen in the life of a laptop, but this is a bit overboard to me.
Currently, with Hyper-V enabled, the battery life of my Surface Pro 3 is just about the same as on the Surface Pro 2, around 4 hours of normal use with the screen at 1/2 of total brightness. The Surface Pro 3 has an adaptive brightness feature, that when enabled will not allow the screen to be on Maximum brightness on battery no matter where the screen slider is. Again you have to go back to the Hyper-V settings box and turn the Adaptive brightness OFF.
The fact that Microsoft officially claims that the “only power option for the Surface Pro 3 is the balanced option” is true if you run your machine with Hyper-V off. From what I can tell Hyper-V is unique to Windows 8.1, as I cannot find any such setting under Windows 7 64 bit. With the older Surface Pro 2 you had all three options available, but with HYPER-V OFF. NOTE I WROTE OFF. So something has changed in the layout of the Surface Pro 3.
I have heard rumors that a major update to the power management will happen sometime in the July 15th time frame. I am not sure what this entails, more than likely it might take away the ability to turn on Hyper-V knowing how Microsoft works, so I will pass on that update for a while.
By turning on Hyper-V I have found that the Surface Pro 3 runs much more reliably especially with WiFi connections. It’s pretty clear to me that the “9 hour” battery life is just another marketing ploy and you should not make a purchase decision based on that.
06/30/14 Featured Arkansas Photography–Summertime sunset over Pinnacle Mountain
- At June 30, 2014
- By paul
- In Featured Arkansas Photography
 0
0
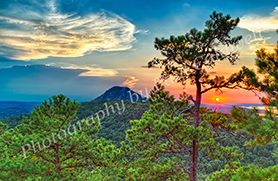

Summertime sunset over Pinnacle Mountain
Taken with a Canon 1D MK IV, Canon 24-70 Lens @F11, iso 250, Multiple exposure technique used to create photo. In the summer months it’s often very easy to catch a late afternoon thunderstorm rolling in behind Pinnacle mountain. On this evening the light had started out with just a bright sun with very few clouds, but as the evening approached, bank of thunderheads rolled in to the left of Pinnacle. The wind seemed to die down quite a bit, so since I was using older Canon equipment with a very limited dynamic range, I went ahead and shot a 4 shot bracketed exposure. I was able to catch the sun just as it was starting to roll down behind the ridge behind Pinnacle. The contrast between the dark thunderhead and the high cirrus clouds was impressive and I stayed around for as long as could before it got too dark.
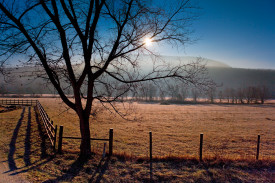
06/18/14 Featured Arkansas Photography–Early springtime sunset at Haw Creek Falls
- At June 18, 2014
- By paul
- In Featured Arkansas Photography
- 0

I was able to catch the setting sun at just the right angle
Taken in 3 parts with a Phase One IQ260 and Rodenstock 40mm lens, Arca rm3di camera with a CL-PL filter. This image will be featured in my up coming show at Cantrell Gallery. I am featuring locations in Arkansas that I am always drawn back to. Haw Creek Falls, is not the tallest waterfall in Arkansas or the most dramatic, however it’s a beauty. Haw Creek runs over a huge ledge that runs back about 100 yards and has created in effect a natural dam. There is pool behind the falls that is a great swimming hole in the summer months. The way the trees lean down to the water just makes for a great photograph. Working a sunset at Haw Creek can be very problematic, most times there will be someone standing on the ledge and you have to time out your shots. Also in the later months of summer the sun will be going down directly over the center of the valley which makes for a much more difficult shot. In this case, mid April, the sun is still over to the far left and on this evening as it set it cast an amazing line of light down the valley of Haw Creek. This effect only lasted about 10 minutes, just enough for me to figure out where to stand to get the best vantage point. On this day, the entire main ledge had water coming over the top which always makes for a great shot. I took this photograph as a series of stitches using an Arca technical camera, the rm3di. As the light was already at a low angle, I did not need a neutral density filter, just a polarizer to help cut the glare off the water. I was blessed this evening as there was almost no wind blowing which made for a very detailed shot.
06/13/14 Featured Arkansas Photography–Sunset and Distant Thunderstorm at Sam’s Throne
- At June 13, 2014
- By paul
- In Featured Arkansas Photography
- 1


Taken with a Fuji X-E1 18-55 lens @ 18mm and F11 iso 200, image taken in 3 vertical series and converted into 1 horizontal image. I can never get enough of the vista from Sam’s Throne in Searcy County, Arkansas. This spot is surround by red/yellow sandstone bluffs that really will catch the setting sun. In this view, the sun had already dropped below the hills in the distance, however there was still plenty of light available. This day had started out with a cloudy and overcast sky, which as the day wore on, started to open up. By sundown only one large storm was still visible way off in the distance and the light hitting it really made the thunderheads pop. One of the most beautiful things about Sam’s Throne is the way the hills overlap off into the distance. This is the valley of Big Creek which is one of the largest tributaries of the Buffalo National River. The bluffs around Sam’s Throne are a favorite for rock climbers in the state. It’s a great place to spend the day. I took this shot my my camera in the vertical orientation in 3 segments, and then stitched them into 1 image that is in the landscape orientation. This allowed me to have much greater overall resolution.
03/15/14 Featured Arkansas Photography–Moonset over Downtown Little Rock between the bridges
- At March 15, 2014
- By paul
- In Featured Arkansas Photography
- 0

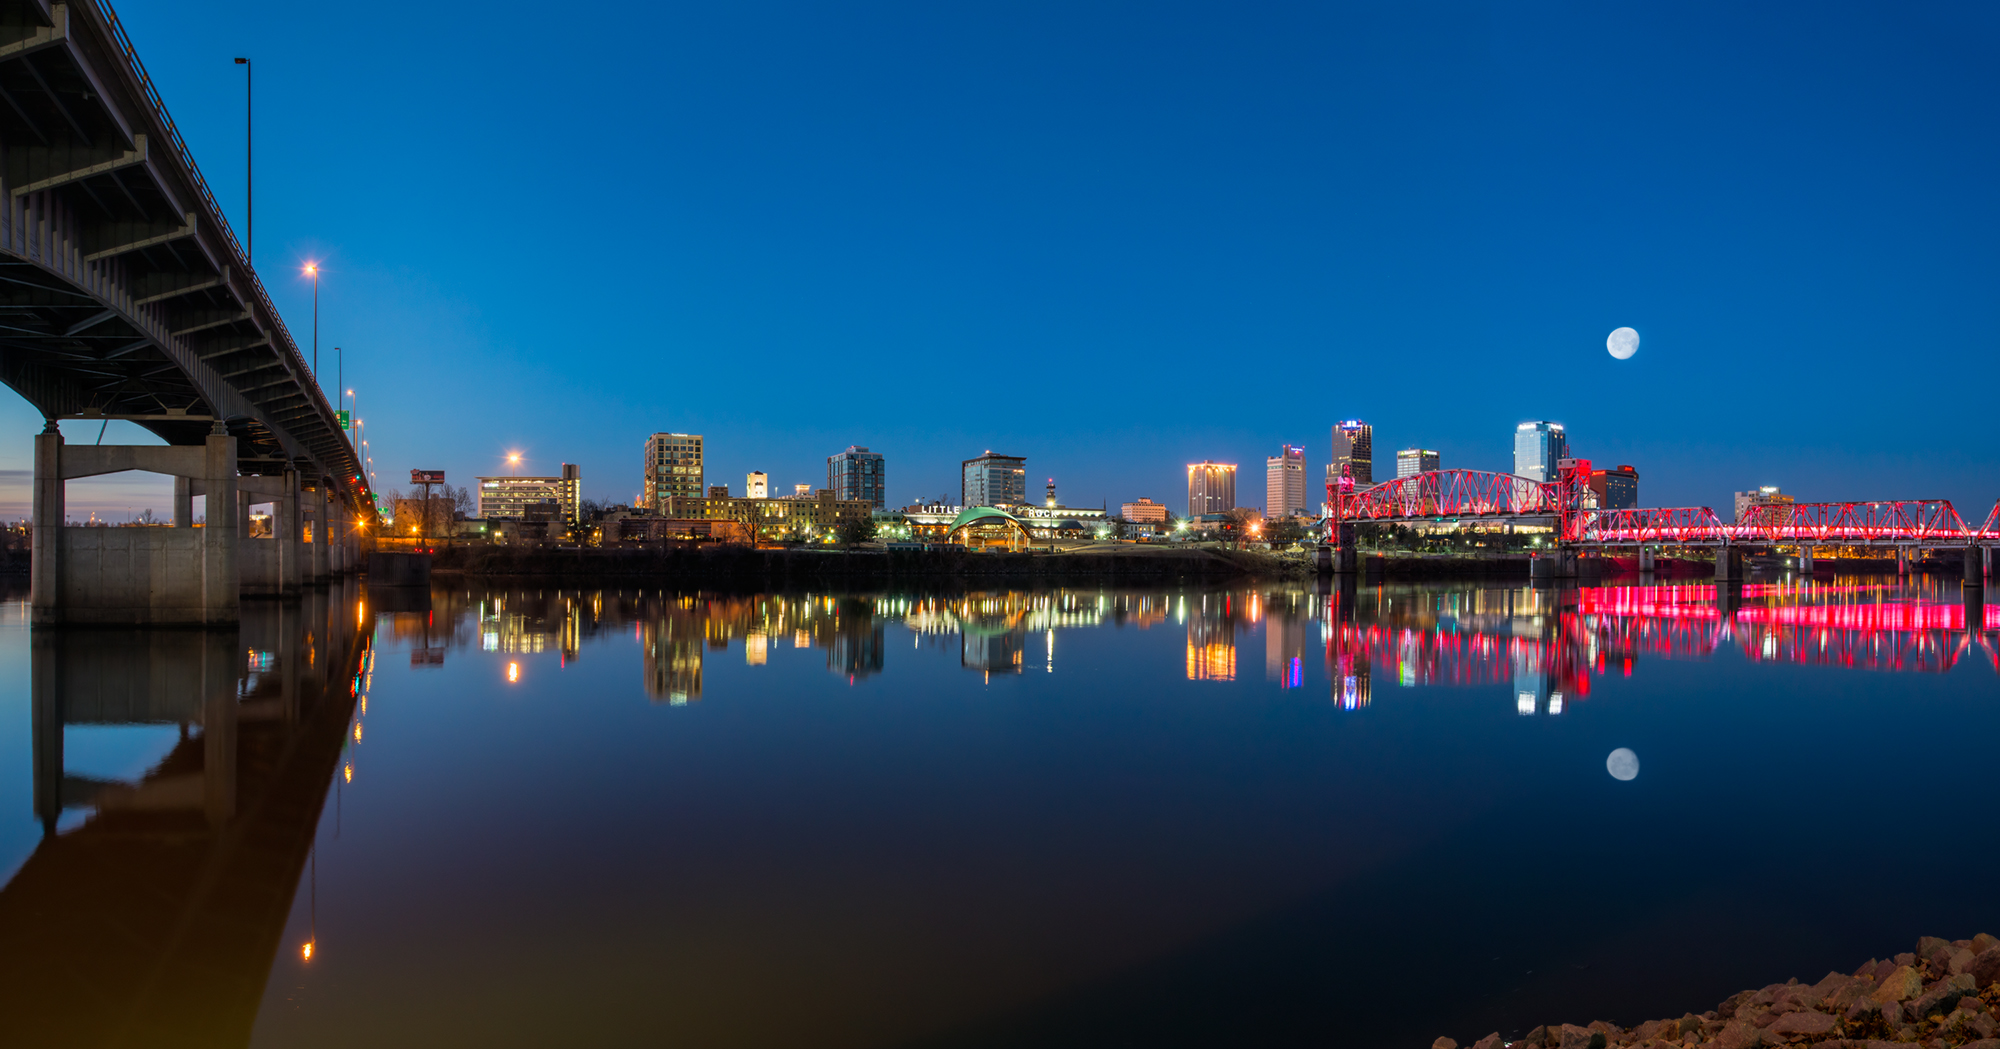
Moonset over Downtown Little Rock between the bridges
Taken with a Nikon D800, 14-24 lens @ 14mm, iso 200 F 7.1 for 2 seconds, 2 part nodal pan featuring the moon-set. I like to spend time at this spot since it provides such a great view of both downtown Little Rock, and the various bridges over the Arkansas River. Since December of 2013, the all the bridges except the I-30 bridge are now lit up with a red light at light. This makes for quite a scene and is well worth the trip down even though it’s not in the best part of town. In this view you can see both the old Junction Bridge and the Main Street Bridge immediately behind it. This photo was taken in several parts as I had to shoot for the skyline, and then expose separately for the moon. The reflection was near perfect, but there was just a slight ripple on the water, however most of it seemed to be over on the Little Rock side so the moon’s reflection was not blurred that much. The sun was just starting to rise in the background behind the I-30 bridge.
 From the Blog
- Errors with High Resolution Mode, Panasonic LUMIX S1RII July 4, 2025
- 05/08/25 Capture One, big announcement, at least for portrait photographers May 8, 2025
- 05/03/25 Trump’s Tariffs finally start to hit Photography Equipment. May 3, 2025
- Firmware 4.1.0 for X2D? April 21, 2025
- 04/18/25–Looks like Trump’s Tariffs are much ado about NOTHING in regard to photography equipment. April 18, 2025
- 04/09/25 Arkansas Sets new standard for Scientific Ignorance with new law for Ivermectin April 4, 2025