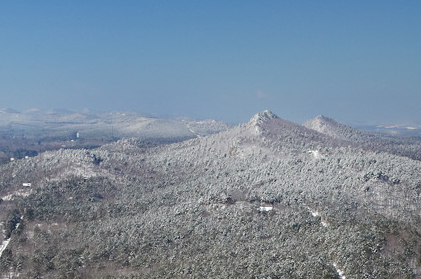
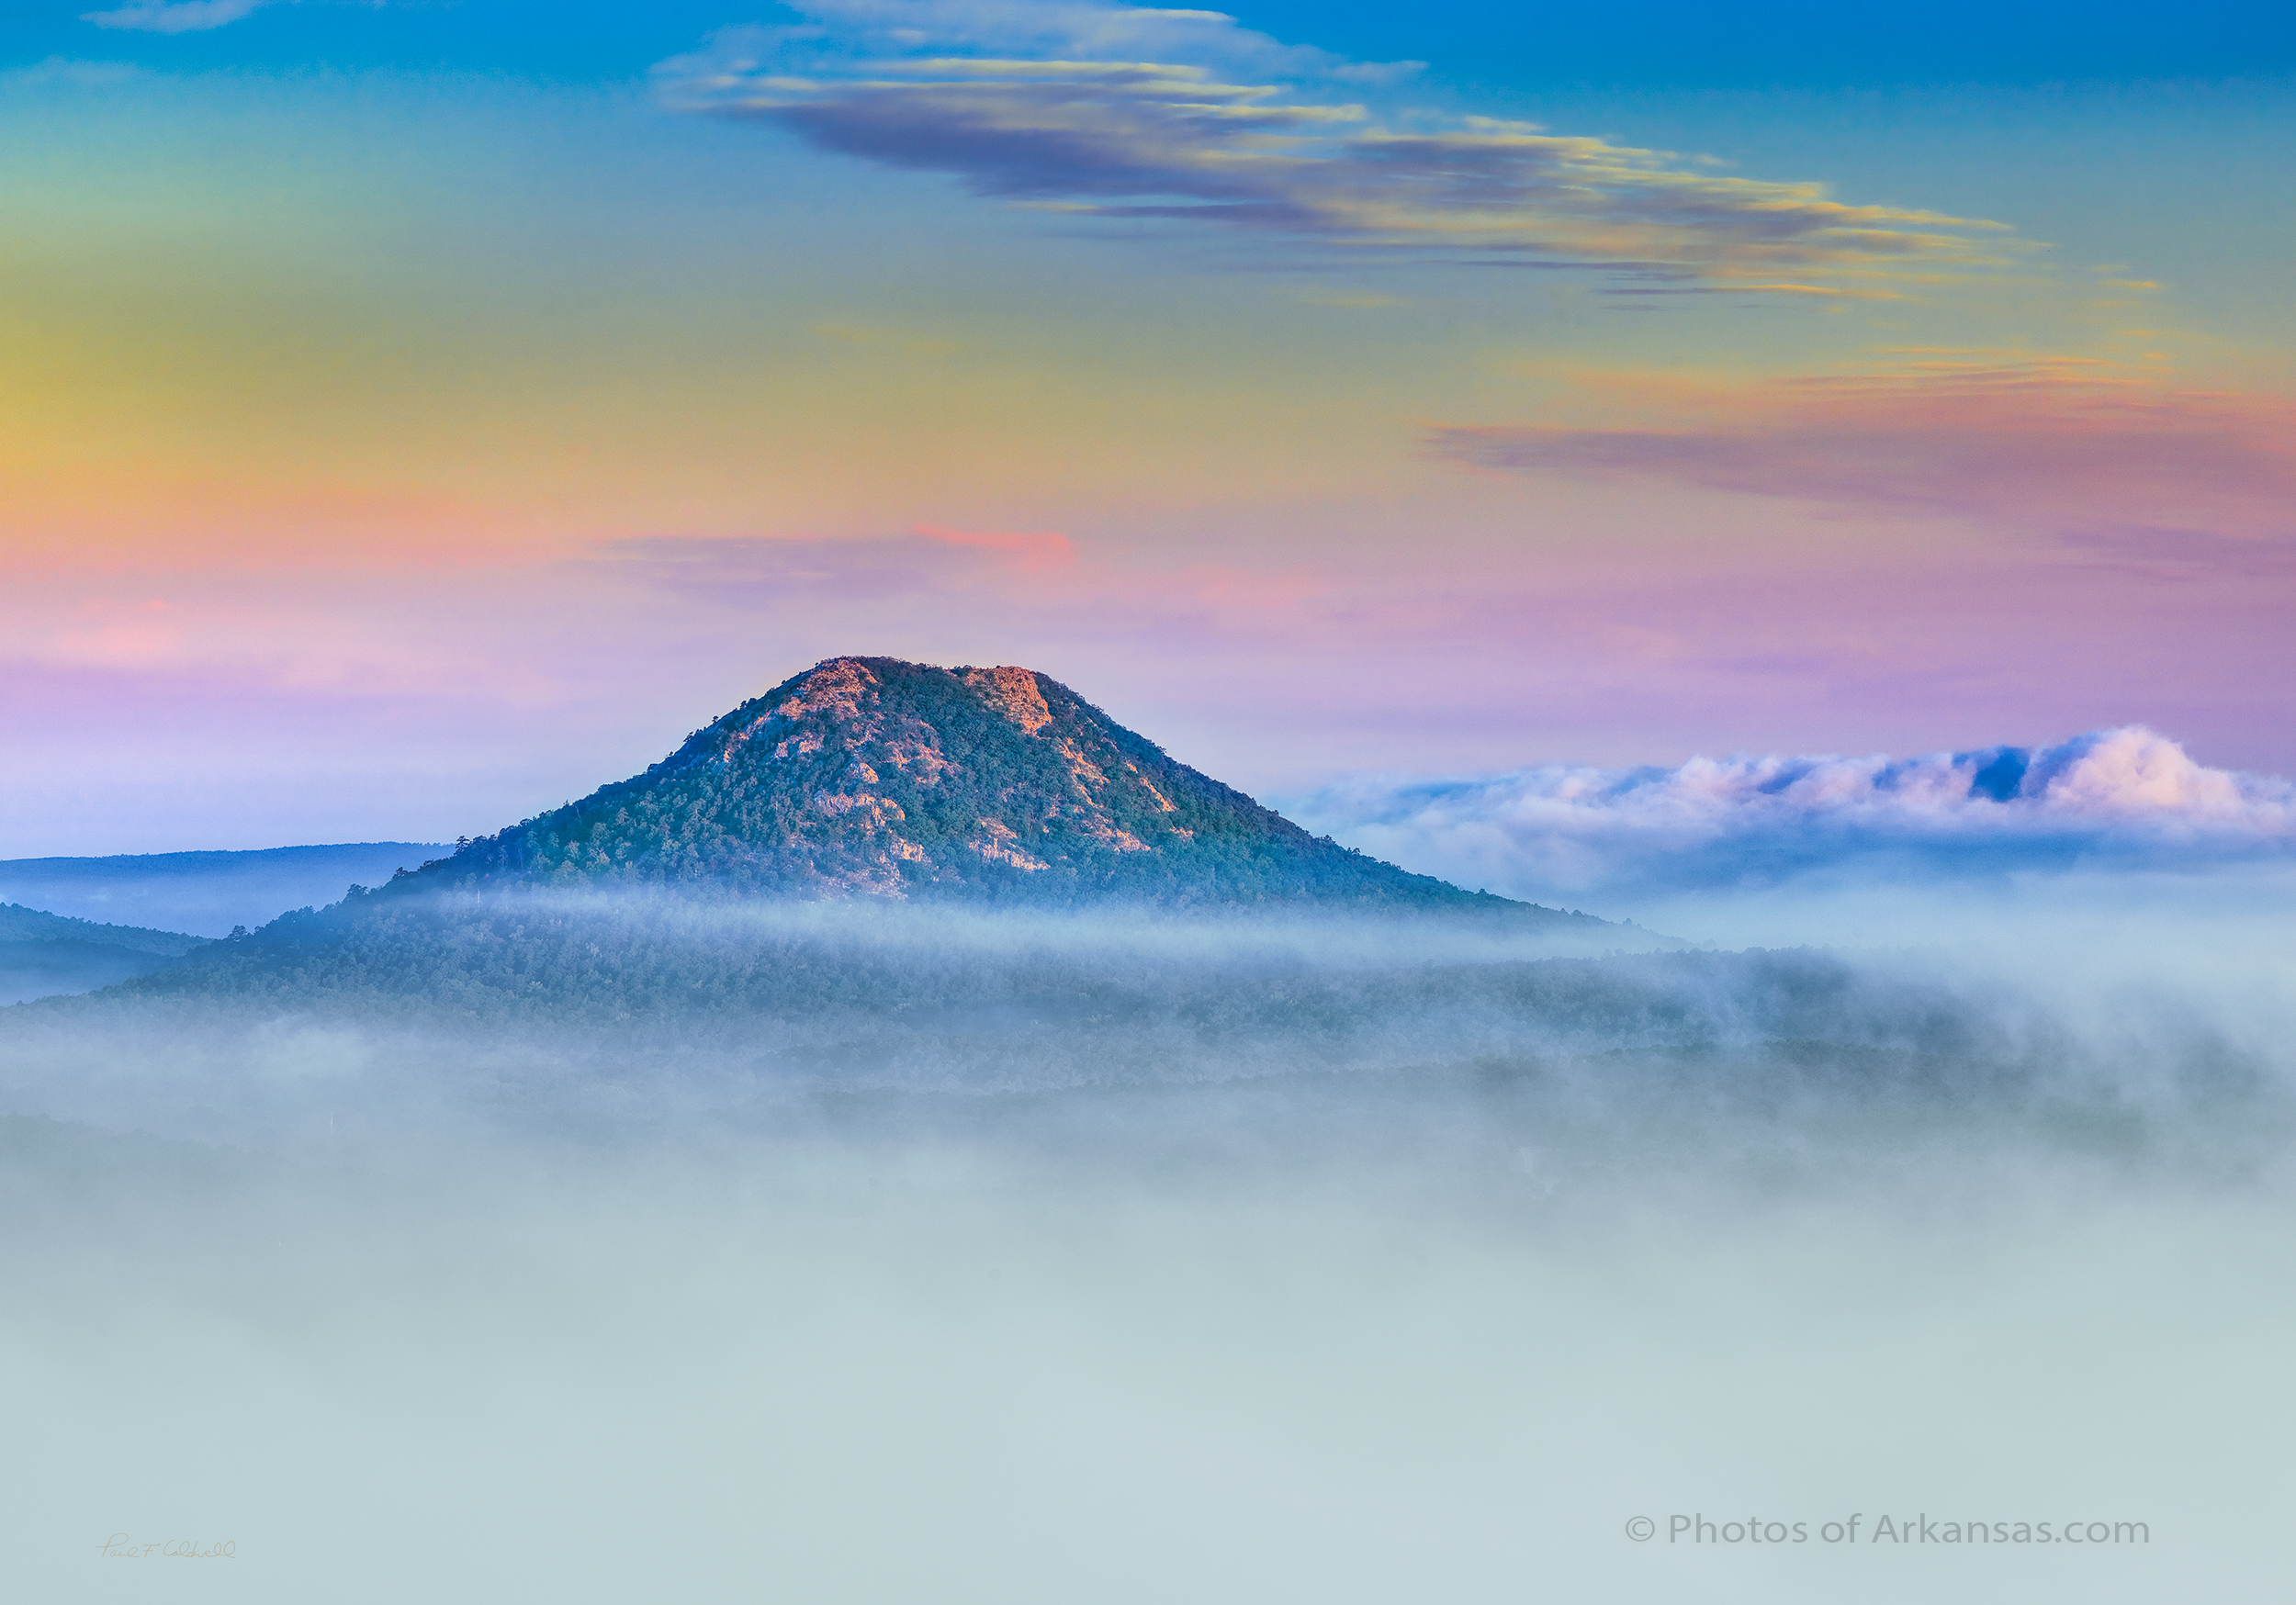
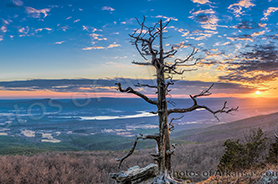
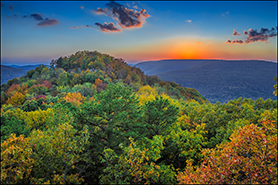
02/05/16 Featured Landscape Photography–Wintertime on White Oak Mountain near Hector Arkansas


PLEASE NOTE: All of the photography of this website is the property of www.photosofarkansas.com and is copy right protected. Do not copy any of the images on this site to paste on Facebook, Pintrest, or any other website without the permission of Paul Caldwell. Years of time have gone into capturing these photographs, please respect that. I do not take copy right infringement lightly. If you have a need to display any of my work on your site ASK me before you Copy & Paste.
Taken with a Phase One XF camera & IQ260, 55mm LS lens and CL-PL. Image is composite of 3 vertical images with the 55LS set to it’s nodal point.
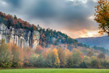
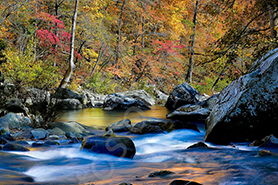
This past winter I started trying to find some new places to photograph in Arkansas. I have worked Falling Water Creek and Richland for years and still love that part of Arkansas, but I felt it was time to move on. I had heard a lot about White Oak Mountain from Chris Kennedy and wanted get a look at the area in winter. If you hike into a spot in Arkansas for the first time, I always recommend coming in winter or early spring as you will see a lot more of the surrounding areas. Later on in summer the trees will hide a lot and the undergrowth makes hiking in general much harder.
White Oak Mountain, is actually a long ridge that runs east and west near Hector Arkansas. To get there, you need to drive to Hector, through the town and as soon as cross a small bridge over a minor creek, you will see a dirt road heading up to the right. Stay on this road for about 7 miles, there will be some turn offs but once you find the right spot, you can hike right down into a great creek valley. This creek has a nice run which offers several nice smallish waterfalls in quick succession. If you hike up the far hillside, you can find some much more dramatic waterfalls, but these will only be running after a locally heavy rain.
What I found most interesting on White Oak mountain was the number large boulders that were just laying in the creek. This reminded me of Richland creek, however the terrain is a bit more open than on Richland.
Once you are done in the creek valley walking is very easy and you can make good headway. There is a RV trail and a marked hiking trail that will take you down to the creek. This creek outwardly appears to be about 1/5 the volume of Richland creek, but the unique geography surrounding the creek makes the hike worth a trip. I would warn anyone that crossing this creek in high water could be a bit dangerous as the bottom is full of large mossy rocks easy to slip on.
I hope to make another trip here in the future to see what the area looks like in Spring with more water running.
To capture this photograph, I used a Phase One XF camera with a IQ260 Medium Format back and 55mm LS lens. The photograph was taken with a nodal panorama setup and I used the captures to make the one horizontal shot. To slow the water down I used ISO50 on my camera and a polarizer. As you can see in the photograph, the light was already marching up the far side of the valley, so I did not need a ND filter. The raw files were converted in Capture One software and then I used PtGui to stitch the 3 images together. I then added a bit of Topaz clarity to my liking.
01/30/16 Featured Arkansas Landscape Photography–December sunset from the summit of Mt. Magazine

Sunset from the summit of Mt Magazine looking towards Havana Arkansas
PLEASE NOTE: All of the photography of this website is the property of www.photosofarkansas.com and is copy right protected. Do not copy any of the images on this site to paste on Facebook, Pintrest, or any other website without the permission of Paul Caldwell. Years of time have gone into capturing these photographs, please respect that. I do not take copy right infringement lightly. If you have a need to display any of my work on your site ASK me before you Copy & Paste.
Taken with a Fuji X-T1 and Fujion 16-55 lens, in 2 landscape segments and converted into a panorama in Photoshop
In December I was able to take sometime off and spend the Christmas weekend at Mt Magazine Lodge. The weather I had hoped for was snow but instead the daytime temperature was in the high 60’s, (and they say we don’t have global warming going on!!), but at least it did not rain while were there. The days in December are quite short but I was able to get some wonderful sunrise and sunset shots from below the lodge.
In the summer months, the sun will set behind the main part of Mt. Magazine, so the best time to grab a sunset shot is in December and January. During these months the sun will just barely be visible on the far right side of the shot. However to capture both the famous trees below the lodge, you will need to work your shot into a panorama. There are many ways to do this, but on this evening, I went with the fastest method, which was to just take two horizontal shots and then merge them back into one final image later one. This is usually an easy process, but on this evening, there was a lot of wind blowing so I had to bracket not only for the light but to stop the trees blowing on either side of the shot.
There are many great spots to capture the view from the summit of Mt Magazine, but this has to be the most famous as it features the Bonsai Juniper tree that is used in all the literature from Mt. Magazine and is the emblem used by Mt Magazine State Park. I have never been to Mt Magazine when the large cedar tree on the right side of the shot was alive, but standing as it does bare against the sky makes for an interesting shot. In the valley below you will see Blue Mt. Lake and the town of Havana. The two peaks off in the distance are both about 1,500 feet tall, and the one of the left is Blue Mountain. You can easily see the boundary of the state park, as it’s where the pine trees begin, as all of the hillsides below the state park have been cut.
The clouds this day were most impressive starting out with a nice band just above Blue Mountain and then a large group formed just around the sun which made for an even better view.
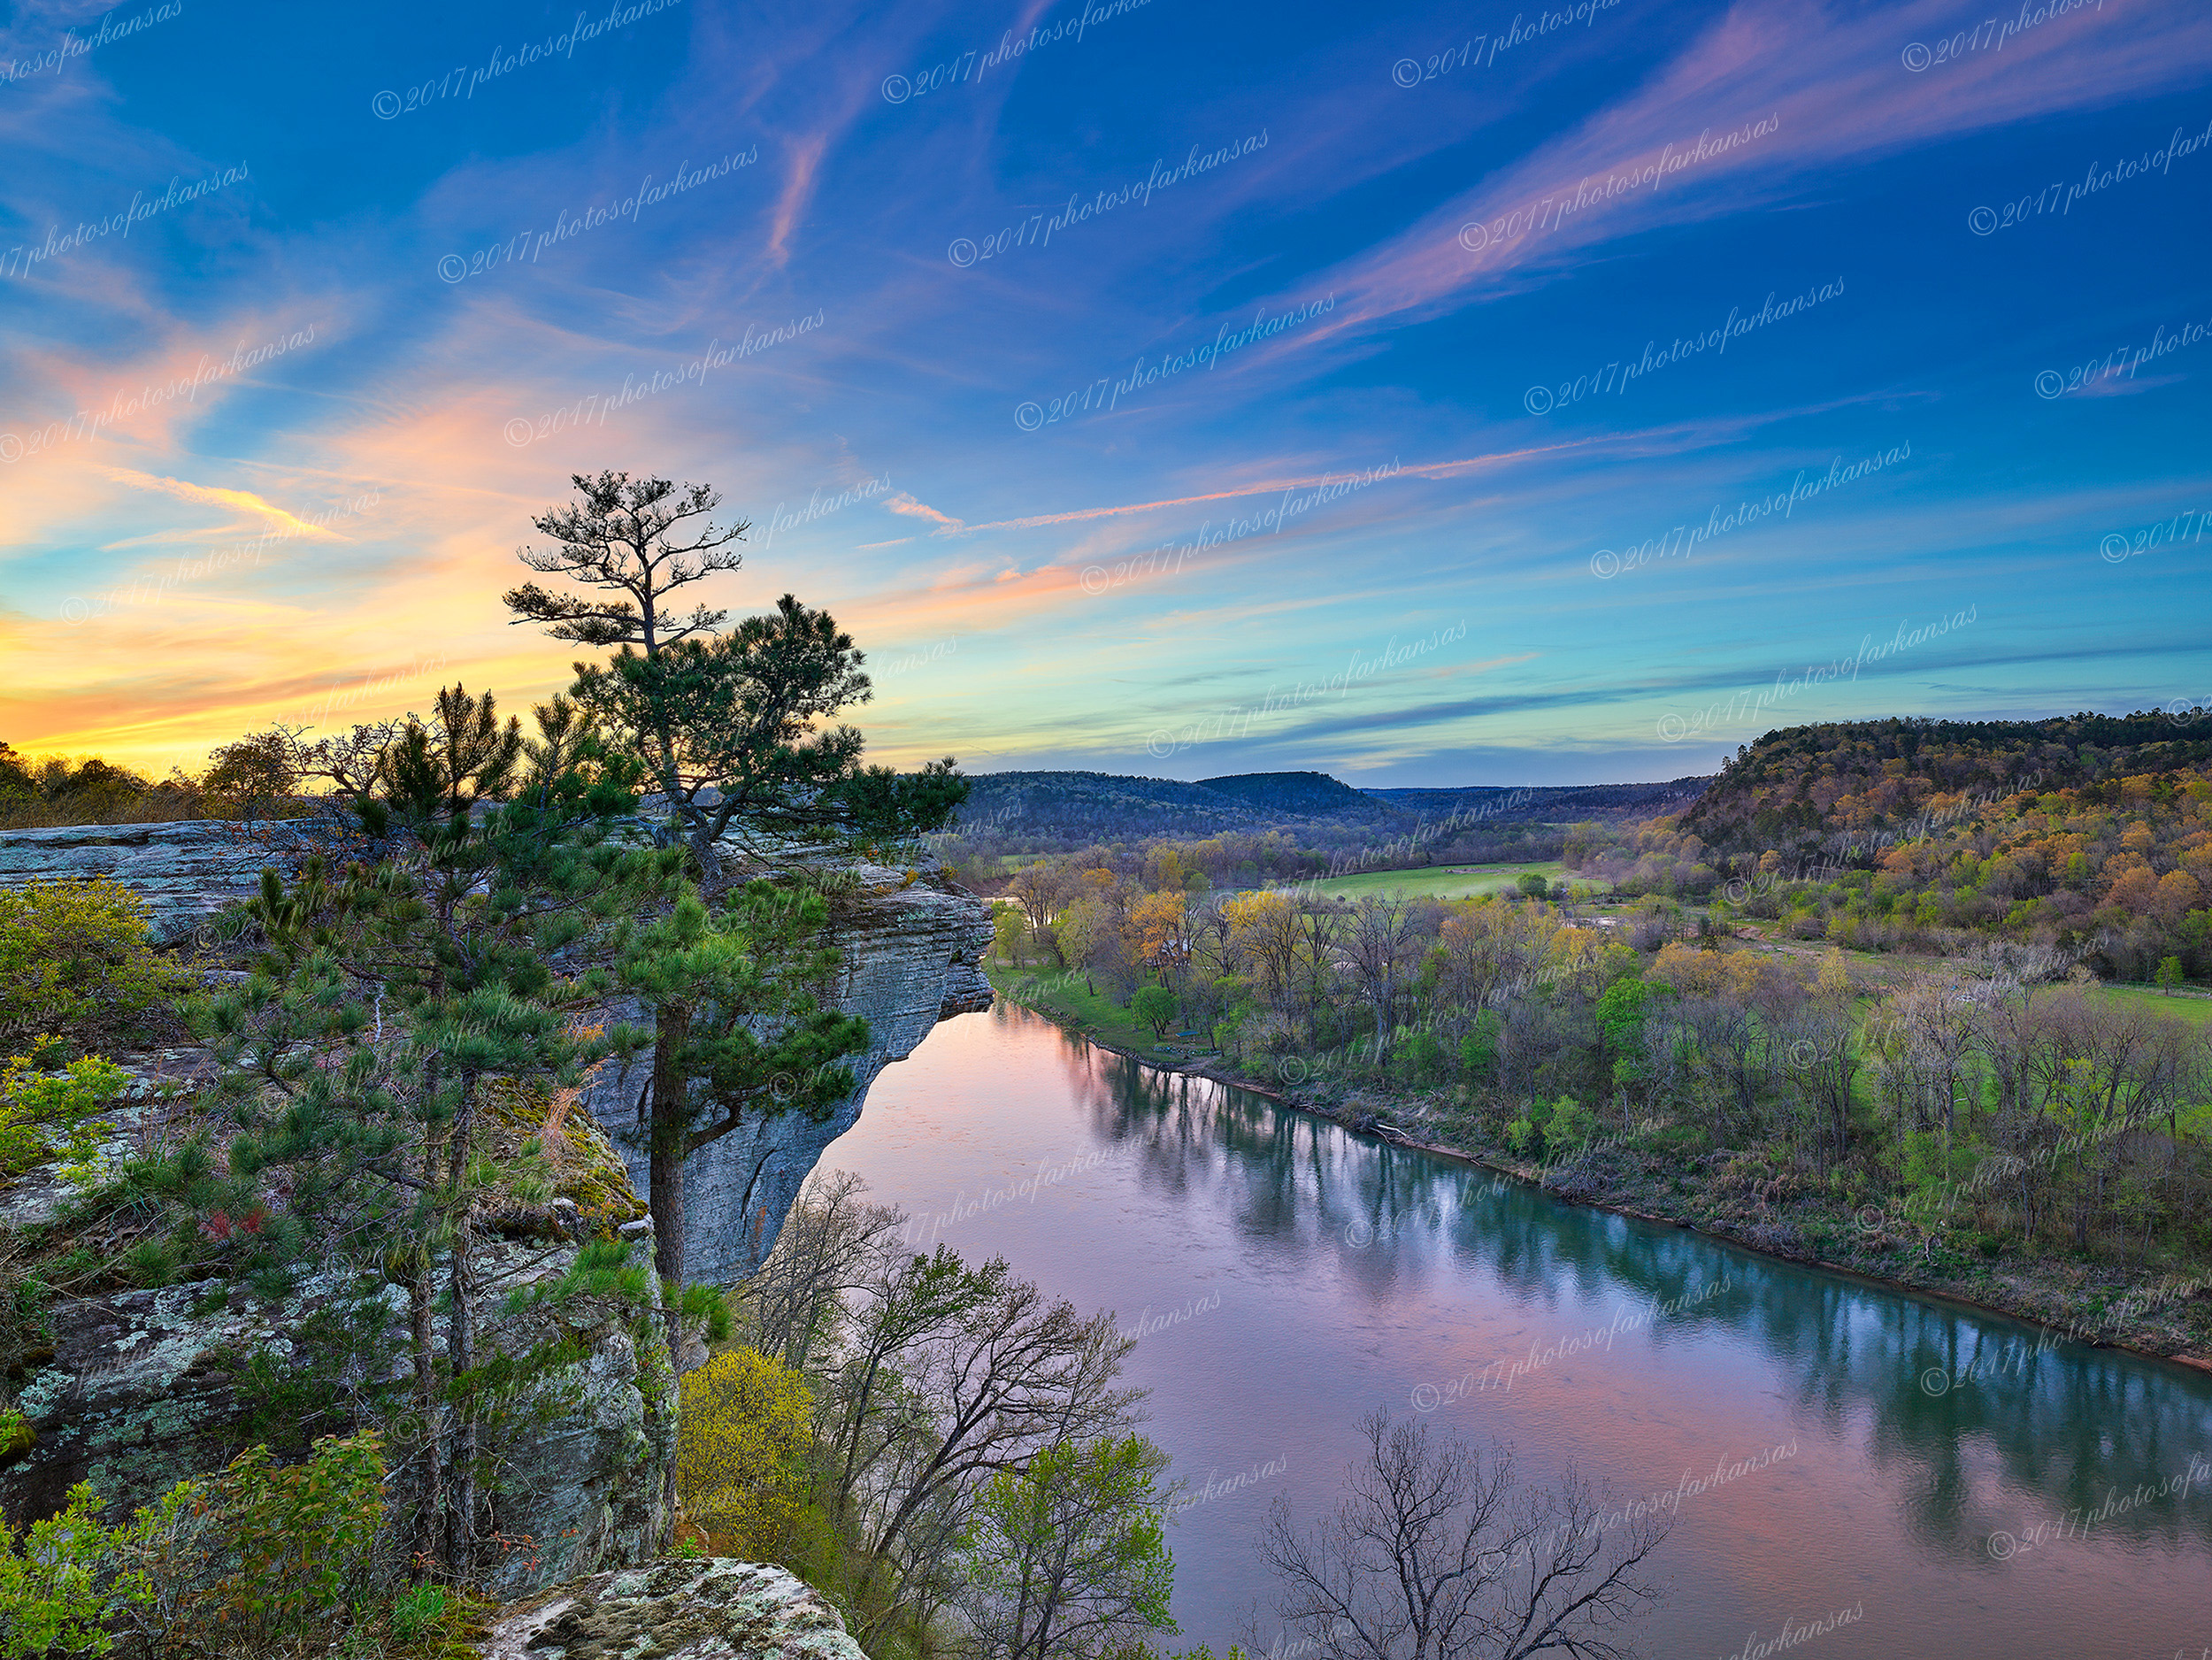
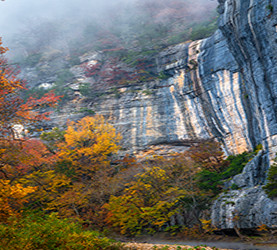
12/29/15 Featured Arkansas Landscape Photography–Foggy Morning View from Roark Bluff
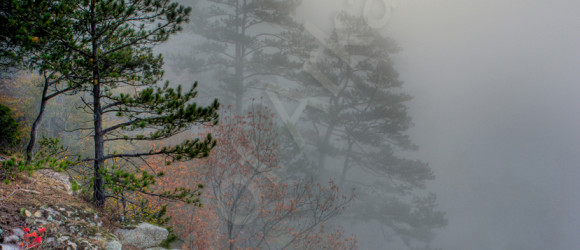

Foggy Morning View from Roark Bluff on the Buffalo River
PLEASE NOTE: All of the photography of this website is the property of www.photosofarkansas.com and is copy right protected. Do not copy any of the images on this site to paste on Facebook, Pintrest, or any other website without the permission of Paul Caldwell. Years of time have gone into capturing these photographs, please respect that. I do not take copy right infringement lightly. If you have a need to display any of my work on your site ASK me before you Copy & Paste.
Taken with a Canon 5D MKII, Canon 24-70mm Lens, ISO 400 to 800 bracketed, and exposure bracketed in 5 separate exposures.
The early morning hours on the Buffalo tend to be some of the best to photograph the river. I love to hike up to the summit of one of the river bluffs and then wait for the morning fog to lift over the river. However sometimes the best shots are taken in the fog as this one was.
On this morning, I was setup to catch the fog rising and wanted to keep my lens out of the sun, so I was aiming westward. During the long morning wait I went back to my pack to get a drink and just happened to see this shot, as the sun was starting to break through the fog. I was barely able to run back to the camera, grab my camera/tripod and catch this shot.
I took this image in 5 exposure and ISO brackets since I knew that the Canon camera would not allow me the dynamic range to capture it in one shot. The Canon 1ds MKII, as good as it was for the time @ 16MP was pretty terrible with shadow recovery. Most the shots I took during this time were all in exposure brackets. Still the sun coming through the fog has always been a hard part of the shot to get just right. I did not want to the bright orb of the sun to just break through the shot, but instead I wanted it to just barely show. Many of the HDR software tools at the time would not allow for this, and I ended up having to do a manual bracketing exposure. Since then I have re-worked this shot many times over the years and but still have come back to my early versions as my preference.
This photograph has been printed up to sizes of 40 x 60 and has been selected by several Hospitals and offices in Arkansas to be placed in their permanent collections.
12/24/15 Featured Arkansas Landscape Photography–Patterns in the Rock on the Cossatot
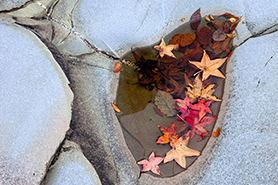
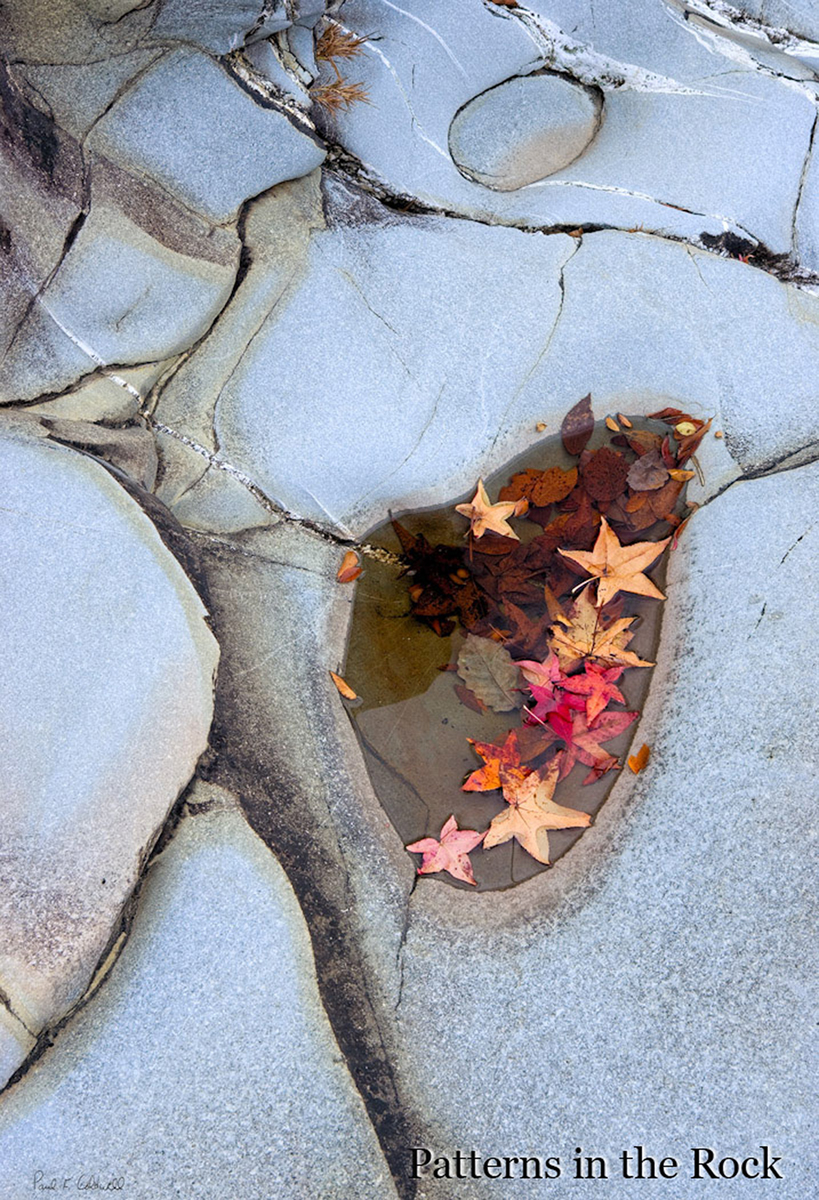
Patterns in the Rock on the Cossatot River
Taken with a Canon 1ds MKII, and 100mm Macro lens, ISO 200.
The Cossatot River has some of the most unique rock formations in Arkansas. They are sandstone mixed with Quartz veins. The rocks tend to work their way across the river in rows and ledges and the river creates small channels through the rocks. The most famous of these would be Cossatot Falls, where there are 6 separate ledges going across the river.
I love to work the Cossatot, both in normal wide landscape shots but also like to spend time looking for macro shots. There are hundreds of spots like the one in this photograph, where the river has cut down the main ledge, and smoothed it over like sandpaper was used. Many of these will contain small depressions, that will catch rainwater.
This photograph was taken late in the fall season after a rain. The leaves were captured in the rock and the puddle just added to the scene for me. The smallish quartz veins that were running through the rock added some nice contrast. The rock in the Cossatot can appear pink when the sun is hitting it directly but there are some nice grey ones also to make for a colorful composition. In this photograph, you can see a bit of the pink showing up in the lower left corner.
The Cossatot is a long 3 hour drive from Little Rock but the area is remote so you can often find yourself working the falls all by yourself. If you are heading down that way, also consider the Little Missouri River, near Langley Arkansas. The Cossatot is in the southwest corner of Arkansas in the Ouachita mountains.
12/18/15 Featured Arkansas Landscape Photography–Late afternoon on Richland Creek

Late fall afternoon on Richland Creek
Taken with a Canon 1ds MKII, 24-70 Lens, @ 24mm, with a CL-PL and ND 1.2 filter, ISO 100 for 2 seconds foreground and 1/250 background.
What can I say about Richland Creek, it’s one of the rare gems in Arkansas. The Richland Creek wilderness was established in the 1970’s and has a huge outdoor appeal. The creek offers fishing, hiking, kayaking and of course photography. I have been hiking up Richland for the past 25 years and hope I can make a few more trips before my knees give out. I have probably shed more blood and gear on this creek, having taken several bad falls and breaking at least 4 cameras or lenses over years. But to me it’s worth it.
Richland is the 3rd or 4th largest tributary of the Buffalo and comes into the Buffalo at Woolum Ford. It’s headwaters are about 25 miles due west from Woolum. The best parts of Richland are the 6 miles from Moore to the Richland Creek Campground and the following 10 miles downstream to the low water bridge. The creek is very isolated and you can expect to cross it several times on your hike upstream. Going upstream from the campground, look for a trail on the left side of the creek. Since Richland is in Wilderness, the Forest Service will not make a permanent trail (STUPID), BUT THAT’S THE GOVERNMENT. You can find the make shift trail on the left bank pretty quickly as most of the time it stays within sight of the creek. From the campground up to the big bend where Big Devils Creek comes in, you will find over 20 major rapids most of which have a name.
You can hike Richland anytime of the year, but make sure the water level is running about 400 CFS (cubic feet per second) or less. Anymore than this and you can have a lot of trouble crossing the creek. Be careful when crossing as the creek bottom is mainly limestone and slick. The hike from the campground to Richland Falls is about 2.0 miles but plan to spend extra time along the creek. There are not many other places in Arkansas where such a beautiful creek runs by house sized boulders.
PLEASE NOTE: All of the photography of this website is the property of www.photosofarkansas.com and is copy right protected. Do not copy any of the images on this site to paste on Facebook, Pintrest, or any other website without the permission of Paul Caldwell. Years of time have gone into capturing these photographs, please respect that. I do not take copy right infringement lightly. If you have a need to display any of my work on your site ASK me before you Copy & Paste.
12/15/15 Featured Arkansas Landscape Photography–Big water at Cedar Falls on Petit Jean Mountain

A great shot of Cedar Falls with both a lot of water and great fall color.
Taken with a Phase One P45+, Mamiya 35mm F 3.5 lens, for approx 1 second, with a circular polarizer, ISO 50.
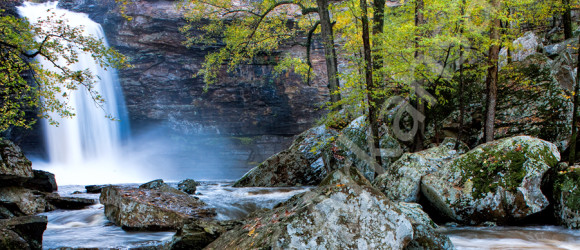
The view of Cedar Falls on Petit Jean mountain is always impressive, but when you have a lot of water and fall colors, well, it just gets better. There was almost too much water running this day as the force of the water made all the sweetgums up by the falls be in constant motion. I was not really able to get to a shutter speed that would stop them totally so they just really blend into a mass of yellow. I had hoped for some red and yellow colors as is common with the sweet gums, but this year they were only yellow. Lots of folks don’t realize that the water in Cedar Creek is has such a brown tint to it. But on this day it just seemed to add to the overall shot.
To get this photograph, I had to stand in the water and cross out into the creek. Standing where I was the spray coming off the falls was also pretty constant. I had tried to get closer, but the spray was just too much to handle as it covered the front of my lens very quickly. I used a circular polarizer even though the sun was not out as it always seems to help bring out better overall colors and there was still glare on the rocks. I tried several shutter speeds this day, but anything over 1 second just did not look very good as the there was too much water moving by at such a high rate speed.
Cedar falls is one of the highest “real” waterfalls in Arkansas at over 75 feet tall. You can hike down to the base of the falls the trail that starts at the back of Mather Lodge.
PLEASE NOTE: All of the photography of this website is the property of www.photosofarkansas.com and is copy right protected. Do not copy any of the images on this site to paste on Facebook, Pintrest, or any other website without the permission of Paul Caldwell. Years of time have gone into capturing these photographs, please respect that. I do not take copy right infringement lightly. If you have a need to display any of my work on your site ASK me before you Copy & Paste.
12/14/15 Featured Arkansas Landscape Photography–Fall view below Big Bluff on the Buffalo River

Fall Vista below Big Bluff on the Buffalo River
Taken with a Phase One P45+ and 35mm F 3.5 lens, ISO 50, 2 exposures-one polarized and one non-polarized for reflections.
The Buffalo River has numerous bluffs along it’s entire length, but Big Bluff is the tallest at well over 550 feet tall from the river. Big Bluff is famous for the goat trail, which is a narrow shelf of rock that cuts across the middle Big Bluff. At a few points it’s barely 4 feet wide and the edge is straight off. Since the road down to Big Bluff from Hwy 21 was closed, you now have to hike down from the Compton Trail head and that is a major hike. The trail itself is at least 2 miles to the goat trail, and it’s all up hill on the way back. There is no water on the trail unless you happen go during a heavy rain so plan to bring some.
The best view is not from the the goat trail, but instead from the bottom of the bluff. Here in the fall you can catch some wonderful reflections along the river bank if the river is calm. On this day, I hiked in from Steel creek and waited for about 2 hours for the wind to die down. The wait was well worth it as the sunlight improved and the tress on the far bank were just lit up. It’s very interesting to note, that only the trees along the river were starting to turn and the trees up towards the top are still mainly green.
I used a Phase One P45+ back to take this photograph. I used a tripod mainly since I was going to bracket the shots. I wanted to use a polarizer to help cut the glare off the trees but I also knew that the polarizer would cut down on the reflections. So it was a simple thing to take two shots bracketing and then combine them later in Photoshop. This hike from Steel creek is a about 1.5 miles one way and you have to cross the Buffalo several times, so plan to make this trip on a low water day, or from a canoe.
PLEASE NOTE: All of the photography of this website is the property of www.photosofarkansas.com and is copy right protected. Do not copy any of the images on this site to paste on Facebook, Pintrest, or any other website without the permission of Paul Caldwell. Years of time have gone into capturing these photographs, please respect that. I do not take copy right infringement lightly. If you have a need to display any of my work on your site ASK me before you Copy & Paste.
12/05/15 Featured Arkansas Landscape Photography–Breakout

A wonderful sunrise taken from Flatside Pinnacle
Taken with a Canon 5D MKII, and 24-70MKI lens, iso 400 Single exposure
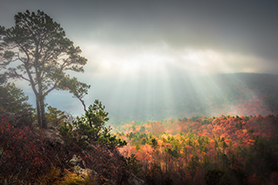
Flatside Pinnacle, really is the gateway to the Ouachita mountains and the view to the west from the summit is well worth the drive out from Little Rock. Don’t confuse this with Pinnacle Mountain, which is much closer to Little Rock. Flatside pinnacle is around 1,500 feet tall, which puts it higher than Petit Jean, and Mt. Nebo. On a clear day you can can see Forked Mountain way off in the distance and also Mt. Magazine, the highest spot in Arkansas. Looking behind you can make out the eastern end of Petit Jean mountain and the Mt. Nebo and Spring Mountain. Flatside was recently heavily defaced with paint which just goes to show there are SOME REALLY FRIGGIN STUPID PEOPLE out there. Not sure why they bother to come out. I have worked on the graffiti now about 3 times over the past year and it’s finally starting to wear off, but it’s a damn shame that some folks just don’t get it and want to ruin it for everyone.
This was a morning that really did not turn out to be a very good day, but there was a brief period where the sun managed to break through the heavy clouds and really the effect was wonderful. Fall was in full bloom and so the colors down in the valley from the summit of Flatside Pinnacle were excellent. I worked this image up in Lightroom and then used Topaz clarity to help bring out more of the rays of the sun in the fog. This light only lasted about 10 minutes and then the clouds settled back down over the entire valley. Just another example of just how much photography is luck and being able to be at the right spot at the right time.
Flatside is worth a hike anytime of the year. It offers some of the best sunsets in the Ouachitas. Sadly the wilderness boundary continues to become more and more defined by recent clear cuts, which leave huge swatches of solid green pine trees in their place. If you go after a big storm or in winter you might want to bring a chainsaw or handsaw as it’s quite possible to find a recent fallen tree blocking the road.
12_02_15 Featured Arkansas Landscape Photography–Autumn afterglow at Sam’s Throne

Sam’s Throne Afterglow in the Arkansas Ozarks
Taken with a Canon 1ds MKII (16MP), multishot bracket for exposure, Canon 24-70 @ 24mm F 11 iso 200
This an example where it pays to work with older files, in this case, way back 2004, with more modern software. I have taken a lot of sunsets at Sam’s Throne, however this is still one of my all time favorites. When I purchased my Canon 1ds MKII, which had 16MP, I started retracing many of trips to places I loved to go as I felt that 16MP would be about the maximum in resolution for a long time to come. We all know that changed pretty quickly. However on this evening, I found the best shot was after the sun set as it painted a wonderful afterglow in the sky. Sam’s Throne was just starting to change for fall but there was plenty of color around. To make the shot perfect, the couple of clouds that rolled into the frame helped to breakup the solid sky.
Sam’s Throne is one of premier climbing spots in Arkansas but it’s also one of the best for photography. You have a huge bluff line that runs at least 1/2 mile or longer and allows for wonderful views of the Big Creek valley. In this view you can see the Throne itself and all the rolling hilss that work their way off into the distance. The forest here is a good mix of both pine and deciduous trees, mainly Oak, and Gum but there are also some nice Maples scattered though the valley. One of the best aspects of Sam’s Throne is the fact that you can drive very close to the bluffline and you only have about a 1/8 of a mile walk to get started. Sam’s Throne is a great place to camp also as there is now a primitive campground with about 10 sites.
As this series of shots was taken with an older Canon Digital camera, the noise in the shadows was excessive. The 1ds MKII was not noted for extreme dynamic range. Back in the day, I shot almost everything in brackets knowing I would need multiple shots to get the exposure coverage I needed without excessive noise even at base iso or one step up. I had worked this image many times with various HDR software toolsets, but never really received the output I was looking for. Now that Adobe Lightroom has an excellent HDR tool, I decided to go back and try this shot again. The result was impressive and I found a much better overall image. The big advantage to HDR in LR is that Lightroom leaves that output as an .dng, in essence a raw file. This means you have all the flexibility of a raw file but with the added exposure blend, and you can still use the excellent Lightroom Toolset. I have started going back to a lot of my early Canon photography and working it back in LR and the results have been impressive.
11/18/15 Featured Arkansas Landscape Photography–Foggy view of Roark Bluff

Foggy morning at Roark Bluff on the Buffalo River
Taken with a Nikon D810, Nikon 24-120mm Lens, hand held @ 320iso for 1/100 of second, F 5.6
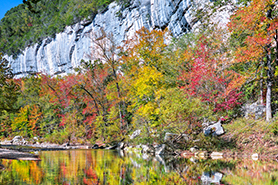
When I think of the Buffalo River, I tend to think about Roark Bluff and the beauty around that part of the river. Here you have two of the largest bluffs on the river, Roark and Bee both of which are well over 300 to 400 yards long. Each bluff has a unique character to it and the colors of the limestone comes alive in the early morning. At this time you have the valley totally fogged in. The fog will last for a while after sunrise and the best time to photograph the mornings is when the sun has started pop through the fog and adds a very unique light to the scene. Now add fall colors you have a real prime setting for sure.
On this morning, I was amazed to have the entire beach to myself, and I will take that when I can get it. It was a Sunday morning and the colors on the top of Roark Bluff had already turned brown, however there was still excellent color along the river. The top of the bluff seems to be mainly hickoy and maple, but on the riverbank there is a lot more variety. Here you will find oak, sweetgum, maple and gums. The display this morning was perfect. I had a tall gum tree on the upper left of the frame still showing the brillant yellows and reds, and across the river was another gum tree, but in pure yellow. In the foreground the river birch is starting to turn from green to yellow so overall it was a nice setting. I framed the shot with just a bit of the fog on the top of the shot. I still wanted to be able to see through the fog to make out the colors along the top of the bluff.
Roark is a great place to drive and spend the entire day. You can watch the sun move across the valley and enjoyed varied shooting situations during the day. Roark is one of my favorite spots for night photography, either star trail work or the milky way.
 From the Blog
- Errors with High Resolution Mode, Panasonic LUMIX S1RII July 4, 2025
- 05/08/25 Capture One, big announcement, at least for portrait photographers May 8, 2025
- 05/03/25 Trump’s Tariffs finally start to hit Photography Equipment. May 3, 2025
- Firmware 4.1.0 for X2D? April 21, 2025
- 04/18/25–Looks like Trump’s Tariffs are much ado about NOTHING in regard to photography equipment. April 18, 2025
- 04/09/25 Arkansas Sets new standard for Scientific Ignorance with new law for Ivermectin April 4, 2025