08/16/16 Capture One “Error when processing a file” in Windows
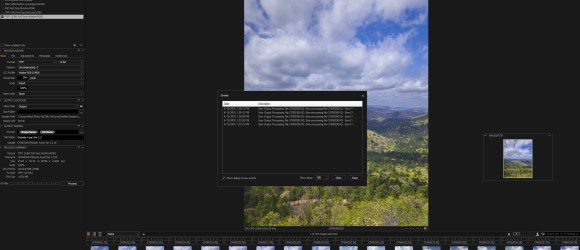
If you use Capture One for raw processing, over the years Phase One has continued to bring new useful enhancements to this particular software. If you own and use any Phase One digital back you will most likely use Capture One for the vast majority of processing. As these new features roll out, it seems that Phase One is not able to keep up with basic and simple errors. Errors that are not catastrophic but errors that still take a lot to time away from processing out files. If you work with Capture One in either Win7, Win8 or Win10, you may have received this type of error during an attempt to process a file: Click on image to view it larger.
Error screen from Capture One while processing a file.
This problem has something to do with how Capture One hands off processing to Open CL and nvidia cards. The error occurs like playing Russian Roulette, as you never know exactly when it will start to show up. Sometimes I will get it on the first image I process, others times after 5 or or 10 images have been processed. However once the error occurs, then you can expect to continue over an over and until you close C1 and reopen it. Each time you get the error, you have to click to close the error box and then attempt to reprocess out the image. Sometimes you can get the image to go ahead on the next attempt other times you may get this error 5, 10, 15, 20 times. It’s as if the particular file has been marked by C1. Here are some typical questions and answers.
- If you are a batch processing person, then this error is even worse, as odds are out of 20 files 3 may not process, so you have to manually go back and edit your processing to see which files did not run. This takes even more time. So for me batch is out.
- When did this error show up? It appeared with C1 Vr 9 and has continued through all new releases.
- Did I attempt to open a case with Phase One? Yes I opened a case, and Phase One’s answer was the usual “remove all instances of C1 on your PC and reinstall it based on our posted instructions”.
- Did that fix the problem? NO
- Have I opened a case via a dealer? Yes,
- Did that help? Yes, Phase One came back to me with a script to totally disable Open CL on my PC
- Is that a good solution? No as Capture One is very dependent on Open CL for both zooming to 100%, drawing masks, and working with local adjustments.
- Does this happen with any camera file or only a Phase raw file? Yes it happens, on Nikon, Sony, Fuji, Canon and Phase One
- Do you have this occur on only 1 PC or multiples? Yes ever PC I own (6) will get this error with C1 Vr 9, Pro or Data Back release
- If you run the script does the error go away? Yes
- Is your Nvidia card current on all of it’s various drivers? Yes
- Are you the only person getting this error? NO, I have reported on the Luminous Landscape forums and have received plenty of responses that other photographers running windows are also getting this error
- Has anyone on the Luminous Landscape forum from Phase One attempted to help? NO
- Is this a big issue that disrupts workflow? YES last night alone to process only 3 IQ100 files, it took me 5 different attempts
Surprisingly Phase One does not seem to notice this issue when they test on their side, personally I don’t buy that. Phase One’s first answer was that I was running a Nvidia GTX960 card which is not on the list of supported video cards by Capture One. Everyone one knows that is total BS, but you have to make the change. So I did, and purchased a GTX970 card, did the error go away or decrease in frequency? No. Did I expect that it would? No.
Here is link to the Luminous Landscape post that has more details.
I can only assume that this is a timing issue between C1 and the Nvidia card and that if for some millisecond there is a hiccup in communication. I even took the steps to removed all instances of any older Nvidia drivers from my PC, which is an time consuming process but the error still continues. All of my desktop PC’s run Nvidia cards, GTX970’s but the MacPro 15″ (under bootcamp and win10) is using an Intel graphics card and I believe the Surface Pro 3 and 2 both use Intel graphic cards also. All of these machine get the error at sometime. The desktop PC’s are either a 3.4Ghz i7 or a 4.0Ghz i7 on Asus boards.
This is not the first time that Capture One developed a troublesome issue with windows as for most of the time Capture One Vr 8 was out there was a terrible error where if you minimized C1 to the taskbar then attempted to reopen it, C1 froze and had to be forced closed. Sometimes this error created a need to have the PC rebooted.
My experience with C1 goes way to back to the 3.7.x versions and I have used it continuously since. There are many processing features in Capture One that are essential to my workflow so for now, I will just keep on closing the error out and trying again, but it would nice for Phase One to figure out this issue and I do hope that it does not transfer to Capture One 10, which I assume is coming soon.
Photographer Notes:
I am a working photographer, mainly working with landscape imaging. Capture One is my go to raw converter for all Phase One raw files (P45, IQ160, IQ260, IQ280, IQ180 IQ150 and IQ100) along with Fuji and Nikon raw files. I have just started working with the Pentax K1 and have found that Capture One has an excellent profile for this camera, however Capture One does not support the pixel shift format from the K1, but that is another topic.
This error can become very disruptive at times especially if you are attempting to process out more than 10 files at a time as more than likely of the 10 3 will error out. It also eliminates the use of the batch processing feature for larger jobs since the time it takes to reconcile the batch takes too long.
It is my hope that Phase One will address this in a future release however my feelings are until more photographers raise up the issue Phase One will not focus on it.
Phase One/Capture One is a much more Mac centric program and the development always seems to fall first to the Mac side of the software and eventually to the Windows side even thought worldwide the number of Windows licenses vastly outnumbers Mac
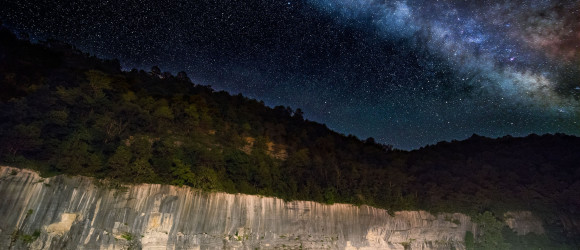
08/15/16 A close look at the Dynamic Range of the Phase One IQ100
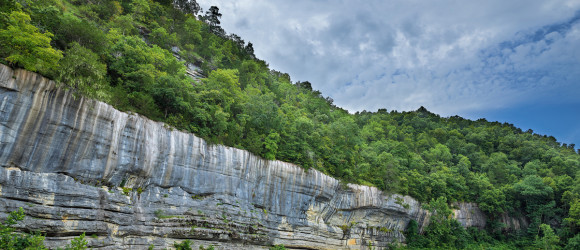
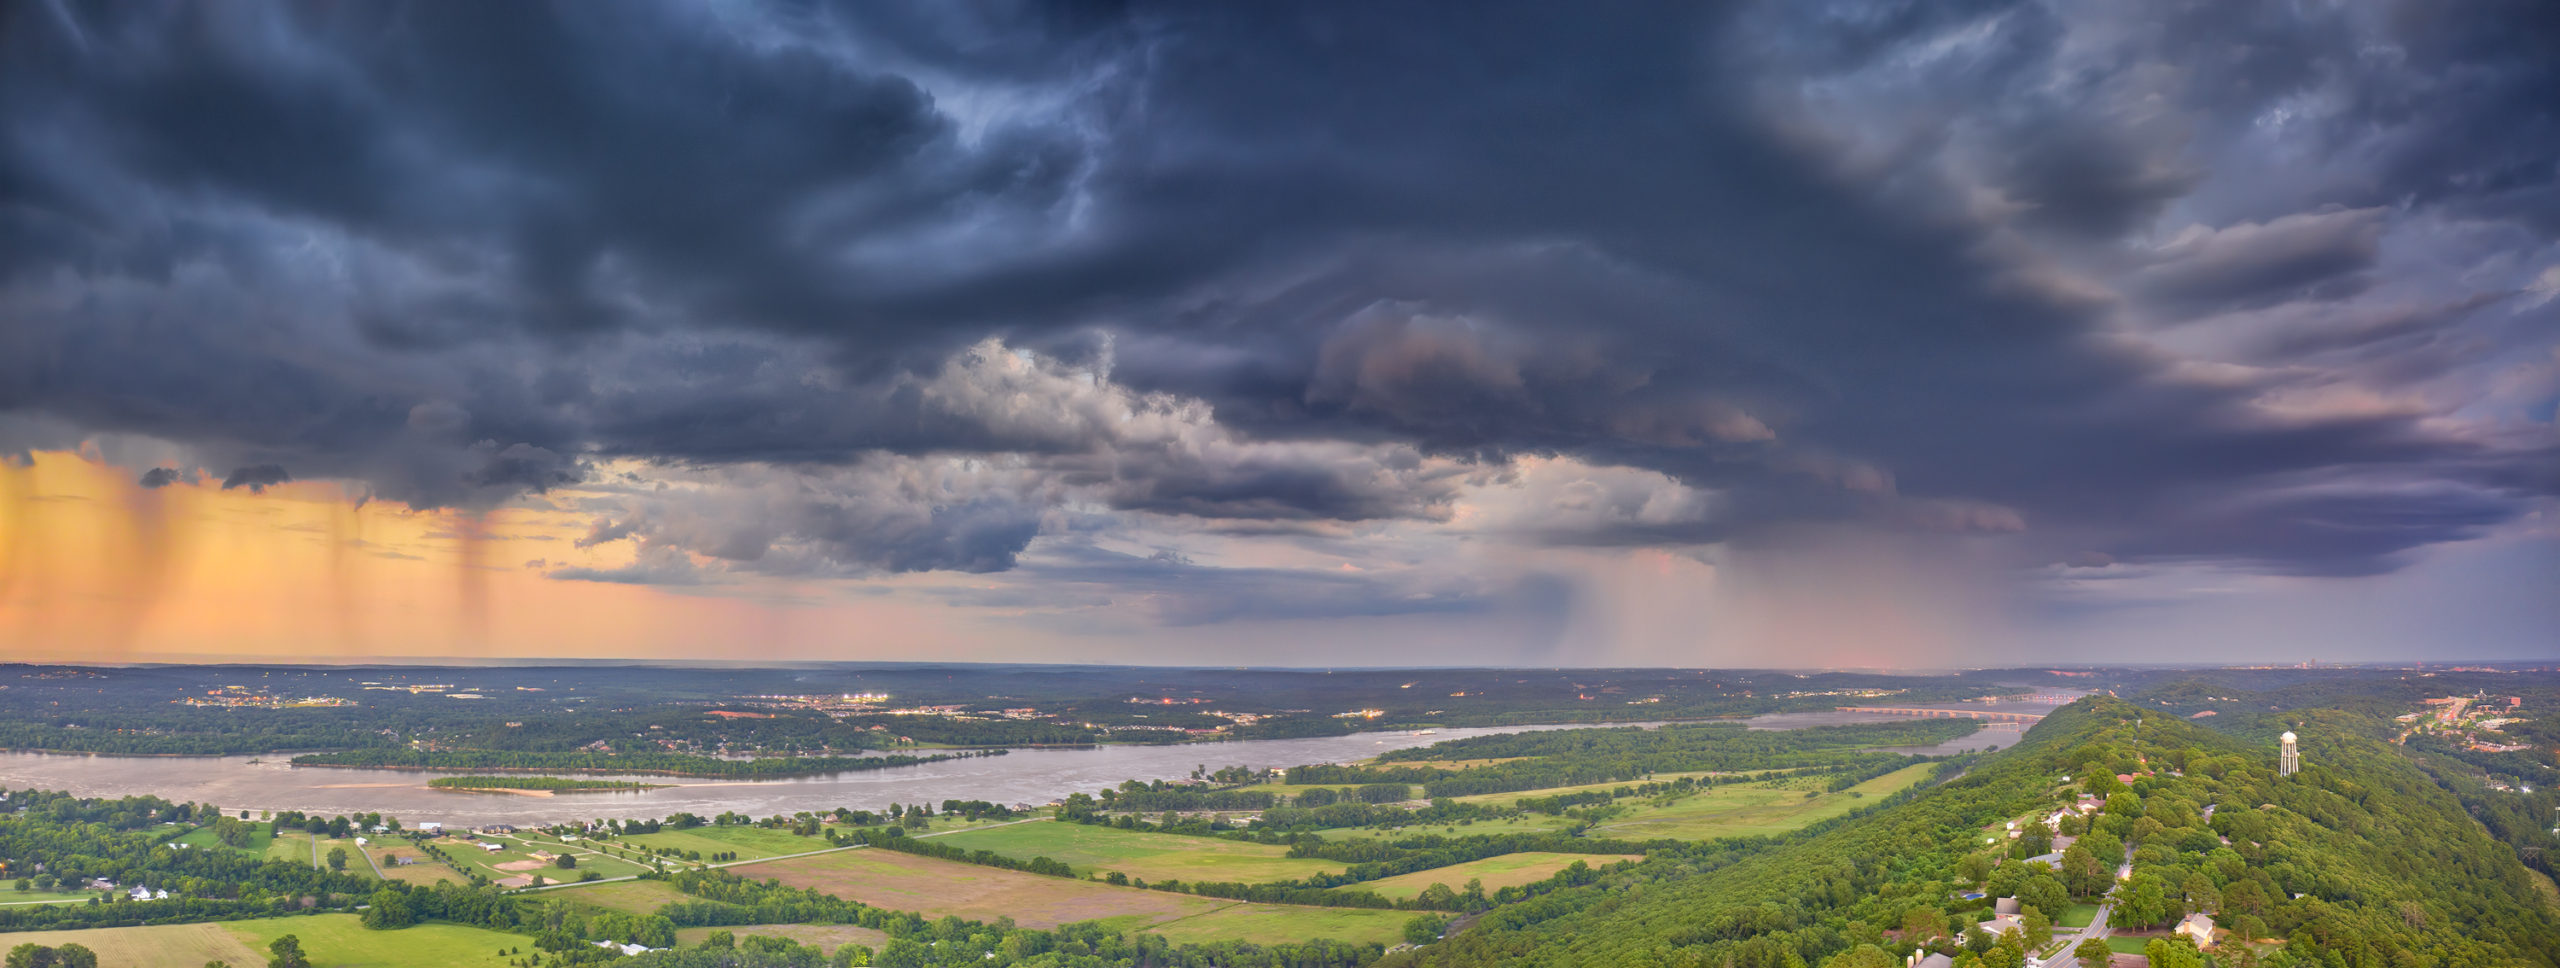
I have been using the IQ100 now for several months, and have noticed that there are some interesting facets to the dynamic range of this digital back. Lets take a more detailed look at this particular image taken on the Buffalo River, in Arkansas
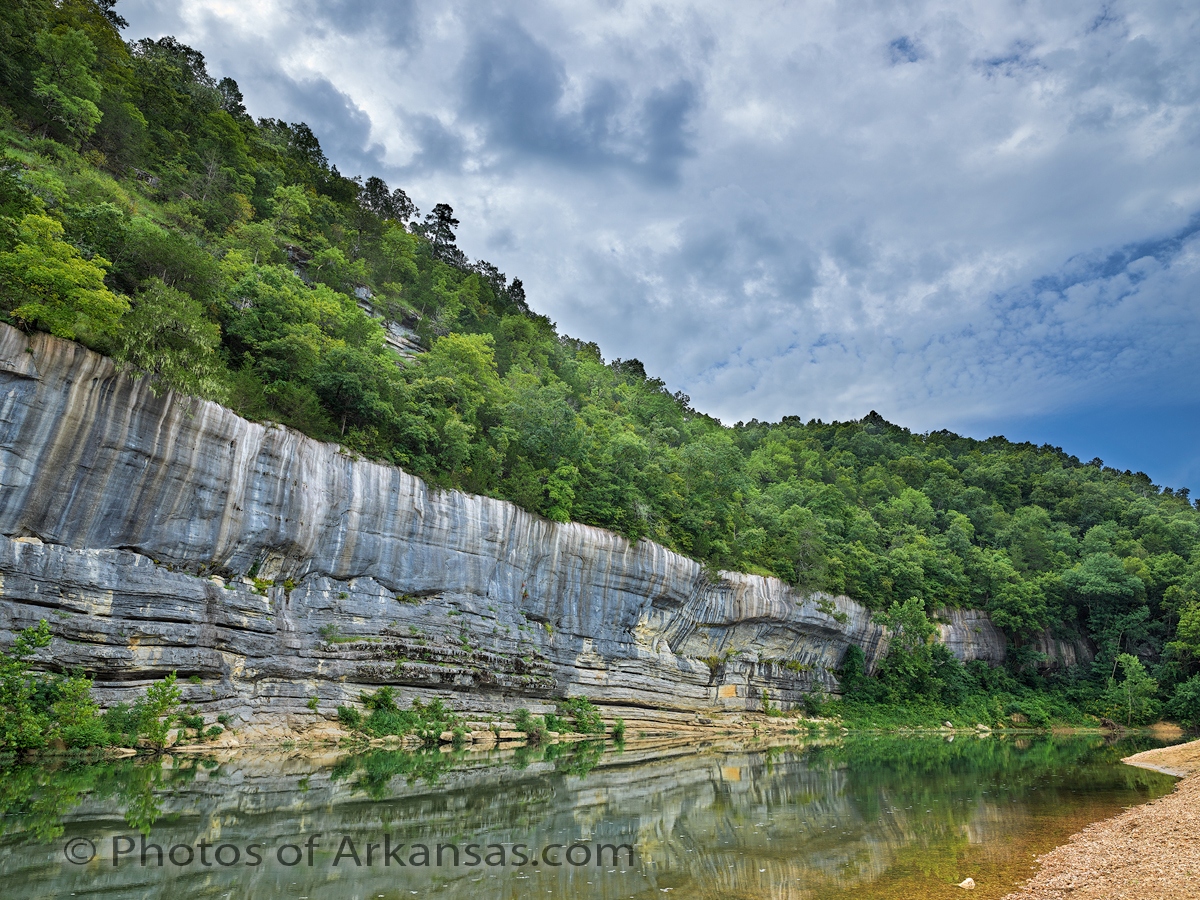
The Buffalo River at Buffalo Point in early August with a morning storm rolling in.
The IQ100 is of course the first 100MP digital camera ever marketed, was introduced in January of 2016 by Phase One, and so far has had a very good reception. I was very interested in the previous IQ250, 50MP digital back, however it has a 1:3 crop factor, which for my work, (example this image) would have been too much to sacrifice. I use wide angle lenses in most of work unless I am stitching and the 30 percent loss in focal view was too much for me. But I easily saw with the IQ250 the massive advantages that CMOS had over the traditional CCD Phase One backs. This showed up for me in two main areas, noise and dynamic range. These both have many definitions but for me it’s simple:
Noise, how much noise will I see in areas of shadow, at base ISO and at higher ISO. If I push an image, how much detail is lost to noise in the shadows. With a CCD back, there was never too much room here even at base ISO of 50
Dynamic Range, with one single exposure, what can I capture? If I adjust for highlights, will my shadows be filled with too much noise or vise versa. Also how well does my color saturation hold up at higher ISO ranges. With CCD digital backs, the color saturation fell off very quickly once past the base ISO. You might be able to get one more stop before the saturation was lost.
Moving to the IQ100 from the IQ260 I was hoping to see similar if not greater dynamic range at base ISO to the Nikon D810. I still regard the Nikon D810 as the flagship for dynamic range at base ISO of 64. With the Nikon D810 it’s easy to push a single exposure as much as 2.5 stops and still have wonderful details in the areas of shadow. Phase One (P1) rates the IQ100 at a base ISO of 50 so I was hoping to be able to get at least 2 stops of details when shooting at ISO 50. So on my first couple of outings with the IQ100, I mainly used ISO50 and planned to push the shots when necessary. I quickly found out that this the chip in the IQ100 (made by Sony) behaves differently that the 36MP chip in the D810 (also by Sony).
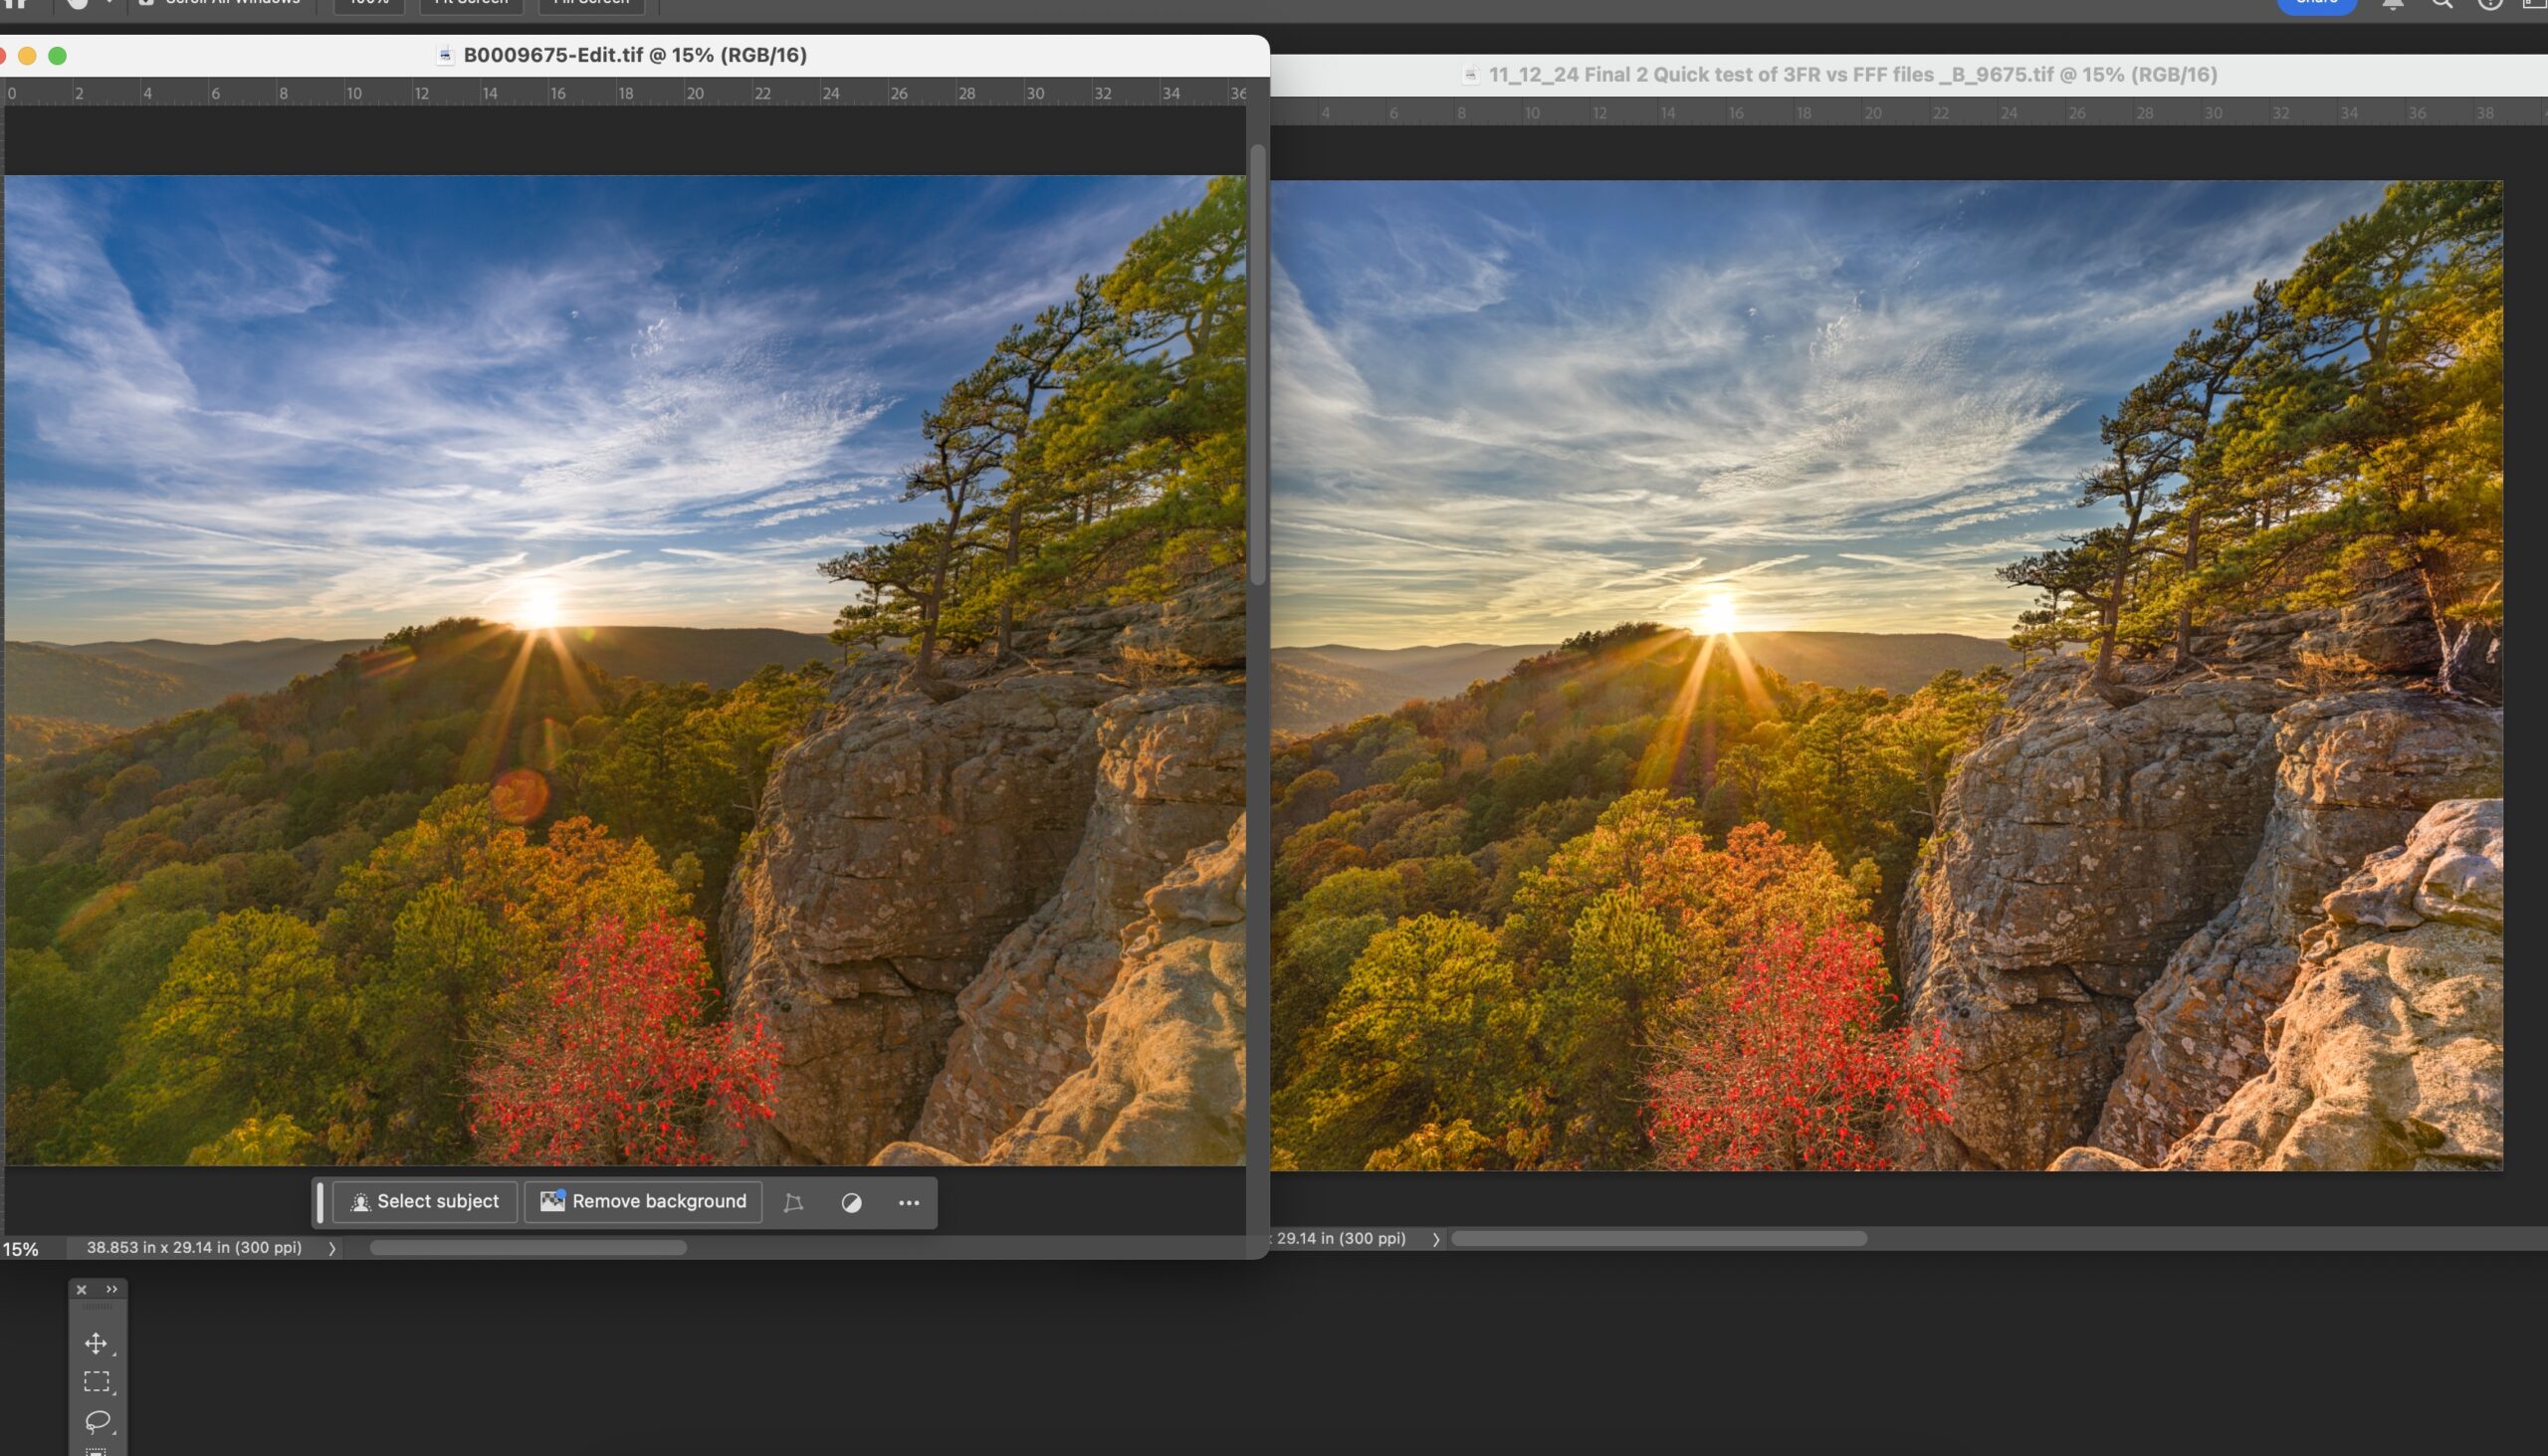
In working at base ISO 50, it became apparent to me that a shadow push of even 1 stop may be enough to cause you to lose details in the shadows, and also a huge amount of color saturation. This was a surprise to me as I had expected to get even better push than what I was seeing with the D810. However it was also soon apparent that the IQ100 has quite a bit of leeway with highlights, much more so than any of the CCD backs I have used from Phase One in the past. You can easily let your highlights go past 1 to 1.5 stops and still regain the finer whites. If you combine the “highlights” slider in Capture One, along the exposure slider, there is a lot of recovery. Looking at the example below: Click on the image to view it larger
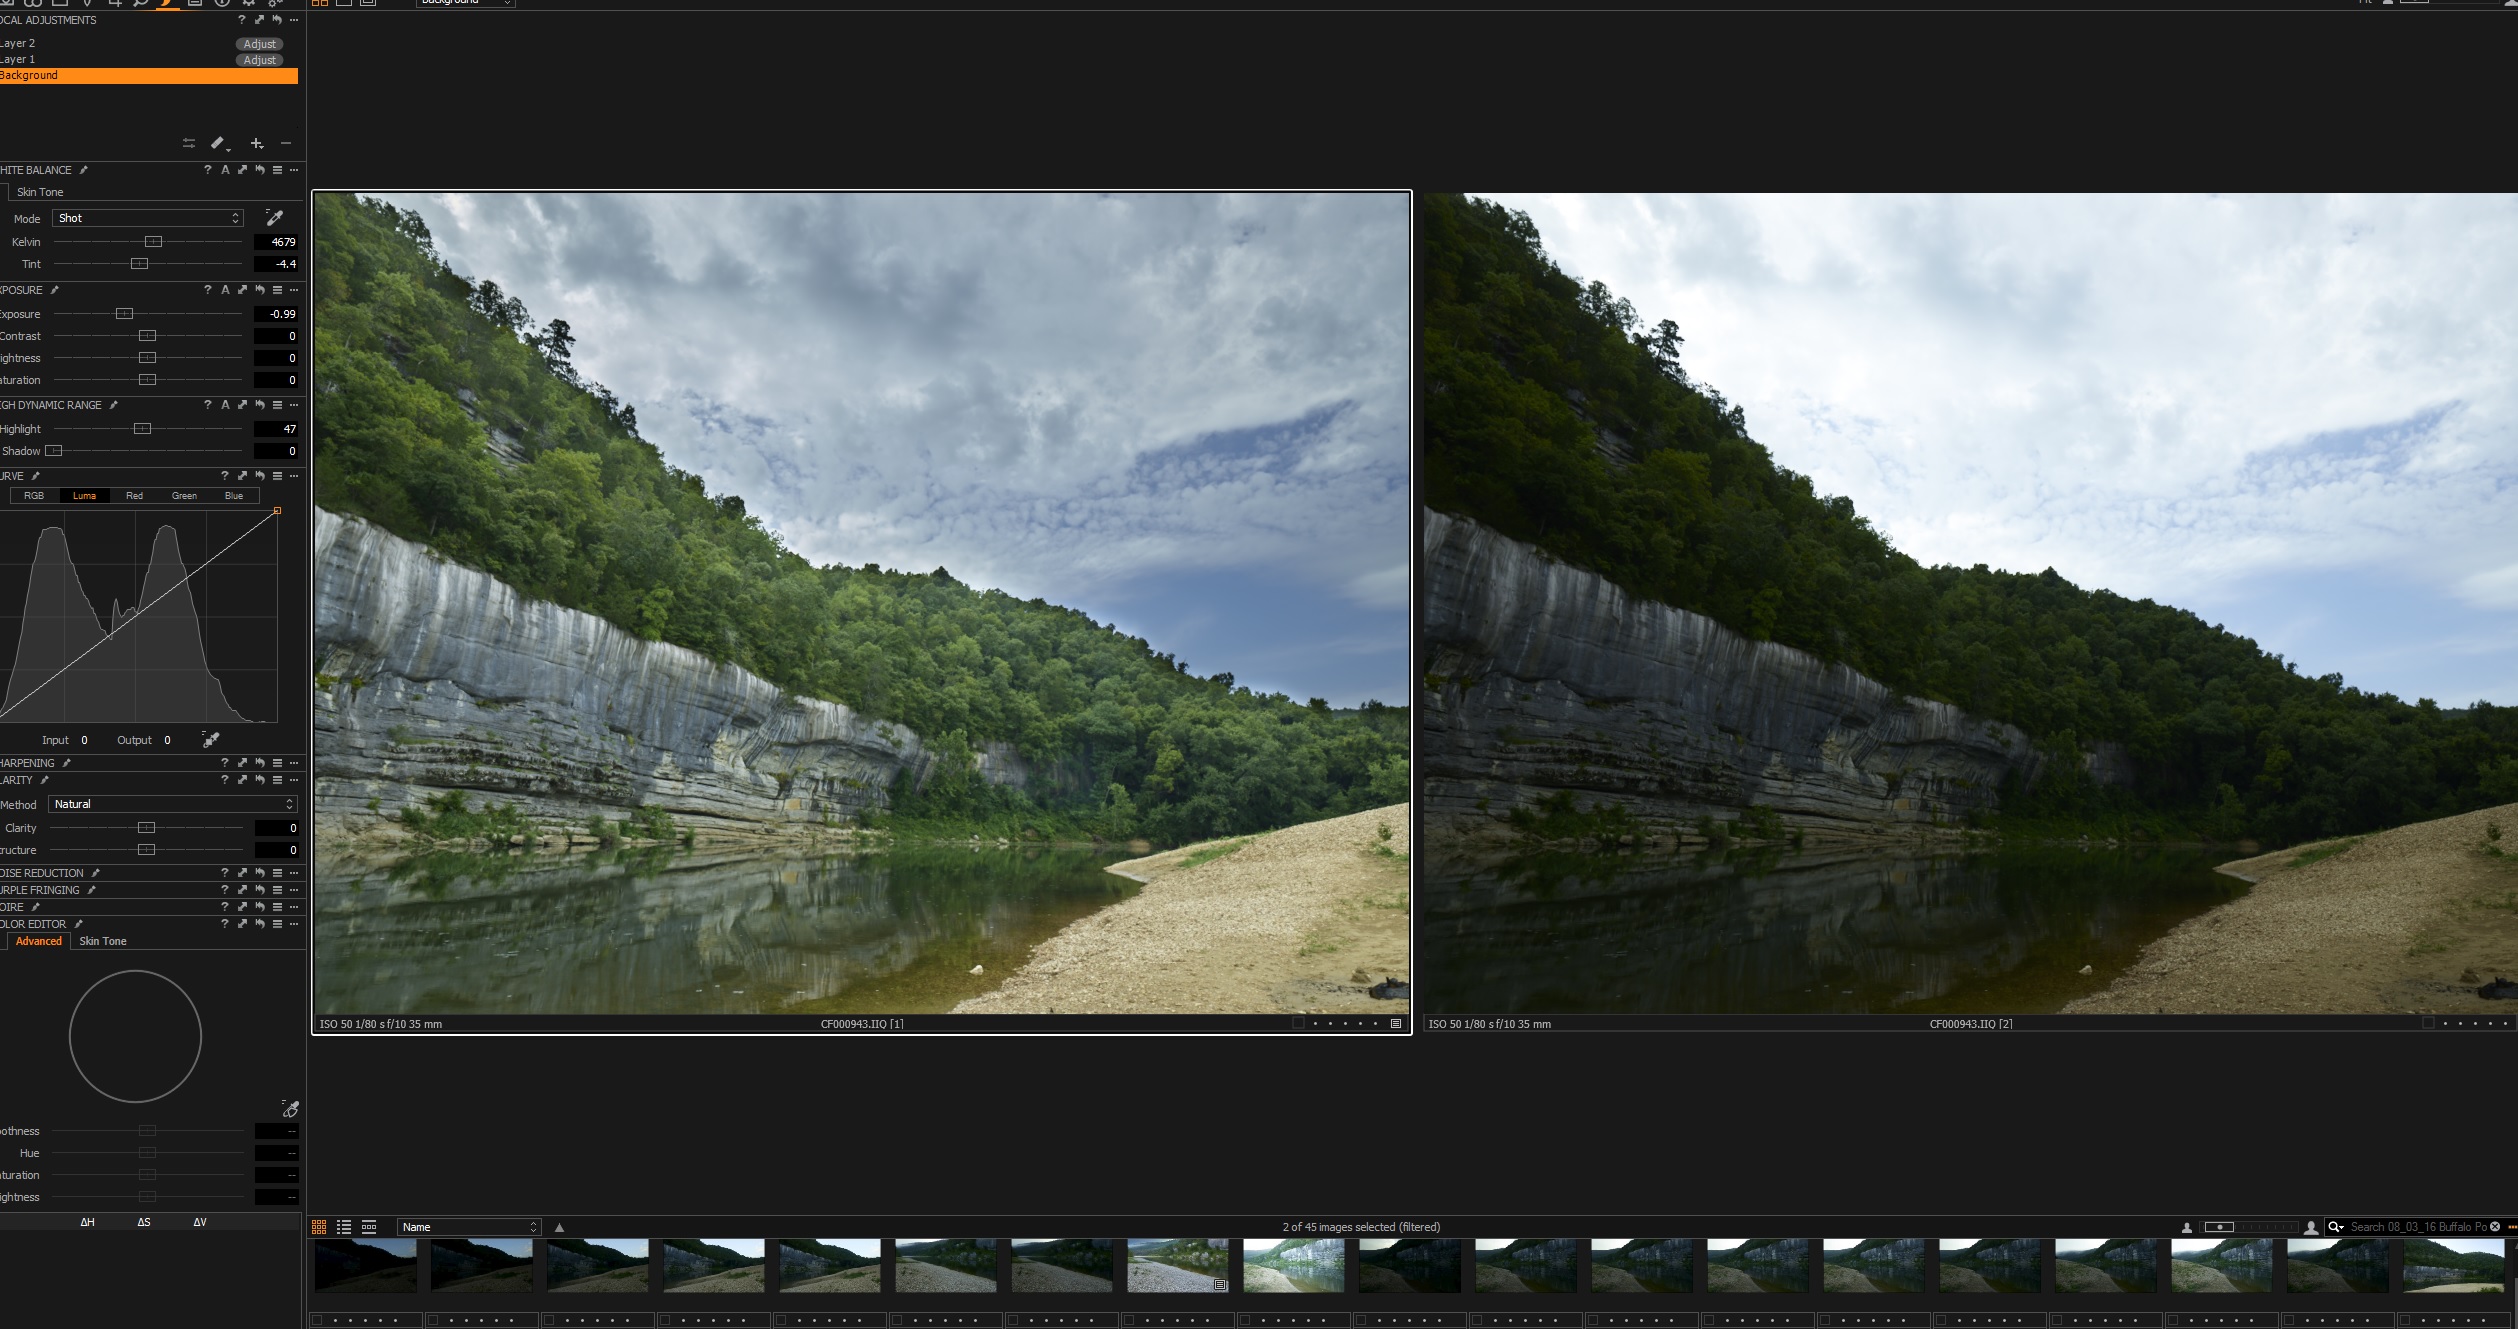
Screen shots of IQ100 image side by side
The image on the right side is the base image before any adjustments, the image on the left side, I just pulled the overall exposure down from center to -99 (almost 1 stop) and then adjusted the highlights to 47 from the far left. This pulled back all of the sky and actually provided some very nice cloud features. I then just added a local adjustment layer to the lower portion of the file, (non sky) and pulled up the overall exposure then added one more adjustment layer to tweak a few dark areas. Overall the end result to me is very nice and again is testimony to just how much range is in a single exposure from this chip. The take away is for sure feel free to let your highlights go a bit so that you can pull in a bit more shadow details.
Here another example.
2nd Example of highlight range IQ100
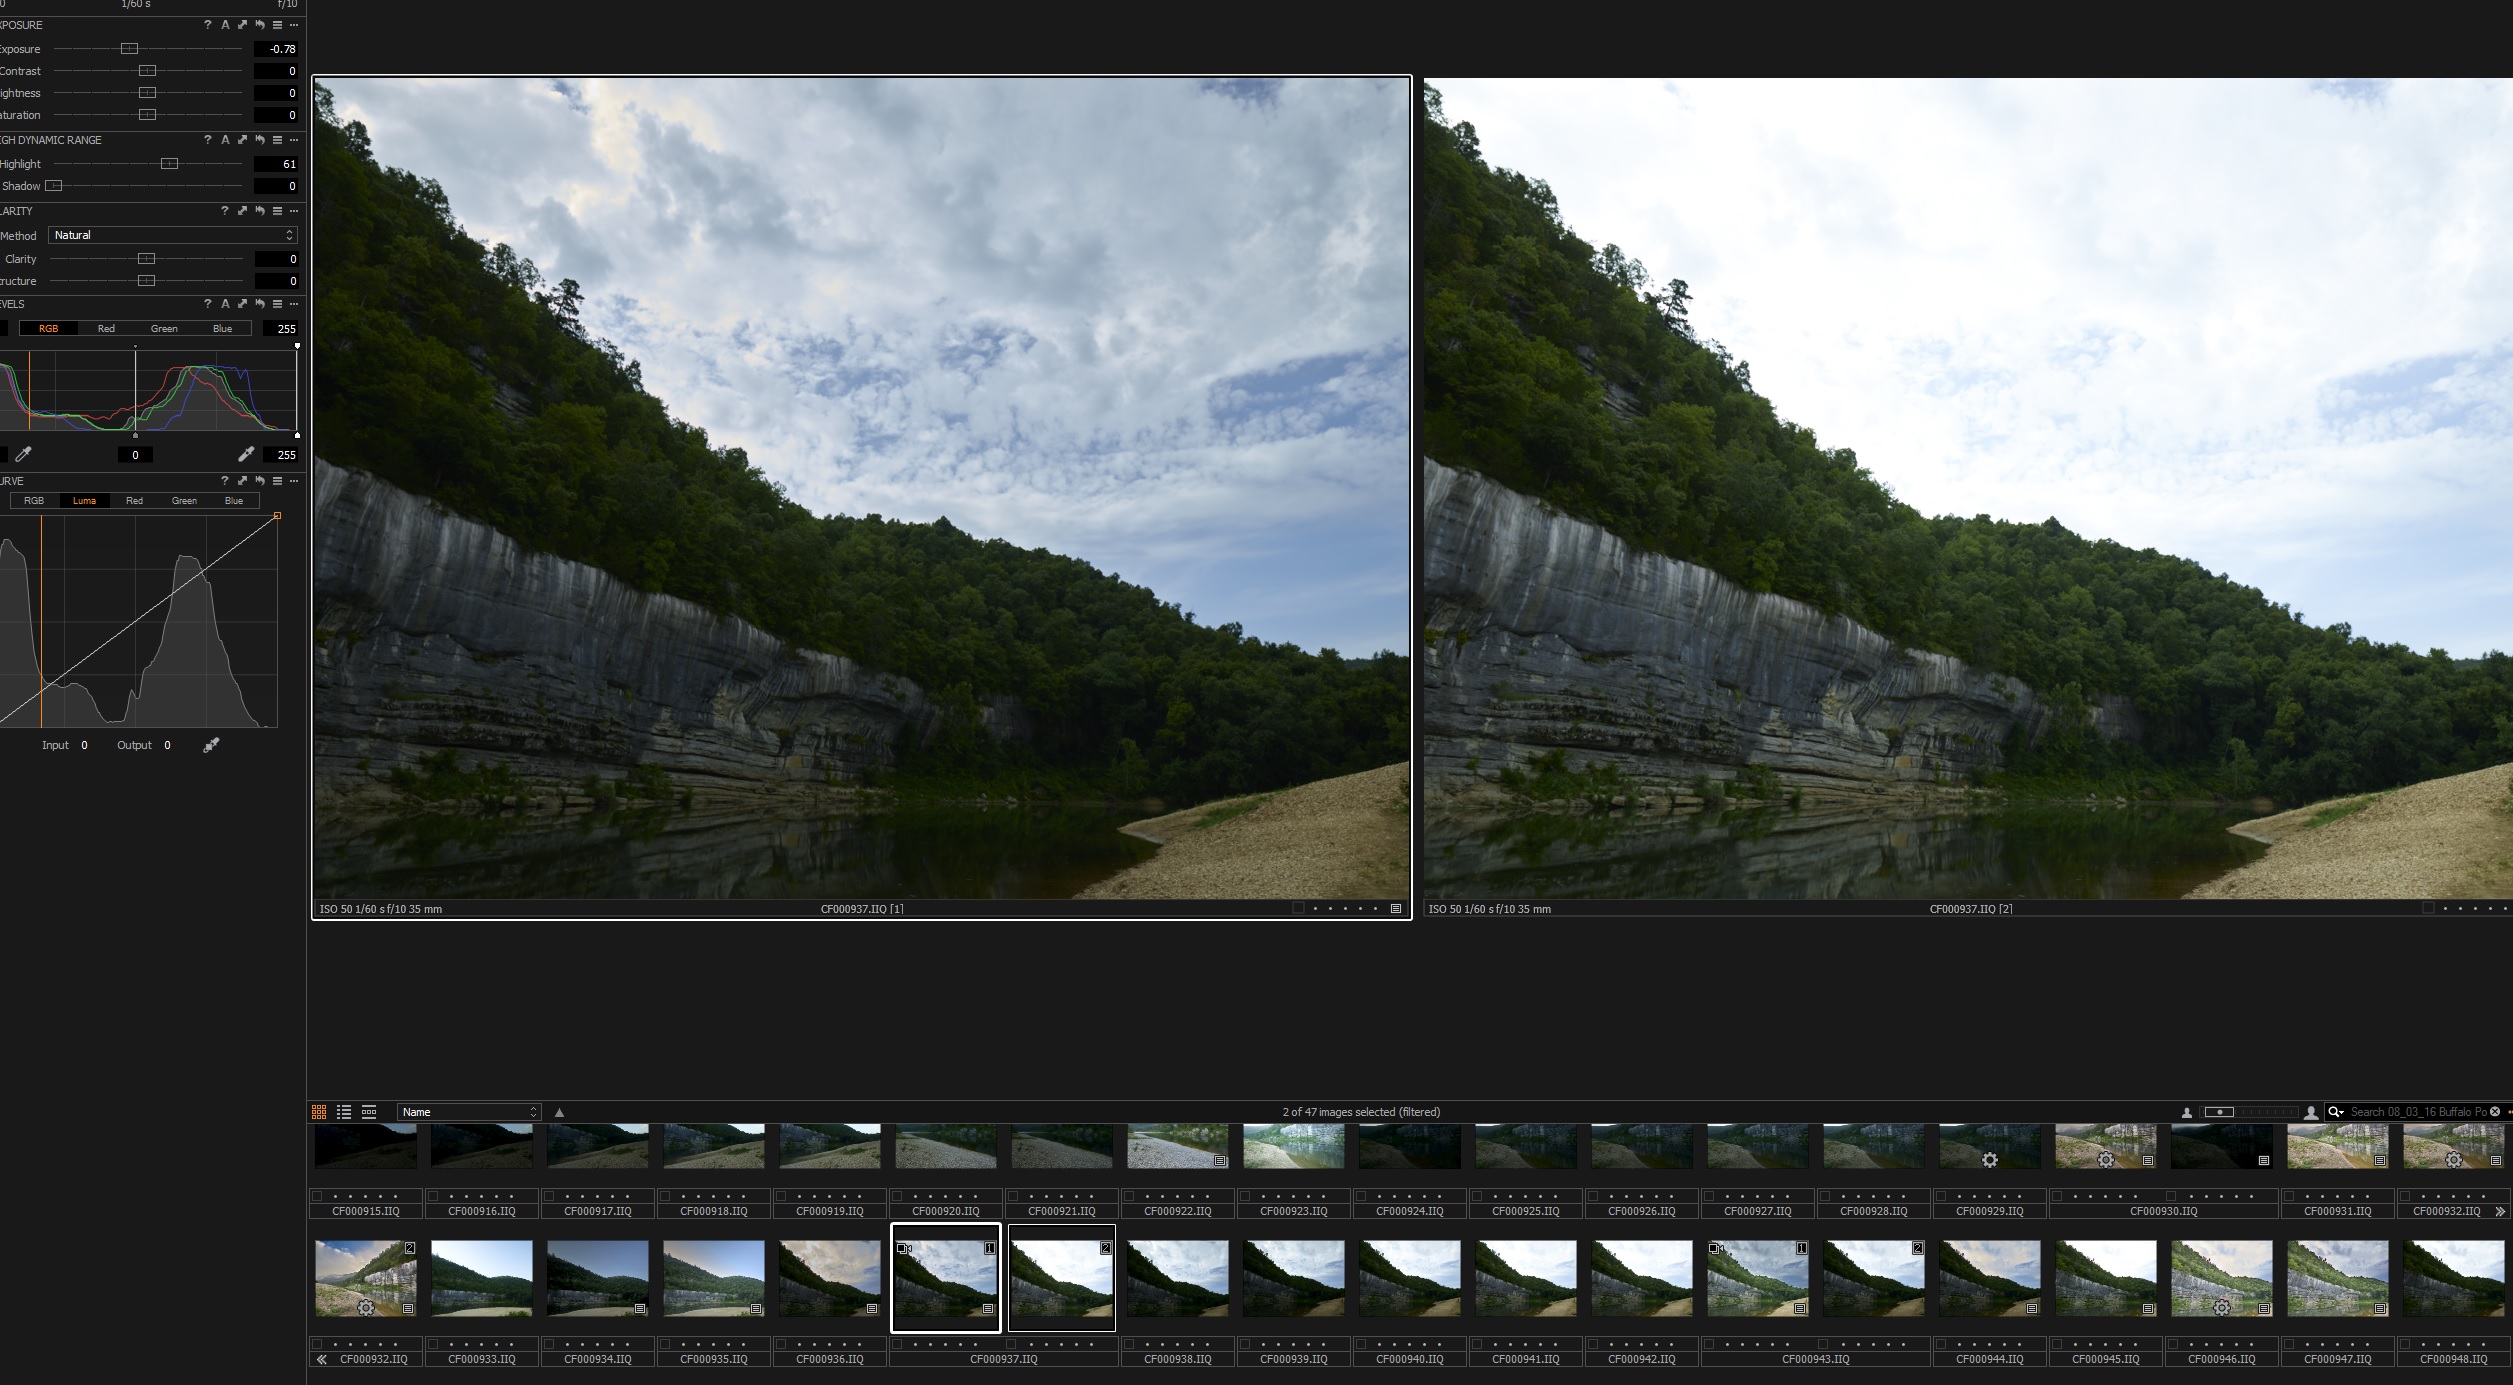
Here the original raw file is on the left side. Initial thoughts are that the sky is pretty blown, but with just a bit of highlight adjustment and overall exposure work, you can pull back the sky to a very manageable level. The bluff and trees will easily recover to most of their full detail with a bit of shadow recovery and local adjustment layer to work only on that part of the image.
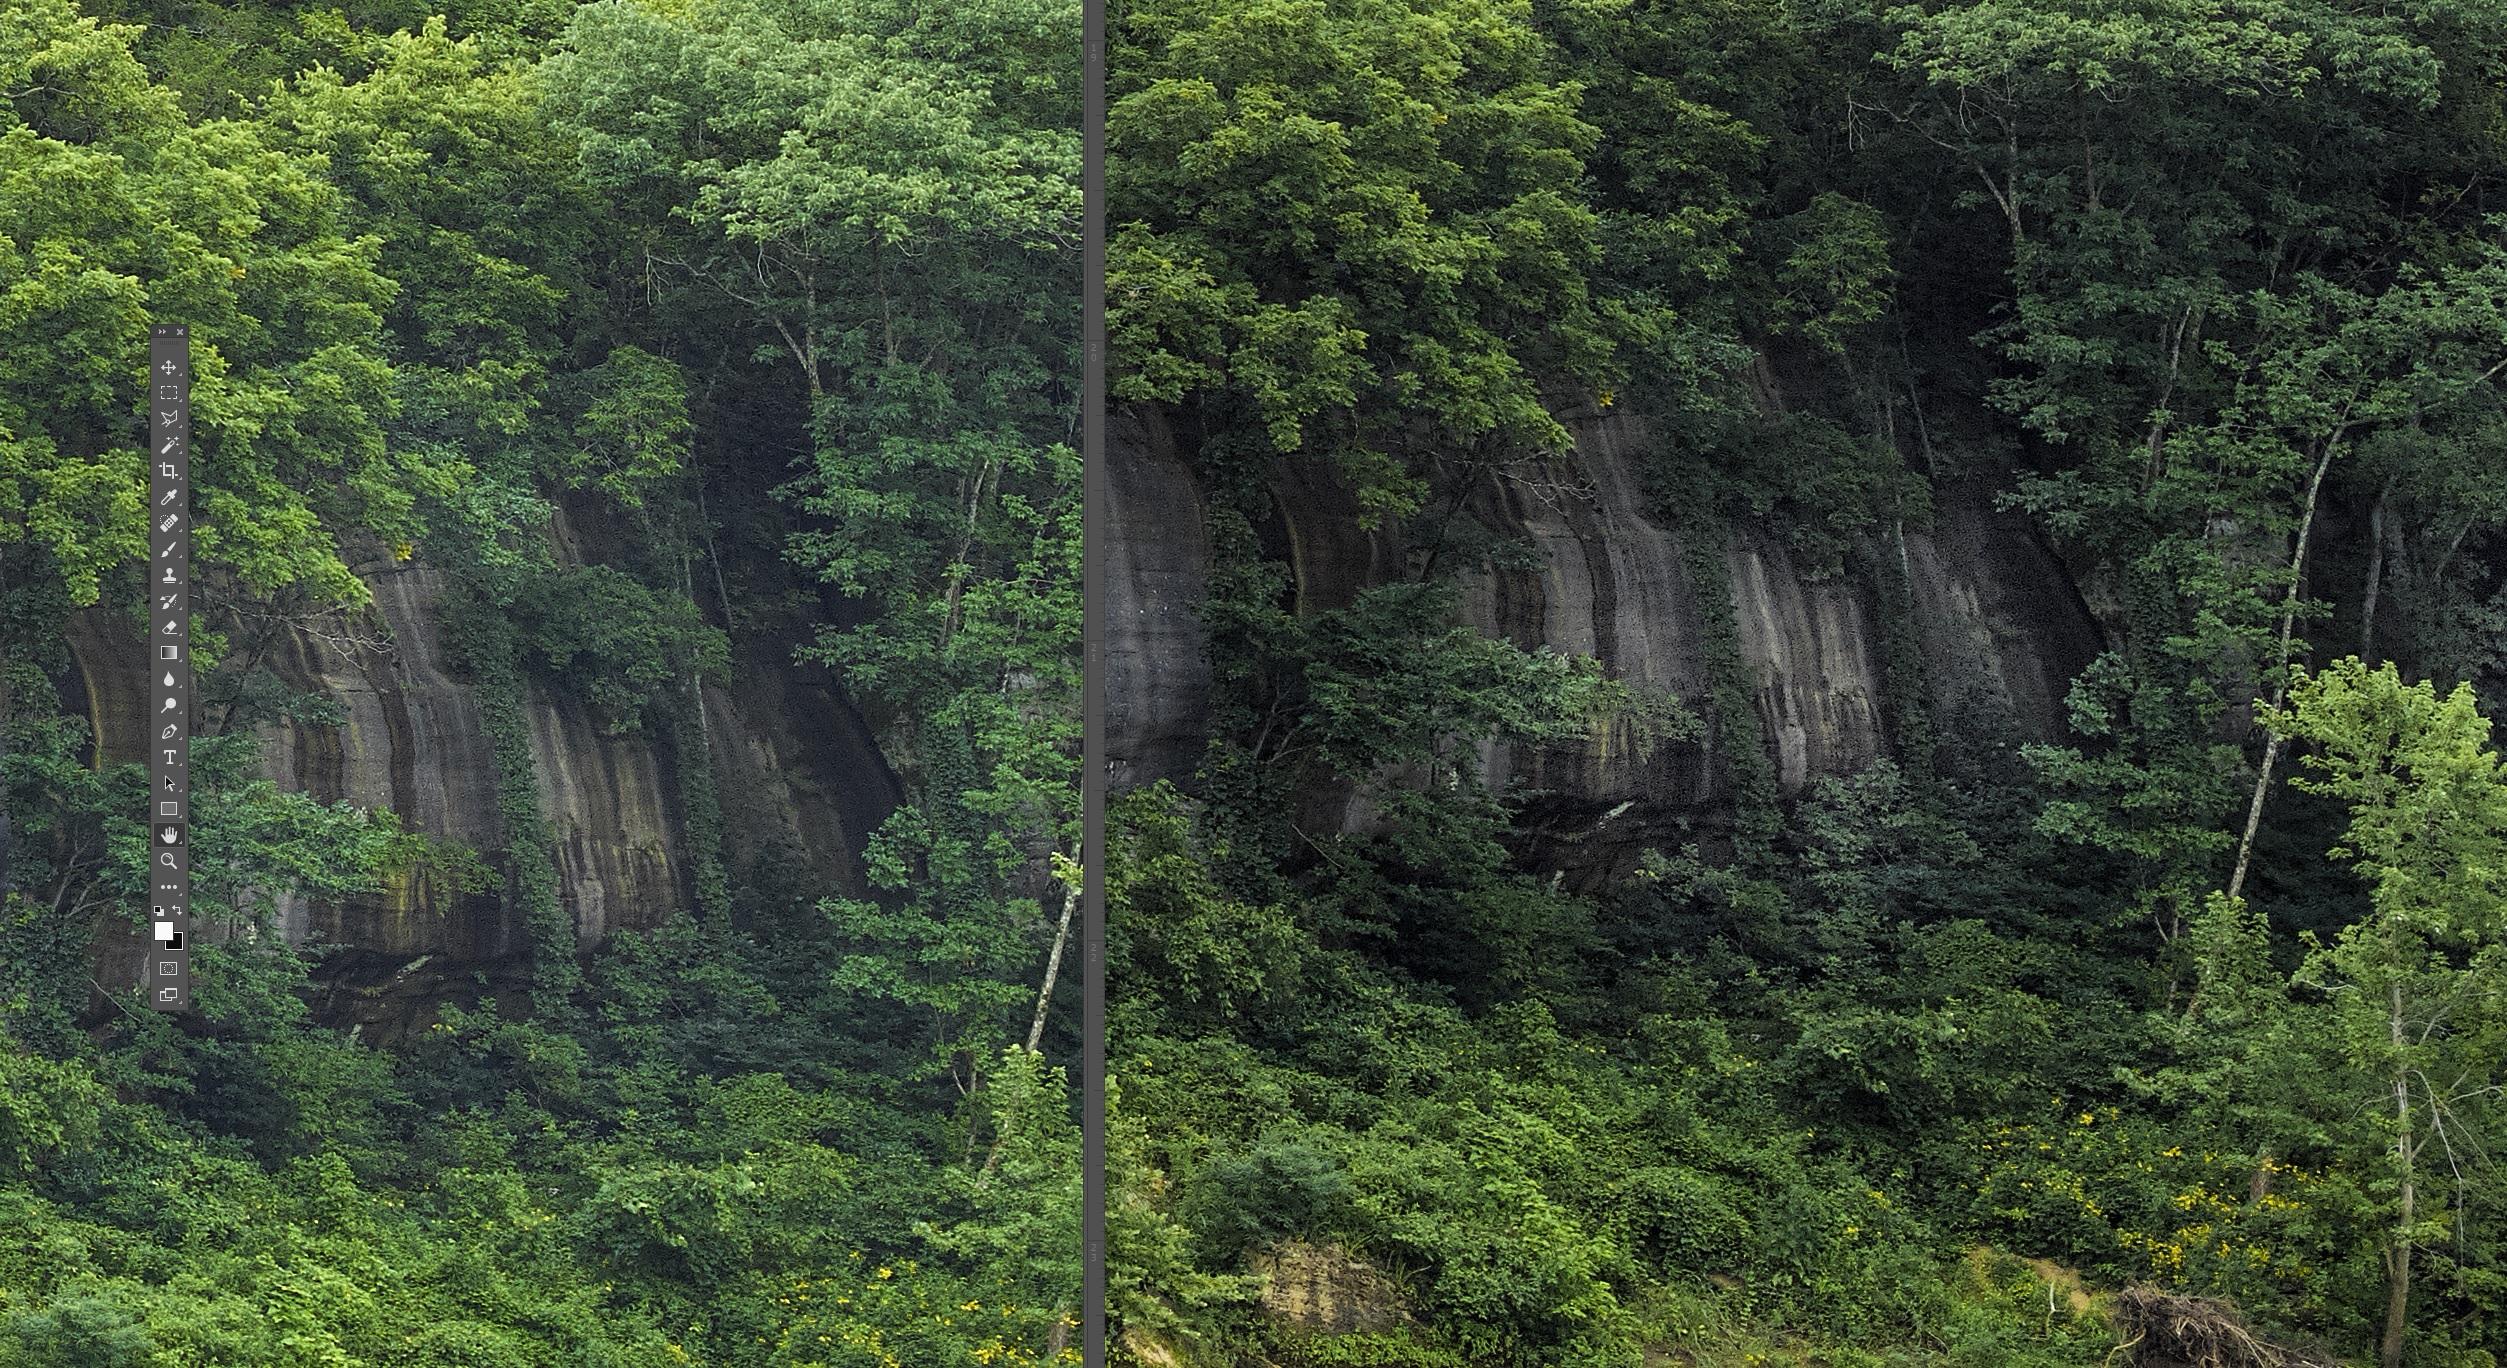
From my photography I feel if there is a downside to the IQ100 dynamic range, it would be in the shadow recovery. Here you have to be very careful as just one stop or two can make a huge difference between good details and color in the shadows. Lets go back to an example from the same set of images. If you look at the image at the top of this article, you can see that towards the far right on the bluff there is a dark area. I shot this scene in several brackets at both ISO 50 and 100 as I was unsure as to just how the clouds would capture. As it turned out, the clouds/sky were not the problem, but the dark shadows were. Look at this comparison: make sure to click on the image to view it full screen.
IQ100 side by side for shadow details
The image on the left was shot at ISO 50 at 1/25th of a second, F12, and the image on the left was taken immediately next at ISO50 and 1/60th of a second F12. If you click on the image, you can see that the bluff and trees along the bluff are almost devoid of color and there is considerably more noise. Both of these screen crops are from sharpened final images. The image on the left holds the green down into the shadows where as the same part of the image on the right is starting to lose the color fidelity. The color you may be able to pull back with some work in Photoshop, but the noise and loss of overall details you will never get back. So the point, is that you really need to watch your exposure and if you are unsure, bracket the frames. Just a difference in 1/25th and 1/60th can make a big improvement in the overall quality of the final image.
Photographer’s Notes:
I feel that there is considerably more dynamic range in the IQ100 CMOS back, over similar CCD backs like the IQ260 and IQ380 (60 and 80MP respectively)
The IQ100 has a tendency to push to a green overall tint and it seems that the greens can easily be come over saturated.
When working in mixed outdoor lighting, I would recommend exposing to the right, and pushing the highlights, as from my shooting experience you can easily recover 1 stop and possibly 1.5 stops in the highlights.
The shadows will quickly loss details and color if underexposed, even at base ISO of 50 or one push to ISO100. Once these details are lost you will not be able to get them back easily.
Considering that the 100MP back will start to suffer softness from diffraction at apertures past F11, you need to balance your shooting between both shutter speeds (subject allowing) and ISO.
When working on a single file, don’t be fooled into thinking that you have lost your highlights as you will be surprised to see just how much dynamic range and malleability is available in these fantastic files.
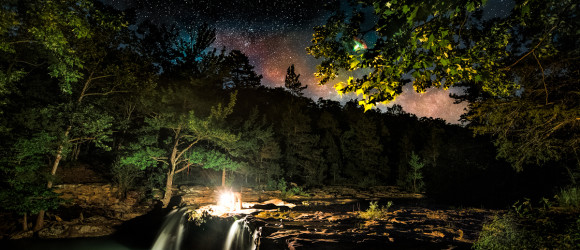
08/08/16 Featured Arkansas Landscape Photography–Milky Way over Buffalo Point, Buffalo National River

The Milky Way over the Buffalo River at Buffalo Point, Buffalo National River.
Taken with a Pentax K1 and 15-30mm lens @ 15mm and F 3.2 ISO 3200 for 2 minutes using the Pentax Astrotracer function in camera.
This was my first test for night photography with the Pentax K1, and overall I was pleased with the results from the Astrotracer feature in camera. This photograph is a combo from a 2 minute Astrotracer shot for the MilkyWay, and several different shots for the foreground at various times. I used a small lantern down by the bluff to add some local illumination.
Chris Kennedy and I worked for about 2 hours, starting with a very clear night sky and temperatures around 89 degrees with 100% humidity. 2 hours later the temperature was about the same, so I was sweating just standing around waiting on the camera. But there was little to no wind so I was able to pull a nice reflection of the bluff on the river and if there had been a bit more water or a better angle by me, I might have gotten a Milky Way reflection.
Buffalo Point is one of the more popular spots on the Buffalo River, and the only campground with full electric hookups, so it will always be crowded in the summer months. You can either reserve a campground in the lower camping loops or you can try to get a spot in loop A, where it is always first come first serve, and loop A is the original WPA worked sites. I hope to get back to work this place in fall, both for the Milky Way and later on for Star trails. Star Trails will be a bit more difficult due to the location of the moon and due north.
Paul Caldwell
06/18/16 Featured Arkansas Landscape Photography–Nighttime skies over Falling Water Creek
- At June 18, 2016
- By paul
- In Featured Arkansas Photography
 0
0

Nighttime skies over Falling Water Creek
Taken with a Nikon D750, ISO 3200, 15 seconds with a Nikon 14-24 lens at 14mm F 2.8 for main night sky and a series of shorter exposures to blend in the lantern and water.
Working with the night sky can be easy and hard and on this night it was a combination of both extremes. I was working with Chris Kennedy at Falling Water Falls in the Arkansas Ozarks. Falling Water Falls is one of the more known spots and very often has a lot of folks either swimming or just hanging around. But at midnight, I have yet to run into anyone (at least human). I have thought about this spot many times for either star trail work or the Milky way and have successfully taken many star trail shots here, but have never worked the Milky Way. The conditions for the best Milky Way shooting are a moonless night or as close to it as you can get. On this night Chris and I were working with a very small amount of moon less than 16% and we both hoped that this amount of light would not effect the Milky Way’s luminace, but we were wrong. As soon as the last of the sunlight was gone, we could quickly see that there was quite a bit of light being provided by the 16% moon, which was setting directly behind us. On this night, June 8th, the Milky Way was due south and very faint at first. This was as strange night as there was too much moonlight to really see the Milky Way but the stars were amazingly bright. Also this small amount of moonlight did not provide very much light to the falls and surrounding area, so we quickly fired up a lantern.
The night was very muggy and dead calm. Normally I want dead calm, but as soon as I fired up the lantern every bug in the area made a bee line for the light and for the rest of the night we were covered in bugs. There were also a lot of lightening bugs and they added a strange effect to a lot of the star stacks. We kept looking for the Milky Way to the southwest as both of our star tracer apps were pointing us that direction but we could not see it. After working for about 1 hour I happened up to the top of the falls and for the first time could really see that the Milky Way was off to the southwest and very low on the horizon. Strange!, but still possible to shoot.
We quickly left out spot on the far side of the falls. We had set up here as it was the only only place to really get a clear view of the sky below the falls. Once on top on the large ledge that creates Falling Water Falls, we could clearly see the Milky Way just over the tree line. The moon was so low in the sky now that it was not providing any illumination at all, so Chris walked out on the ledge and held the lantern. It really made the shot in that the lantern provided just enough light to the immediate parts of the trees and gave a very nice fade out. The trick was holding the lantern totally steady for the 17 seconds required to shoot the sky. We actually both tried this for each others shots and it came out very nicely. I have left one piece of lens flare in this shot as it’s not really hurting the shot. The 14-24 will flare always, when given any chance. This will be an easy one to take out later.
I used the Nikon D750 for this shot and I was very impressed! The ambient temperature was around 70 degrees F and the relative humidity had to be 100%. I shot the entire sequence at ISO 3200 with the 14-24 wide open at F2.8. The longest exposure I used was 20 seconds and there was just a bit of trailing on the far sides which I did take out with a custom brush in Photoshop. At 20 seconds I was just able to get enough of the unique color of the Milky Way, however the rest of the frame was totally blown out due to the lantern. So I then shot a series of short frames the shortest exposure @ 6 seconds and then combined various elements from 3 different shots to get the final work. There was no wind blowing or very little most times so the leaves are not blurred and can add a nice effect. The lantern added a very warm tone to the trees and water so I also tweaked that back to a more neutral tone.
Overall I am pretty happy with this attempt. If there had been much more water coming over the falls, then all the trees below the falls and on the side would have been moving due to the force of the water. The lantern captured the nice green color of the water which is common to all Arkansas streams this time of year. For the Milky Way, I spent the most amount of time as it was just barely showing so I used several different adjustment brushes in Lightroom to help bring out the colors and different tones common with the nightsky. The stars were very bright this night and they add a very nice contrast to the night sky above the Milky way.
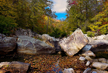
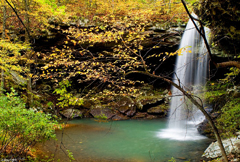
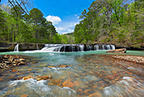
05/25/16 Six Finger Falls on Falling Water Creek–Featured Arkansas Landscape Photography
- At May 26, 2016
- By paul
- In Featured Arkansas Photography
- 0
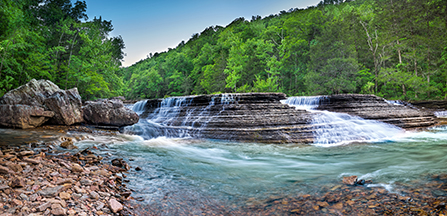

A late springtime view of six finger falls on falling water creek.
Taken in two frames with a Phase One IQ100 and Phase One 35mm LS lens, raw files developed in Capture One, panorama stitching in Lightroom.
We had driven up to 6 finger falls to attempt a night shoot, which did not work out due to the clouds that rolled in, however during the sunset, the light did allow for a wonderful series of photographs. I love to get down low on the creek, below the falls and attempt to grab some short pans, as the normal medium format of 4:3 does not allow for very much to work with. I am not a big fan of cropping out the center of a shot to get to a pano, as you loose so much image in the process.
Normally, I would have used my rail to get a nodal solution, but I had forgotten it. Using the Arca D4 geared head, it was easy enough to get level for each shot, then go back to Lightroom to let it work it’s magic on the panorama. Lightroom with the new panorama feature does a great job on single row stitching and now they have added a feature called boundary warp, which really does a great job. In the past, I had always used software like Ptgui or Kolor’s panorama software, to get a cylindrical solution, as I am panning with a wide lens, (the 35mm in medium format is equivalent to about 22mm with a 35mm camera), still not that wide. The 35mm LS has a pretty good hyper focal range by F11 and I took this at F14. Due to the subject range and distance, I was not worried about losing details to diffraction.
For these shots, I used both a circular polarizer and a Neutral Density filter. The polarizer was from B+W and the ND filter from HiTech, (their new Firecrest line). This allowed exposure times of around 1 sec, at an ISO of 50. There was little to no wind blowing so I was able to get away with just two exposures.
The addition of the boundary warp in Lightroom has really made this type of photography more fun and much quicker to get to a solution.
05/05/16 Featured Arkansas Landscape Photography–Springtime sunset over Pinnacle Mountain
- At May 05, 2016
- By paul
- In Featured Arkansas Photography
- 0
A strange combination of light for springtime in Arkansas, but it made for a wonderful shot.
Taken with a Nikon D800e, Nikon 14-24 @ 14mm F 8, ISO 100, exposure bracketed in 3 frames and worked up in Lightroom with Topaz Clarity
The evening I took this, I have hoped for a bit more cloud cover, but the spring colors were out in full so I went ahead and worked up the shot. This was taken from one of my all time favorite spots over looking Pinnacle mountain. Here you are looking due west, so depending on the time of year, you can sometimes catch the sun setting right on top of Pinnacle. As I recall the best times for this are in late March and September, but it’s been a long time since I went after that shot.
Even with Nikon I went ahead and bracketed this shot, I feel many times that in protecting the shadows, I will blow out the highlights and they will never be recoverable. I worked this shot up once before a couple of years ago, but never got it where I liked it. Now with the HDR feature within Lightroom, I went back to the raw files and worked them up again. This time I got much better results and then worked on the file just a bit in Topaz Clarity. I am not sure why the sky went black at the top, but that is just how it worked out, I kinda of like it!
The HDR feature in LR has it’s problems, but most of the time I can do what I want and get the effects I am looking for so much easier than any other HDR tool I have ever used.
The spring colors in Arkansas just looked great on this evening so it all came together for me.
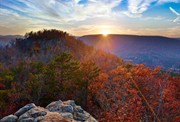
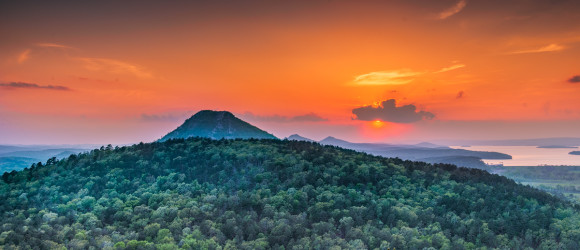
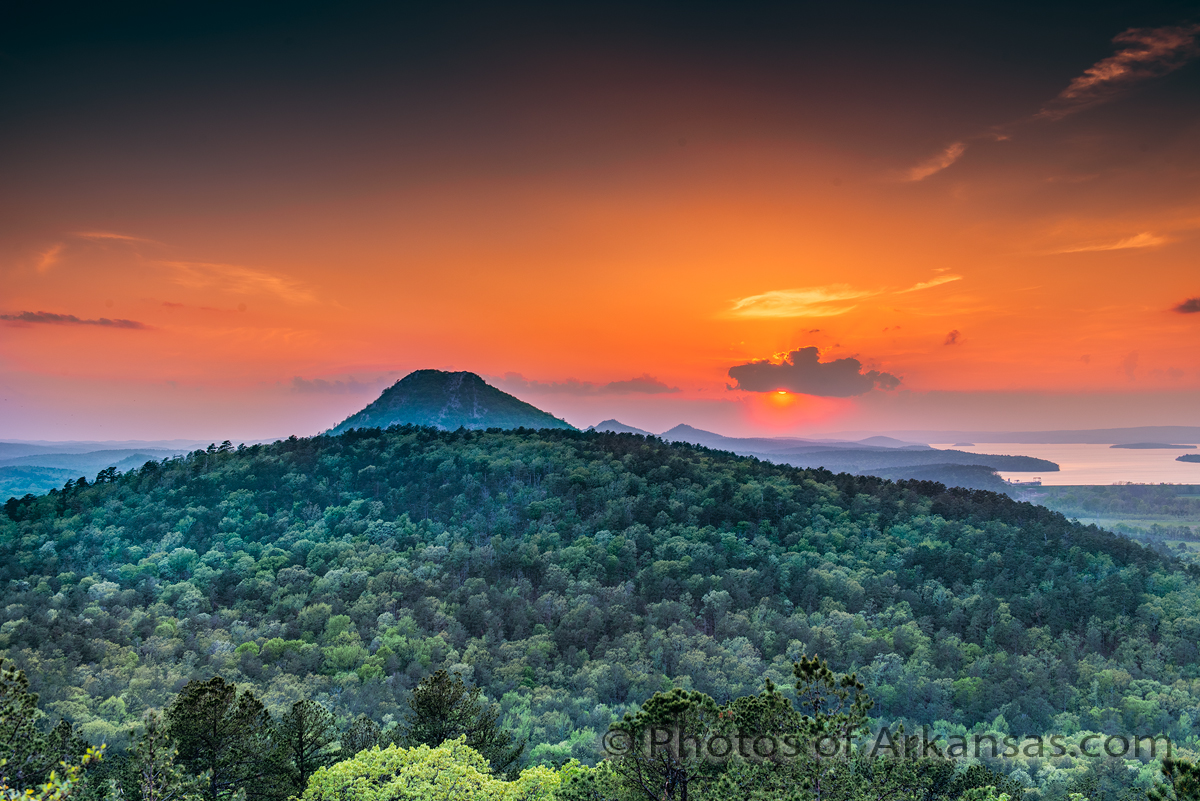
Featured Arkansas Landscape Photography–October sunrise on Mt Magazine
- At March 25, 2016
- By paul
- In Featured Arkansas Photography
- 0

October Sunrise on Mt Magazine
PLEASE NOTE: All of the photography of this website is the property of www.photosofarkansas.com and is copy right protected. Do not copy any of the images on this site to paste on Facebook, Pintrest, or any other website without the permission of Paul Caldwell. Years of time have gone into capturing these photographs, please respect that. I do not take copy right infringement lightly. If you have a need to display any of my work on your site ASK me before you Copy & Paste.
Taken with a Nikon D810 and 14-24 Lens @ 14mm and F 5.6 ISO 250 exposure bracketed in 3 frames
On Mt Magazine, the view in late October back to the east can provide some amazing sunrises. The sun will rise right out in the center of the frame and when you have clouds the light can be fantastic. In this shot, I was on the 3rd floor of the lodge, but you can work from any floor. All the rooms on the lodge open out to the back side and have a southward facing view. Mt Magazine is the “border” of the end of the Ozark mountains, as all the mountains to the south are in the Ouachita Mountains. So you get a excellent view of the beginning of the Ouachita chain that runs from here to the southwest corner of Arkansas. In the view looking back to the east, you can see Flatside Pinnacle way off in the distance also. Flatside is 1,500 feet tall and is a great photographic area also.
Later in the spring and summer the sun will move back to the left and will rise out of view, so the best times to catch a sunrise, is October through early February. In 2015, the fall colors in Arkansas sucked, yes, they were that back. Mt Magazine tends to have a pretty good display even in the years like 2015 and I guess this is due to micro climate that Mt Magazine has, being 2,700 feet tall. But what made this shot were the clouds that came across the sky right as the sun came up. The sun is in the dead center of this shot, but is filtered by the band of clouds that are right on the horizon, but these same clouds allowed the light to reflect upwards and just popped the clouds towards the top of the frame.
I used ISO 250 on this shot as there was considerable wind blowing I wanted to start my exposure stack with a higher shutter speed. The Nikon D810 does a good job here, not as well as it would have at base ISO of 64, but I was still able to stop the motion of the trees and get the shot. The camera was mounted to tripod so alignment was not an issue. I used the HDR feature of Adobe Lightroom to merge the 3 exposures and Lightroom did a very good job on this shot. In this shot you can see the rock bluffs of Mt Magazine and then one row of the cabins that can be rented. There is really no way to get this shot without also getting the cabins in the view, so I just include them. Off in the distance you can see a couple of the rolling ridges that create the Ouachita mountains.
02/25/16 Featured Arkansas Landscape Photography–Sunset Falls on Mt. Magazine aka Chris Kennedy Falls

Sunset Falls on Mt Magazine in the Arkansas Ozarks.
PLEASE NOTE: All of the photography of this website is the property of www.photosofarkansas.com and is copy right protected. Do not copy any of the images on this site to paste on Facebook, Pintrest, or any other website without the permission of Paul Caldwell. Years of time have gone into capturing these photographs, please respect that. I do not take copy right infringement lightly. If you have a need to display any of my work on your site ASK me before you Copy & Paste.
Taken with an Nikon D810 & 14-24 lens @ 14mm, F11 ISO 64 through 400 in a series of bracketed exposures, combined into a single photograph in Lightroom.
In Yosemite National Park, there is a famous spot where during the month of February you can catch the setting sun illuminating a slender waterfall. Once the angle of the sun moves past a certain point the light falls beyond the waterfall. The problem is there tends to be over 1000 people lined up to get the same shot, so it’s really become a common shot. Still a thrill to get, but 1000’s of copies floating around the internet and in various galleries.
By pure chance, one of my friends, Chris Kennedy found this place on Mt. Magazine. I am sure this creek has a name, but I felt it fair to give Chris title. I have seen thousands of waterfall shots taken in Arkansas, but I have never seen one that features the setting sun, both in the shot and illuminating the waterfall. I knew of a different spot a bit further down on Highway 9 and had mentioned this to Chris to check out. During that trip, he found a second series of waterfalls, just up the highway, and while he was photographing them, he realized that it was possible to catch the sunset on the waterfall. Chris sent me a shot the next day and I was transfixed! Chris mentioned to me in passing that the trip to the base of this waterfall was about like the hike down Big Devil’s creek from Hill Cemetery, a hike I had made many times, so I was not too worried about it. I had a lot to learn.
Highway 9 heads up the south side of Mt. Magazine out of Havana Arkansas. On the way up you will cross several small creeks that really just runoff from the summit of the mountain. The largest creek in the area Shoal, starts up on the other side of Magazine and runs to the north. As you wind up Hwy 9, you will come to a spot where two small creeks cross the highway and then come together. This spot has obviously been photographed many times before as there is a worn down trail to a vantage point. This creek now bounces down a very steep gorge over many more waterfalls, and disappears out of sight headed south. While walking along the highway, Chris spotted a higher waterfall, much further down the creek, and headed down the hillside to get a better view and in the process discovered this wonderful view.
The waterfall, is actually in 3 parts and in this photograph, you are viewing only the top part of the waterfall, which is also the highest single point. It’s about 20 to 25 feet tall from the very base. The creek then winds around the shale bluff and makes two more nice drops before emptying into a nice pool. The sun in January, is at just the right angle to shine on the base of the falls, providing a beautiful shot. Chris told me that you only have about 10 minutes to catch the light before the best part of it moves away from the falls.
I headed up to this spot with Dr. Todd Smith, (and will tell more of that story on my blog), and we were both able to get to the base of the falls just in time to catch this shot.
A few points of consideration:
- This waterfall has one of the most dangerous approaches I have ever attempted in Arkansas in over 40 year of hiking this state. You are hiking down a pitch of at least 55 degrees or more at times and it’s all loose rock
- About 1/2 of the way down you will hit a band of large loose rock that is full of pitfalls and places to break your ankle, there is an old crashed car laying in this part of the decent. This is a steep enough spot that if you lean too far backwards, you will fall.
- The last 20 feet to the base of the waterfall is along a 55 degree pitch, where if you slip, you will be headed straight down to the bottom 10 feet below. The area is just a muddy hillside and very slick
- When you are photographing the waterfall, you need an extremely wide angle lens, and a full frame sensor, (no APS-C cameras) if you want to get both the full waterfall and the setting sun. I used a 14mm lens
- Make sure to pack a series of filter and a tripod as this shot has to be bracketed.
- The trees above the waterfall are moving all the time due to the force of the water, so plan on shooting at least one frame at a faster ISO and shutter speed to stop the motion
- The hike out, well, lets just say it’s not for the faint of heart. It’s ten times worse than the hike down as the entire hillside is just loose rock, so you may climb 3 feet just to slide back 1.5 feet. The use of a rope on the last 50 feet would be strongly advised and something I plan to bring the next time I attempt this shot.
- You can try to come at the falls from a little bit further down the highway, but trust me the going is not any easier as the forest floor is just a bunch of broken rock and it make for very difficult footing.
- It’s very apparent that some blasting was done for the Highway above here and the rock just all fell away down the hillside and is very loose, footing is very tricky.
Overall this has to be one of the more unique places I have ever worked in Arkansas and have been to many. I would not attempt this hike alone, as there is just too much a risk, and I was glad to have Todd and Chris with me both times I headed down to the falls. This hike will give you just a bit more appreciation as to just how high Mt Magazine is and steep. The result is well worth the hike.
Paul Caldwell
02/14/16 Featured Arkansas Landscape Photography–Sunset from the summit of Flatside Pinnacle


Sunset from the summit of Flatside Pinnacle
PLEASE NOTE: All of the photography of this website is the property of www.photosofarkansas.com and is copy right protected. Do not copy any of the images on this site to paste on Facebook, Pintrest, or any other website without the permission of Paul Caldwell. Years of time have gone into capturing these photographs, please respect that. I do not take copy right infringement lightly. If you have a need to display any of my work on your site ASK me before you Copy & Paste.
Taken with a Phase One IQ160 Medium Format Back and Arca rm3di/28mm Rodenstock Lens, image was captured in a bracketed series of exposures.
I have featured this image many times, but it’s still one of my favorites. I took this shot in January 2011 with a “tech” camera an Arca rm3di, with a Rodenstock 28mm lens. This view has since been ruined by graffiti, which was painted all over the rocks. I have slowly tried to removed it over the past 2 years, and have made some progress, however to the assholes that did it, **uk you.
Flatside Pinnacle is the key point in the Flatside Wilderness, and is right in the middle of the Quachita mountains. Looking in the shot between the two pine trees you can see Forked Mountain off in the western distance. Towards the middle of summer, you can catch the sun setting over the top of Forked Mountain. Flatside itself is around 1,500 feet tall, which make it taller than both Mt. Nebo, (near Russellville) and Petit Jean Mountain. The good news is that you don’t have hike very far to get to the summit as a road takes you almost all the way to summit. The Ouachita trail comes very close to Flatside also. The view from the summit has to be one of the best in Arkansas. Here looking to the west you can see Forked Mountain, and off to the right, Mt. Nebo, Spring Mountain, and the grandest of all Mt. Magazine, which is over 2,700 feet tall.
Flatside is great spot to catch a sunset, however if you want to get the best light try to get there before 11:00 am as after that you will be shooting into the sun. If there are some clouds, you may still get away with a great shot. Take a lunch and sit out on the rocks and enjoy the day.
02/11/16 Featured Arkansas Landscape Photography–Wintertime Vista from the summit of Pinnacle Mountain

View from the summit of Pinnacle Mountain in Pulaski County Arkansas
PLEASE NOTE: All of the photography of this website is the property of www.photosofarkansas.com and is copy right protected. Do not copy any of the images on this site to paste on Facebook, Pintrest, or any other website without the permission of Paul Caldwell. Years of time have gone into capturing these photographs, please respect that. I do not take copy right infringement lightly. If you have a need to display any of my work on your site ASK me before you Copy & Paste.
Taken with a Canon 5d MKII, Canon 24-70 lens, @ 24mm and F 8 ISO 100 with a Circular Polarizer, Panorama taken in multiple vertical stitches
One of the most noticeable landmarks in Pulaski County, Arkansas is Pinnacle Mountain. The mountain is approximately 550 feet tall and has a commanding view of both Little Rock and the eastern approaches to the Ouachita Mountains. In fact the Ouchita trail starts at the Pinnacle Mountain Visitor center which is not far at all from the base of Pinnacle.
There are many trails up to the summit of Pinnacle, but the most common is the trail that goes up the west face. Here you get a great view of the slate rock that makes up most of the mountain and you can get some great views of the surrounding countryside.
This shot was taken after a heavy snow fall in February of 2009, and I was very lucky to catch the mountain right after the skies cleared. There was no one else there so the snow was totally undisturbed. My goal on this day was to get about 1/2 way up the mountain where the hard rock face starts to show up. The pitch of the climb can be upwards of 30 degrees, maybe a bit more and on a normal day this is not a problem. But on a snowy day things were a bit more difficult. Once on the summit I realized that the view was amazing and I wanted to take some panoramas. I did not have my tripod, but just shot away in multiple vertical hand held series and then stitched the images together later on with Photoshop. Now, I would most likely want to use Lightroom as it offers a lot more possibilities and power. But for this shot Photoshop was able to get the job done.
There was no wind and the snow was perfect in that everything was nicely coated. I did use a polarizer on the shots and wondered if I would be able to get an even sky but overall I like what I was able to produce. Pinnacle mountain is in western Pulaski county, in Arkansas and is well worth a hike if you have the time.
 From the Blog
- Errors with High Resolution Mode, Panasonic LUMIX S1RII July 4, 2025
- 05/08/25 Capture One, big announcement, at least for portrait photographers May 8, 2025
- 05/03/25 Trump’s Tariffs finally start to hit Photography Equipment. May 3, 2025
- Firmware 4.1.0 for X2D? April 21, 2025
- 04/18/25–Looks like Trump’s Tariffs are much ado about NOTHING in regard to photography equipment. April 18, 2025
- 04/09/25 Arkansas Sets new standard for Scientific Ignorance with new law for Ivermectin April 4, 2025