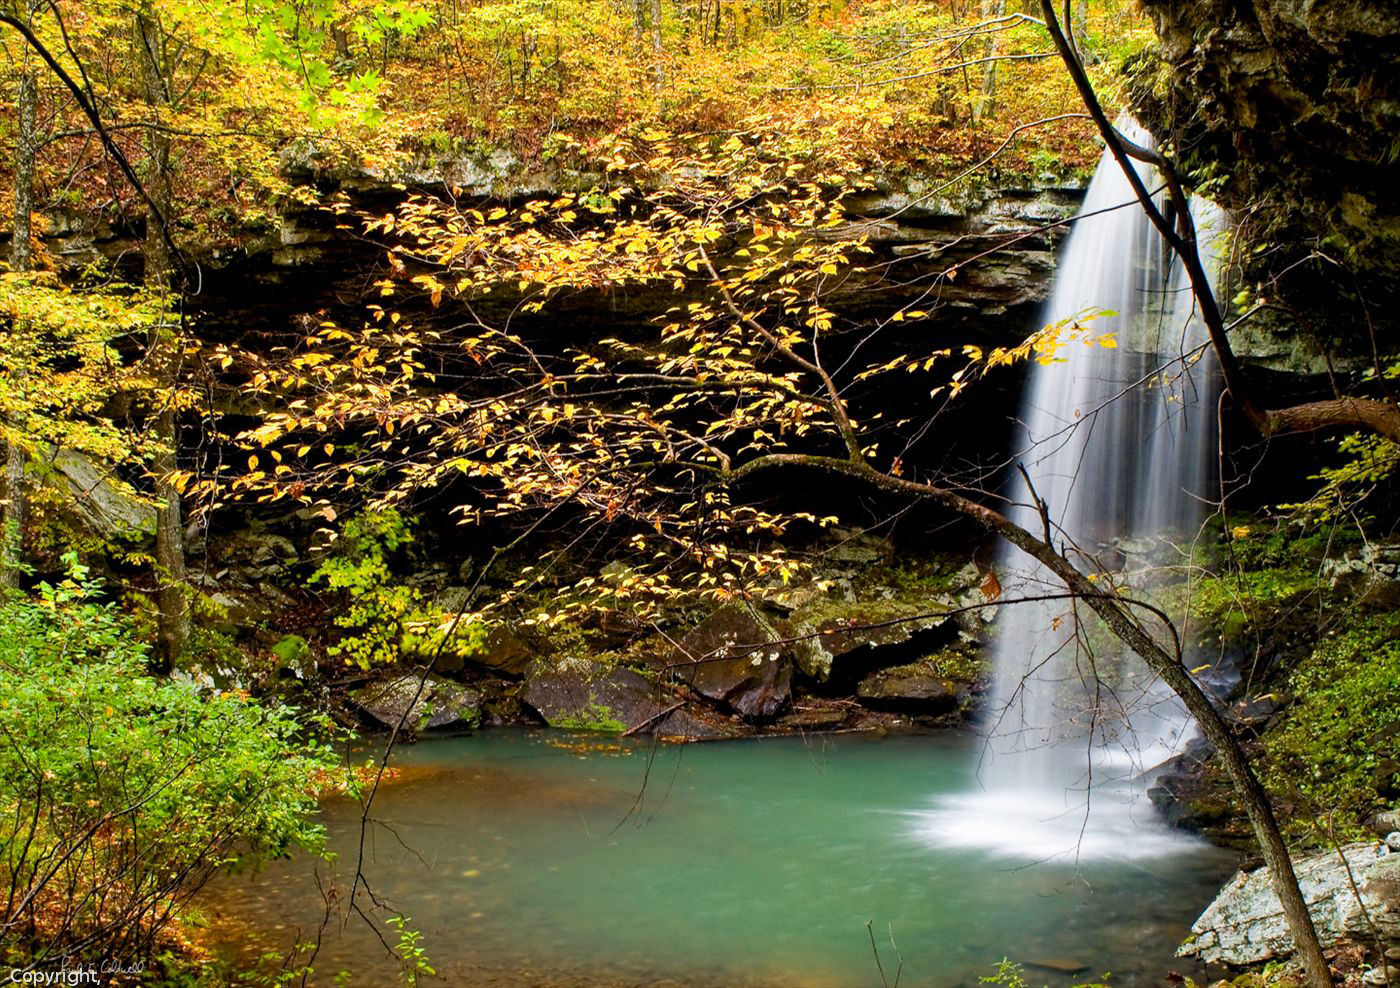
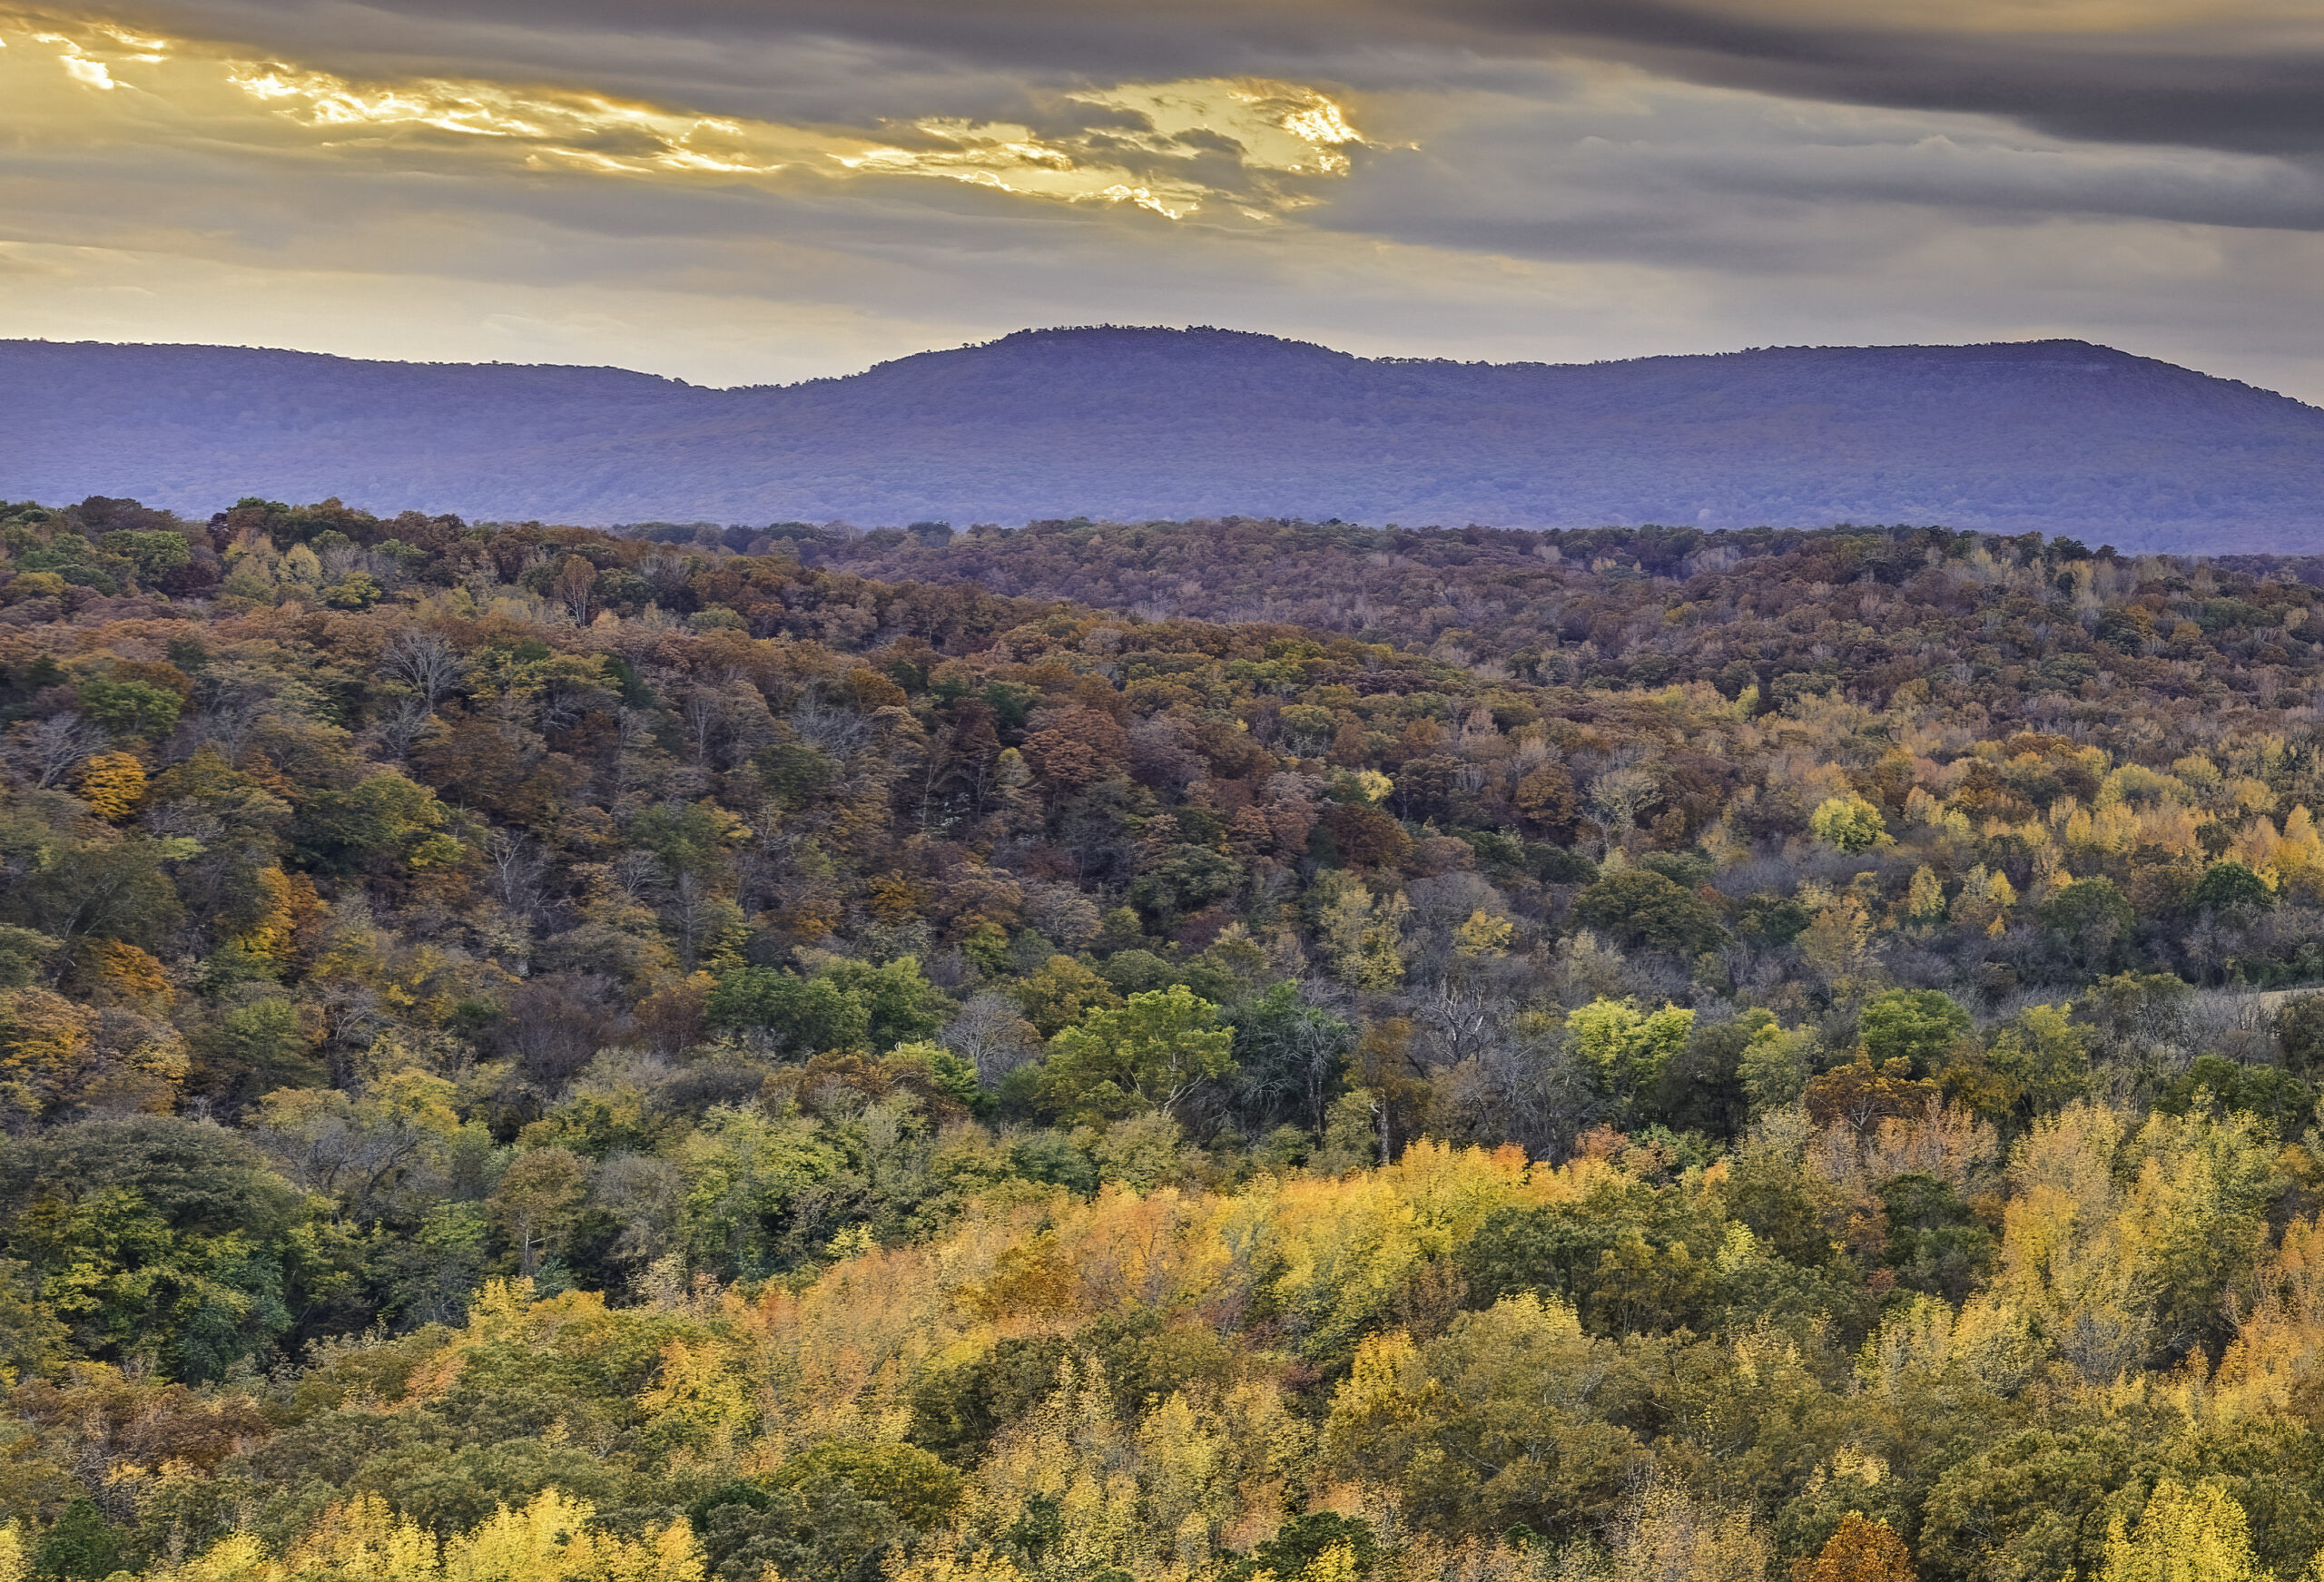
02/03/25 Focus Bracketing example, Hasselblad X2D and 21mm XCD Lens


Focus Bracket, 7 images total, Hasselblad X2D
When working with a Medium format camera system, you have to be very careful when composing your shot for many reasons, one of the most important one is the issue of shallow Depth of Field (DOF). If you are coming from 35mm or APS-C, you may be surprised the first time you view your images as many times you will have parts of a shot that are outside the range of focus for the particular lens you are using. This is true with all medium format lenses and can be an issue when composing your shot. There are two ways around this that I know of:
- Increase your aperture to F12 to F16. This will help bring in the closer details to a better focus, however you may start to see smearing in the corners and for sure you will see some diffraction. The smaller your aperture, (larger the number) the more diffraction will play. What diffraction will cause is softness in parts of the image, mainly the finer details. In the past my technique would be to focus on infinity and increase my aperture to F14 or F16. This will give you a good result most of the time, especially with all of the modern software tools for sharpening that are available.
- Use Focus bracketing. With Focus Bracketing, you allow the camera to focus on various ranges of the image from the greatest distance to the closest the chosen lens will resolve. For example in the image above I used F 6.3 and ended up with 7 total images. Each image will have a unique part of the scene in perfect focus.
Focus bracketing requires a lot of post production work. You now have to work up in this case 7 different images and they need to be pretty much the same. After that you will use a software tool like “Helicon Focus” which will take the images and combine them into one image with everything in focus. Trying to do this manually is next to impossible and requires a tremendous amount of work, whereas Helicon will do everything for you.
There are a few issues that might come into play when you are working with Focus Bracketing.
- The most important consideration is that there is little to no subject movement. So if you are attempting this on a windy day, with a lot of tree limbs, forget it. In the example above, I was blessed with a totally calm evening. There may have been slight movement in the cedar tree overhead, but it was not enough to create a problem. If you have too much movement, you will see aliasing, as the software can’t get the exact same parts of the various images to line up. The effect will be like a ghost image and makes the combination impossible. Also do not try Focus Bracketing where you have cars, trains, or people moving through the scene as they will cause the same problems.
- Exposures variances. In the example shown above, I knew that I could not expose for the sky and the foreground (especially the rocks in the lower right corner) in one series of images. So I ended up taking 14 total shots. I ran Helican on both series of 7 images, which resulted in 2 final images, that I then combined in Photoshop and the Camera Raw filter. Note: The name camera raw filter is misleading as it works very well on tif and jpg images.
- You must have your camera on a tripod. There is no way to hand hold the camera to take the bracketing series of images, you will have movement and the images will not align correctly.
With the X2D, you have three options when working with focus bracketing:
- Shoot from Infinity to nearest spot
- Shoot from nearest spot to infinity
- Use a symmetric option, where the camera should start in the middle and work up and down.
I use option 1, with the camera in AF mode (auto focus) I will move the focus point to where I know I am on the most distant part of the subject and start the series. You have to pick the number of frames you want, and for most landscape shots I have found that anywhere from 6 to 10 seems to work with the aperture at F6.3. However it’s always a good habit to check you shots to make sure the camera was accurate on the furthest and nearest frame. NOTE, if you are going to need several series due to the variance in exposure make sure you do not move the camera. Also you will need to be on a tripod.
Here are some close ups from parts of the file to show the details that were captured throughout.
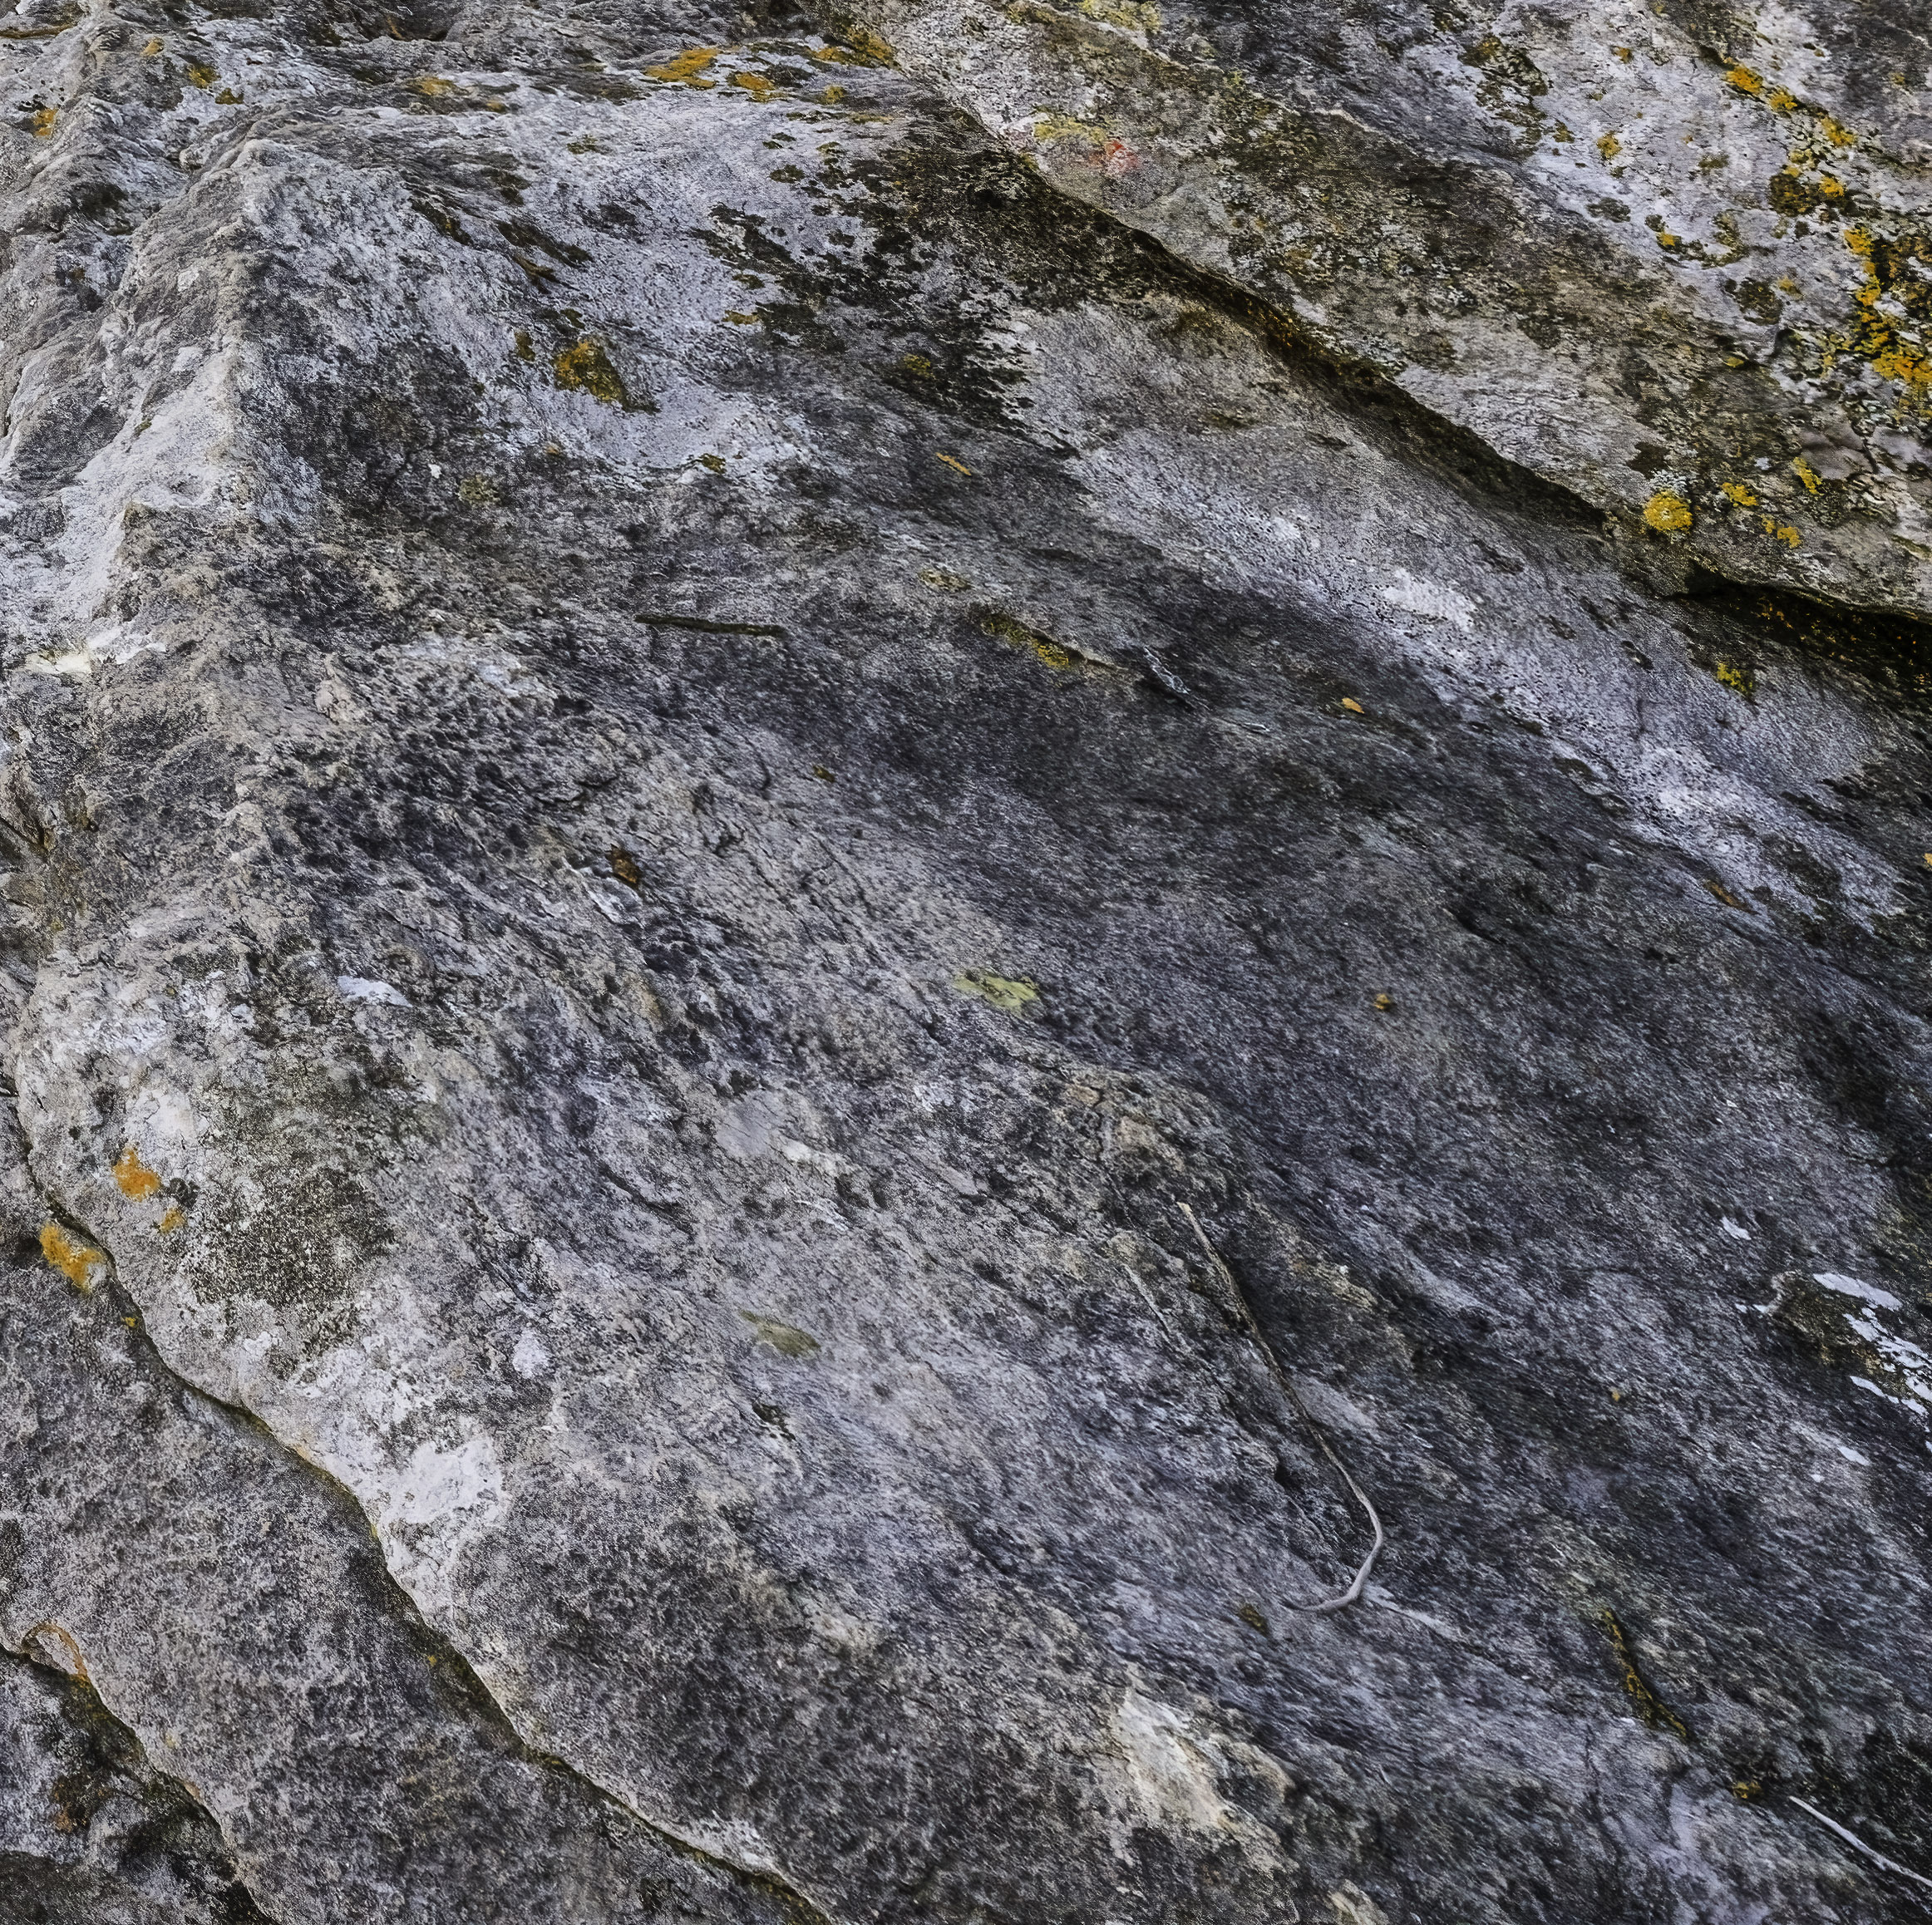
LOWER RIGHT CORNER (Click on image to view it larger)
Even though I used a 21mm lens, I still needed to focus bracket to get the closest corner in good focus. This part of the subject was less than 3 feet away from my camera.

UPPER RIGHT CORNER SHOWING DETAILS OF CEDER TREE (Click on image for a larger view)
What really makes this shot complete for me is the 1000+ year old cedar tree that is growing out of the top of the bluff. It’s really impossible to shoot the scene without the tree being in the frame so it’s very important to have it in sharp focus.
UPPER LEFT OF IMAGE SHOWING TREES IN THE DISTANCE (Click on image for a larger view)
This was a fall shot, so I wanted to have all the different species of trees in sharp detail. The Hasselblad 21mm lens has an excellent ability to resolve these finer details, however if I had tried to capture all of the shot in one frame I would have lost some of the finer details to diffraction.
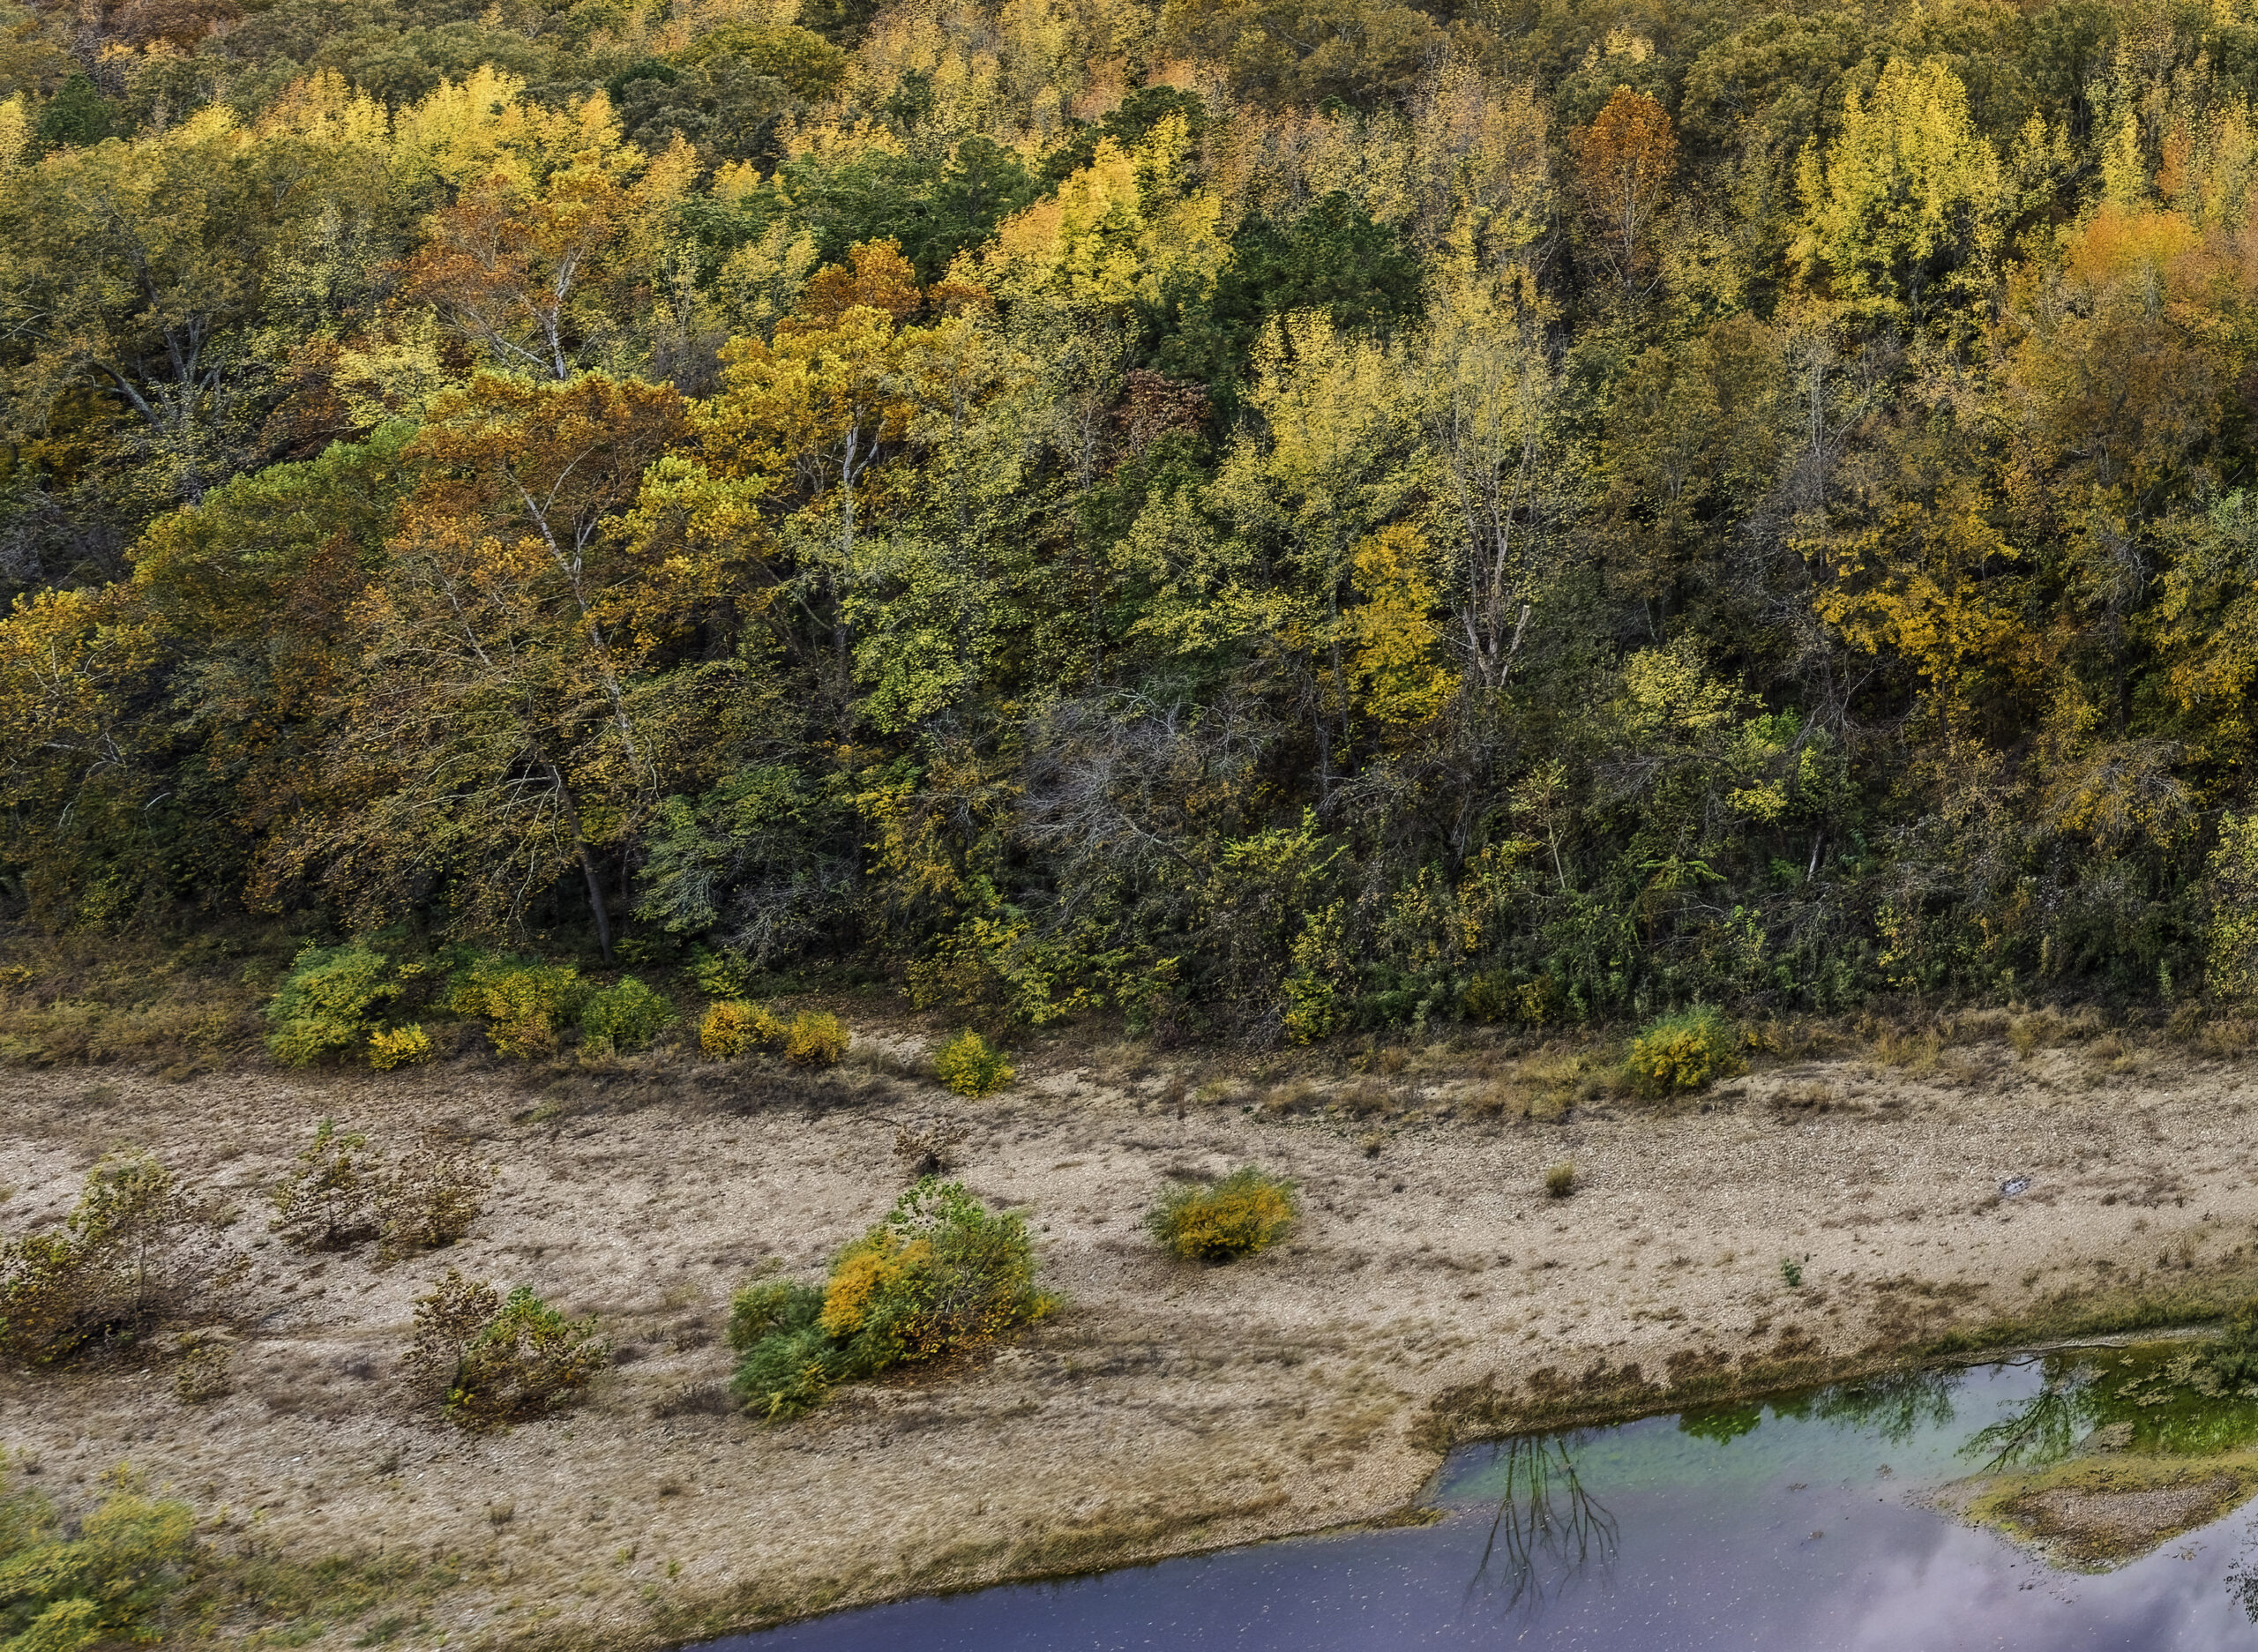
LOWER LEFT CORNER (Click on image for a larger view)
One test of any ultra wide is the ability to capture sharp details at the extreme edges of the frame. The Hasselblad 21mm does a very good job with this, however it does suffer from retrofocus distortion. This will cause details at the edges of the frame to elongate and or stretch out. The effect on this image is not enough that I am concerned with it. However if I were to make a print of this, I might crop into the image just a bit.
In conclusion, I hope this article has made you more interesting in working with Focus Bracketing. If you have a medium format system from either Fuji (GFX camera) or Hasselblad (X2D), you can work with this in camera to take all of the images. Once you understand the workflow it’s a pretty automated process. If you have a 35mm camera from Nikon, or Canon, I know that Nikon offers focus bracketing with their Z cameras, I assume that Canon also now has it. Sadly Leica still does not offer Focus bracketing and I feel it’s huge over sight by them. There is no need for image stabilization, all you need is auto focus and a piece of firmware to process out the images. Leica has missed this with both the Sl2 and now their latest Sl3 cameras. According to available information, the Leica SL3 does not have an in camera focus bracketing option; reviews and specifications indicate that the camera only offers exposure bracketing, meaning it cannot automatically capture a series of images with varying focus points within a single shooting sequence.
Notes from the author:
I have the Lecia Sl2 and would strongly recommend to Leica that they add Focus Bracketing to their SL cameras. I doubt it would be retroactive the SL2, but with the SL3 it could be added via firmware. The Sl3 is 6oMP and even with the best Leica lenses, you often times need to bracket your focus to get the best overall image. I have used the Hasselblad X2D and it has a very nice Focus bracketing option, however after each series, you have to go back to re-focus on infinity (if you are shooting from far to near). The Fuji GFX100 has a more complicated menu to setup Focus Bracketing, however once you have it set, you can reshoot at will, i.e. the camera remembers you are shooting from far to near and on each series will return to the set point to gave the camera. With Fuji you set both the far and near points. With Hasselblad pick the shooting method far to near or near to far, and use you AF point to hit first point, then the camera makes all the rest of the decisions, thus I feel you need to check it after the first run to make sure the camera got the near point correctly.
 From the Blog
- Errors with High Resolution Mode, Panasonic LUMIX S1RII July 4, 2025
- 05/08/25 Capture One, big announcement, at least for portrait photographers May 8, 2025
- 05/03/25 Trump’s Tariffs finally start to hit Photography Equipment. May 3, 2025
- Firmware 4.1.0 for X2D? April 21, 2025
- 04/18/25–Looks like Trump’s Tariffs are much ado about NOTHING in regard to photography equipment. April 18, 2025
- 04/09/25 Arkansas Sets new standard for Scientific Ignorance with new law for Ivermectin April 4, 2025