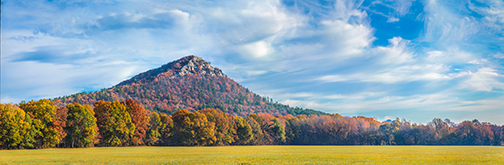
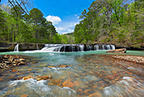
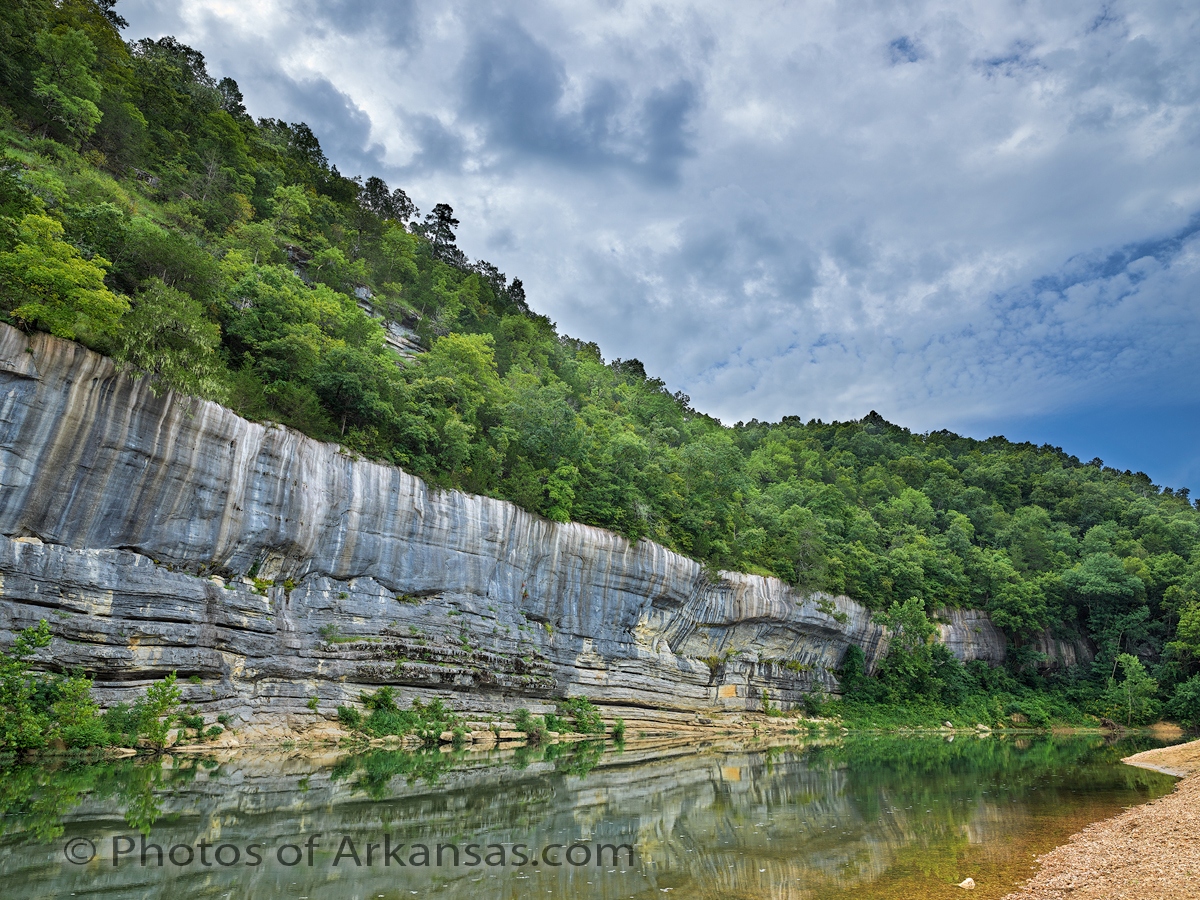
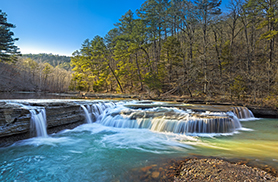
02/05/16 Featured Landscape Photography–Wintertime on White Oak Mountain near Hector Arkansas

PLEASE NOTE: All of the photography of this website is the property of www.photosofarkansas.com and is copy right protected. Do not copy any of the images on this site to paste on Facebook, Pintrest, or any other website without the permission of Paul Caldwell. Years of time have gone into capturing these photographs, please respect that. I do not take copy right infringement lightly. If you have a need to display any of my work on your site ASK me before you Copy & Paste.
Taken with a Phase One XF camera & IQ260, 55mm LS lens and CL-PL. Image is composite of 3 vertical images with the 55LS set to it’s nodal point.
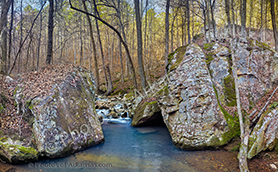
This past winter I started trying to find some new places to photograph in Arkansas. I have worked Falling Water Creek and Richland for years and still love that part of Arkansas, but I felt it was time to move on. I had heard a lot about White Oak Mountain from Chris Kennedy and wanted get a look at the area in winter. If you hike into a spot in Arkansas for the first time, I always recommend coming in winter or early spring as you will see a lot more of the surrounding areas. Later on in summer the trees will hide a lot and the undergrowth makes hiking in general much harder.
White Oak Mountain, is actually a long ridge that runs east and west near Hector Arkansas. To get there, you need to drive to Hector, through the town and as soon as cross a small bridge over a minor creek, you will see a dirt road heading up to the right. Stay on this road for about 7 miles, there will be some turn offs but once you find the right spot, you can hike right down into a great creek valley. This creek has a nice run which offers several nice smallish waterfalls in quick succession. If you hike up the far hillside, you can find some much more dramatic waterfalls, but these will only be running after a locally heavy rain.
What I found most interesting on White Oak mountain was the number large boulders that were just laying in the creek. This reminded me of Richland creek, however the terrain is a bit more open than on Richland.
Once you are done in the creek valley walking is very easy and you can make good headway. There is a RV trail and a marked hiking trail that will take you down to the creek. This creek outwardly appears to be about 1/5 the volume of Richland creek, but the unique geography surrounding the creek makes the hike worth a trip. I would warn anyone that crossing this creek in high water could be a bit dangerous as the bottom is full of large mossy rocks easy to slip on.
I hope to make another trip here in the future to see what the area looks like in Spring with more water running.
To capture this photograph, I used a Phase One XF camera with a IQ260 Medium Format back and 55mm LS lens. The photograph was taken with a nodal panorama setup and I used the captures to make the one horizontal shot. To slow the water down I used ISO50 on my camera and a polarizer. As you can see in the photograph, the light was already marching up the far side of the valley, so I did not need a ND filter. The raw files were converted in Capture One software and then I used PtGui to stitch the 3 images together. I then added a bit of Topaz clarity to my liking.
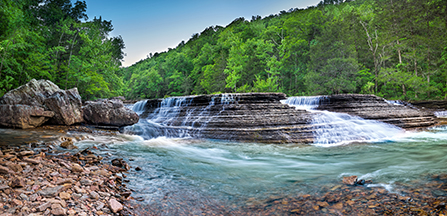
11/10/15 Featured Arkansas Landscape Photography–Springtime View of Haw Creek Falls
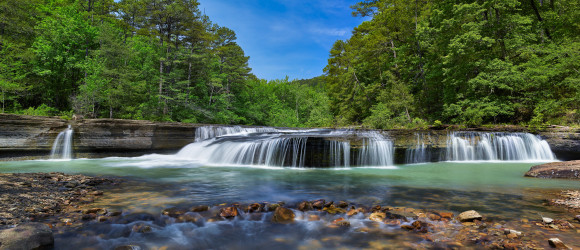
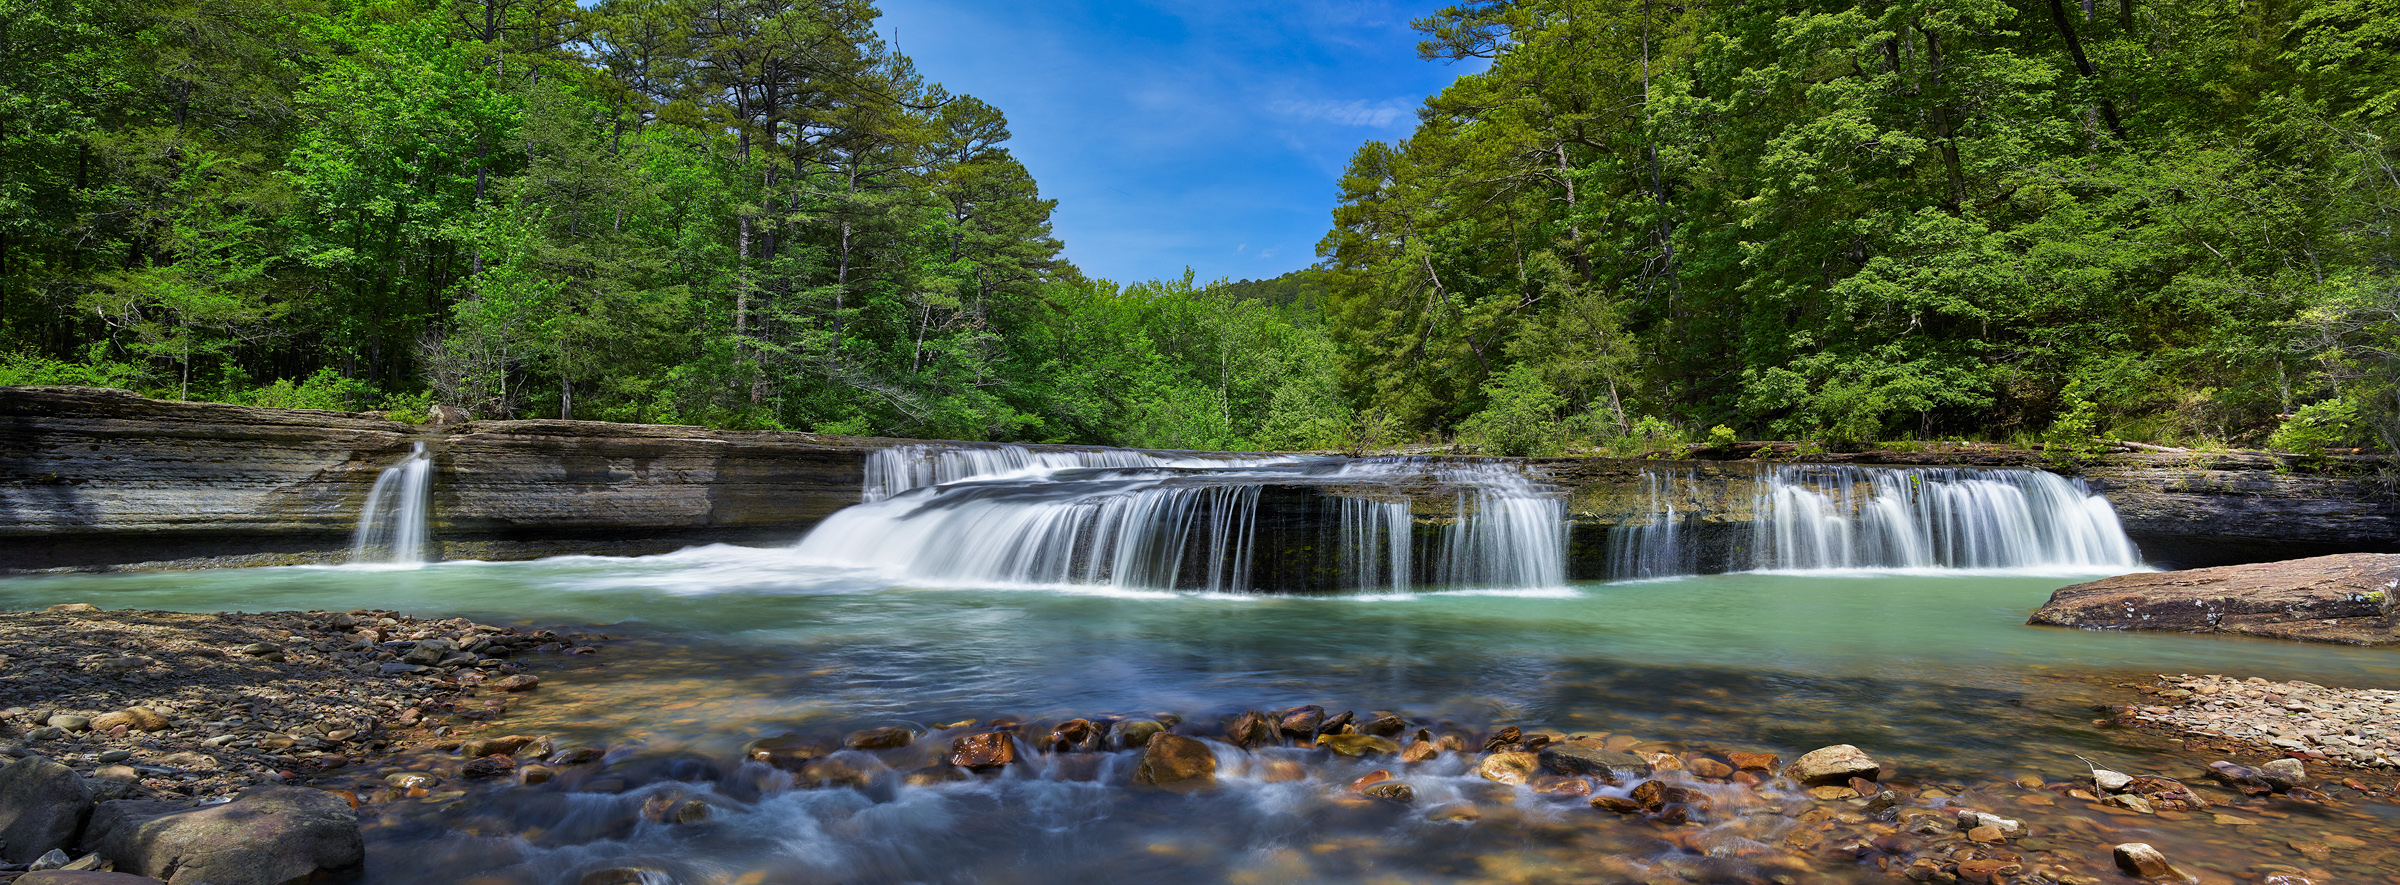
Springtime View of Haw Creek Falls in the Arkansas Ozarks
Taken with a Phase One IQ260 and Arca rm3di tech camera/40mm Rodenstock lens
This is a typical day at Haw Creek falls, and I was again lucky to be there without anyone else to stand around and get in the way during the shoot. Haw Creek is a lovely smallish creek that runs in the Big Piney Creek, not far from these falls. The falls are impressive since there is a large ledge that runs all the way across the creek and in higher water conditions the water will start to consume the entire ledge. I like to catch water about like this, just enough to keep most of the ledge in play but not too much to flood out the rocks below the falls. To get this shot, I used my Arca rm3di camera which allows movements like a large format camera with my digital camera back. The shot is actually a composite of 3 images, Left, Center and Right. The Left and Right segments represent 16mm of shift in those respective directions. This allows you to create a very high resolution panorama without any of the issues like parallax. The lens I used was as 40mm Rodenstock HR-W which allows for an excellent field of view when shifted.
You have to be careful when working Haw Creek as there tends to be a lot of wind blowing down the creek. In most cases, I prefer to take a 1 to 4 second exposure of the water which in most cases will have a lot of wind blur in the trees. So you have make sure to cover the tree movement with a second series of exposures around 1/125 to 1/250 to stop the wind movement. It’s a simple process to combine the files later since I am using a tech camera and the movements are very precise. To allow the longer exposures I used both a Circular Polarizer and a Neutral Density filter. The polarizer will help with glare on the water and rocks and adds about 1.5 stops of exposure to the shot. As this was a bright day, I had to use a 1.2x ND filter. When I was taking the faster exposures for the trees, I left the polarizer on, but took the ND filter off as I no longer needed the extra exposure compensation.
As I already mentioned, Haw Creek Falls, tends to be overrun with people during the peak times of the year. The best day to go is a Monday as there will not be as many people at the campground and thus less traffic around the falls. There are some great swimming spots above the falls in the large pool that is created by the ledge. It’s a great place to head to when you know you have some water running in the creek.
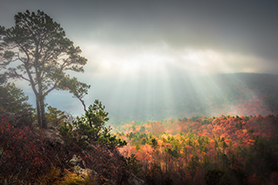
Mt. Magazine morning Vista–12/14/14 Featured Arkansas Photography
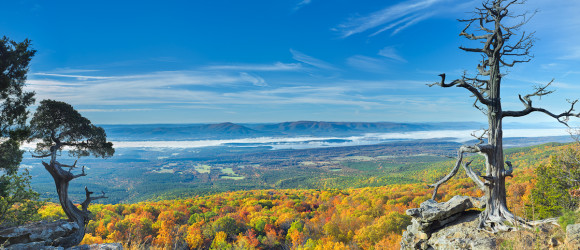

Morning Vista from Mt. Magazine
Taken with a Phase One IQ260 & Rodenstock 28mm HR lens, with an Arca rm3di, image created by combining 2 nodal pans. Mt. Magazine, which is the highest spot in Arkansas at around 2700 feet, has some wonderful views. One of the best is from from rock ledge below the Lodge where you have a wonderful view of the Blue Mountain, and Blue Mountain Lake off in the distance. This view is looking southwest, and shows the fall colors at peak or near peak. The deciduous trees in the area include, Maples, Hickory and various Oaks. You can also see the effect of the massive amount of forestry cutting in the lower valley which is beyond the boundary of the State Park where all the trees are now pines. These are not the natural pine to Arkansas, the short leaf, but instead Loblolly and or Slash pines, both of which were planted after the clear cuts were made. All of the lower foothills of Mt. Magazine are covered in this type of tree.
This is a hard shot to get in one frame with a 4:3 ratio camera like the IQ260 Medium Format back, so I worked in a series of pans, where I set the 28mm Rodenstock at a spot on my tripod that was close to the nodal point for the lens. This allowed me to pan across the scene and then combine the images into one larger frame later on. On this day, the sky was a radiant blue with some very high cirrus clouds that were rolling in from the west. With a tech camera like the Arca rm3di, and the Rodenstock 28mm lens, this type of shot is a bit more difficult since you have to correct for the color cast the lens creates. I used the Rodenstock Center filter on the lens and a linear polarizer to enhance both the blue in the sky and fall colors, as the sun was over my left shoulder and provided perfect conditions for polarization.
This is popular spot on the weekends, but during the week, most times you will not find anyone around so plan your trips accordingly. Make sure you take enough time to drive around the entire summit of Mt. Magazine as there are many great vantage points for photography.
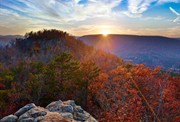
06/18/14 Featured Arkansas Photography–Early springtime sunset at Haw Creek Falls
- At June 18, 2014
- By paul
- In Featured Arkansas Photography
 0
0

I was able to catch the setting sun at just the right angle
Taken in 3 parts with a Phase One IQ260 and Rodenstock 40mm lens, Arca rm3di camera with a CL-PL filter. This image will be featured in my up coming show at Cantrell Gallery. I am featuring locations in Arkansas that I am always drawn back to. Haw Creek Falls, is not the tallest waterfall in Arkansas or the most dramatic, however it’s a beauty. Haw Creek runs over a huge ledge that runs back about 100 yards and has created in effect a natural dam. There is pool behind the falls that is a great swimming hole in the summer months. The way the trees lean down to the water just makes for a great photograph. Working a sunset at Haw Creek can be very problematic, most times there will be someone standing on the ledge and you have to time out your shots. Also in the later months of summer the sun will be going down directly over the center of the valley which makes for a much more difficult shot. In this case, mid April, the sun is still over to the far left and on this evening as it set it cast an amazing line of light down the valley of Haw Creek. This effect only lasted about 10 minutes, just enough for me to figure out where to stand to get the best vantage point. On this day, the entire main ledge had water coming over the top which always makes for a great shot. I took this photograph as a series of stitches using an Arca technical camera, the rm3di. As the light was already at a low angle, I did not need a neutral density filter, just a polarizer to help cut the glare off the water. I was blessed this evening as there was almost no wind blowing which made for a very detailed shot.
01/04/14 Some issues for IQ260 and IQ280 owners on the Wifi top cover

This only applies to photographers that purchased a IQ260 (possibly IQ280) early in the product life. I would say back to about July to October of 2013.
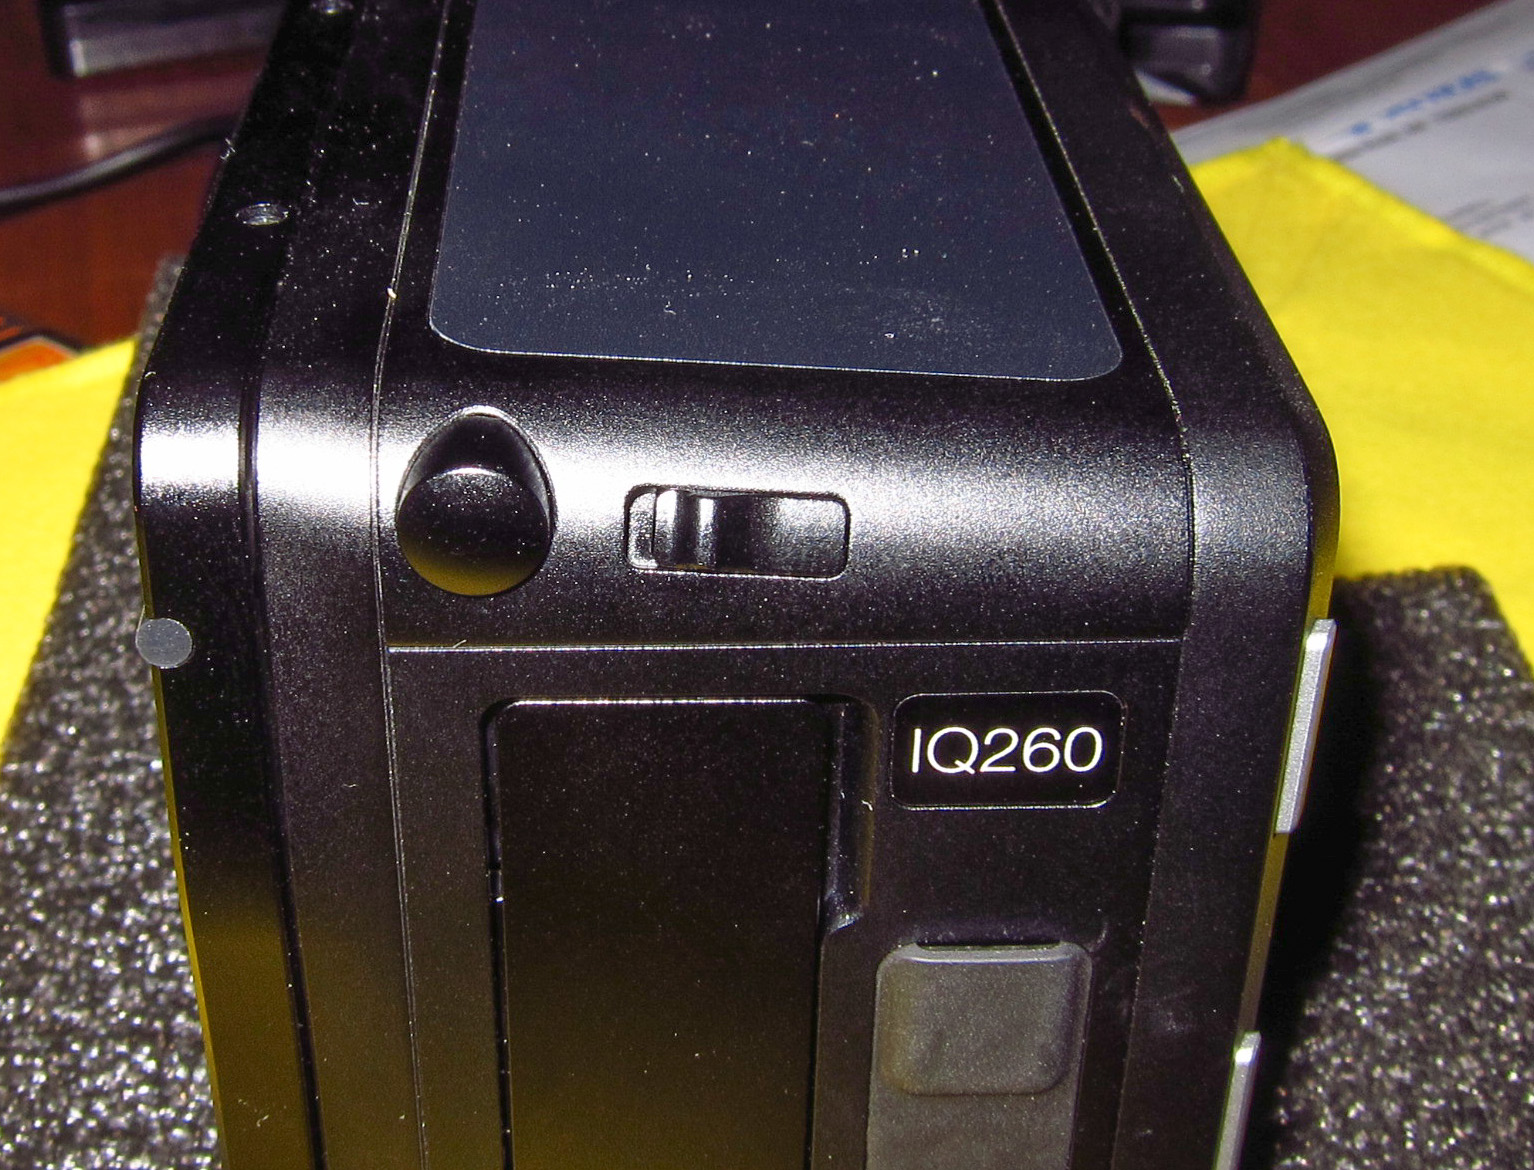
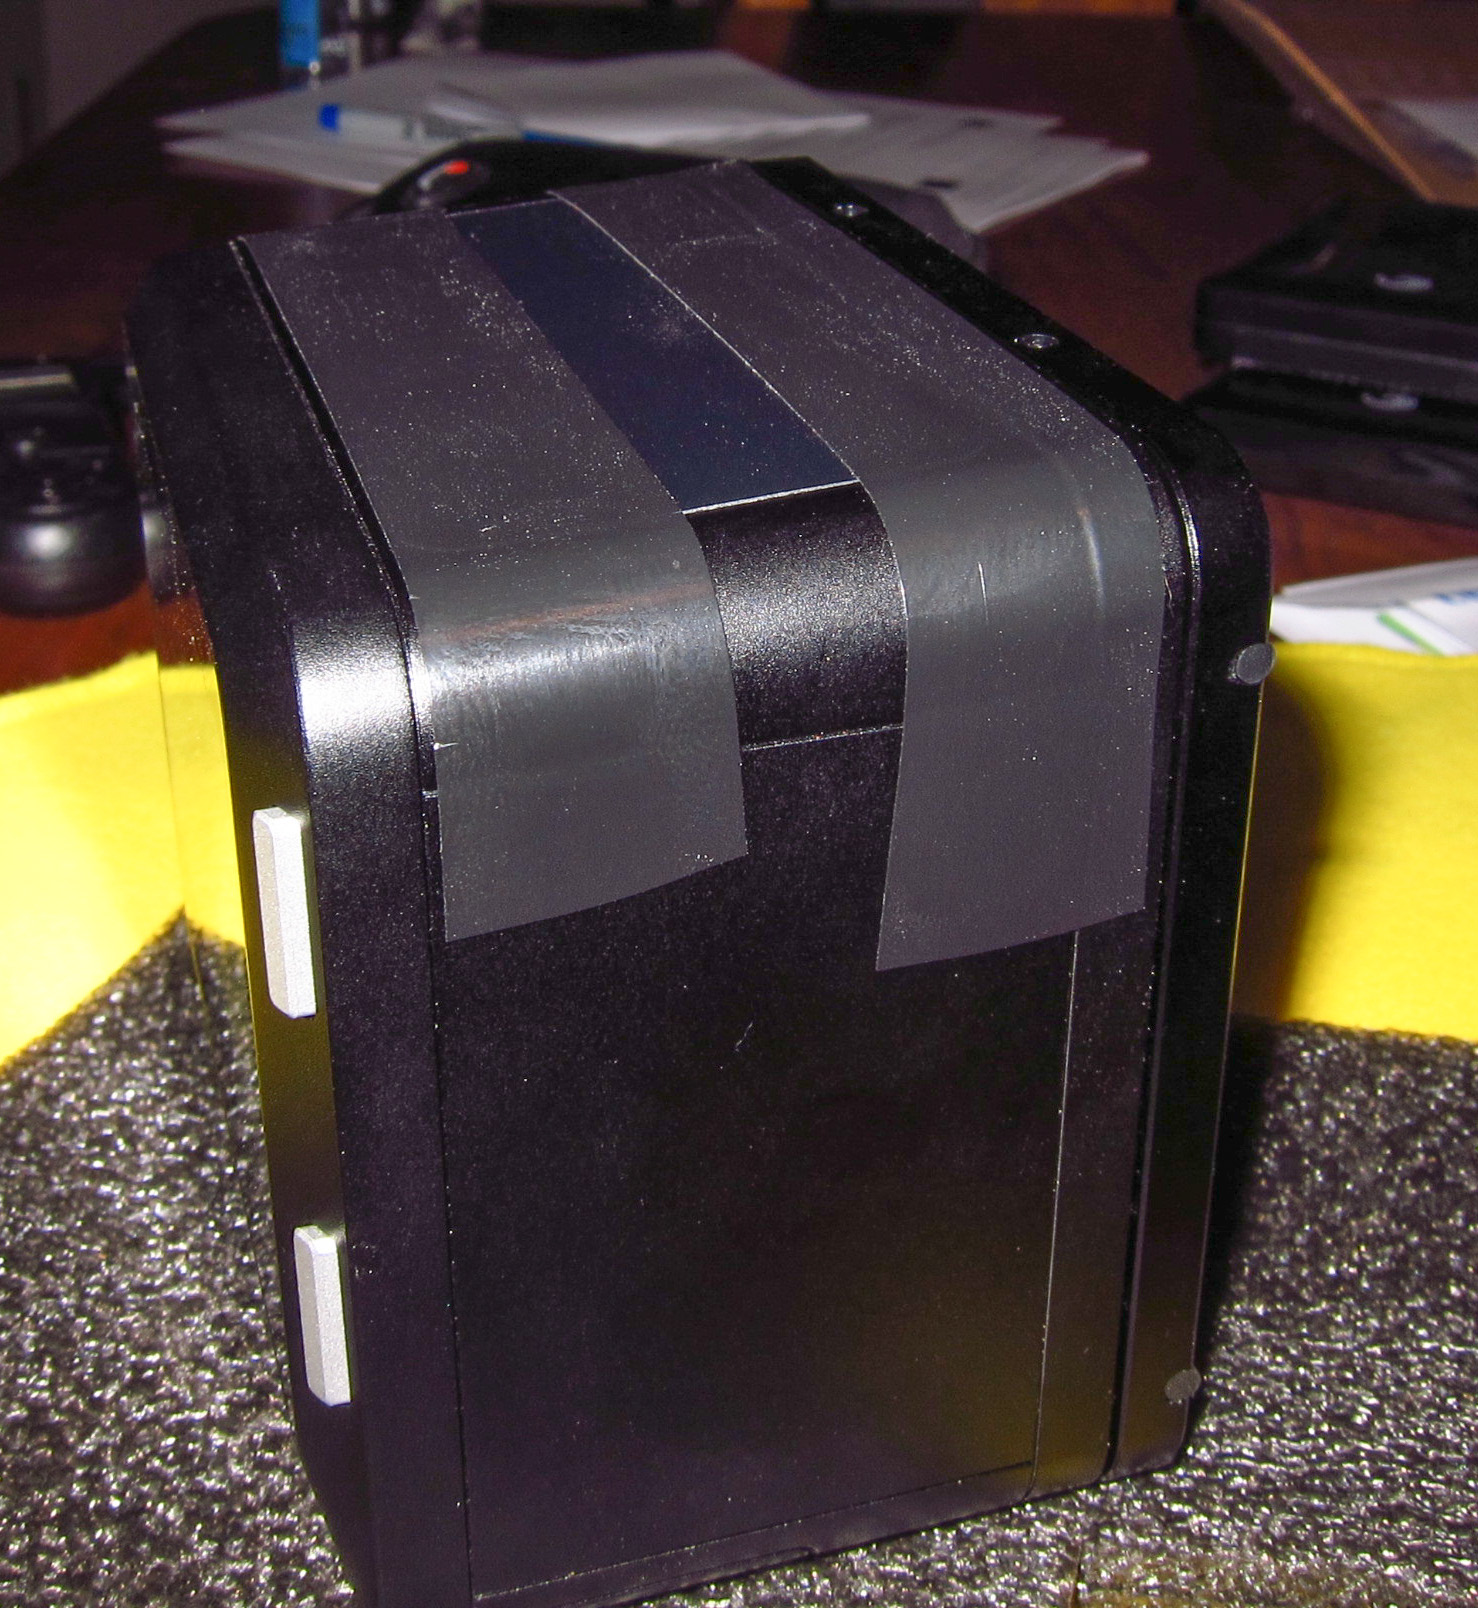
One of the features of the IQ2 backs is the built in Wifi capabilities. When you first get the back, you will notice that the top has a rather large plastic rectangular piece. You can clearly see this in the photo below:
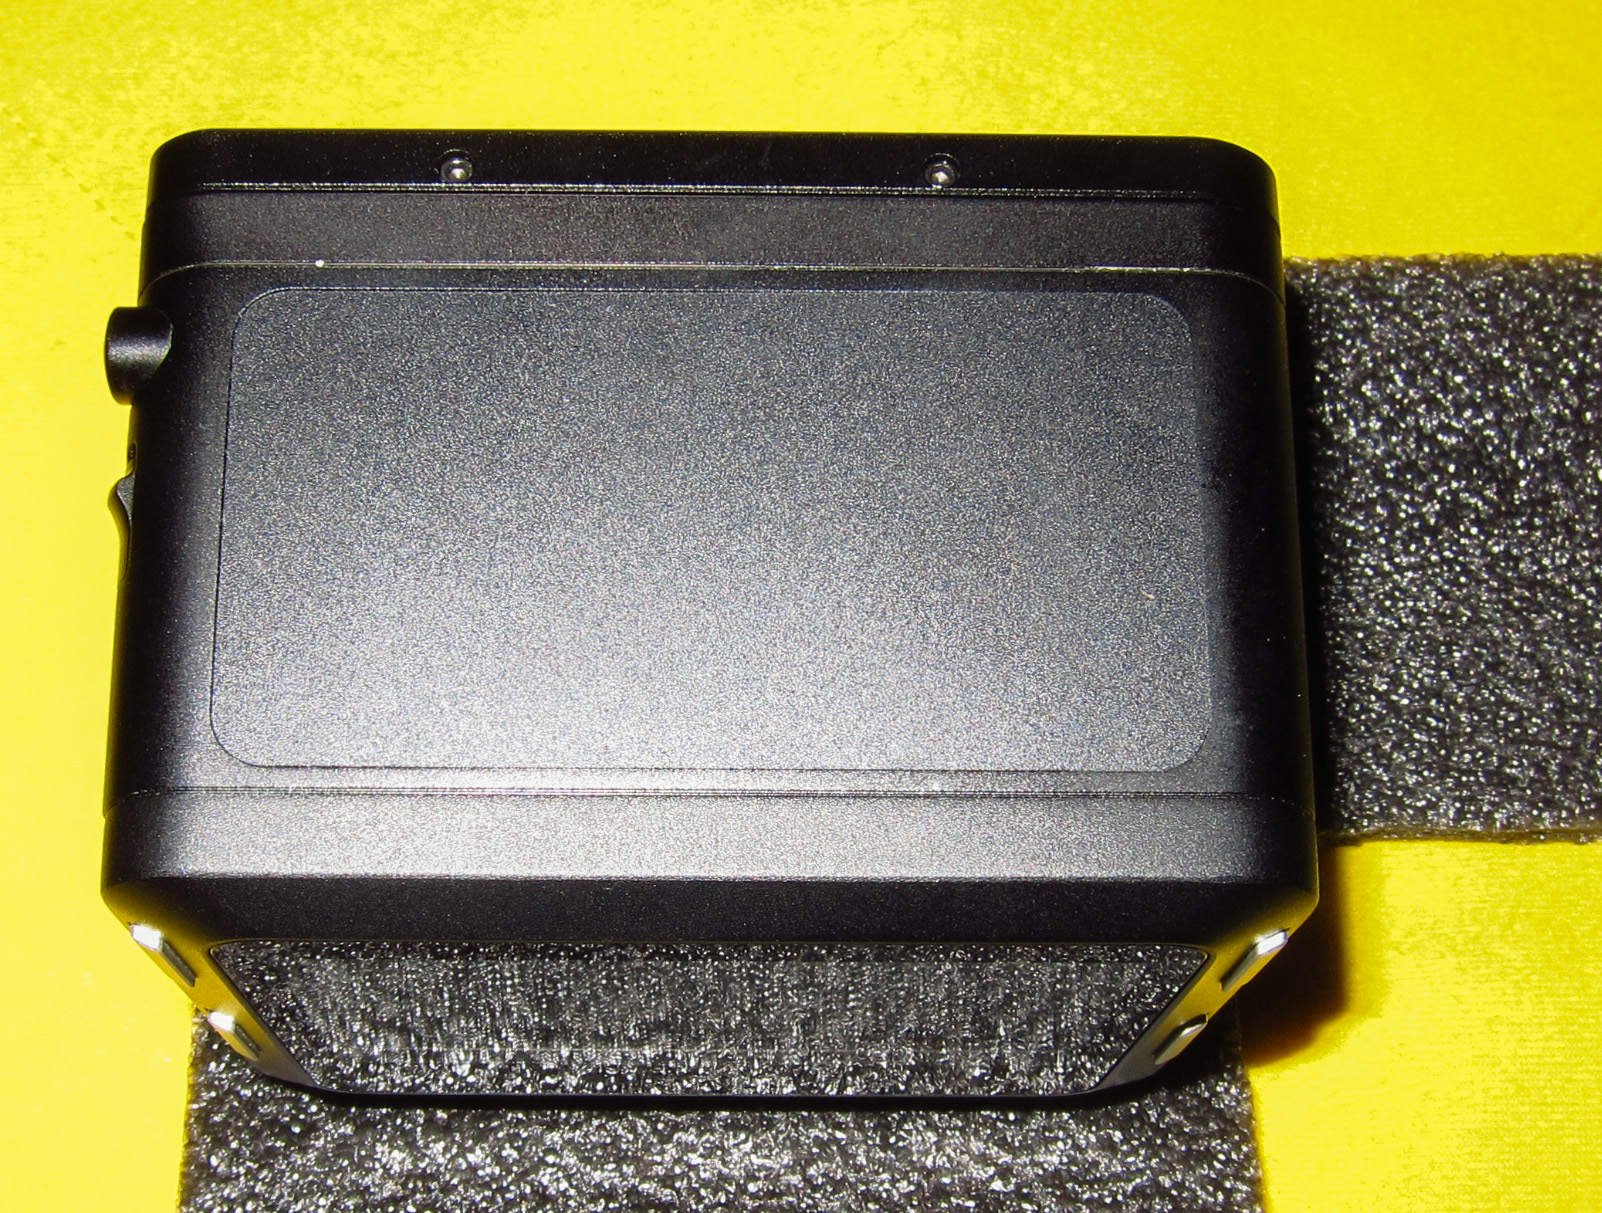
Top of IQ260 showing the WiFi plate cover
With the older IQ140, 160 and 180, this part of the back was solid and there was no plastic top. However with the placement of the WiFi Card on the top, Phase had to apparently cut the top open to allow for signal strength. As you can see from the next picture that there was probably no way to place this card on the bottom of the back and it’s appears to be too large to go down the side.
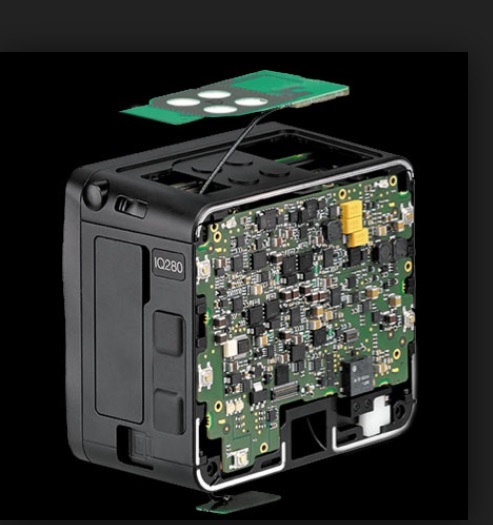
Breakout of the IQ2 line of digital backs
So instead of the hard shell across the top you now have a ridge plastic piece that fits into the rounded cut out. This piece should be flush to the top and not have any raised edges.
I had noticed a post on the Luminous Landscape forum where someone had tried out a used IQ260 and noticed that the top piece was raised and it was possible to feel a gap between the edge of the frame of the back and this cover. It’s interesting to note that since I purchased my back in March of 2013 and took delivery in mid August of 2013, I have had it out in the field at least 20 times now. I have used it on hot days and cold ones and only in passing had noticed this plastic top on the back. However until I read the the post, I had never really checked to see if my plate was fitting flush to the top.
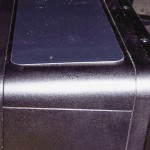
Curious I checked my back and noticed immediately that from the back where the LCD is, the entire right side of my top plate had indeed raised up a considerable amount. You can see the difference between the right and left sides in these two photos.
-
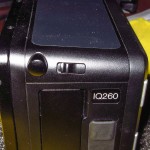
- Left side my my IQ260 showing edge of WiFi cover
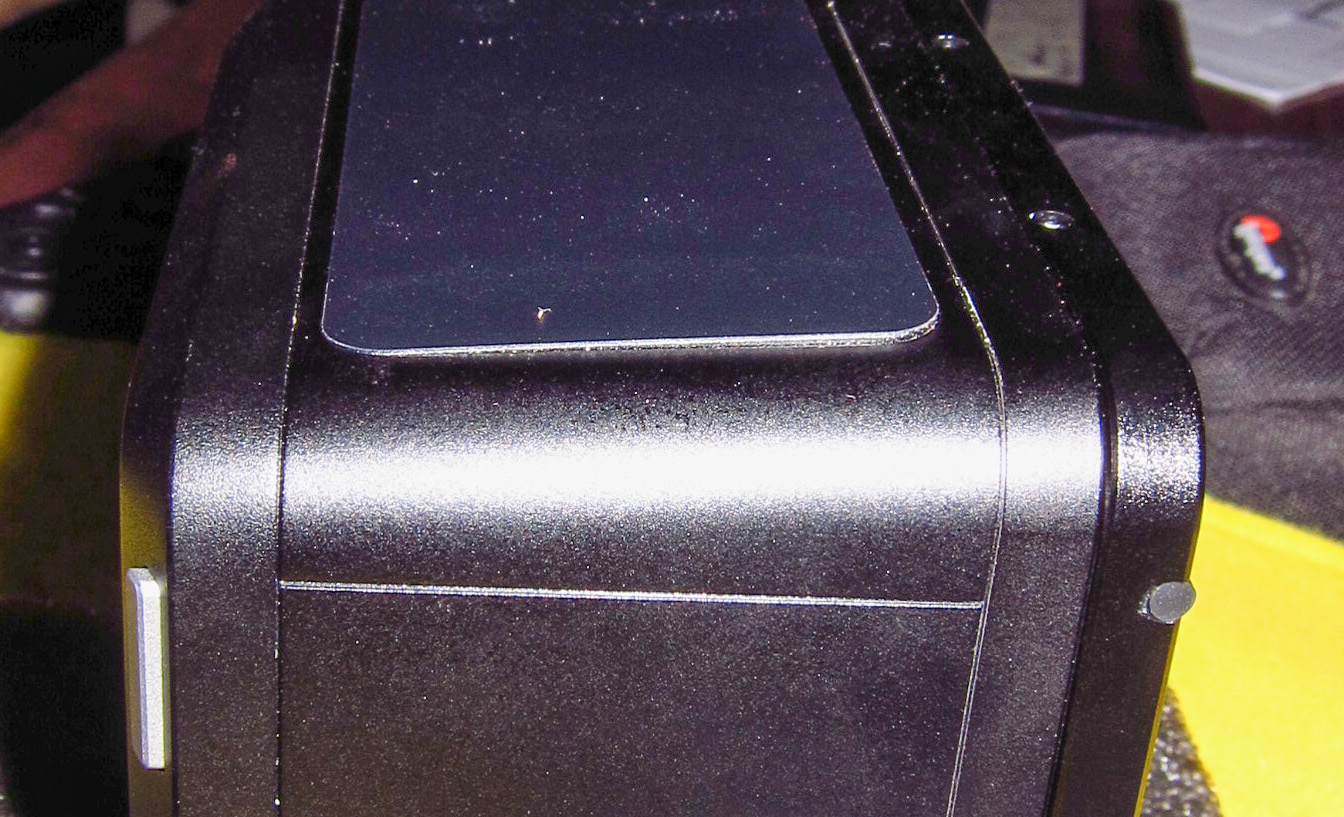
-
- Right side of my IQ260 showing top of cover and gapping
I attempted to push the plate back down, but in a minute or two the plate had pushed back up to the same position. The top plate had raised up enough that I could easily catch it with my fingernail and feel it trying to pull up. The plate was loose and what concerned me more was the fact that it might now somehow have compromised the integrity of the seals for the back. I have more to show on this in a different post, as I had been getting some fogging on the inside of my LCD for sometime now.
With a simple push you can get the top plate to go back down, but as mentioned before it’s not going to stay there. I don’t know exactly how long my back had been doing this and this surprises me as I am usually pretty quick to see such things. If I had been using a Phase One DF+ body with the back, I could easily have missed this since the viewfinder of the DF+ comes right over the top of the back, but with the Arca rm3di that I use the back sits out at a 90 degree angle to the camera and nothing covers this piece.
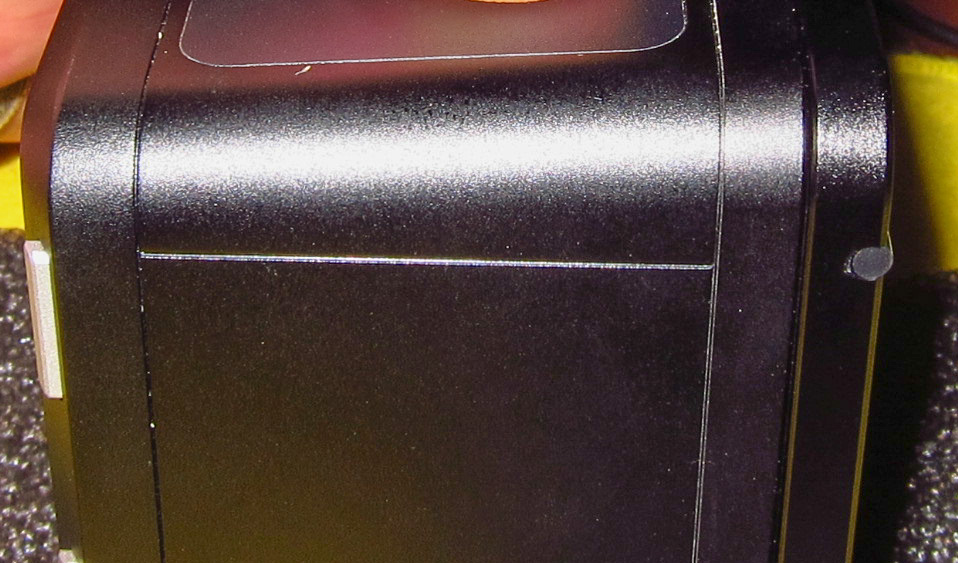
Close up of right side of top plate with pressure
As you can see in this shot, with simple pressure you can get the plate to go back to the original position but of course you can’t keep pressure on it and I was a bit worried that pressure might not be the best idea since you might be pushing down on the wifi card also. From the pictures of the card on the Phase One website it appears that the wifi controller card is directly below the plate. The other issue is that the plate is surrounded by the hard metal of the back so if anything does push on this part of the back, the plate will give in long before the back frame does. NET: Don’t drop this back on it’s top. I have a few ideas for mine since I am always in the field and protection is important.
I have one other concern that I have not heard back from my dealer or Phase One yet. What is the amount of weather sealing that this plate is given? I am a outdoor photographer, not indoor and my older P45+ or IQ160 was pretty much bombproof. I had 2 close calls with my P45+ and neither time did have any damage. If anything the 160 was even stronger than the P45+, the only areas that really need protection being the LCD and the sensor. Working outdoors, it’s always possible for a errant drop of moisture to hit the top of the back. In fact it’s more possible than not. Have you ever worked in the woods directly after a rain? Drops are constantly coming down and they are going to hit the flat top of this back really quickly. The older IQ160 does not have an issue here since there is no opening, just the metal frame. Now you have a huge opening almost all the way around the top of the back and the opening has a small gap (even when the plate is where it should be). Water will always seek and find the weakest part of a seal and it will also get down into the gap no matter what you do. I can only hope that there is very tight (well mine was not very tight) weather seal on this plate. This would be one way to fix it, but it’s rather ugly and I am hoping to hear back from Phase One that the correctly mounted plate can handle a few drops of water.
One possible way to weather seal the top of the IQ260
This whole issue caused me to email my Digital Transitions (DT )Rep, who quickly put me in contact with one of the dedicated technical support staff with DT. Scott, one of the techs at DT, took my information and opened a case with Phase One. About the same time I found another forum post where Phase One had responded to another user informing them that the first round of backs released to the field (mine was one of them) had a different method of attaching the WiFi plate and if you saw gaping, the back needed to go back to Phase One to have the plate replaced with the newer style or method of gluing it down in place.
NOTE: If you are considering purchase of a Phase One back, I strongly recommend you work with a dealer like DT. They can sell used or new and have a direct line to Phase One. As a end user, it is very hard to reach Phase One in Denmark. They have no phone support. They do have a location in Mellville NY, but it’s more of a marketing support arm and I don’t believe that any repairs like the ones I needed will be done in the U.S. If you purchase a back over the web and it has a Value add warranty, then that warranty will be supported by dealer, however you will need to develop a relationship with that dealer. If you purchase a used back with no warranty, then you just spent a lot of money and you may end up with no recourse at all. Save a bit up front and pay a lot in the rear. The dealer can get through to Phase One much faster and they can also contact Phase One in Denmark. The only way I know to reach Phase One in a situation like this is open a trouble ticket with Phase One via the main Phase One website. You will get a response but it will take a while and you will not get any phone calls. I prefer a phone call in situation like this.
I purchased a Value Add warranty with my upgraded IQ260 so Phase One has sent me a loaner back, in this case a IQ280. I did check the top plate on the replacement back and it’s definitely more secure than my back was. I will update this post when my back returns and when I hear back about the weather seals on the plate when it’s mounted correctly.
Hopefully this is just a slight hiccup with my IQ260. So far I have only had this issue and fogging inside the screen and I am wondering if the fact that the seal for this plate being loose had allowed some moisture inside? I had DT also add this issue to my case.
07/17/13 IQ260 Arrives in Little Rock Arkansas–The unboxing
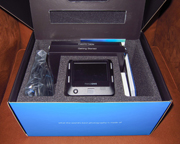

Phase One IQ260 in Box
I can remember back when I was a fan of collecting watches, when someone purchased a new watch, they always published an “unboxing”. I never did it for a watch, but did go ahead for the IQ260. I am pretty sure this is the first one in Arkansas and I am very happy to be the owner.
After a lengthy decision process, I upgraded my IQ160 go the new IQ260. I have been on the fence for quite a time on this but after working with Digital Transitions, out of New York I found that there was enough value in the IQ260 to move from the 160. I was able to demo the IQ260 in Dallas TX, on a hot clear day. The outside temperatures were approaching 100 degrees so longer exposures were out of the question. However I was more interested in the file quality of the IQ260 vs. the IQ160. I was hoping to see a bit more room in the shadows and a bit more top end with highlights. I was also interested to see if there was much improvement in iso 200 and iso 400 results in the long exposure mode. These are areas where I tend to get pushed with my my outdoor photography. The IQ260 at first blush does seem to provide a bit more top end at iso 200 and 400 and definitely seems to show a smoother tonality in the shadows. Since I moved to the IQ160, I have never seen the need for any larger MP output. The IQ280 loomed on the horizon but since I am mainly a tech camera user with Schneider lenses, I was not ready to make the switch to 80mp.
One consideration that I considered was where Phase One was in the development stage of the IQ160 vs the IQ260. The IQ160 was the same chip as the older P65+. Images are identical. However with the IQ160, you picked up the excellent IQ interface to the back. I feel that Phase One will continue to produce enhancements to the IQ260 over the next year or so, whereas I don’t think there will be any more improvements to the IQ160/P65+. I am betting on the future here. It’s also the 1st new chip that Phase One has brought to the market in over 2 years. The IQ280 is still based on the same chip as the older IQ180, however it does have a newer processor/logic card that supposedly gets a bit more DR from the current chipset.
I had also looked at the financial situation on the upgrade (something many people don’t seem to consider when making such a large purchase). My IQ160 was fully depreciated so I wasn’t going to take a book loss. Also after reviewing the numbers that Digital Transitions shared with me for the trade in, I felt better about trading in my IQ160.
One nice new feature is the ability to review the images in Black and White. It’s not a black and white conversion, but if you are looking for focus checks, depending on the lighting, viewing the image preview in black and white is sometimes easier. It’s my understanding that the latest version of the firmware for the IQ160/180 also will have this feature.
As I mentioned I worked closely with Digital Transitions, my dealer out of New York, I was able to demo the IQ260 against my IQ160. So far I have found several areas where I believe the IQ260 is superior to my older IQ160.
- Better tonal transition from shadow to lighter areas at iso50
- Very clean 60mp image at iso140, cleaner than my IQ160 at iso100
- The ability to glean an extremely clean file at iso140 in Long Exposure Noise Reduction mode
- Wifi connectivity to an iPad for checking focus on Tech camera shots.
I have not been able to do anything in the long exposure mode due to the extreme heat we are experiencing here in Arkansas and more than likely will not be able to test this feature until late September or October.

Opening the box on a Phase One IQ260
It’s interesting to note, that the wifi feature has actually become a more positive feature for me than I first realized. I originally felt that the wifi feature would be moot for me, but with a bit of trial, I am finding that it’s actually a very important feature, especially for tech camera work. Since all the IQ’s (for that matter all current Phase One backs) use CCD instead of CMOS chips, live view as most people are used to does not work. Yes Phase One offers Live View on the IQ backs, but in actual daytime use it’s not very helpful. With the wifi feature, you can shoot a series of images with the back on a tech camera, then view them with Capture Pilot on a ipad, This allows you much more flexibility to check your shots. Sure the IQ LCD is loaded with features, but it’s still small and it’s also locked into position on the tech camera. Many times I will setup a shot on my knees or bent over double. Exposure is easy but bending over to see the screen is harder and even then it’s a bit difficult to see all the details. With the wifi feature, you can leave the camera in position, and pull out the ipad and find a comfortable viewing position to check the images. You can also delete them from Capture Pilot. Sure it adds one more thing to carry, but it’s not a bad compromise.
I hope to add a lot more to this report as I get out and shoot the IQ260. One thing I found surprising, it seems that speed of the processor in the IQ160 and 260 is about the same. I base this on the fact that the latency between shoot and review is pretty much the same.
Thanks again to Digital Transitions for all of their help in making this upgrade possible.

 From the Blog
- 01/24/24 Sunset over Walton Heights and Pinnacle Valley January 24, 2024
- 01/22/24 Looking through the Keyhole on Roark Bluff–Autumn January 23, 2024
- 01/14/24 Sunset from Pinnacle Mountain Little Rock, AR January 12, 2024
- 01/14/24 Winter View of Pinnacle Valley January 12, 2024
- 01/12/24 Fall Scene, Pinnacle Mountain January 11, 2024
- 01/11/24 Hasselblad XCD Camera lenses, all out of stock? January 11, 2024