03/14/19 Sunset skies over Pinnacle Mountain–Featured Arkansas Photography
- At March 14, 2019
- By paul
- In Featured Arkansas Photography
 0
0

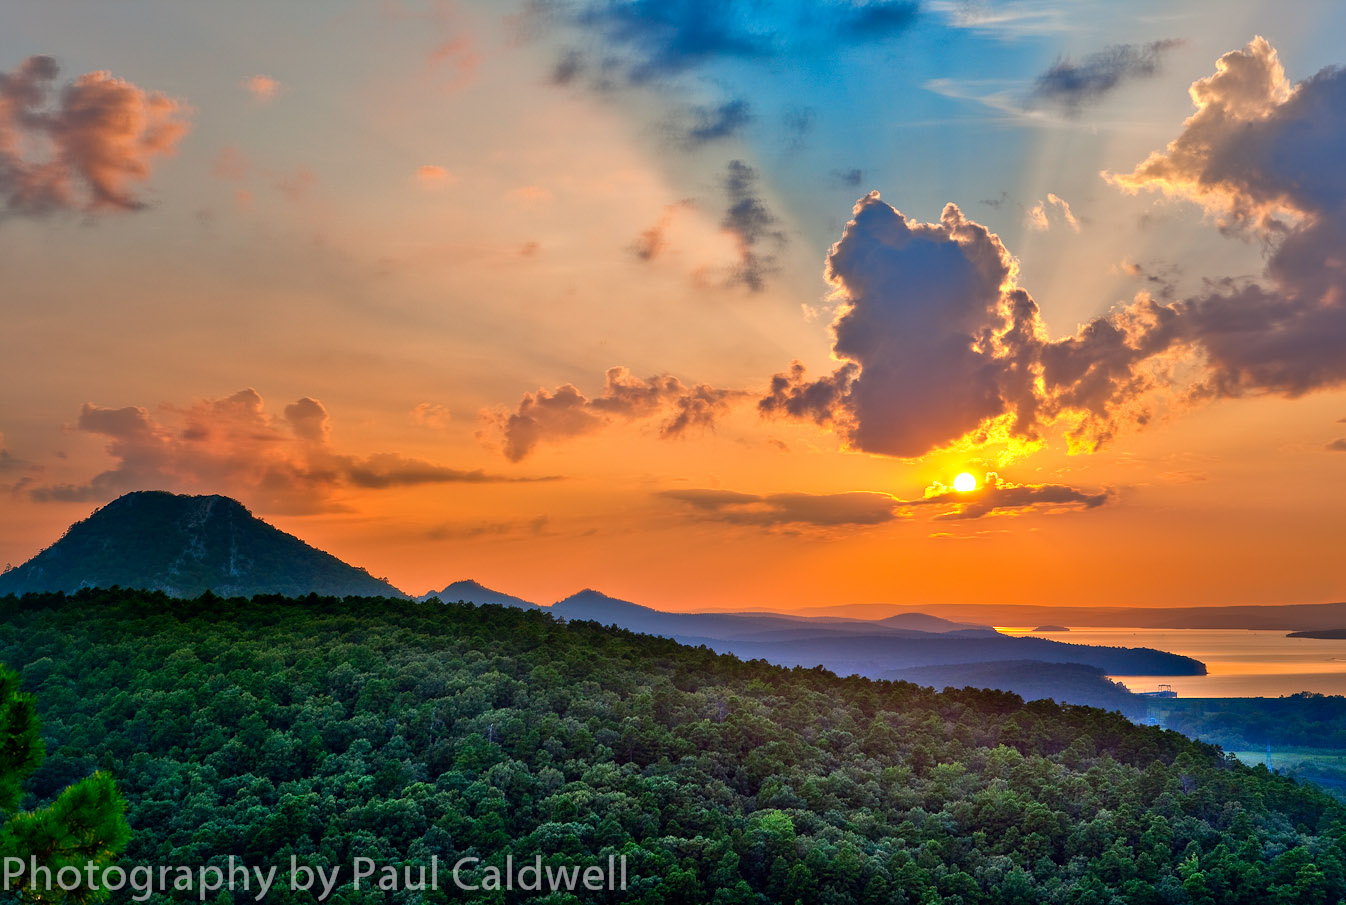
Sunset skies over Pinnacle mountain
Taken with a Nikon D850 and 80-400 lens, ISO 200. 4 vertical shots combined into 1 final image.
Love the area around Pinnacle mountain in western Pulaski county. All day long the skies had been grey and dark, no color. But right at sundown, the clouds broke open and the sun started to shine. It was still raining a bit, but I headed out to try and capture at least 1 sunset shot. I was working with the D850 and 80-400 lens, (a lens I have mixed feelings about) and no tripod, so I pushed up the ISO to 200 and shot brackets. I really should have pushed up to around 400 or even 800, but I was still able to get my shot. There is a bit of noise in the foreground, but it’s not as bad as I thought it would be. The skies were just loaded with color and I loved the way the various layers of clouds were moving across the skies.
I used Capture One to convert the images from raw files and then used Photoshop CC 2018 to create the panorama. It’s not really a true panorama, but more large format image. To capture this, I took 4 vertical images all hand held then used the panorama tools in Photoshop to create the final image. Photoshop does a great job most of the time and was able to get this image converted fine.
Pinnacle is an amazing looking mountain in western Pulaski County, Arkansas.
Written for www.photosofarkansas.com by Paul Caldwell, please do not reprint or reproduce any of this content without permission.
06/20/17 Featured Arkansas Landscape Photography–Springtime sunset near Calico Rock on the White River
- At June 20, 2017
- By paul
- In Featured Arkansas Photography
- 0
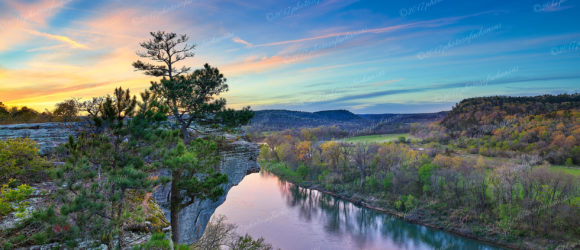

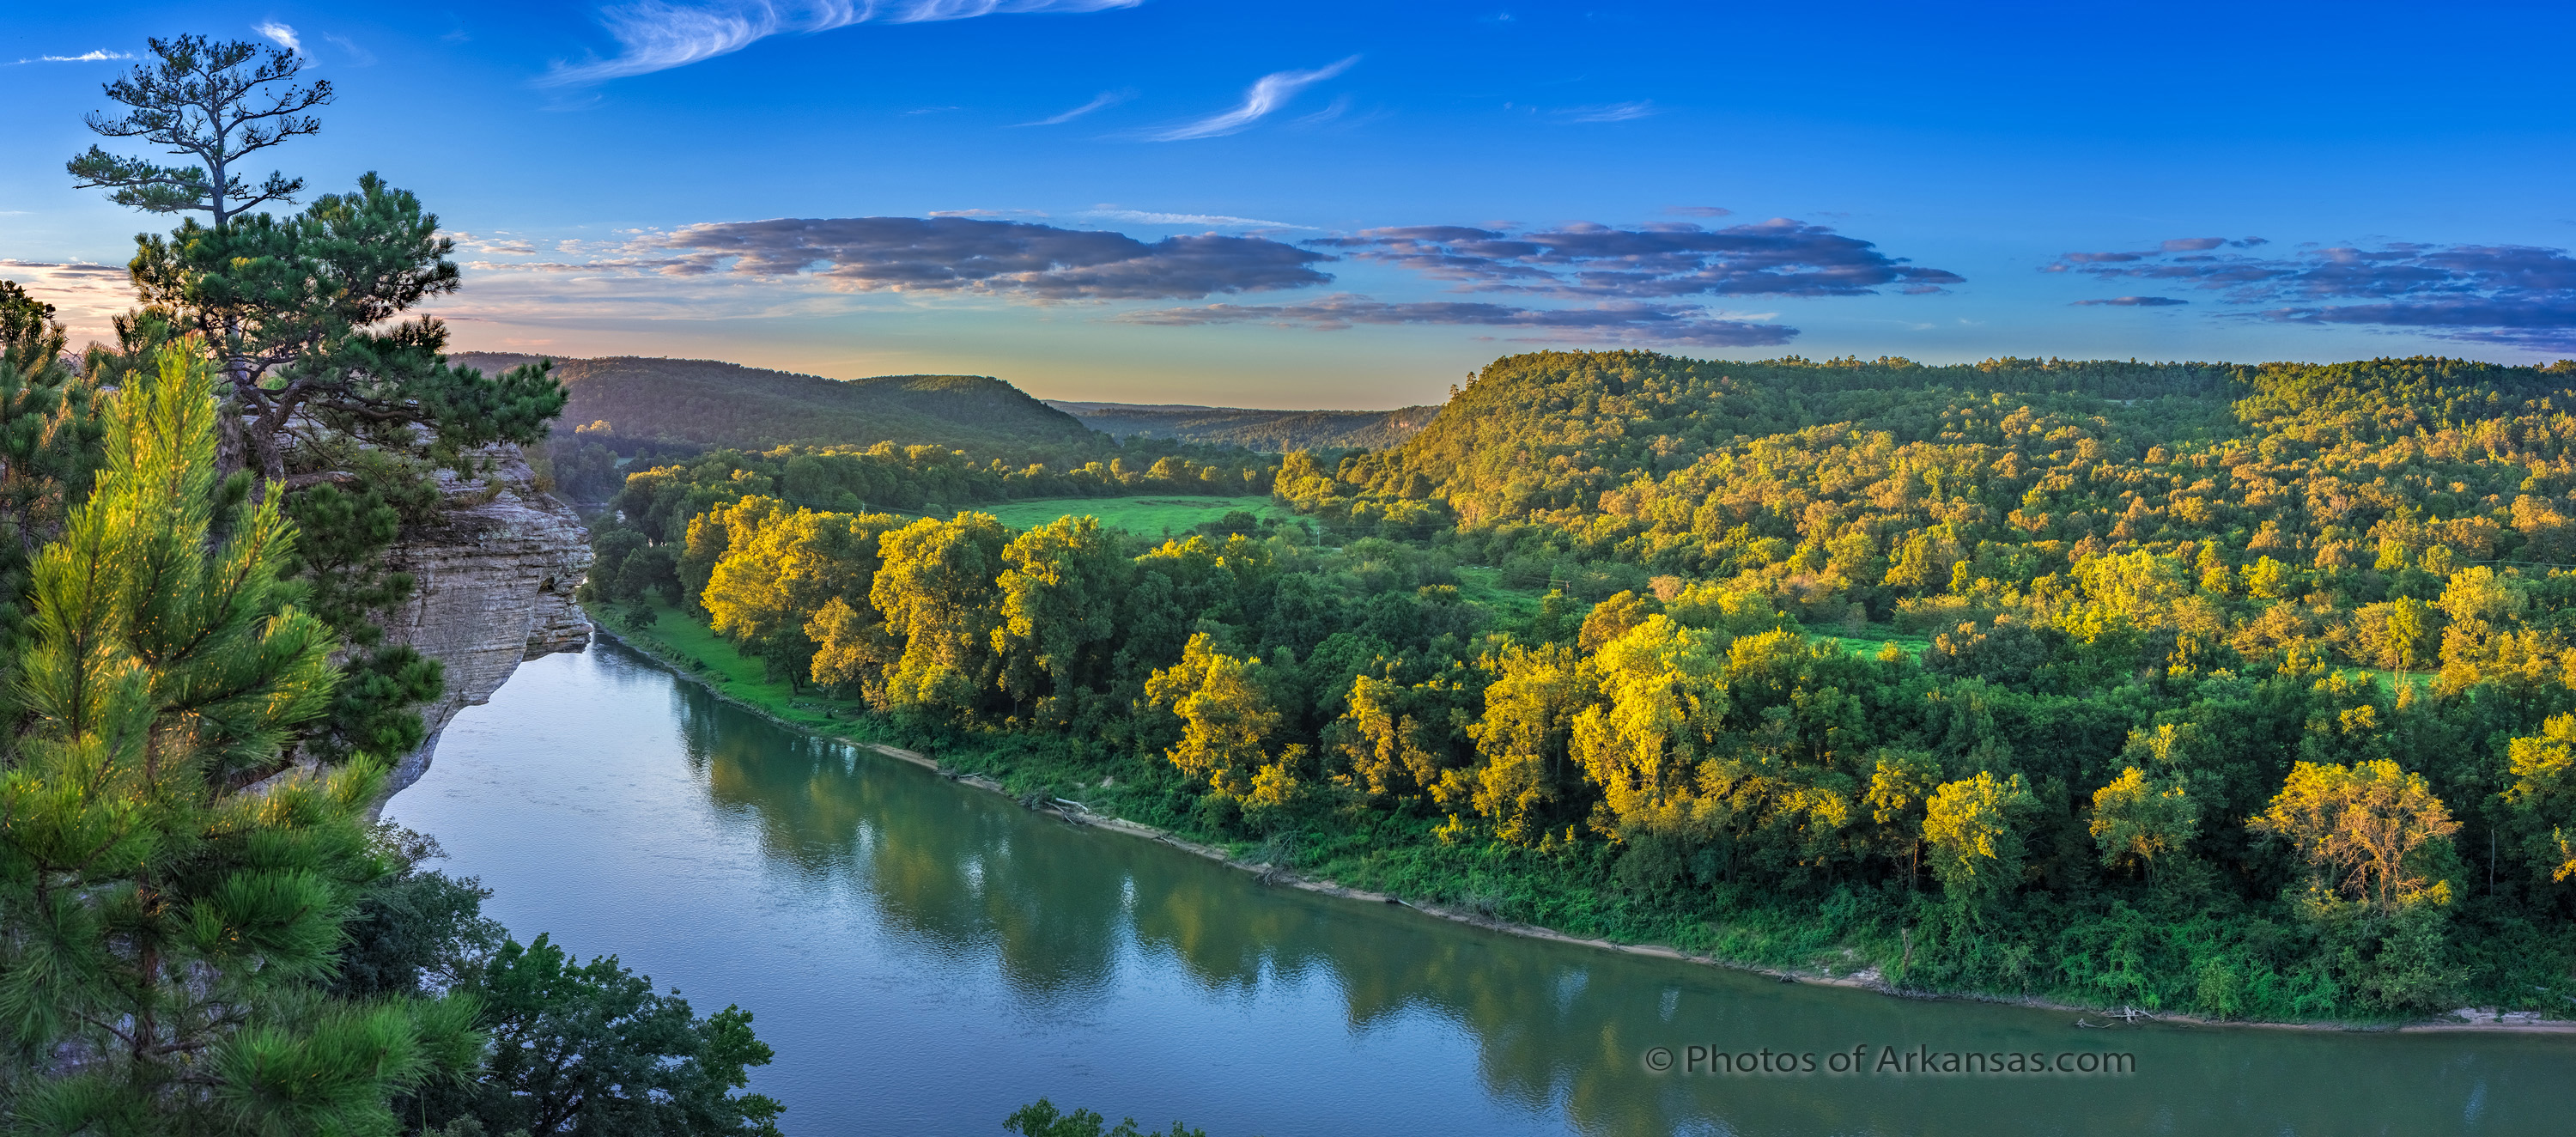
Early Springtime Sunset at Calico Rock on the White River
Note, Please do not attempt to screen print or download this image for use in any type of project either print or web related. If you are interested in use of this image CALL ME OR EMAIL ME nothing in the world is free.
Taken with a Phase One IQ3100 and XF camera with a 35mm LS lens. I used ISO 50 and only one exposure. Raw file was developed in Capture One and then final color work was done in LR and Topaz.
There are many great places to catch a sunset in Arkansas, however if you don’t mind the long drive from Little Rock, the area around Calico Rock is excellent. Here you have a long winding bend in the White River and bluff that is about 150 feet above the river. There are nice vistas both to the east (towards Calico Rock town) and the west as in this image. You only get a few short months where the sun will actually reach all the way over to the bluff, mainly late June and July after that the sun will be behind you on the left. Even though I had a lot of folks milling around this night I was able to get one shot or two with the light reflecting on the nearly calm White River.
I also like to work this spot at night as you can catch the evening fog rolling. Many times the fog will totally close down the scene so you need to be there right at dark. The surrounding towns will give off a bit of unnatural light, but if you work with the moon, then this is an excellent place for star trail work, not so good for Milky Way as the main Milky Way is behind you.
The small crag in the foreground is sometimes called “Little Hawksbill Crag” after the more famous Hawksbill Crag up on the Buffalo River.
Paul Caldwell
Copy right by photosofarkansas
10/14/16 Featured Arkansas Landscape Photography–Sunrise from the summit of Mt. Magazine
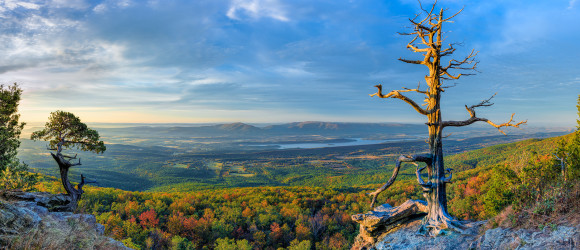

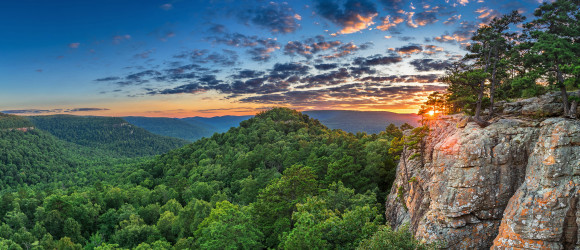
A view to the south from the summit of Mt Magazine, highest point in Arkansas
Taken with a Nikon D810 and 14-24 Lens, @ 24mm in 3 vertical shots, stitched together in Lightroom
The view from the summit of Mt. Magazine offers some amazing vistas, and one of the best is looking out to the due south towards Blue Mt. Lake and Blue Mountain behind it. This shot was taken last year, in late October and I was able to catch the rising sun hitting the rock and old tree in the foreground. Mt. Magazine is the highest place in Arkansas and has a lot to offer the visitor. There is a wonderful lodge where you can spend the night and enjoy a great meal after hiking around on some of the trails. The area is also a favorite for rock climbing and hang gliding.
I like to work this particular spot on Mt. Magazine year round, but the spring and fall are my favorite times. The sun will only come into the frame during December and January, but you can still get great photographs during the rest of the year. The play of light is amazing here.
Mt. Magazine’s summit is 2,700 feet high, and is the highest place in Arkansas. You can see for many miles off in pretty much any direction. The lodge offers a higher vantage point so when you visit make sure stop by.
The view from Mt. Magazine’s north side is just as impressive, so make a point of driving over to that side also. There is a one way drive which has several pull outs for viewing. During the fall you can expect a lot of traffic and a bit of congestion, especially during the weekends. The lodge will be booked up a year in advance for the best dates in the fall so plan accordingly.
This image was taken with aid of a tripod, in 3 vertical segments with a Nikon D810 and 14-24 lens. I used the 24mm focal length and F8 with the base ISO. I did not use a polarizer since I was panning across the scene and knew that would cause problems with composition later. I used Lightroom to work on the raw files, and also to make the panorama. The fall colors were just a few days before peak when this image was taken.
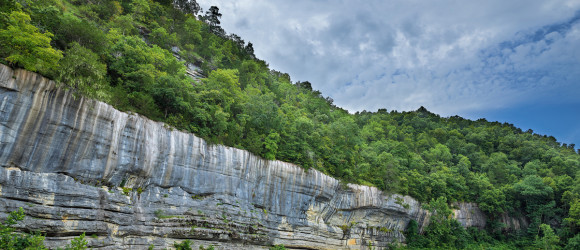
09/27/16 Featured Arkansas Landscape Photography–Late afternoon at Roark Bluff Buffalo River
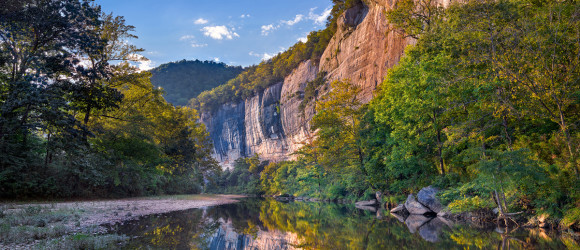

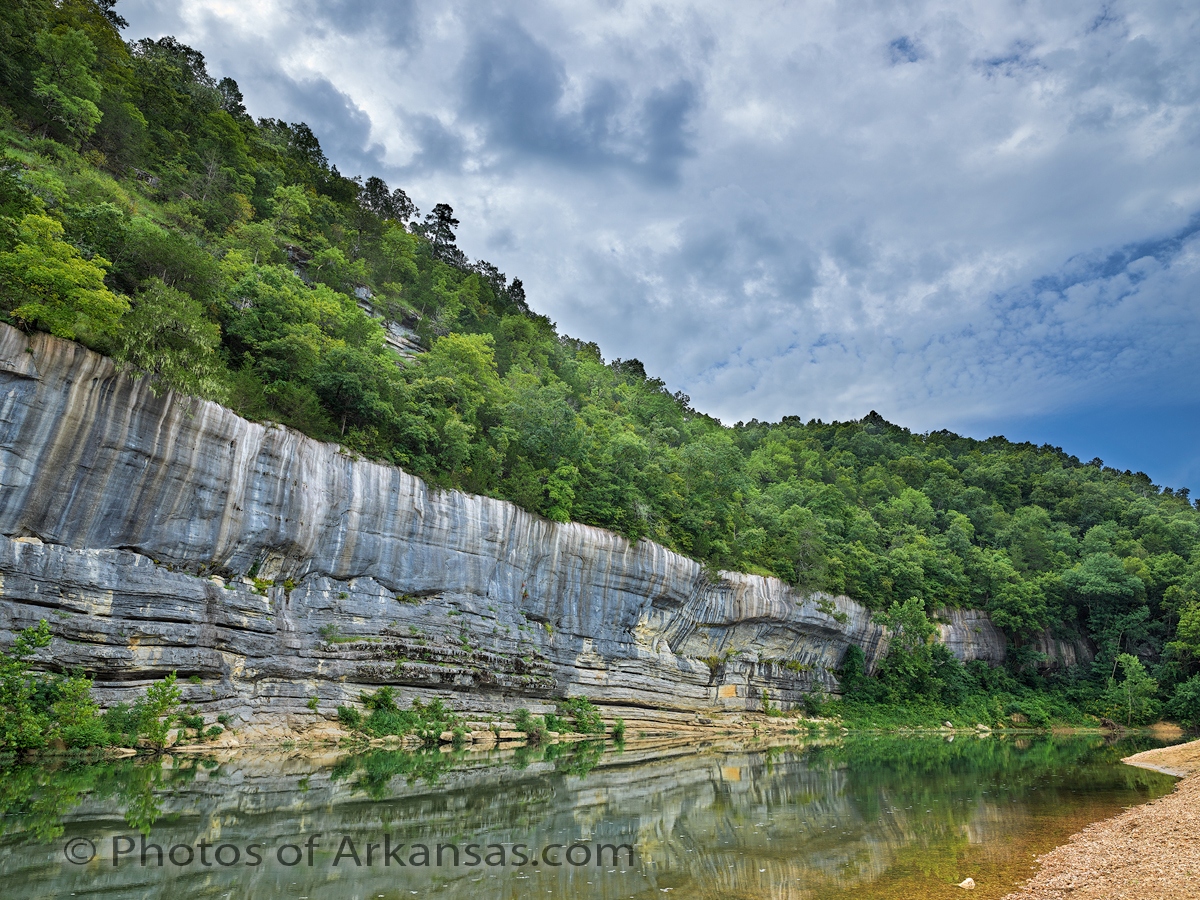
Late afternoon light creeping along Roark Bluff on the Buffalo National River
Taken with an Phase One IQ100 @ 35mm LS lens, ISO 50 and circular polarizer for both sky and cutting glare on leaves.
This is the time I like to start working the Buffalo River, as fall is just around the corner, and as can be seen in this shot, is actually started on the Buffalo.
The Buffalo River at Roark Bluff is one of my favorite spots to photograph and I work it as often as I can, but the drive up and back has started to slow me down. I was hoping for a few clouds to help break up the sky and there were there, but only towards the far side. The sun was playing hide and seek most of the afternoon, and when the sun finally came out the wind started to blow ruining the reflection. There are a lot of spots on the Buffalo to catch a reflection but this is my favorite.
This was taken in one exposure, something I never could have done before with a Phase One CCD back, the 100MP CMOS chip does have some excellent range. This type of shot is one of the most difficult as you are working directly at the brightest part of the subject. This means that anything not illuminated by the sun (in this case the left side of the river) will be in deep shade. You want enough exposure to be able to pull this area up some and not leave it black, but you also have to be very care not to blow out the sky, especially the left side. The use of a polarizer was needed more for the glare on the leaves to the right. Without it the colors would not have been as nice and clean, you have to be careful when working such a scene to see that you keep the polarized effect as even as possible on your sky, so you may need to try a few exposures.
After waiting for almost an hour, the sun popped back from behind the clouds and the wind died down long enough for this shot.
09/22/16 Featured Arkansas Landscape Photography–Sunset at Calico Rock on the White River
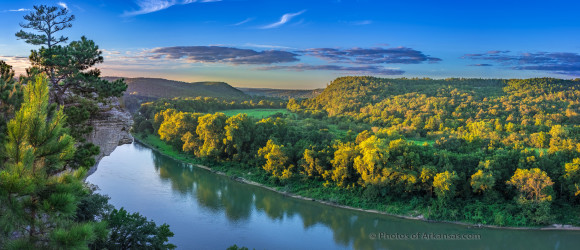
Sunset from Calico Rock on the White River in Arkansas
Taken with a Fuji X-Pro2, ISO 400, 35mm F2.0 lens, at F9, Panorama taken in 4 vertical images, each segment 3 exposures for a total of 12. Worked up in Adobe LR
Calico Rock, is one of the more interesting spots on the White River in Arkansas. You can drive right to it and when you arrive, you have a sweeping view of one of the larger bends of the White River. The bluff is about 150 feet above the river and you really cannot see much of the bluff itself. However there is one vantage spot where you can look to the west an there is a small out cropping that adds a lot to the photograph. Many call this “little Hawksbill Craig” after the larger feature up on the Buffalo River. However I just like to photograph the valley. If you look downstream, you will see the town of Calico Rock on the left hand bank of the river.
This shot was taken in a series of vertical segments, 4 total and for each segment I exposed 3 images. I then worked each of the 3 shots into a HDR balanced image in Lightroom. After that, I took the final 4 images and created a panorama. It’s very important to realize that you do not want to do any work on the individual HDR segments before the panorama merge. I prefer to use the boundary warp feature of Lightroom also as most of panoramas in taken like this will only work in a spherical format and thus your top and bottom edges will have some problems.
The Fuji X-Pro2 makes this very easy with it’s automatic bracketing shutter, where you only have to press the shutter once to fire all 3 brackets.
I have found that Fuji made some very good positive changes to the dynamic range of the X-Pro2 as can be seen in this image. Also Adobe must have done a bit of tweaking to their X-trans conversion for the X-Pro2.
You can get to Calico Rock from Little Rock, in about 3 hours and the drive is quite beautiful.
09_10_16 Featured Arkansas Landscape Photography–Sunset from Sam’s Throne

Late summer sunset from Sams Throne in the Arkansas Ozark mountains.
Taken with a Pentax K1 in three vertical segments of 4 exposures each, LR used for HDR conversion to 3 vertical segemnts, Stitched in Lightroom into single 3 part panorama, ISO 100, F11 Pentax 15-30mm Lens @ 17mm.
In the late summertime of September, the Arkansas skies can surprise you. Many times you will find a pure blue sky about 1 hour before sunset, only to see some light cloud cover roll right as the sun sets. On this evening, I was able to catch some of this at Sam’s Throne. I had hoped to have clear skies as I was going to stay for a while after dark and work the Milky Way with the Pentax Astrotracer feature, but the sunset was a added bonus for sure.
Sam’s Throne is one of the premier climbing spots in Arkansas due to the bluffs that run for over 1 mile. The rock is a type of sand stone and and during the sunset will take on an orange color. The rocks are also covered with a bright orange lichen, one that I have really only found in this part of Arkansas. So at the times of bright and intense light, the rock of the bluffs can really stand out. I like to work from a spot where you can catch both the true throne (the smaller peak in the center of the image) and pick up the bluff line. During the late summertime the sun will set just off the bluff through the trees and can add a wonderful effect as it will accent the pines at the top of the bluff line.
This photograph, is quite a composition as it was taken in 12 frames, 4 from each station in a short panorama. I then blended each segment with Lightroom’s HDR tool into a 3 dng files, that were then combined into a 3 part panorama. This allowed me to capture both the brightest highlights in the shot and keep the noise out of my shadows. The green of the trees was just perfect on this evening, just a bit of yellow starting to show up in the tops. There were a few trees already starting to go into a full color display, but these were more towards the top of the bluff.
You can pick any of hundreds of spots to work at Sam’s. In this shot, you can see on the left side the same bluff line as it has worked around the hillside. I sometimes like to work from that spot also as you can still capture the sunset and you have a different perspective of Sam’s.
It takes about 2.5 hours to get to this part of Arkansas from Little Rock, and the drive north from Russellville is well worth it, especially in the Spring and Fall when the trees take on very unique colors.
08/20/16 Featured Arkansas Photography–Early morning at Buffalo Point, Buffalo National River
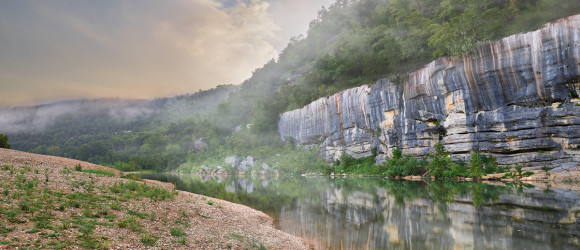

Early mornings are some of the best times to photograph the Buffalo River. This is from Buffalo Point.
Taken with a Phase One IQ100 and 35LS lens, no filters @ ISO 100 for 1/40th of a second F12 and Phase One XF.
While on a trip to the lower Buffalo River, I was able to spend the night at Buffalo Point Campground. This is the first campground that was built on the Buffalo, and dates back to the WPA and CCC days of the late 1930’s in Arkansas. Here you are pretty low down on the river as there is only about 20 or so miles left before the river runs into the White River. Buffalo Point is a very popular spot on the river as it has an excellent campground, and there is a great swimming hole below the large bluff on the far side of the river. From here you can take a quick float down to Rush which is about 8 miles or do down river. It’s a great float to take in the fall to enjoy the fall colors as most often there will be enough water for floating year round.
I was hoping to catch the early morning light burning off the fog but there was only a small amount of fog. However there was a large cloud bank moving in from the west and sun managed to pop the lower clouds along with the fog rising up towards the top of the bluff. I had the place to myself, which on this river is a rare event so I was able to have almost 45 minutes before the first floaters started to come down from Hwy 14 and break up the great reflection on the river.
The Phase One XF and IQ100 worked together very well on this occasion. I was using a tripod due to the slower exposure times and the fact that the 35LS lens is so heavy. The camera controls on the back of the IQ100 LCD made working with this scene very easy. I ended up shooting several manual brackets but due to the impressive dynamic range of the IQ100 sensor, I was able to create this image from one exposure. The 35LS lens performed quite well, giving me excellent details throughout the image.
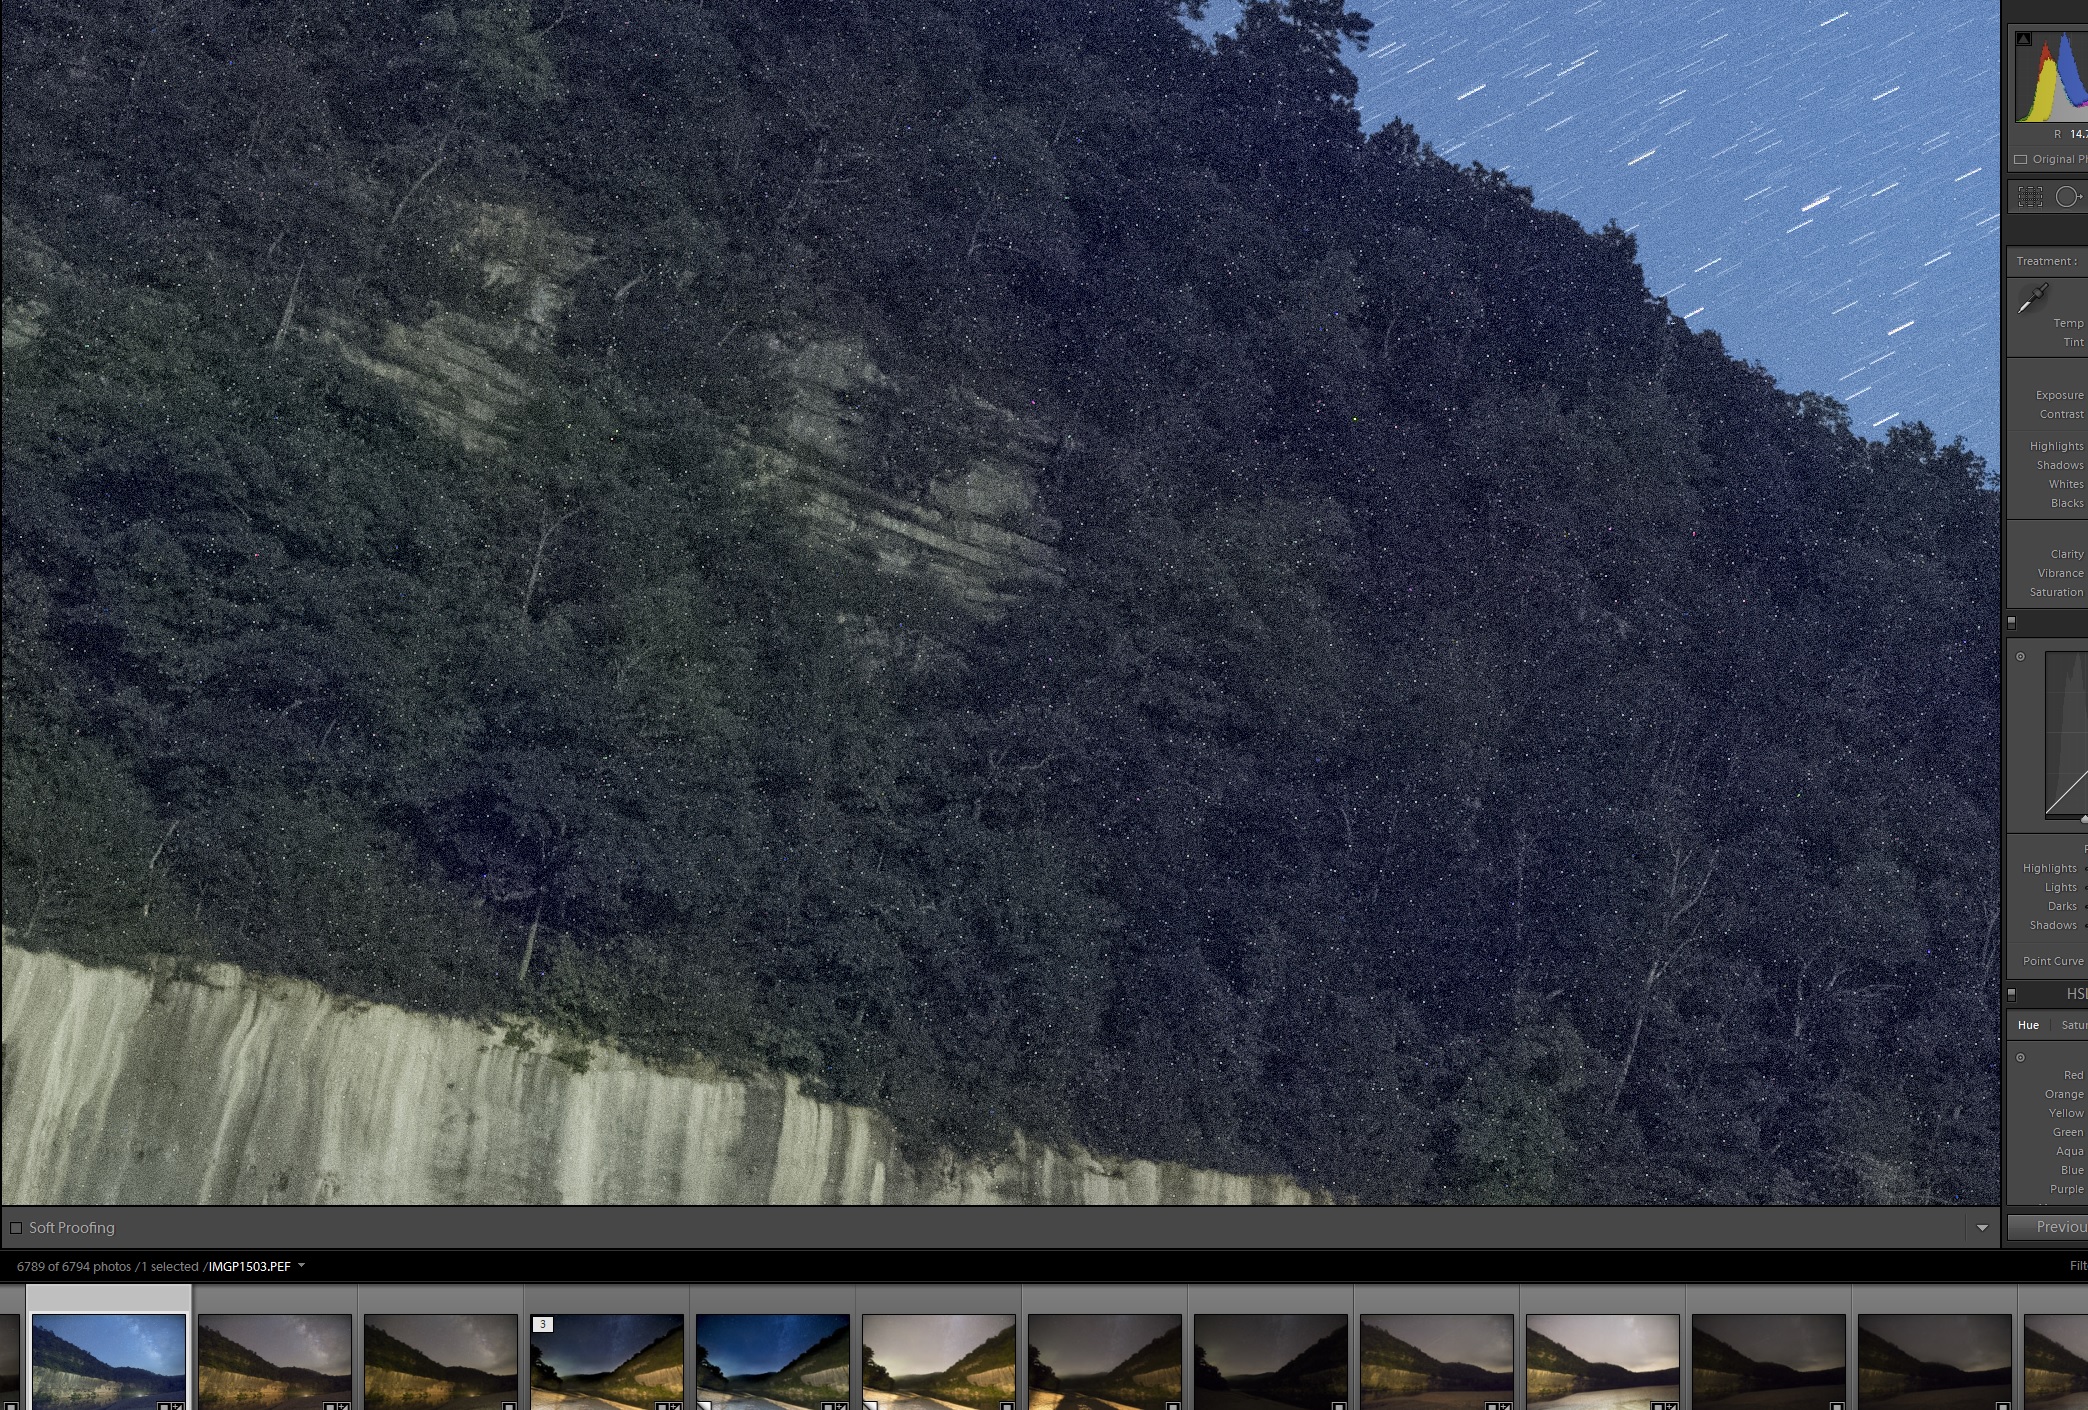
08/15/16 A close look at the Dynamic Range of the Phase One IQ100
I have been using the IQ100 now for several months, and have noticed that there are some interesting facets to the dynamic range of this digital back. Lets take a more detailed look at this particular image taken on the Buffalo River, in Arkansas
The Buffalo River at Buffalo Point in early August with a morning storm rolling in.
The IQ100 is of course the first 100MP digital camera ever marketed, was introduced in January of 2016 by Phase One, and so far has had a very good reception. I was very interested in the previous IQ250, 50MP digital back, however it has a 1:3 crop factor, which for my work, (example this image) would have been too much to sacrifice. I use wide angle lenses in most of work unless I am stitching and the 30 percent loss in focal view was too much for me. But I easily saw with the IQ250 the massive advantages that CMOS had over the traditional CCD Phase One backs. This showed up for me in two main areas, noise and dynamic range. These both have many definitions but for me it’s simple:
Noise, how much noise will I see in areas of shadow, at base ISO and at higher ISO. If I push an image, how much detail is lost to noise in the shadows. With a CCD back, there was never too much room here even at base ISO of 50
Dynamic Range, with one single exposure, what can I capture? If I adjust for highlights, will my shadows be filled with too much noise or vise versa. Also how well does my color saturation hold up at higher ISO ranges. With CCD digital backs, the color saturation fell off very quickly once past the base ISO. You might be able to get one more stop before the saturation was lost.
Moving to the IQ100 from the IQ260 I was hoping to see similar if not greater dynamic range at base ISO to the Nikon D810. I still regard the Nikon D810 as the flagship for dynamic range at base ISO of 64. With the Nikon D810 it’s easy to push a single exposure as much as 2.5 stops and still have wonderful details in the areas of shadow. Phase One (P1) rates the IQ100 at a base ISO of 50 so I was hoping to be able to get at least 2 stops of details when shooting at ISO 50. So on my first couple of outings with the IQ100, I mainly used ISO50 and planned to push the shots when necessary. I quickly found out that this the chip in the IQ100 (made by Sony) behaves differently that the 36MP chip in the D810 (also by Sony).
In working at base ISO 50, it became apparent to me that a shadow push of even 1 stop may be enough to cause you to lose details in the shadows, and also a huge amount of color saturation. This was a surprise to me as I had expected to get even better push than what I was seeing with the D810. However it was also soon apparent that the IQ100 has quite a bit of leeway with highlights, much more so than any of the CCD backs I have used from Phase One in the past. You can easily let your highlights go past 1 to 1.5 stops and still regain the finer whites. If you combine the “highlights” slider in Capture One, along the exposure slider, there is a lot of recovery. Looking at the example below: Click on the image to view it larger
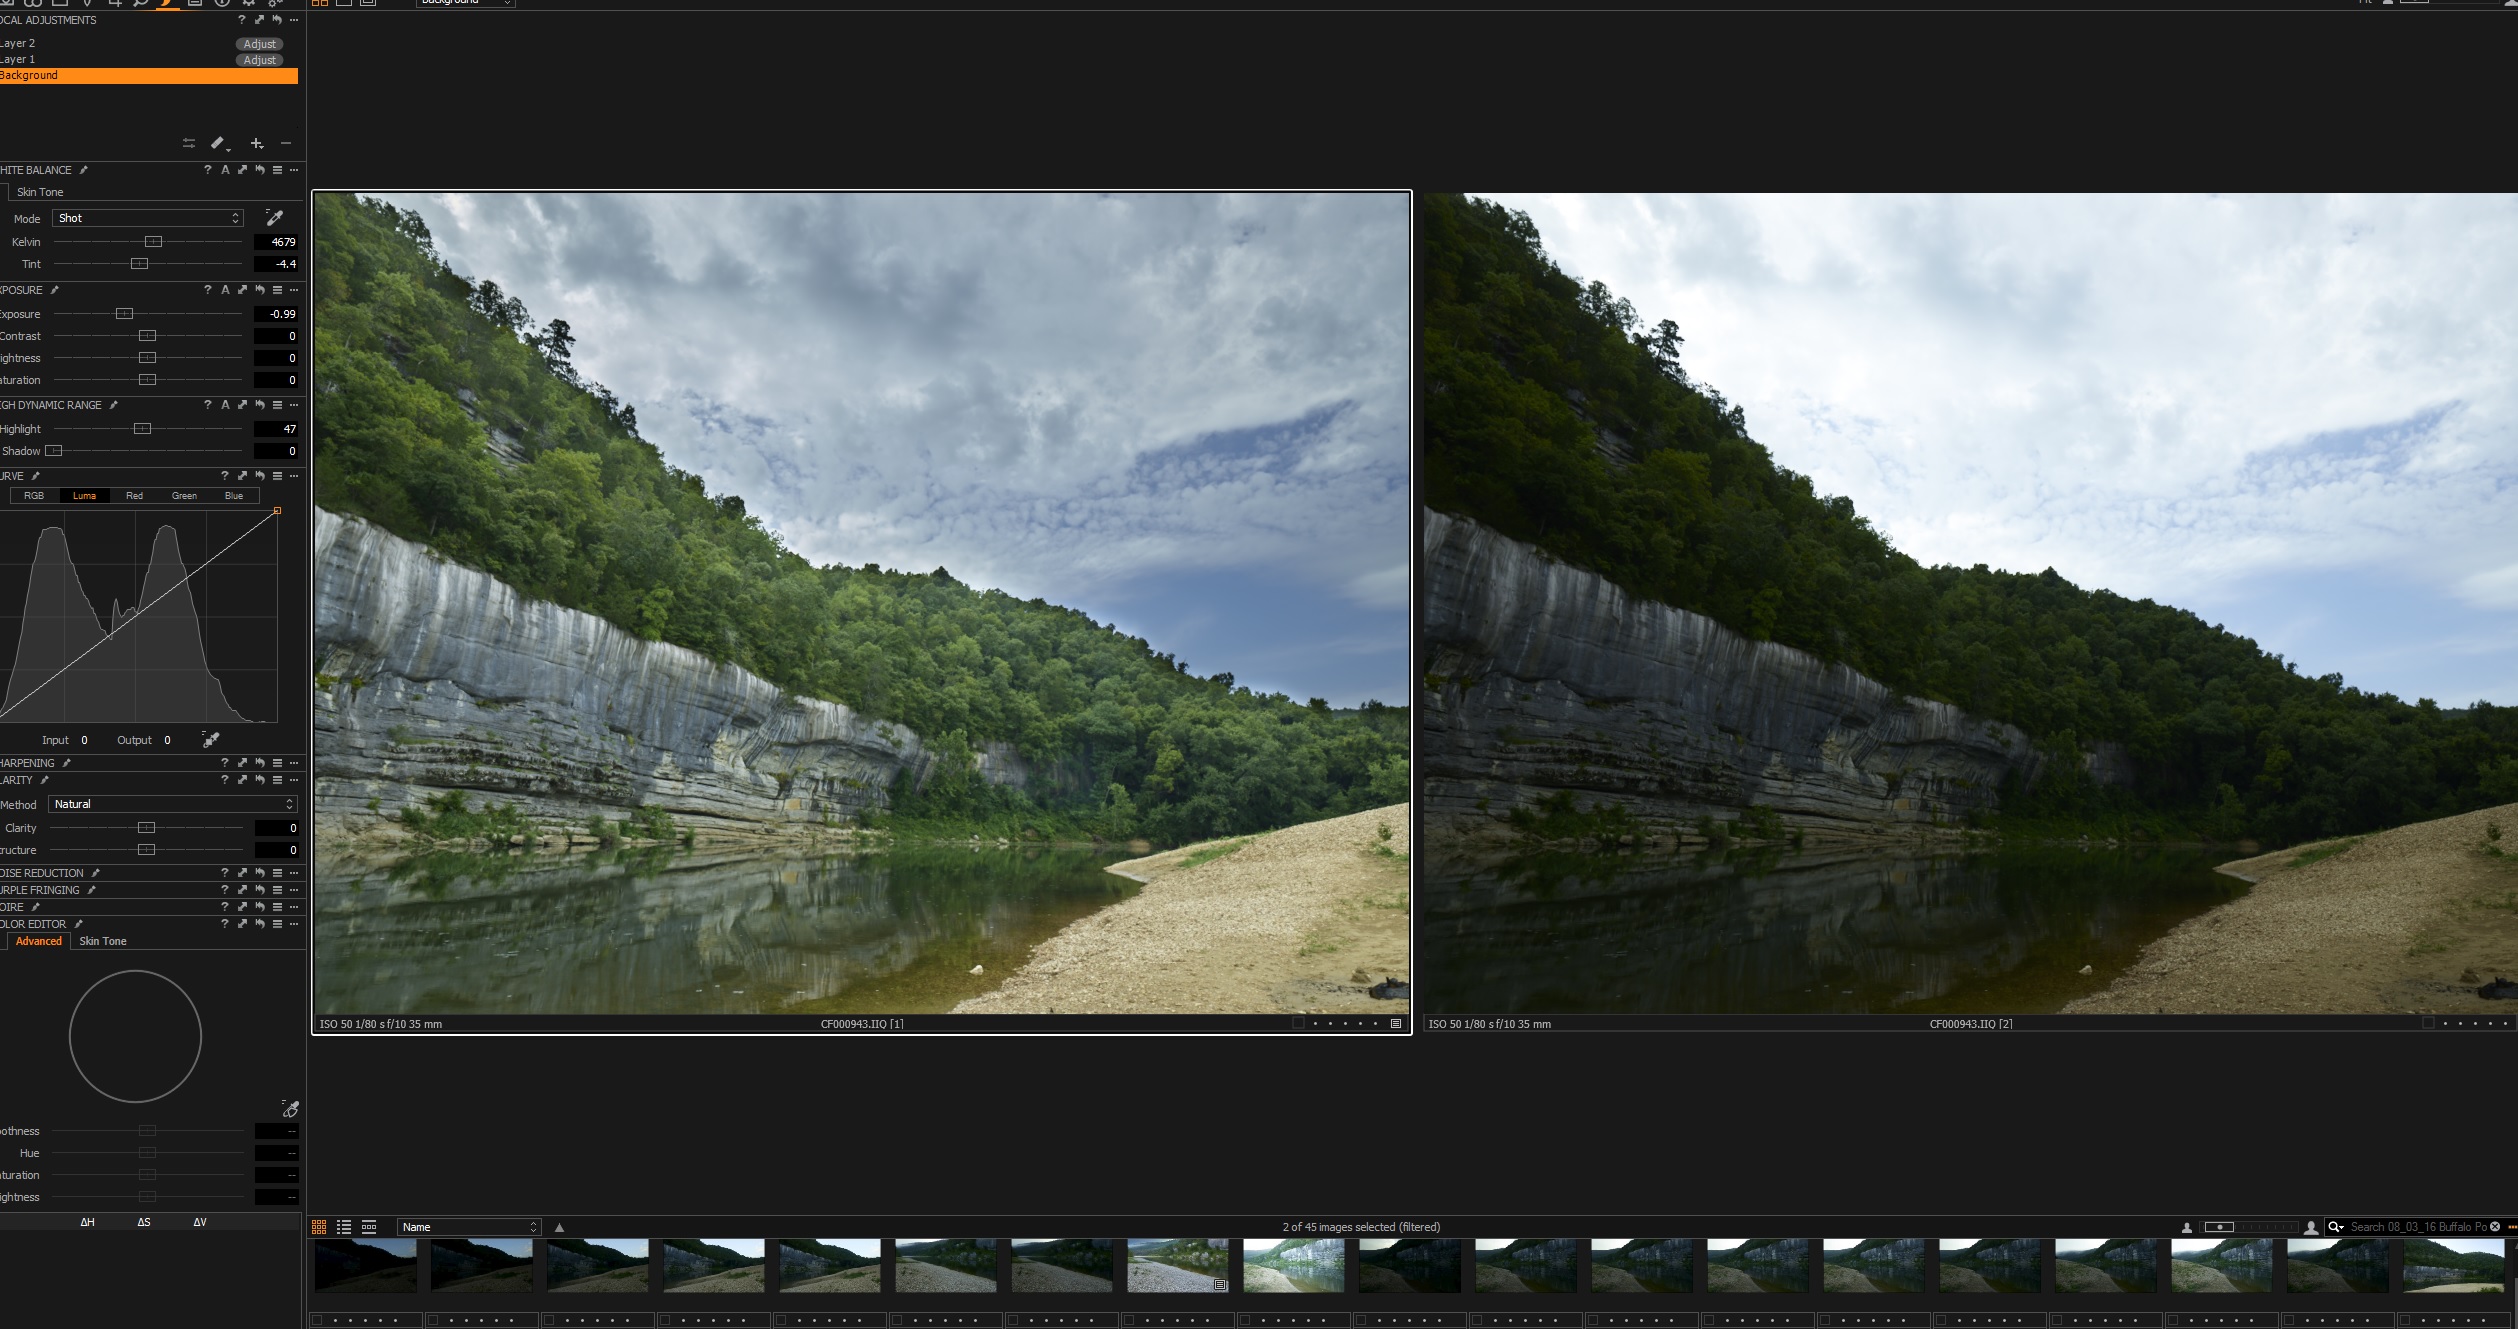
Screen shots of IQ100 image side by side
The image on the right side is the base image before any adjustments, the image on the left side, I just pulled the overall exposure down from center to -99 (almost 1 stop) and then adjusted the highlights to 47 from the far left. This pulled back all of the sky and actually provided some very nice cloud features. I then just added a local adjustment layer to the lower portion of the file, (non sky) and pulled up the overall exposure then added one more adjustment layer to tweak a few dark areas. Overall the end result to me is very nice and again is testimony to just how much range is in a single exposure from this chip. The take away is for sure feel free to let your highlights go a bit so that you can pull in a bit more shadow details.
Here another example.
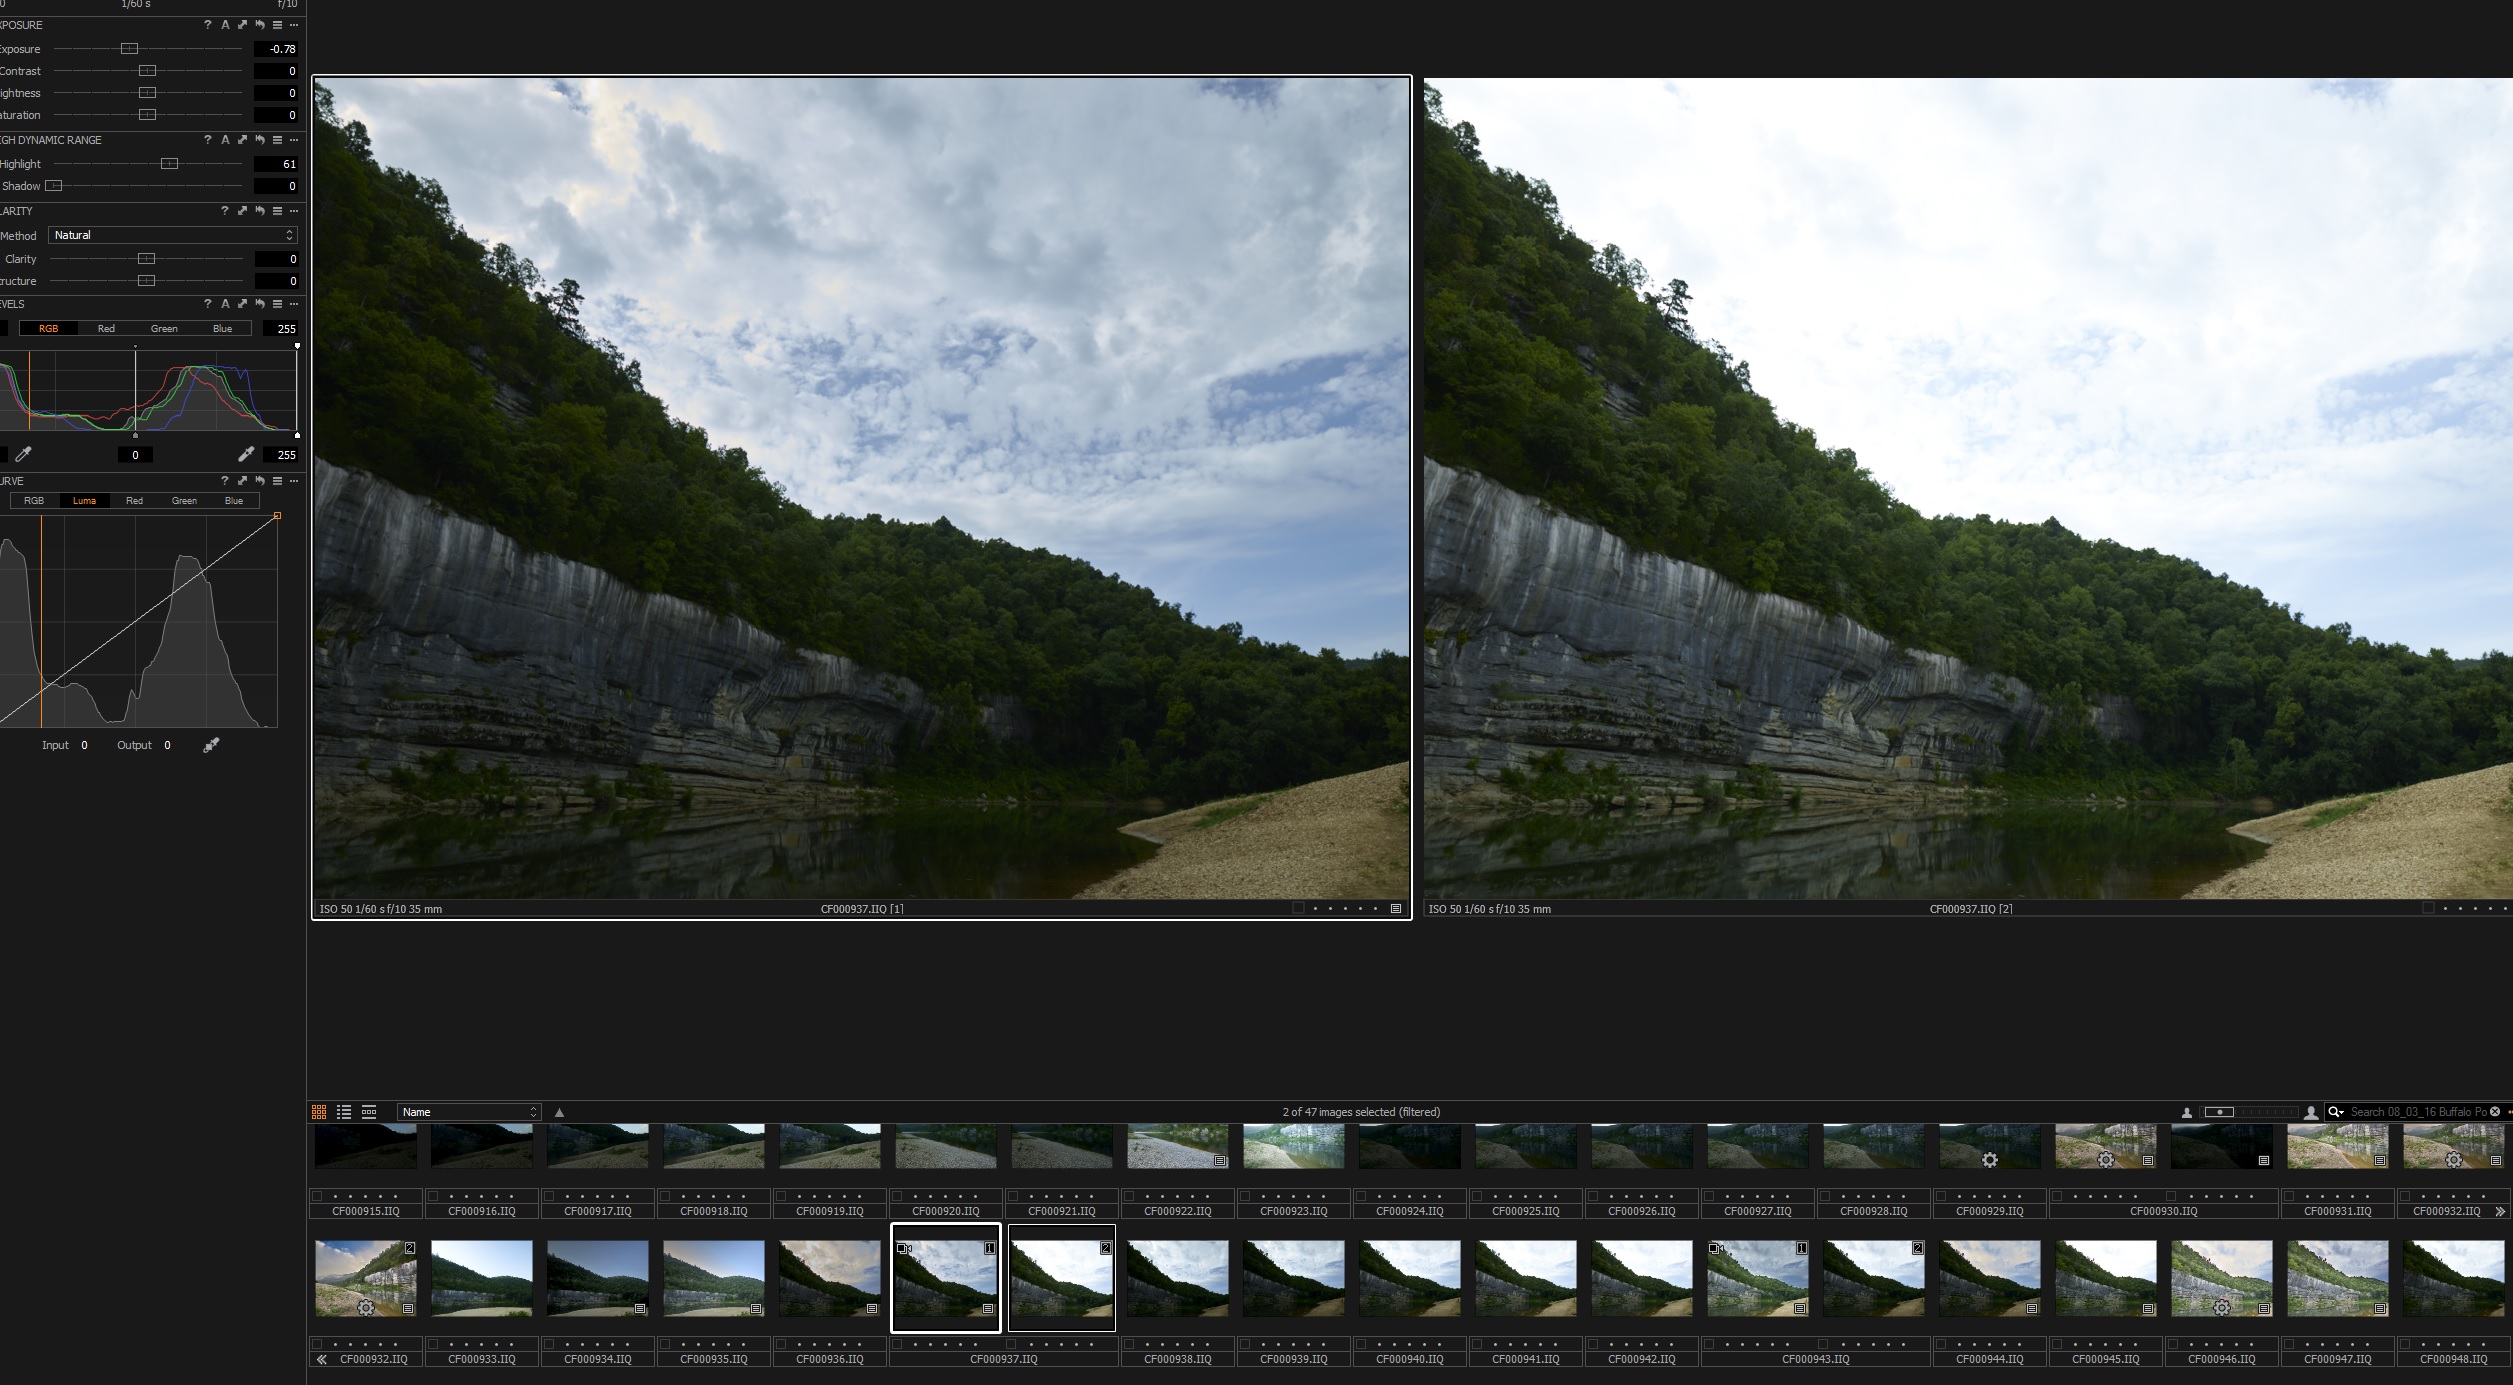
2nd Example of highlight range IQ100
Here the original raw file is on the left side. Initial thoughts are that the sky is pretty blown, but with just a bit of highlight adjustment and overall exposure work, you can pull back the sky to a very manageable level. The bluff and trees will easily recover to most of their full detail with a bit of shadow recovery and local adjustment layer to work only on that part of the image.
From my photography I feel if there is a downside to the IQ100 dynamic range, it would be in the shadow recovery. Here you have to be very careful as just one stop or two can make a huge difference between good details and color in the shadows. Lets go back to an example from the same set of images. If you look at the image at the top of this article, you can see that towards the far right on the bluff there is a dark area. I shot this scene in several brackets at both ISO 50 and 100 as I was unsure as to just how the clouds would capture. As it turned out, the clouds/sky were not the problem, but the dark shadows were. Look at this comparison: make sure to click on the image to view it full screen.
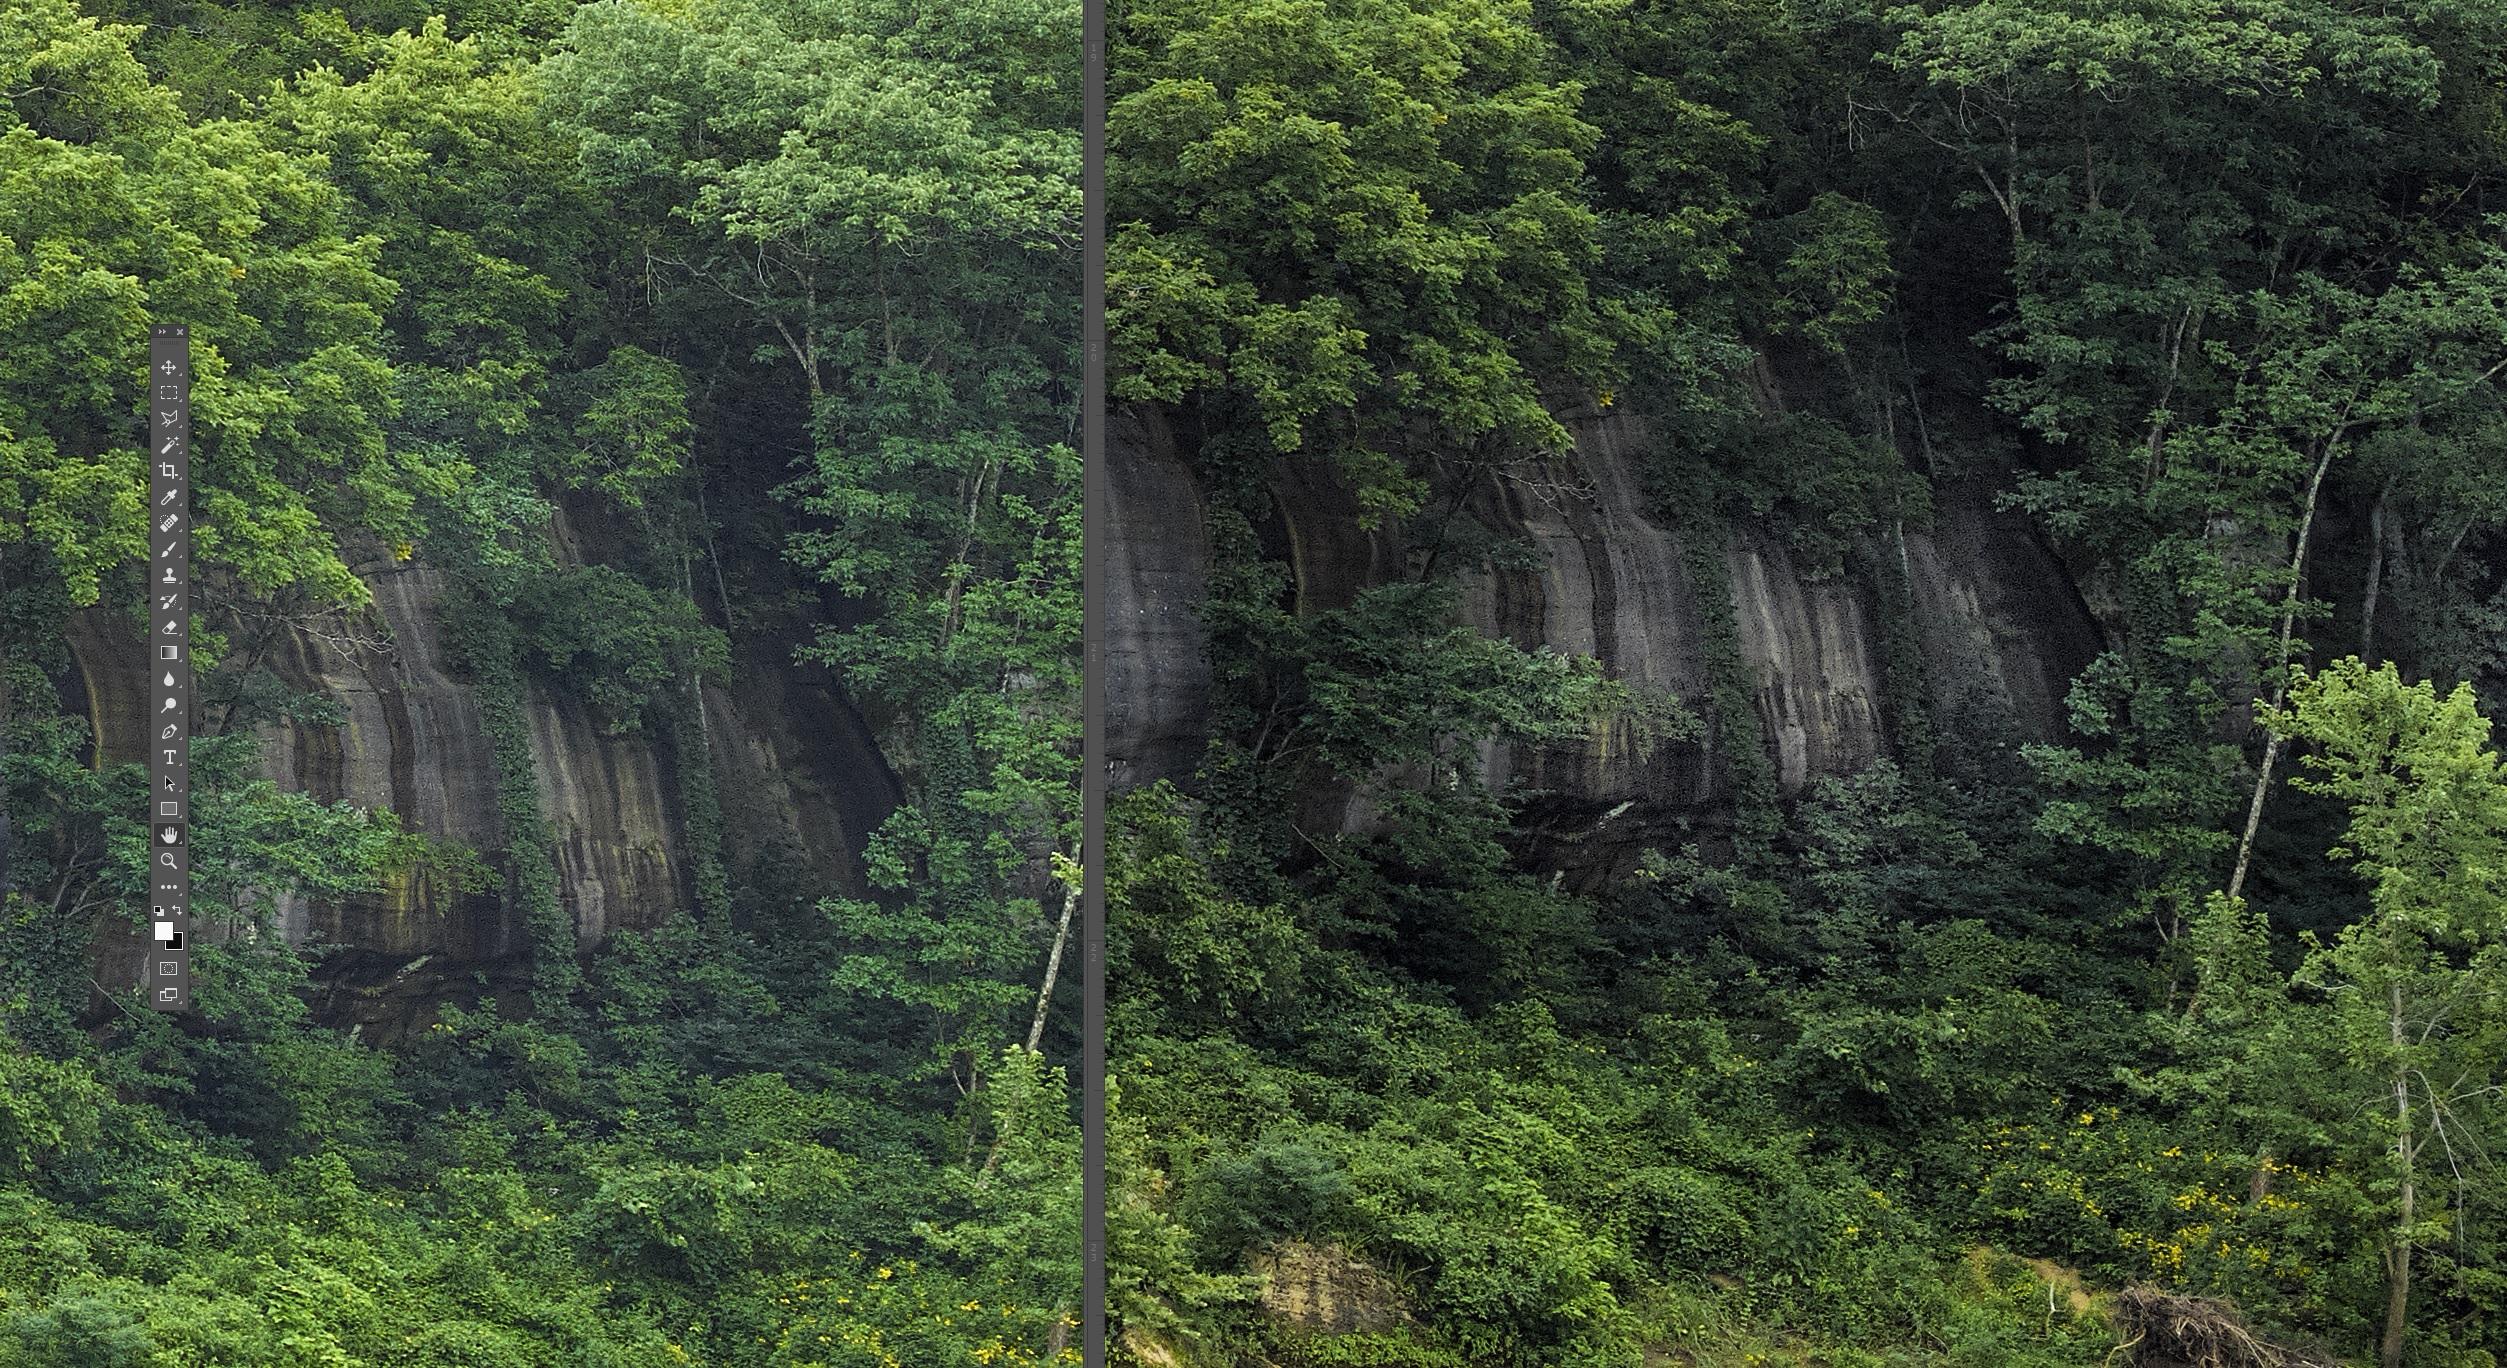
IQ100 side by side for shadow details
The image on the left was shot at ISO 50 at 1/25th of a second, F12, and the image on the left was taken immediately next at ISO50 and 1/60th of a second F12. If you click on the image, you can see that the bluff and trees along the bluff are almost devoid of color and there is considerably more noise. Both of these screen crops are from sharpened final images. The image on the left holds the green down into the shadows where as the same part of the image on the right is starting to lose the color fidelity. The color you may be able to pull back with some work in Photoshop, but the noise and loss of overall details you will never get back. So the point, is that you really need to watch your exposure and if you are unsure, bracket the frames. Just a difference in 1/25th and 1/60th can make a big improvement in the overall quality of the final image.
Photographer’s Notes:
I feel that there is considerably more dynamic range in the IQ100 CMOS back, over similar CCD backs like the IQ260 and IQ380 (60 and 80MP respectively)
The IQ100 has a tendency to push to a green overall tint and it seems that the greens can easily be come over saturated.
When working in mixed outdoor lighting, I would recommend exposing to the right, and pushing the highlights, as from my shooting experience you can easily recover 1 stop and possibly 1.5 stops in the highlights.
The shadows will quickly loss details and color if underexposed, even at base ISO of 50 or one push to ISO100. Once these details are lost you will not be able to get them back easily.
Considering that the 100MP back will start to suffer softness from diffraction at apertures past F11, you need to balance your shooting between both shutter speeds (subject allowing) and ISO.
When working on a single file, don’t be fooled into thinking that you have lost your highlights as you will be surprised to see just how much dynamic range and malleability is available in these fantastic files.
06/18/16 Featured Arkansas Landscape Photography–Nighttime skies over Falling Water Creek
- At June 18, 2016
- By paul
- In Featured Arkansas Photography
- 0
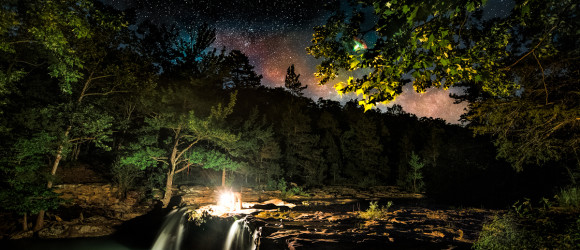

Nighttime skies over Falling Water Creek
Taken with a Nikon D750, ISO 3200, 15 seconds with a Nikon 14-24 lens at 14mm F 2.8 for main night sky and a series of shorter exposures to blend in the lantern and water.
Working with the night sky can be easy and hard and on this night it was a combination of both extremes. I was working with Chris Kennedy at Falling Water Falls in the Arkansas Ozarks. Falling Water Falls is one of the more known spots and very often has a lot of folks either swimming or just hanging around. But at midnight, I have yet to run into anyone (at least human). I have thought about this spot many times for either star trail work or the Milky way and have successfully taken many star trail shots here, but have never worked the Milky Way. The conditions for the best Milky Way shooting are a moonless night or as close to it as you can get. On this night Chris and I were working with a very small amount of moon less than 16% and we both hoped that this amount of light would not effect the Milky Way’s luminace, but we were wrong. As soon as the last of the sunlight was gone, we could quickly see that there was quite a bit of light being provided by the 16% moon, which was setting directly behind us. On this night, June 8th, the Milky Way was due south and very faint at first. This was as strange night as there was too much moonlight to really see the Milky Way but the stars were amazingly bright. Also this small amount of moonlight did not provide very much light to the falls and surrounding area, so we quickly fired up a lantern.
The night was very muggy and dead calm. Normally I want dead calm, but as soon as I fired up the lantern every bug in the area made a bee line for the light and for the rest of the night we were covered in bugs. There were also a lot of lightening bugs and they added a strange effect to a lot of the star stacks. We kept looking for the Milky Way to the southwest as both of our star tracer apps were pointing us that direction but we could not see it. After working for about 1 hour I happened up to the top of the falls and for the first time could really see that the Milky Way was off to the southwest and very low on the horizon. Strange!, but still possible to shoot.
We quickly left out spot on the far side of the falls. We had set up here as it was the only only place to really get a clear view of the sky below the falls. Once on top on the large ledge that creates Falling Water Falls, we could clearly see the Milky Way just over the tree line. The moon was so low in the sky now that it was not providing any illumination at all, so Chris walked out on the ledge and held the lantern. It really made the shot in that the lantern provided just enough light to the immediate parts of the trees and gave a very nice fade out. The trick was holding the lantern totally steady for the 17 seconds required to shoot the sky. We actually both tried this for each others shots and it came out very nicely. I have left one piece of lens flare in this shot as it’s not really hurting the shot. The 14-24 will flare always, when given any chance. This will be an easy one to take out later.
I used the Nikon D750 for this shot and I was very impressed! The ambient temperature was around 70 degrees F and the relative humidity had to be 100%. I shot the entire sequence at ISO 3200 with the 14-24 wide open at F2.8. The longest exposure I used was 20 seconds and there was just a bit of trailing on the far sides which I did take out with a custom brush in Photoshop. At 20 seconds I was just able to get enough of the unique color of the Milky Way, however the rest of the frame was totally blown out due to the lantern. So I then shot a series of short frames the shortest exposure @ 6 seconds and then combined various elements from 3 different shots to get the final work. There was no wind blowing or very little most times so the leaves are not blurred and can add a nice effect. The lantern added a very warm tone to the trees and water so I also tweaked that back to a more neutral tone.
Overall I am pretty happy with this attempt. If there had been much more water coming over the falls, then all the trees below the falls and on the side would have been moving due to the force of the water. The lantern captured the nice green color of the water which is common to all Arkansas streams this time of year. For the Milky Way, I spent the most amount of time as it was just barely showing so I used several different adjustment brushes in Lightroom to help bring out the colors and different tones common with the nightsky. The stars were very bright this night and they add a very nice contrast to the night sky above the Milky way.
Featured Arkansas Landscape Photography–October sunrise on Mt Magazine
- At March 25, 2016
- By paul
- In Featured Arkansas Photography
- 0

October Sunrise on Mt Magazine
PLEASE NOTE: All of the photography of this website is the property of www.photosofarkansas.com and is copy right protected. Do not copy any of the images on this site to paste on Facebook, Pintrest, or any other website without the permission of Paul Caldwell. Years of time have gone into capturing these photographs, please respect that. I do not take copy right infringement lightly. If you have a need to display any of my work on your site ASK me before you Copy & Paste.
Taken with a Nikon D810 and 14-24 Lens @ 14mm and F 5.6 ISO 250 exposure bracketed in 3 frames
On Mt Magazine, the view in late October back to the east can provide some amazing sunrises. The sun will rise right out in the center of the frame and when you have clouds the light can be fantastic. In this shot, I was on the 3rd floor of the lodge, but you can work from any floor. All the rooms on the lodge open out to the back side and have a southward facing view. Mt Magazine is the “border” of the end of the Ozark mountains, as all the mountains to the south are in the Ouachita Mountains. So you get a excellent view of the beginning of the Ouachita chain that runs from here to the southwest corner of Arkansas. In the view looking back to the east, you can see Flatside Pinnacle way off in the distance also. Flatside is 1,500 feet tall and is a great photographic area also.
Later in the spring and summer the sun will move back to the left and will rise out of view, so the best times to catch a sunrise, is October through early February. In 2015, the fall colors in Arkansas sucked, yes, they were that back. Mt Magazine tends to have a pretty good display even in the years like 2015 and I guess this is due to micro climate that Mt Magazine has, being 2,700 feet tall. But what made this shot were the clouds that came across the sky right as the sun came up. The sun is in the dead center of this shot, but is filtered by the band of clouds that are right on the horizon, but these same clouds allowed the light to reflect upwards and just popped the clouds towards the top of the frame.
I used ISO 250 on this shot as there was considerable wind blowing I wanted to start my exposure stack with a higher shutter speed. The Nikon D810 does a good job here, not as well as it would have at base ISO of 64, but I was still able to stop the motion of the trees and get the shot. The camera was mounted to tripod so alignment was not an issue. I used the HDR feature of Adobe Lightroom to merge the 3 exposures and Lightroom did a very good job on this shot. In this shot you can see the rock bluffs of Mt Magazine and then one row of the cabins that can be rented. There is really no way to get this shot without also getting the cabins in the view, so I just include them. Off in the distance you can see a couple of the rolling ridges that create the Ouachita mountains.
 From the Blog
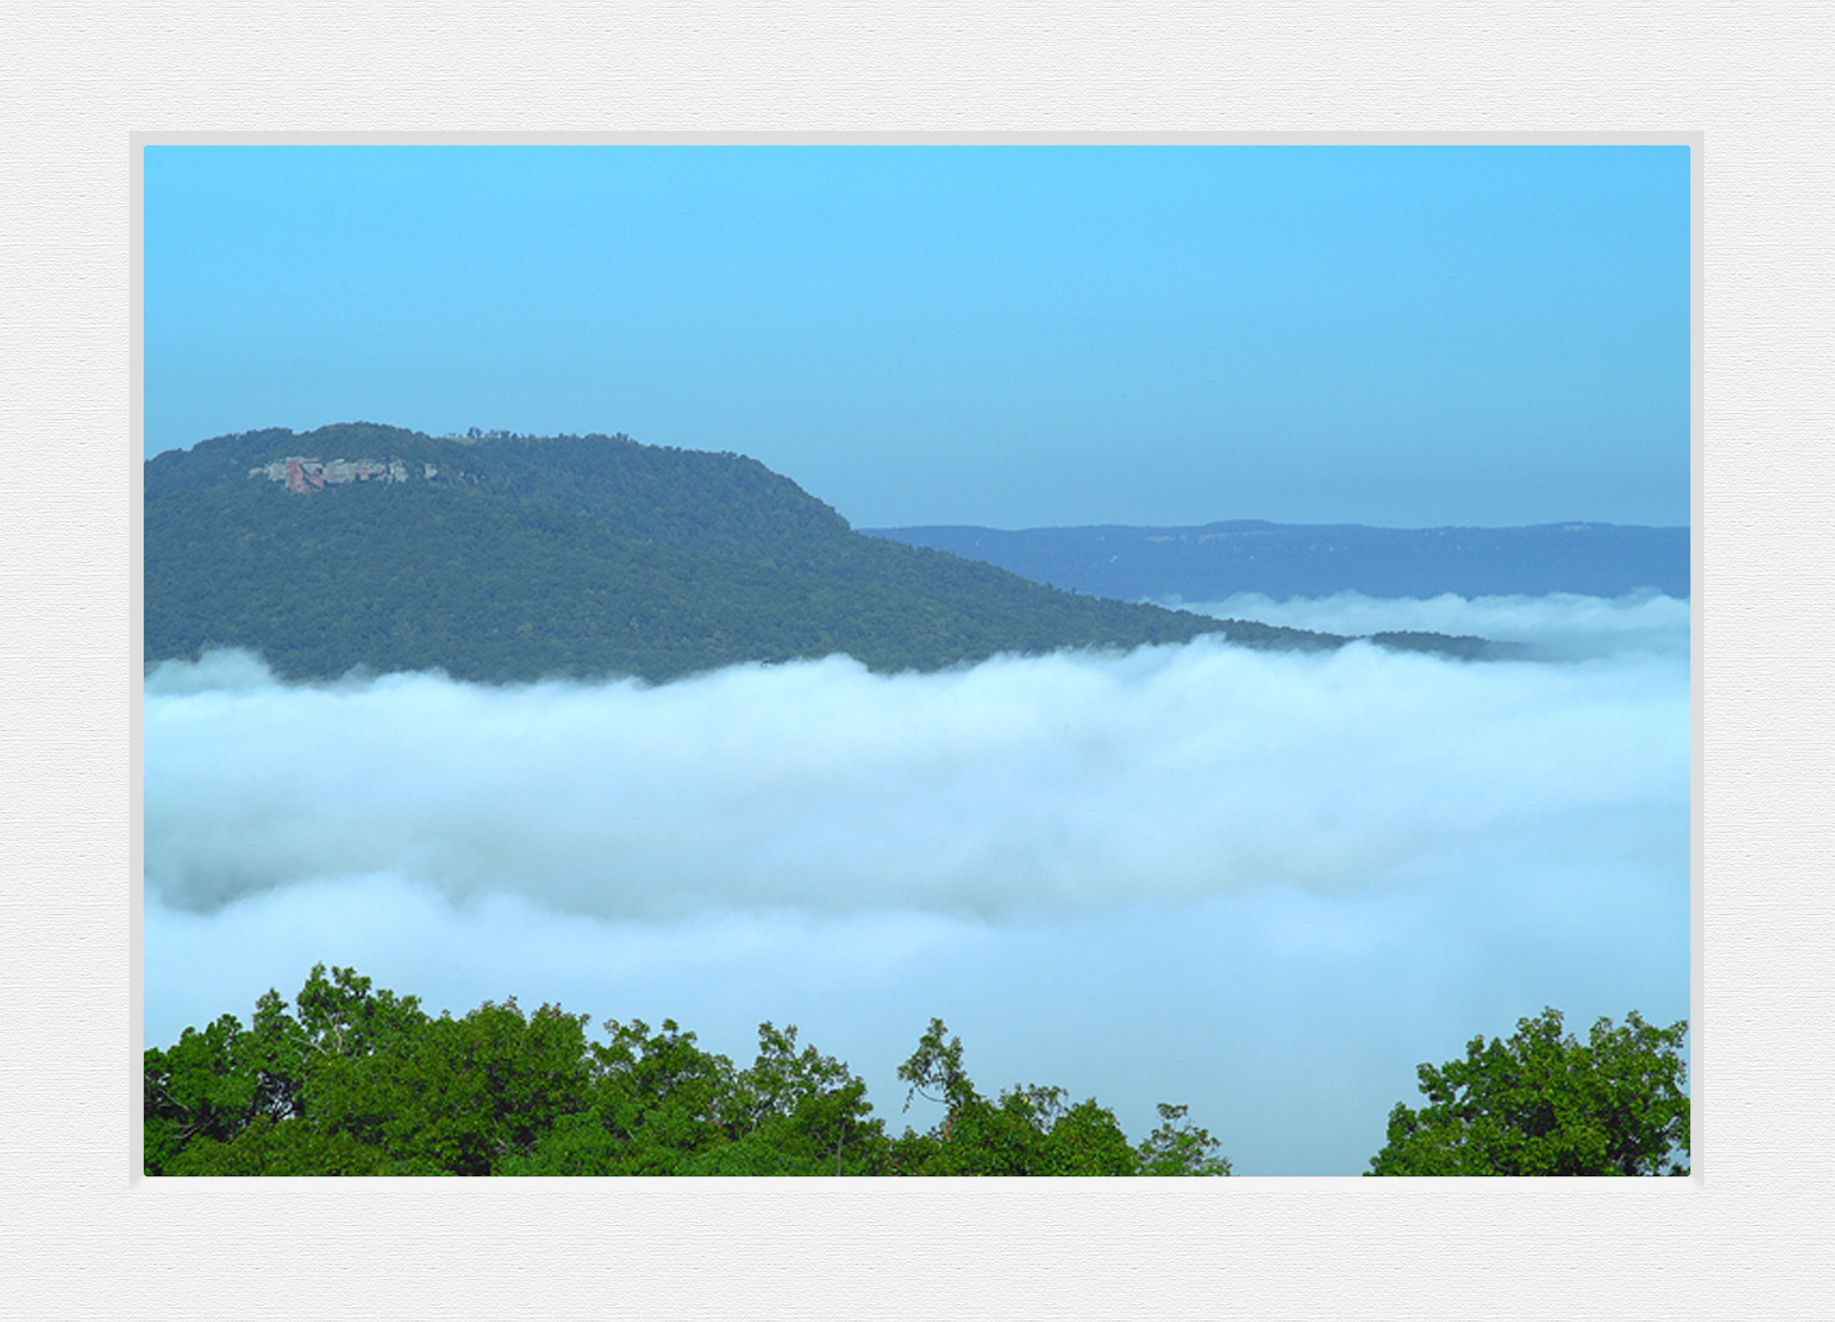
- 01/24/24 Sunset over Walton Heights and Pinnacle Valley January 24, 2024
- 01/22/24 Looking through the Keyhole on Roark Bluff–Autumn January 23, 2024
- 01/14/24 Sunset from Pinnacle Mountain Little Rock, AR January 12, 2024
- 01/14/24 Winter View of Pinnacle Valley January 12, 2024
- 01/12/24 Fall Scene, Pinnacle Mountain January 11, 2024
- 01/11/24 Hasselblad XCD Camera lenses, all out of stock? January 11, 2024